
Owner's Manual
Page 1
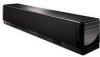
UA YSP-3000 Digital Sound ProjectorTM OWNER'S MANUAL
UA YSP-3000 Digital Sound ProjectorTM OWNER'S MANUAL
Owner's Manual
Page 3
...the following measures: Relocate either this product or the device that your sensitive hearing. Utilize power outlets that lets the sound come through loud and clear without affecting your use the product. 2. In the case of your FCC authorization to ...manual, meets FCC requirements. ii En If you to those products distributed by the FCC, to the operation of interference, which can not locate the appropriate retailer, please contact Yamaha Electronics Corp., U.S.A. 6660 Orangethorpe Ave, Buena Park, CA 90620. IMPORTANT SAFETY INSTRUCTIONS FCC INFORMATION (for Class "B" digital...
...the following measures: Relocate either this product or the device that your sensitive hearing. Utilize power outlets that lets the sound come through loud and clear without affecting your use the product. 2. In the case of your FCC authorization to ...manual, meets FCC requirements. ii En If you to those products distributed by the FCC, to the operation of interference, which can not locate the appropriate retailer, please contact Yamaha Electronics Corp., U.S.A. 6660 Orangethorpe Ave, Buena Park, CA 90620. IMPORTANT SAFETY INSTRUCTIONS FCC INFORMATION (for Class "B" digital...

Owner's Manual
Page 4
...Only voltage specified on the surface of this unit for future reference. 2 Install this sound system in a well ventilated, cool, dry, clean place with a humidifier) to this ...record the serial number of this unit. - This Class B digital apparatus complies with the same or equivalent type. IMPORTANT THE WIRES...with a higher voltage than specified is marked with this manual carefully. Yamaha will form when the surrounding temperature changes suddenly. Disconnect the... the rear of this unit with chemical solvents; in the home are complete. 8 Do not operate this unit is connected ...
...Only voltage specified on the surface of this unit for future reference. 2 Install this sound system in a well ventilated, cool, dry, clean place with a humidifier) to this ...record the serial number of this unit. - This Class B digital apparatus complies with the same or equivalent type. IMPORTANT THE WIRES...with a higher voltage than specified is marked with this manual carefully. Yamaha will form when the surrounding temperature changes suddenly. Disconnect the... the rear of this unit with chemical solvents; in the home are complete. 8 Do not operate this unit is connected ...
Owner's Manual
Page 5
...20 Connections using HDMI cables 21 Connecting a TV 22 Connecting a DVD player/recorder 23 Connecting a digital satellite tuner or a cable TV tuner 24 Connecting a digital airwave tuner 25 Connecting a portable audio player 26 Connecting other components 97 Using the TV macro 100... Specifications 108 List of the system memory 42 Saving settings 42 Loading settings 43 Manual tuning 49 Automatic preset tuning 50 Manual preset tuning 51 Selecting a preset station 52 Displaying the Radio Data System information (Europe model only 52 Enjoying surround sound 54 5 Beam 54 Stereo ...
...20 Connections using HDMI cables 21 Connecting a TV 22 Connecting a DVD player/recorder 23 Connecting a digital satellite tuner or a cable TV tuner 24 Connecting a digital airwave tuner 25 Connecting a portable audio player 26 Connecting other components 97 Using the TV macro 100... Specifications 108 List of the system memory 42 Saving settings 42 Loading settings 43 Manual tuning 49 Automatic preset tuning 50 Manual preset tuning 51 Selecting a preset station 52 Displaying the Radio Data System information (Europe model only 52 Enjoying surround sound 54 5 Beam 54 Stereo ...
Owner's Manual
Page 7
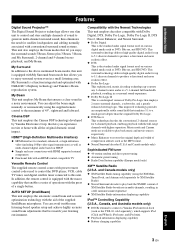
... music and movie sources respectively. ◆ Music Enhancer to enjoy surround system even in a surround sound experience. ◆ Dolby Pro Logic II This is a function integrated ...home with the aid of the supplied IntelliBeam microphone. AUTO SETUP (IntelliBeam) This unit employs the automatic sound beam and acoustic optimization technology with all the original dramatic sound impact. INTRODUCTION Features Features Digital Sound Projector™ The Digital Sound Projector technology allows one slim unit to control and steer multiple channels of sound to connect a Yamaha...
... music and movie sources respectively. ◆ Music Enhancer to enjoy surround system even in a surround sound experience. ◆ Dolby Pro Logic II This is a function integrated ...home with the aid of the supplied IntelliBeam microphone. AUTO SETUP (IntelliBeam) This unit employs the automatic sound beam and acoustic optimization technology with all the original dramatic sound impact. INTRODUCTION Features Features Digital Sound Projector™ The Digital Sound Projector technology allows one slim unit to control and steer multiple channels of sound to connect a Yamaha...
Owner's Manual
Page 9
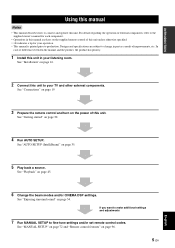
... on page 45. 6 Change the beam modes and/or CINEMA DSP settings. In case of this unit. INTRODUCTION Using this manual Using this manual Notes • This manual describes how to connect and operate this unit unless otherwise specified. • y indicates a tip for each component. •... If you want to make additional settings and adjustments 7 Run MANUAL SETUP to change in your listening room. See "MANUAL SETUP" on page 72 and "Remote control features" on page 35. 5 Play back a source. See "Enjoying surround sound" on the power of improvements, etc. See "Connections" on...
... on page 45. 6 Change the beam modes and/or CINEMA DSP settings. In case of this unit. INTRODUCTION Using this manual Using this manual Notes • This manual describes how to connect and operate this unit unless otherwise specified. • y indicates a tip for each component. •... If you want to make additional settings and adjustments 7 Run MANUAL SETUP to change in your listening room. See "MANUAL SETUP" on page 72 and "Remote control features" on page 35. 5 Play back a source. See "Enjoying surround sound" on the power of improvements, etc. See "Connections" on...
Owner's Manual
Page 10
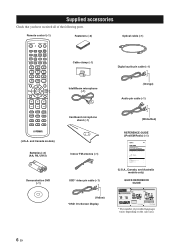
... illustrations used for Yamaha YSP-3000 Digital Sound Projector. Install this unit in the following parts. Install this unit in the exact center of iPod and XM Satellite Radio (U.S.A. y Hint • To enjoy better surround effects, place this unit using the supplied cable. For details, see pages 19 to 29 in the Owner's Manual. Supplied accessories Supplied...
... illustrations used for Yamaha YSP-3000 Digital Sound Projector. Install this unit in the following parts. Install this unit in the exact center of iPod and XM Satellite Radio (U.S.A. y Hint • To enjoy better surround effects, place this unit using the supplied cable. For details, see pages 19 to 29 in the Owner's Manual. Supplied accessories Supplied...
Owner's Manual
Page 12
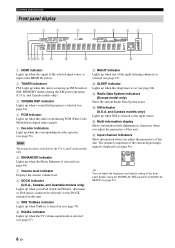
... corresponding decoder operates (see page 56). The channel component of the current digital input signal is displayed (see page 83). 8 En Note The neural decoder.... and Canada models only). 3 CINEMA DSP indicator Lights up when a sound field program is selected (see page 64). 4 PCM indicator Lights up ... display setting of the front panel display using the F.DISPLAY SET parameter in MANUAL SETUP (see page 56). A NIGHT indicator Lights up when this unit. ...Radio Data System indicators (Europe model only) Show the current Radio Data System status. XM: MEMORY flashes during the XM preset...
... corresponding decoder operates (see page 56). The channel component of the current digital input signal is displayed (see page 83). 8 En Note The neural decoder.... and Canada models only). 3 CINEMA DSP indicator Lights up when a sound field program is selected (see page 64). 4 PCM indicator Lights up ... display setting of the front panel display using the F.DISPLAY SET parameter in MANUAL SETUP (see page 56). A NIGHT indicator Lights up when this unit. ...Radio Data System indicators (Europe model only) Show the current Radio Data System status. XM: MEMORY flashes during the XM preset...
Owner's Manual
Page 16
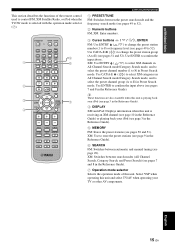
...2 Numeric buttons FM: Enter numbers. 3 Cursor buttons / / / , ENTER FM: Use ENTRY ( / ) to change the preset station group (A to 52). Note that the Radio Data System controls are available for Europe model only, and the iPod controls are also available when this unit is receiving the Radio Data... 7 MUTE TV INPUT TV MUTE CH LEVEL TEST CODE SET 1 PRESET/TUNE FM: Switches between automatic and manual tuning (see page 52) or playing back your TV or other AV components. 12 En Select YSP when operating this unit and select TV/AV when operating your iPod (see page 3 in the Reference...
...2 Numeric buttons FM: Enter numbers. 3 Cursor buttons / / / , ENTER FM: Use ENTRY ( / ) to change the preset station group (A to 52). Note that the Radio Data System controls are available for Europe model only, and the iPod controls are also available when this unit is receiving the Radio Data... 7 MUTE TV INPUT TV MUTE CH LEVEL TEST CODE SET 1 PRESET/TUNE FM: Switches between automatic and manual tuning (see page 52) or playing back your TV or other AV components. 12 En Select YSP when operating this unit and select TV/AV when operating your iPod (see page 3 in the Reference...
Owner's Manual
Page 19
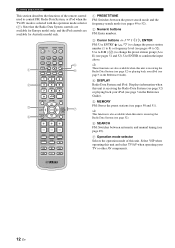
DECODE 0 +10 ENHANCER ENTRY MENU CAT/ A-E DISPLAY ENTER TV/AV YSP RETURN VOLUME CH TV VOL 5 6 7 MUTE TV INPUT TV MUTE CODE SET CH LEVEL TEST Controls and functions 1 PRESET/TUNE FM: Switches between automatic and manual tuning (see pages 51 and 52). Use CAT/A-E ( / ) to select XM categories ... AUTO VOL MODE SETUP INPUTMODE SLEEP 5BEAM 1 ST+3BEAM 2 3BEAM 3 STEREO 4 MY BEAM 5 MY SUR. 6 MUSIC 7 MOVIE 8 SPORTS 9 OFF SUR. Select YSP when operating this unit. Use ENTER to control FM, XM Satellite Radio, or iPod when the TV/AV mode is receiving an XM channel (see...
DECODE 0 +10 ENHANCER ENTRY MENU CAT/ A-E DISPLAY ENTER TV/AV YSP RETURN VOLUME CH TV VOL 5 6 7 MUTE TV INPUT TV MUTE CODE SET CH LEVEL TEST Controls and functions 1 PRESET/TUNE FM: Switches between automatic and manual tuning (see pages 51 and 52). Use CAT/A-E ( / ) to select XM categories ... AUTO VOL MODE SETUP INPUTMODE SLEEP 5BEAM 1 ST+3BEAM 2 3BEAM 3 STEREO 4 MY BEAM 5 MY SUR. 6 MUSIC 7 MOVIE 8 SPORTS 9 OFF SUR. Select YSP when operating this unit. Use ENTER to control FM, XM Satellite Radio, or iPod when the TV/AV mode is receiving an XM channel (see...
Owner's Manual
Page 27
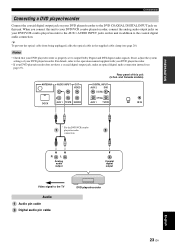
...the supplied cable clamp (see page 27). PREPARATION Connections Connecting a DVD player/recorder Connect the coaxial digital output jack on your DVD player/recorder to the operation manual supplied with your DVD player/recorder. • If your DVD player/recorder does not have a coaxial... digital output jack, make an optical digital audio connection instead (see page 20). For details, refer to the DVD COAXIAL DIGITAL INPUT jack on this unit (U.S.A. If not, adjust the system...
...the supplied cable clamp (see page 27). PREPARATION Connections Connecting a DVD player/recorder Connect the coaxial digital output jack on your DVD player/recorder to the operation manual supplied with your DVD player/recorder. • If your DVD player/recorder does not have a coaxial... digital output jack, make an optical digital audio connection instead (see page 20). For details, refer to the DVD COAXIAL DIGITAL INPUT jack on this unit (U.S.A. If not, adjust the system...
Owner's Manual
Page 37
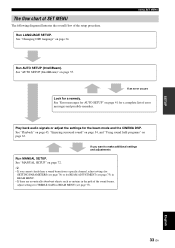
...SETUP" on page 41 for the beam mode and the CINEMA DSP. See "Playback" on page 45, "Enjoying surround sound" on page 54, and "Using sound field programs" on page 35. See "MANUAL SETUP" on page 34. Using SET MENU Run AUTO SETUP (IntelliBeam). y • If you want to make ...additional settings and adjustments Run MANUAL SETUP. See "Changing OSD language" on page 72. Run LANGUAGE SETUP. If an error occurs...
...SETUP" on page 41 for the beam mode and the CINEMA DSP. See "Playback" on page 45, "Enjoying surround sound" on page 54, and "Using sound field programs" on page 35. See "MANUAL SETUP" on page 34. Using SET MENU Run AUTO SETUP (IntelliBeam). y • If you want to make ...additional settings and adjustments Run MANUAL SETUP. See "Changing OSD language" on page 72. Run LANGUAGE SETUP. If an error occurs...
Owner's Manual
Page 38
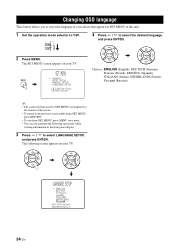
ENTER ENTER ;LANGUAGE SETUP . The SET MENU screen appears on your TV. MENU p p SET MENU . ;MEMORY ;AUTO SETUP ;MANUAL SETUP ;LANGUAGE SETUP [ ]/[ ]:Up/Down [ENTER]:Enter 4 Press / to select the desired language, and press ENTER. ENTER ENTER Choices: ENGLISH (...perform the following screen appears on your TV. ENGLISH DEUTSCH Francais ESPANOL ITALIANO NEDERLANDS [ ]/[ ]:Select [ENTER]:Return p p 34 En TV/AV YSP 2 Press MENU. CHANGING OSD LANGUAGE Changing OSD language This feature allows you to select the language of your choice that appears in the front panel...
ENTER ENTER ;LANGUAGE SETUP . The SET MENU screen appears on your TV. MENU p p SET MENU . ;MEMORY ;AUTO SETUP ;MANUAL SETUP ;LANGUAGE SETUP [ ]/[ ]:Up/Down [ENTER]:Enter 4 Press / to select the desired language, and press ENTER. ENTER ENTER Choices: ENGLISH (...perform the following screen appears on your TV. ENGLISH DEUTSCH Francais ESPANOL ITALIANO NEDERLANDS [ ]/[ ]:Select [ENTER]:Return p p 34 En TV/AV YSP 2 Press MENU. CHANGING OSD LANGUAGE Changing OSD language This feature allows you to select the language of your choice that appears in the front panel...

Owner's Manual
Page 40
... produces in your listening room. Notes • After you have completed the AUTO SETUP procedure, be when you can manually fine-tune the sound beam angle and balance the sound beam output levels using MANUAL SETUP (see page 72) once the AUTO SETUP procedure is completed. • If a subwoofer with the walls will be...
... produces in your listening room. Notes • After you have completed the AUTO SETUP procedure, be when you can manually fine-tune the sound beam angle and balance the sound beam output levels using MANUAL SETUP (see page 72) once the AUTO SETUP procedure is completed. • If a subwoofer with the walls will be...
Owner's Manual
Page 42
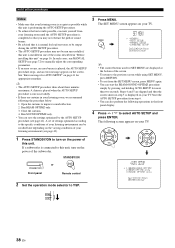
... SET MENU, press RETURN. • To exit from the SET MENU screen, press MENU again. • You can be run MANUAL SETUP (see page 72) to manually adjust the corresponding parameters. • If an error occurs, an error buzzer is played, the AUTO SETUP procedure stops, and an ... front panel display. 4 Press / to select AUTO SETUP and press ENTER. ENTER ENTER ;AUTO SETUP . 1)BEAM+SOUND OPTIMZ 2)BEAM OPTIMZ only 3)SOUND OPTIMZ only [ ]/[ ]:Up/Down [ENTER]:Enter p p TV/AV YSP 38 En AUTO SETUP (IntelliBeam) Notes • Make sure that your listening room is as quiet as possible while...
... SET MENU, press RETURN. • To exit from the SET MENU screen, press MENU again. • You can be run MANUAL SETUP (see page 72) to manually adjust the corresponding parameters. • If an error occurs, an error buzzer is played, the AUTO SETUP procedure stops, and an ... front panel display. 4 Press / to select AUTO SETUP and press ENTER. ENTER ENTER ;AUTO SETUP . 1)BEAM+SOUND OPTIMZ 2)BEAM OPTIMZ only 3)SOUND OPTIMZ only [ ]/[ ]:Up/Down [ENTER]:Enter p p TV/AV YSP 38 En AUTO SETUP (IntelliBeam) Notes • Make sure that your listening room is as quiet as possible while...
Owner's Manual
Page 43
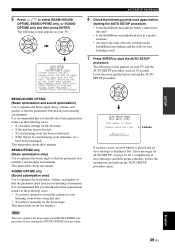
... in 10 seconds. It is recommended that you should select this unit. • If you have manually set at least 1.8m/6ft away from the YSP unit. SOUND OPTIMZ only (Sound optimization only) Use to optimize the beam angle, delay, volume, and quality so that the parameters best... match your listening environment. The following points once again before starting the SOUND OPTIMZ only procedure. ENTER ENTER 6 ...
... in 10 seconds. It is recommended that you should select this unit. • If you have manually set at least 1.8m/6ft away from the YSP unit. SOUND OPTIMZ only (Sound optimization only) Use to optimize the beam angle, delay, volume, and quality so that the parameters best... match your listening environment. The following points once again before starting the SOUND OPTIMZ only procedure. ENTER ENTER 6 ...
Owner's Manual
Page 45
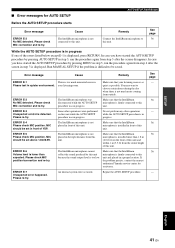
... detected. The IntelliBeam microphone was disconnected while the AUTO SETUP procedure was in front of YSP. The IntelliBeam microphone cannot collect the sound produced by this unit. An internal system error occurred. ■ Error messages for assistance. See page 36 While the AUTO SETUP...unit while the AUTO SETUP procedure was in the right distance from outside. Run MANUAL SETUP if the problem is displayed. If the problem persists, contact the nearest authorized Yamaha service center for AUTO SETUP AUTO SETUP (IntelliBeam) Before the AUTO SETUP procedure starts...
... detected. The IntelliBeam microphone was disconnected while the AUTO SETUP procedure was in front of YSP. The IntelliBeam microphone cannot collect the sound produced by this unit. An internal system error occurred. ■ Error messages for assistance. See page 36 While the AUTO SETUP...unit while the AUTO SETUP procedure was in the right distance from outside. Run MANUAL SETUP if the problem is displayed. If the problem persists, contact the nearest authorized Yamaha service center for AUTO SETUP AUTO SETUP (IntelliBeam) Before the AUTO SETUP procedure starts...
Owner's Manual
Page 46
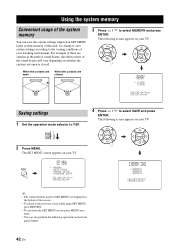
...to the varying conditions of your TV. MENU SET MENU . ;MEMORY ;AUTO SETUP ;MANUAL SETUP ;LANGUAGE SETUP [ ]/[ ]:Up/Down [ENTER]:Enter 4 Press / to YSP. USING THE SYSTEM MEMORY Using the system memory Convenient usage of the system memory You can also perform the following screen appears on your TV. When the curtains ... open When the curtains are open or closed 3 Press / to save the current settings adjusted in SET MENU in the path of sound beams, the effectiveness of the sound beams will vary depending on your TV. It is handy to select MEMORY and press ENTER.
...to the varying conditions of your TV. MENU SET MENU . ;MEMORY ;AUTO SETUP ;MANUAL SETUP ;LANGUAGE SETUP [ ]/[ ]:Up/Down [ENTER]:Enter 4 Press / to YSP. USING THE SYSTEM MEMORY Using the system memory Convenient usage of the system memory You can also perform the following screen appears on your TV. When the curtains ... open When the curtains are open or closed 3 Press / to save the current settings adjusted in SET MENU in the path of sound beams, the effectiveness of the sound beams will vary depending on your TV. It is handy to select MEMORY and press ENTER.
Owner's Manual
Page 47
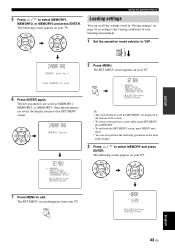
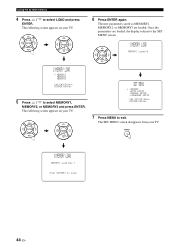
...system memory Loading settings You can also perform the following operations in "Saving settings" on your TV. The new parameters are displayed at the bottom of your TV. Once the parameters are saved, the display returns to select MEMORY and press ENTER. MENU p SET MENU . ;MEMORY ;AUTO SETUP ;MANUAL... screen appears on your listening environment. 1 Set the operation mode selector to select MEMORY1, MEMORY2, or MEMORY3 and press ENTER. TV/AV YSP 2)MEMORY SAVE MEMORY1 Save Now ? The following screen appears on page 42 according to the varying conditions of the screen. • To ...
...system memory Loading settings You can also perform the following operations in "Saving settings" on your TV. The new parameters are displayed at the bottom of your TV. Once the parameters are saved, the display returns to select MEMORY and press ENTER. MENU p SET MENU . ;MEMORY ;AUTO SETUP ;MANUAL... screen appears on your listening environment. 1 Set the operation mode selector to select MEMORY1, MEMORY2, or MEMORY3 and press ENTER. TV/AV YSP 2)MEMORY SAVE MEMORY1 Save Now ? The following screen appears on page 42 according to the varying conditions of the screen. • To ...
Owner's Manual
Page 48
...returns to the SET MENU screen. 1)MEMORY LOAD ENTER MEMORY1 Loading 1)MEMORY LOAD . ENTER ENTER p p p p SET MENU . ;MEMORY ;AUTO SETUP ;MANUAL SETUP ;LANGUAGE SETUP [ ]/[ ]:Up/Down [ENTER]:Enter 7 Press MENU to select LOAD and press ENTER. MENU 1)MEMORY LOAD MEMORY1 Load Now ? The... following screen appears on your TV. Using the system memory 4 Press / to exit. ENTER ENTER 6 Press ENTER again. MEMORY1 MEMORY2 MEMORY3 [ ]/[ ]:Select [ENTER]:Enter 5 Press / to Load...
...returns to the SET MENU screen. 1)MEMORY LOAD ENTER MEMORY1 Loading 1)MEMORY LOAD . ENTER ENTER p p p p SET MENU . ;MEMORY ;AUTO SETUP ;MANUAL SETUP ;LANGUAGE SETUP [ ]/[ ]:Up/Down [ENTER]:Enter 7 Press MENU to select LOAD and press ENTER. MENU 1)MEMORY LOAD MEMORY1 Load Now ? The... following screen appears on your TV. Using the system memory 4 Press / to exit. ENTER ENTER 6 Press ENTER again. MEMORY1 MEMORY2 MEMORY3 [ ]/[ ]:Select [ENTER]:Enter 5 Press / to Load...


