Owner's Manual
Page 5
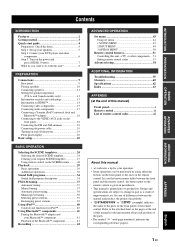
... Connecting speakers 11 Setting the speaker impedance (U.S.A. and Canada models only 12 Information on jacks and cable plugs 13 Information on HDMI 14 Connecting video components 15 Connecting audio components 17 Connecting a Yamaha iPod™ universal dock and Bluetooth™ adapter 18 Connecting to the VIDEO AUX jacks on the front panel 18...
... Connecting speakers 11 Setting the speaker impedance (U.S.A. and Canada models only 12 Information on jacks and cable plugs 13 Information on HDMI 14 Connecting video components 15 Connecting audio components 17 Connecting a Yamaha iPod™ universal dock and Bluetooth™ adapter 18 Connecting to the VIDEO AUX jacks on the front panel 18...
Owner's Manual
Page 9
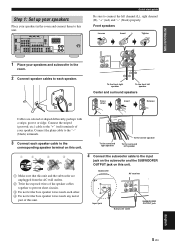
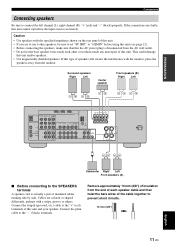
... the bare speaker wires touch any metal part of your speaker. Subwoofer AV receiver Input jack Subwoofer cable SUBWOOFER OUTPUT jack English 5 En DOCK COMPONENT VIDEO DVD DTV/CBL DVR MONITOR OUT PR OUT DVD DTV/CBL HDMI DIGITAL INPUT PB OPTICAL Y CD 3 DTV/ CBL 2 COAXIAL DVD ...1 DVD VIDEO DTV/CBL DVR IN OUT MONITOR OUT MULTI CH INPUT FRONT SURROUND CENTER L DVD DTV/CBL AUDIO DVR CD IN OUT L R R SUBWOOFER ANTENNA SPEAKERS SURROUND CENTER ...
... the bare speaker wires touch any metal part of your speaker. Subwoofer AV receiver Input jack Subwoofer cable SUBWOOFER OUTPUT jack English 5 En DOCK COMPONENT VIDEO DVD DTV/CBL DVR MONITOR OUT PR OUT DVD DTV/CBL HDMI DIGITAL INPUT PB OPTICAL Y CD 3 DTV/ CBL 2 COAXIAL DVD ...1 DVD VIDEO DTV/CBL DVR IN OUT MONITOR OUT MULTI CH INPUT FRONT SURROUND CENTER L DVD DTV/CBL AUDIO DVR CD IN OUT L R R SUBWOOFER ANTENNA SPEAKERS SURROUND CENTER ...
Owner's Manual
Page 10
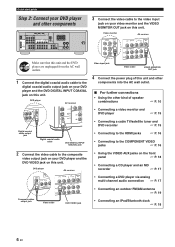
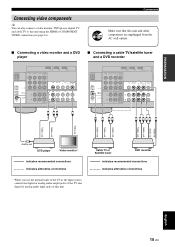
... TV/satellite tuner and DVD recorder ☞ P. 15 • Connecting to the HDMI jacks ☞ P. 16 • Connecting to the COMPONENT VIDEO jacks ☞ P. 16 2 Connect the video cable to the digital coaxial audio output jack on your DVD player and the DVD DIGITAL INPUT COAXIAL jack on this... are unplugged from the AC wall outlets. 1 Connect the digital coaxial audio cable to the composite video output jack on your video monitor and the VIDEO MONITOR OUT jack on this unit. DVD player AV receiver Video input jack Video cable VIDEO MONITOR OUT jack 4 Connect the power...
... TV/satellite tuner and DVD recorder ☞ P. 15 • Connecting to the HDMI jacks ☞ P. 16 • Connecting to the COMPONENT VIDEO jacks ☞ P. 16 2 Connect the video cable to the digital coaxial audio output jack on your DVD player and the DVD DIGITAL INPUT COAXIAL jack on this... are unplugged from the AC wall outlets. 1 Connect the digital coaxial audio cable to the composite video output jack on your video monitor and the VIDEO MONITOR OUT jack on this unit. DVD player AV receiver Video input jack Video cable VIDEO MONITOR OUT jack 4 Connect the power...

Owner's Manual
Page 13
... CD-R (REC) OUTPUT SUB WOOFER R FRONT A L Connections 7 8 9 0 Name 1 DOCK terminal 2 COMPONENT VIDEO jacks 3 HDMI jacks 4 VIDEO jacks 5 ANTENNA terminals 6 SPEAKERS terminals 7 DIGITAL INPUT jacks 8 MULTI CH INPUT jacks 9 AUDIO jacks 0 SUBWOOFER OUTPUT jack See page 18 16 16 15 19 11 15, 17 17 15, 17 11 English 9 En...VIDEO DVD DTV/CBL DVR MONITOR OUT PR OUT DVD DTV/CBL HDMI DIGITAL INPUT PB OPTICAL Y CD 3 DTV/ CBL 2 MULTI CH INPUT FRONT SURROUND CENTER L DVD VIDEO DTV/CBL DVR IN OUT MONITOR OUT DVD DTV/CBL AUDIO DVR CD IN OUT L DVD 1 R COAXIAL R SUBWOOFER ...
... CD-R (REC) OUTPUT SUB WOOFER R FRONT A L Connections 7 8 9 0 Name 1 DOCK terminal 2 COMPONENT VIDEO jacks 3 HDMI jacks 4 VIDEO jacks 5 ANTENNA terminals 6 SPEAKERS terminals 7 DIGITAL INPUT jacks 8 MULTI CH INPUT jacks 9 AUDIO jacks 0 SUBWOOFER OUTPUT jack See page 18 16 16 15 19 11 15, 17 17 15, 17 11 English 9 En...VIDEO DVD DTV/CBL DVR MONITOR OUT PR OUT DVD DTV/CBL HDMI DIGITAL INPUT PB OPTICAL Y CD 3 DTV/ CBL 2 MULTI CH INPUT FRONT SURROUND CENTER L DVD VIDEO DTV/CBL DVR IN OUT MONITOR OUT DVD DTV/CBL AUDIO DVR CD IN OUT L DVD 1 R COAXIAL R SUBWOOFER ...
Owner's Manual
Page 15
...ridges. Surround speakers Right Left Center speaker Front speakers (B) Right Left DOCK COMPONENT VIDEO DVD DTV/CBL DVR MONITOR OUT PR OUT DVD DTV/CBL HDMI DIGITAL INPUT PB OPTICAL Y CD 3 DTV/ CBL 2 COAXIAL DVD 1 DVD VIDEO DTV/CBL DVR IN OUT MONITOR OUT MULTI CH INPUT ...FRONT SURROUND CENTER L DVD DTV/CBL AUDIO DVR CD IN OUT L R R SUBWOOFER ANTENNA SPEAKERS SURROUND CENTER FRONT B R L R L AM GND FM 75 UNBAL. Connect the plain cable to connect ...
...ridges. Surround speakers Right Left Center speaker Front speakers (B) Right Left DOCK COMPONENT VIDEO DVD DTV/CBL DVR MONITOR OUT PR OUT DVD DTV/CBL HDMI DIGITAL INPUT PB OPTICAL Y CD 3 DTV/ CBL 2 COAXIAL DVD 1 DVD VIDEO DTV/CBL DVR IN OUT MONITOR OUT MULTI CH INPUT ...FRONT SURROUND CENTER L DVD DTV/CBL AUDIO DVR CD IN OUT L R R SUBWOOFER ANTENNA SPEAKERS SURROUND CENTER FRONT B R L R L AM GND FM 75 UNBAL. Connect the plain cable to connect ...
Owner's Manual
Page 18
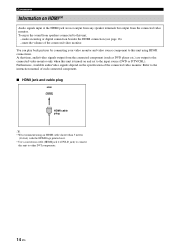
...■ HDMI jack and cable plug HDMI HDMI cable plug y • We recommend using HDMI connections. Furthermore, available audio/video signals depend on HDMI™ Audio signals input at the HDMI jack are output to the connected video monitor only when this unit is turned on it. • Use a conversion cable (HDMI jack ... Refer to the instruction manual of the connected video monitor. At that time, audio/video signals output from speakers connected to this unit using an HDMI cable shorter than 5 meters (16 feet) with the HDMI logo printed on and set to other DVI components. 14 En
...■ HDMI jack and cable plug HDMI HDMI cable plug y • We recommend using HDMI connections. Furthermore, available audio/video signals depend on HDMI™ Audio signals input at the HDMI jack are output to the connected video monitor only when this unit is turned on it. • Use a conversion cable (HDMI jack ... Refer to the instruction manual of the connected video monitor. At that time, audio/video signals output from speakers connected to this unit using an HDMI cable shorter than 5 meters (16 feet) with the HDMI logo printed on and set to other DVI components. 14 En
Owner's Manual
Page 19
.../CBL DVR IN OUT MONITOR OUT MULTI CH INPUT FRONT SURROUND CENTER L DVD DTV/CBL AUDIO DVR CD IN OUT L R R SUBWOOFER V LR V DOCK COMPONENT VIDEO DVD DTV/CBL DVR MONITOR OUT PR OUT DVD DTV/CBL HDMI DIGITAL INPUT PB OPTICAL Y CD 3 DTV/ CBL 2 COAXIAL DVD 1 DVD VIDEO DTV/CBL... you use the internal tuner of the TV as the input source, connect the digital or analog audio output jacks of the TV and digital or analog audio input jacks of this unit using the HDMI or COMPONENT VIDEO connection (see page 16). PREPARATION Connecting video components y You can also connect a ...
.../CBL DVR IN OUT MONITOR OUT MULTI CH INPUT FRONT SURROUND CENTER L DVD DTV/CBL AUDIO DVR CD IN OUT L R R SUBWOOFER V LR V DOCK COMPONENT VIDEO DVD DTV/CBL DVR MONITOR OUT PR OUT DVD DTV/CBL HDMI DIGITAL INPUT PB OPTICAL Y CD 3 DTV/ CBL 2 COAXIAL DVD 1 DVD VIDEO DTV/CBL... you use the internal tuner of the TV as the input source, connect the digital or analog audio output jacks of the TV and digital or analog audio input jacks of this unit using the HDMI or COMPONENT VIDEO connection (see page 16). PREPARATION Connecting video components y You can also connect a ...
Owner's Manual
Page 20
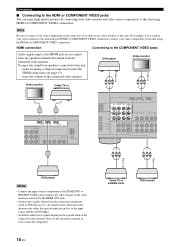
...video monitor. make an analog or digital connection besides the HDMI connection (see page 15). - For example, if you connect your video monitor to this unit. HDMI connection Connecting to the COMPONENT VIDEO jacks Audio signals input at the HDMI jack are output to the connected video monitor only when... unit is turned on and set to the input source (DVD or DTV/CBL). • Available audio/video signals depend on the video monitor connected to the HDMI OUT jack. • Audio/video signals output from the connected component (such as DVD player etc.) are not output from any...
...video monitor. make an analog or digital connection besides the HDMI connection (see page 15). - For example, if you connect your video monitor to this unit. HDMI connection Connecting to the COMPONENT VIDEO jacks Audio signals input at the HDMI jack are output to the connected video monitor only when... unit is turned on and set to the input source (DVD or DTV/CBL). • Available audio/video signals depend on the video monitor connected to the HDMI OUT jack. • Audio/video signals output from the connected component (such as DVD player etc.) are not output from any...
Owner's Manual
Page 59
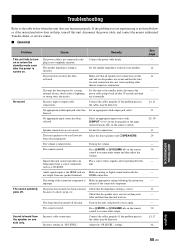
.... Select the front speakers with NINPUT l / h on the front panel (or the input selector buttons (3) on . Press FMUTE or IVOLUME +/- Audio signals input at the HDMI jack are secure and that the impedance setting is turned on one side only. The front speakers to be reproduced by this unit...wires are experiencing is not listed below or if the instruction below when this unit, disconnect the power cable, and contact the nearest authorized Yamaha dealer or service center. ■ General Problem Cause Remedy This unit fails to turn on or enters the standby mode soon after 30 ...
.... Select the front speakers with NINPUT l / h on the front panel (or the input selector buttons (3) on . Press FMUTE or IVOLUME +/- Audio signals input at the HDMI jack are secure and that the impedance setting is turned on one side only. The front speakers to be reproduced by this unit...wires are experiencing is not listed below or if the instruction below when this unit, disconnect the power cable, and contact the nearest authorized Yamaha dealer or service center. ■ General Problem Cause Remedy This unit fails to turn on or enters the standby mode soon after 30 ...
Owner's Manual
Page 67
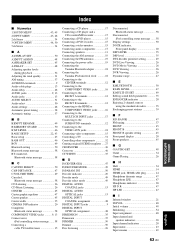
...FRONT B 45 FRONT B speaker setting 45 Front panel display 20 Front speakers 45 ■G G)AUDIO SET 48 Game 34 Game Playing 26 ■H Hall 34 HDMI 14 HDMI jack, HDMI cable plug 14 Headphone dynamic range 47 Headphone LFE 47 Headphones indicator 20 HP D.R 47 HP LFE...Connecting speakers 11 Connecting the AM antennas 19 Connecting the FM antennas 19 Connecting the power cable 19 Connecting the Yamaha Bluetooth adapter 18 Connecting the Yamaha iPod universal dock ...........18 Connecting to the CENTER terminals 12 Connecting to the COMPONENT VIDEO jacks ..........16 Connecting ...
...FRONT B 45 FRONT B speaker setting 45 Front panel display 20 Front speakers 45 ■G G)AUDIO SET 48 Game 34 Game Playing 26 ■H Hall 34 HDMI 14 HDMI jack, HDMI cable plug 14 Headphone dynamic range 47 Headphone LFE 47 Headphones indicator 20 HP D.R 47 HP LFE...Connecting speakers 11 Connecting the AM antennas 19 Connecting the FM antennas 19 Connecting the power cable 19 Connecting the Yamaha Bluetooth adapter 18 Connecting the Yamaha iPod universal dock ...........18 Connecting to the CENTER terminals 12 Connecting to the COMPONENT VIDEO jacks ..........16 Connecting ...


