User Guide
Page 3
... Feeder 16 Using the Menu Button 17 Changing Ink Cartridges 17 Aligning Ink Cartridges 17 Setting Paper Size Using the Control Panel 18 Testing the Print Nozzles 18 Xerox XK35c/25c User Guide i Table of Contents Preface v Safety Notes v Helpful Hints viii WorkCentre Location viii Care of Your WorkCentre viii Calling for Service and Supplies ix...
... Feeder 16 Using the Menu Button 17 Changing Ink Cartridges 17 Aligning Ink Cartridges 17 Setting Paper Size Using the Control Panel 18 Testing the Print Nozzles 18 Xerox XK35c/25c User Guide i Table of Contents Preface v Safety Notes v Helpful Hints viii WorkCentre Location viii Care of Your WorkCentre viii Calling for Service and Supplies ix...
User Guide
Page 5
...Panel 72 General Tips 73 Status Message Codes on the Control Panel 74 Appendix 75 Machine Specifications 75 Scanner (XK35c only 75 Printer 76 Copier 77 General Specifications 78 Media Specifications 79 Sizes 79 Feeding by Media Type 80 ...WorkCentre is Printing 58 Tips for your ink cartridges 44 Clean Print Head Procedure 44 Wiping the Ink Cartridge Nozzles and Contacts 47 Cleaning the Cartridge Carrier Contacts 48 Replacing the Ink Cartridge 49 Cartridge Alignment 51 The Xerox WorkCentre Control Program 54 Starting the Xerox WorkCentre Control Program 54 Xerox WorkCentre...
...Panel 72 General Tips 73 Status Message Codes on the Control Panel 74 Appendix 75 Machine Specifications 75 Scanner (XK35c only 75 Printer 76 Copier 77 General Specifications 78 Media Specifications 79 Sizes 79 Feeding by Media Type 80 ...WorkCentre is Printing 58 Tips for your ink cartridges 44 Clean Print Head Procedure 44 Wiping the Ink Cartridge Nozzles and Contacts 47 Cleaning the Cartridge Carrier Contacts 48 Replacing the Ink Cartridge 49 Cartridge Alignment 51 The Xerox WorkCentre Control Program 54 Starting the Xerox WorkCentre Control Program 54 Xerox WorkCentre...

User Guide
Page 11
Model Serial Number Xerox WorkCentre XK35c or XK25c fill in keeping your country) Visit the Xerox Web site at : 1 - 800 - 822 - 2200 Part Numbers for Consumables: Black Ink Cartridge: 8R7881 Color Ink Cartridge: 8R12591 CAUTION: Non-Xerox ink cartridges will not fit correctly into the WorkCentre cartridge compartment, and may call or visit your model and serial numbers handy. If...
Model Serial Number Xerox WorkCentre XK35c or XK25c fill in keeping your country) Visit the Xerox Web site at : 1 - 800 - 822 - 2200 Part Numbers for Consumables: Black Ink Cartridge: 8R7881 Color Ink Cartridge: 8R12591 CAUTION: Non-Xerox ink cartridges will not fit correctly into the WorkCentre cartridge compartment, and may call or visit your model and serial numbers handy. If...
User Guide
Page 14
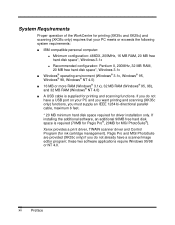
Xerox provides a print driver, TWAIN scanner driver and Control Program (for driver installation only. Pagis Pro and MGI PhotoSuite are provided (XK35c only) if you must supply an IEEE 1284 bi-directional parallel cable, maximum 6 feet. * 20 MB minimum hard disk space required for ink ...cartridge management). xii Preface If you do not have a scanner/image editor program; System Requirements Proper operation of the WorkCentre for printing (XK35c and XK25c) and scanning (XK35c only) requires that your PC and you want printing and...
Xerox provides a print driver, TWAIN scanner driver and Control Program (for driver installation only. Pagis Pro and MGI PhotoSuite are provided (XK35c only) if you must supply an IEEE 1284 bi-directional parallel cable, maximum 6 feet. * 20 MB minimum hard disk space required for ink ...cartridge management). xii Preface If you do not have a scanner/image editor program; System Requirements Proper operation of the WorkCentre for printing (XK35c and XK25c) and scanning (XK35c only) requires that your PC and you want printing and...
User Guide
Page 15
...(APF 14 Loading Paper 14 Loading Envelopes 15 Using the Manual Paper Feeder 16 Using the Menu Button 17 Changing Ink Cartridges 17 Aligning Ink Cartridges 17 Setting Paper Size Using the Control Panel 18 Testing the Print Nozzles 18 Paper Guidelines 19 Paper Selection ... photo paper 21 Installing Software 22 Overview of your WorkCentre. Getting Started This section describes the installation and setup of WorkCentre Software 22 General Installation 23 Uninstalling Software 24 Windows® 3.1x 24 Windows® 95/98, or Windows® NT 24 Xerox XK35c/25c User Guide 1
...(APF 14 Loading Paper 14 Loading Envelopes 15 Using the Manual Paper Feeder 16 Using the Menu Button 17 Changing Ink Cartridges 17 Aligning Ink Cartridges 17 Setting Paper Size Using the Control Panel 18 Testing the Print Nozzles 18 Paper Guidelines 19 Paper Selection ... photo paper 21 Installing Software 22 Overview of your WorkCentre. Getting Started This section describes the installation and setup of WorkCentre Software 22 General Installation 23 Uninstalling Software 24 Windows® 3.1x 24 Windows® 95/98, or Windows® NT 24 Xerox XK35c/25c User Guide 1
User Guide
Page 16
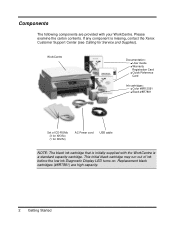
... missing, contact the Xerox Customer Support Center (see Calling for XK25c) AC Power cord USB cable NOTE: The black ink cartridge that is a standard capacity cartridge. Replacement black cartridges (#8R7881) are provided with the WorkCentre is initially supplied with your WorkCentre. This initial black cartridge may run out of CD-ROMs (3 for XK35c) (1 for Service...
... missing, contact the Xerox Customer Support Center (see Calling for XK25c) AC Power cord USB cable NOTE: The black ink cartridge that is a standard capacity cartridge. Replacement black cartridges (#8R7881) are provided with the WorkCentre is initially supplied with your WorkCentre. This initial black cartridge may run out of CD-ROMs (3 for XK35c) (1 for Service...

User Guide
Page 18
Control Locations (continued) Scanner module Cartridge compartment lid/support Ink cartridge carrier access Control Panel Lower left back of machine Spare ink cartridge compartment AC power cord socket Lower right back of machine On/Off power switch USB port IEEE 1284 Parallel port 4 Getting Started
Control Locations (continued) Scanner module Cartridge compartment lid/support Ink cartridge carrier access Control Panel Lower left back of machine Spare ink cartridge compartment AC power cord socket Lower right back of machine On/Off power switch USB port IEEE 1284 Parallel port 4 Getting Started
User Guide
Page 20
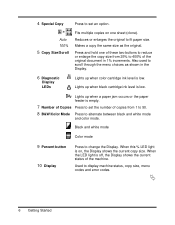
4 Special Copy Press to set the number of the original document in the Display. 6 Diagnostic Display LEDs Lights up when black cartridge ink level is off, the Display shows the current status of the machine. Lights up when a paper jam occurs or the paper feeder is empty. 7 Number ... and white mode Color mode 9 Percent button 10 Display Press to fit paper size. Press and hold one sheet (clone). Lights up when color cartridge ink level is on one of these two buttons to reduce or enlarge the copy size from 25% to 400% of copies from 1 to 50. 8 B&W/Color...
4 Special Copy Press to set the number of the original document in the Display. 6 Diagnostic Display LEDs Lights up when black cartridge ink level is off, the Display shows the current status of the machine. Lights up when a paper jam occurs or the paper feeder is empty. 7 Number ... and white mode Color mode 9 Percent button 10 Display Press to fit paper size. Press and hold one sheet (clone). Lights up when color cartridge ink level is on one of these two buttons to reduce or enlarge the copy size from 25% to 400% of copies from 1 to 50. 8 B&W/Color...

User Guide
Page 21
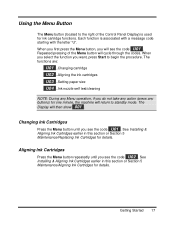
Press to enter Menu Mode. 11 Menu 12 Start 13 Stop/Cancel Press this button, the Display shows the menu code: U01 Change cartridges U02 Align cartridges U03 Set paper size U04 Ink nozzle self test/cleaning Press to default settings in standby mode. This action restores all copy menus to start operation or activate your selection. Each time you press this button to stop an operation or cancel a selection. Getting Started 7
Press to enter Menu Mode. 11 Menu 12 Start 13 Stop/Cancel Press this button, the Display shows the menu code: U01 Change cartridges U02 Align cartridges U03 Set paper size U04 Ink nozzle self test/cleaning Press to default settings in standby mode. This action restores all copy menus to start operation or activate your selection. Each time you press this button to stop an operation or cancel a selection. Getting Started 7
User Guide
Page 24
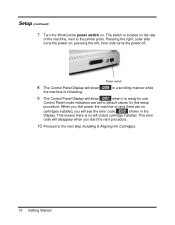
... ports. This means there is ready for this setup procedure. The switch is located on and there are set to the next step Installing & Aligning Ink Cartridges. 10 Getting Started Pressing the right, outer side turns the power on . This error code will see the error code E02 shown in a scrolling... while the machine is initializing. 9 The Control Panel Display will show 000 in the Display. pressing the left (color) cartridge installed. Setup (continued) 7 Turn the WorkCentre power switch on ; Control Panel mode indicators are no left , inner side turns the power off.
... ports. This means there is ready for this setup procedure. The switch is located on and there are set to the next step Installing & Aligning Ink Cartridges. 10 Getting Started Pressing the right, outer side turns the power on . This error code will see the error code E02 shown in a scrolling... while the machine is initializing. 9 The Control Panel Display will show 000 in the Display. pressing the left (color) cartridge installed. Setup (continued) 7 Turn the WorkCentre power switch on ; Control Panel mode indicators are no left , inner side turns the power off.
User Guide
Page 25
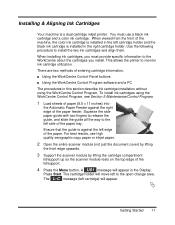
...ink cartridges and align them. Installing & Aligning Ink Cartridges Your machine is against the right edge of the lid/support. 4 Press the Menu button. You must provide specific information to the WorkCentre about the cartridges you must use high quality xerographic copy paper or inkjet ...5 Maintenance/Control Program. 1 Load sheets of the paper. For best results, use a black ink cartridge and a color ink cartridge. Press Start. To install ink cartridges using the WorkCentre Control Program. Use the following procedure to the open change area. There are two methods of ...
...ink cartridges and align them. Installing & Aligning Ink Cartridges Your machine is against the right edge of the lid/support. 4 Press the Menu button. You must provide specific information to the WorkCentre about the cartridges you must use high quality xerographic copy paper or inkjet ...5 Maintenance/Control Program. 1 Load sheets of the paper. For best results, use a black ink cartridge and a color ink cartridge. Press Start. To install ink cartridges using the WorkCentre Control Program. Use the following procedure to the open change area. There are two methods of ...
User Guide
Page 26
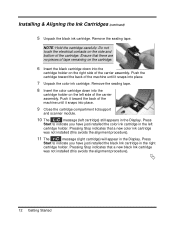
...) still appears in the left side of the machine until it snaps into place. 7 Unpack the color ink cartridge. Pressing Stop indicates that a new black Ink cartridge was not installed (this avoids the alignment procedure). Ä 12 Getting Started Press Start to indicate you... have just installed the black Ink cartridge in the Display. Installing & Aligning the Ink Cartridges (continued) 5 Unpack the black ink cartridge. NOTE: Hold the cartridge carefully. Push the cartridge toward the back of the carrier...
...) still appears in the left side of the machine until it snaps into place. 7 Unpack the color ink cartridge. Pressing Stop indicates that a new black Ink cartridge was not installed (this avoids the alignment procedure). Ä 12 Getting Started Press Start to indicate you... have just installed the black Ink cartridge in the Display. Installing & Aligning the Ink Cartridges (continued) 5 Unpack the black ink cartridge. NOTE: Hold the cartridge carefully. Push the cartridge toward the back of the carrier...

User Guide
Page 27
...The Display will show L-P . Review this sheet in group "A", press Start. Repeat step 13 for these remaining five steps, from "B" through "F". 15 The Ink Cartridge alignment is not pressed, and will return to Standby Mode. If the printed lines associated with the best-aligned set of printed lines that... the other printed lines in response to the next series of the alignment sheet in the series. Getting Started 13 Installing & Aligning the Ink Cartridges (continued) 12 If you see the code U02 displayed, then press Start to repeat the cartridge alignment process. 14 The Display will...
...The Display will show L-P . Review this sheet in group "A", press Start. Repeat step 13 for these remaining five steps, from "B" through "F". 15 The Ink Cartridge alignment is not pressed, and will return to Standby Mode. If the printed lines associated with the best-aligned set of printed lines that... the other printed lines in response to the next series of the alignment sheet in the series. Getting Started 13 Installing & Aligning the Ink Cartridges (continued) 12 If you see the code U02 displayed, then press Start to repeat the cartridge alignment process. 14 The Display will...
User Guide
Page 31
... for one minute, the machine will then show 001 . The Display will return to standby mode. See Installing & Aligning Ink Cartridges earlier in this section or Section 5 Maintenance/Aligning Ink Cartridges for ink cartridge functions. Repeated pressing of the Control Panel Display) is associated with a message code starting with the letter "U". Getting Started...
... for one minute, the machine will then show 001 . The Display will return to standby mode. See Installing & Aligning Ink Cartridges earlier in this section or Section 5 Maintenance/Aligning Ink Cartridges for ink cartridge functions. Repeated pressing of the Control Panel Display) is associated with a message code starting with the letter "U". Getting Started...

User Guide
Page 34
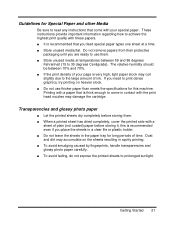
... transfer paper to those produced with water or damp surfaces, making software with inkjet printers. Follow instructions that come with different paper types. These cards give your unique, personalized cards the look and feel of letter, legal and A4 ... Card Stock Get the most out of card making it does not require special ink jet papers. Paper Selection One of the most important things you purchase a large quantity. it a good choice for damp or rainy environments. Inkjet Paper This paper has been developed specifically for high quality printing with minimal or...
... transfer paper to those produced with water or damp surfaces, making software with inkjet printers. Follow instructions that come with different paper types. These cards give your unique, personalized cards the look and feel of letter, legal and A4 ... Card Stock Get the most out of card making it does not require special ink jet papers. Paper Selection One of the most important things you purchase a large quantity. it a good choice for damp or rainy environments. Inkjet Paper This paper has been developed specifically for high quality printing with minimal or...
User Guide
Page 35
n Store unused media flat. n If the print density of ink. If you place the sheets in the paper tray for long periods of plain (not coated) paper before storing them . n Do not use them . this ...
n Store unused media flat. n If the print density of ink. If you place the sheets in the paper tray for long periods of plain (not coated) paper before storing them . n Do not use them . this ...
User Guide
Page 57
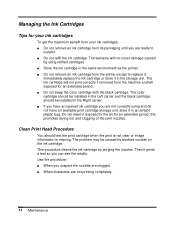
5. It includes the following topics: Page Managing the Ink Cartridges 44 Tips for the Xerox WorkCentre. Maintenance This section describes maintenance procedures for your ink cartridges 44 Clean Print Head Procedure 44 Wiping the Ink Cartridge Nozzles and Contacts 47 Cleaning the Cartridge Carrier Contacts 48 Replacing the Ink Cartridge 49 Cartridge Alignment 51 The Xerox WorkCentre Control Program 54 Starting the Xerox WorkCentre Control Program 54 Xerox WorkCentre Control Program Tab Menus 55 Cleaning the Scanning Glass 56 Xerox XK35c/25c User Guide 43
5. It includes the following topics: Page Managing the Ink Cartridges 44 Tips for the Xerox WorkCentre. Maintenance This section describes maintenance procedures for your ink cartridges 44 Clean Print Head Procedure 44 Wiping the Ink Cartridge Nozzles and Contacts 47 Cleaning the Cartridge Carrier Contacts 48 Replacing the Ink Cartridge 49 Cartridge Alignment 51 The Xerox WorkCentre Control Program 54 Starting the Xerox WorkCentre Control Program 54 Xerox WorkCentre Control Program Tab Menus 55 Cleaning the Scanning Glass 56 Xerox XK35c/25c User Guide 43
User Guide
Page 58
...in the storage unit. Use the procedure: n When you are ready to the air for an extended period. n Do not remove an ink cartridge from its packaging until you are not currently using refilled cartridges. this promotes drying out and clogging of the print nozzles. n When characters... are clogged. n If you can see the results. Immediately replace the ink cartridge or store it in the same environment as the printer. Then it prints a test so you have an available print cartridge storage unit,...
...in the storage unit. Use the procedure: n When you are ready to the air for an extended period. n Do not remove an ink cartridge from its packaging until you are not currently using refilled cartridges. this promotes drying out and clogging of the print nozzles. n When characters... are clogged. n If you can see the results. Immediately replace the ink cartridge or store it in the same environment as the printer. Then it prints a test so you have an available print cartridge storage unit,...

User Guide
Page 60
... broken, wipe the nozzles and contacts. NOTE: For Windows 3.1: At system startup, open the Xerox WorkCentre group from your PC: In Windows 95/98 or Windows NT 4.0: 1 Go to Wiping the Ink Cartridge Nozzles and Contacts. 46 Maintenance The printer feeds a sheet of the test pattern. NOTE:... If print quality does not improve, remove and reinstall the ink cartridge. Look for a break in the appearance of the Cartridges Tab between Windows 95/98 and Windows NT 4.0 Examine the test pattern. Refer to Start>Programs>Xerox WorkCentre XK Series. If all nozzles are minor differences in the...
... broken, wipe the nozzles and contacts. NOTE: For Windows 3.1: At system startup, open the Xerox WorkCentre group from your PC: In Windows 95/98 or Windows NT 4.0: 1 Go to Wiping the Ink Cartridge Nozzles and Contacts. 46 Maintenance The printer feeds a sheet of the test pattern. NOTE:... If print quality does not improve, remove and reinstall the ink cartridge. Look for a break in the appearance of the Cartridges Tab between Windows 95/98 and Windows NT 4.0 Examine the test pattern. Refer to Start>Programs>Xerox WorkCentre XK Series. If all nozzles are minor differences in the...

User Guide
Page 61
...7 Close the cartridge compartment lid/support and scanner module. 8 Repeat the nozzle test. NOTE: If you are cleaning a color ink cartridge, be caused by dried ink on the top edge of the lid/support. 2 Press Menu until the code U01 appears in your machine. Lift the cartridge compartment... lid/support up so the scanner module rests on the ink cartridge: n nozzles n contacts n carrier contacts in the printer Follow this procedure: 1 Lift the scanner module. The cartridge carrier assembly will move ...
...7 Close the cartridge compartment lid/support and scanner module. 8 Repeat the nozzle test. NOTE: If you are cleaning a color ink cartridge, be caused by dried ink on the top edge of the lid/support. 2 Press Menu until the code U01 appears in your machine. Lift the cartridge compartment... lid/support up so the scanner module rests on the ink cartridge: n nozzles n contacts n carrier contacts in the printer Follow this procedure: 1 Lift the scanner module. The cartridge carrier assembly will move ...


