User Guide
Page 3
... Using the Manual Paper Feeder 16 Using the Menu Button 17 Changing Ink Cartridges 17 Aligning Ink Cartridges 17 Setting Paper Size Using the Control Panel 18 Testing the Print Nozzles 18 Xerox XK35c/25c User Guide i Table of Contents Preface v Safety Notes v Helpful Hints viii WorkCentre Location viii Care of Your WorkCentre viii Calling...
... Using the Manual Paper Feeder 16 Using the Menu Button 17 Changing Ink Cartridges 17 Aligning Ink Cartridges 17 Setting Paper Size Using the Control Panel 18 Testing the Print Nozzles 18 Xerox XK35c/25c User Guide i Table of Contents Preface v Safety Notes v Helpful Hints viii WorkCentre Location viii Care of Your WorkCentre viii Calling...

User Guide
Page 15
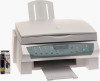
...Setup 8 Installing & Aligning Ink Cartridges 11 Using the Automatic Paper Feeder (APF 14 Loading Paper 14 Loading Envelopes 15 Using the Manual Paper Feeder 16 Using the Menu Button 17 Changing Ink Cartridges 17 Aligning Ink Cartridges 17 Setting Paper Size Using the Control Panel ... 21 Installing Software 22 Overview of your WorkCentre. Getting Started This section describes the installation and setup of WorkCentre Software 22 General Installation 23 Uninstalling Software 24 Windows® 3.1x 24 Windows® 95/98, or Windows® NT 24 Xerox XK35c/25c User Guide 1 1.
...Setup 8 Installing & Aligning Ink Cartridges 11 Using the Automatic Paper Feeder (APF 14 Loading Paper 14 Loading Envelopes 15 Using the Manual Paper Feeder 16 Using the Menu Button 17 Changing Ink Cartridges 17 Aligning Ink Cartridges 17 Setting Paper Size Using the Control Panel ... 21 Installing Software 22 Overview of your WorkCentre. Getting Started This section describes the installation and setup of WorkCentre Software 22 General Installation 23 Uninstalling Software 24 Windows® 3.1x 24 Windows® 95/98, or Windows® NT 24 Xerox XK35c/25c User Guide 1 1.

User Guide
Page 37
... the rest of the installation. 8 Restart your PC's CD-ROM drive), and click OK. Continue with screen instructions. b) Follow screen instructions to Xerox CD. General Installation continued... 7 The WorkCentre software installation program will see an Add New Hardware dialog. Continue with step 7. General Installation 1 Make sure the..., point to load USB driver. When asked for Windows® 95/98 or Windows® NT 4.0 continued... c) Go to Step 5 to manually install the XK Series printer and TWAIN drivers. 5 If AutoPlay is connected to your PC. 2 Power on the...
... the rest of the installation. 8 Restart your PC's CD-ROM drive), and click OK. Continue with screen instructions. b) Follow screen instructions to Xerox CD. General Installation continued... 7 The WorkCentre software installation program will see an Add New Hardware dialog. Continue with step 7. General Installation 1 Make sure the..., point to load USB driver. When asked for Windows® 95/98 or Windows® NT 4.0 continued... c) Go to Step 5 to manually install the XK Series printer and TWAIN drivers. 5 If AutoPlay is connected to your PC. 2 Power on the...
User Guide
Page 77
... of paper is a gap of approximately 1 mm (1/32") between the left and right edges of the envelopes at a time in the Manual Paper Feeder. Select the desired spool setting from the Option menu in the Option menu of the paper. If printing onto envelopes, insert the...of Print Manager may be set incorrectly. n If using Windows 3.1, the Background Printing item in the Print Manager. Troubleshooting 63 Click the WorkCentre icon with the right mouse button, select Properties, click the Details tab, and then click the Spool Settings button. Select Background Printing from...
... of paper is a gap of approximately 1 mm (1/32") between the left and right edges of the envelopes at a time in the Manual Paper Feeder. Select the desired spool setting from the Option menu in the Option menu of the paper. If printing onto envelopes, insert the...of Print Manager may be set incorrectly. n If using Windows 3.1, the Background Printing item in the Print Manager. Troubleshooting 63 Click the WorkCentre icon with the right mouse button, select Properties, click the Details tab, and then click the Spool Settings button. Select Background Printing from...

