User Guide
Page 3
... Paper Feeder 16 Using the Menu Button 17 Changing Ink Cartridges 17 Aligning Ink Cartridges 17 Setting Paper Size Using the Control Panel 18 Testing the Print Nozzles 18 Xerox XK35c/25c User Guide i Table of Contents Preface v Safety Notes v Helpful Hints viii WorkCentre Location viii Care of Your WorkCentre viii Calling for Service and Supplies ix Service...
... Paper Feeder 16 Using the Menu Button 17 Changing Ink Cartridges 17 Aligning Ink Cartridges 17 Setting Paper Size Using the Control Panel 18 Testing the Print Nozzles 18 Xerox XK35c/25c User Guide i Table of Contents Preface v Safety Notes v Helpful Hints viii WorkCentre Location viii Care of Your WorkCentre viii Calling for Service and Supplies ix Service...
User Guide
Page 5
... Ink Cartridge 49 Cartridge Alignment 51 The Xerox WorkCentre Control Program 54 Starting the Xerox WorkCentre Control Program 54 Xerox WorkCentre Control Program Tab Menus 55 Cleaning the Scanning Glass 56 6. Maintenance 43 Managing the Ink Cartridges 44 Tips for Avoiding Paper Jams 59 Display Error Codes 60 Printer Problems 61 Print Quality Problems 64 Paper Feeding Problems 69 Scanning Problems (XK35c...
... Ink Cartridge 49 Cartridge Alignment 51 The Xerox WorkCentre Control Program 54 Starting the Xerox WorkCentre Control Program 54 Xerox WorkCentre Control Program Tab Menus 55 Cleaning the Scanning Glass 56 6. Maintenance 43 Managing the Ink Cartridges 44 Tips for Avoiding Paper Jams 59 Display Error Codes 60 Printer Problems 61 Print Quality Problems 64 Paper Feeding Problems 69 Scanning Problems (XK35c...

User Guide
Page 11
.... Call one of the machine. Model Serial Number Xerox WorkCentre XK35c or XK25c fill in keeping your WorkCentre operational and, if required, will arrange for Consumables: Black Ink Cartridge: 8R7881 Color Ink Cartridge: 8R12591 CAUTION: Non-Xerox ink cartridges will assist you may damage the machine. Calling for Service and Supplies Service A Xerox Customer Support Center Representative will not fit correctly into...
.... Call one of the machine. Model Serial Number Xerox WorkCentre XK35c or XK25c fill in keeping your WorkCentre operational and, if required, will arrange for Consumables: Black Ink Cartridge: 8R7881 Color Ink Cartridge: 8R12591 CAUTION: Non-Xerox ink cartridges will assist you may damage the machine. Calling for Service and Supplies Service A Xerox Customer Support Center Representative will not fit correctly into...
User Guide
Page 14
...Xerox provides a print driver, TWAIN scanner driver and Control Program (for driver installation only. Pagis Pro and MGI PhotoSuite are provided (XK35c only) if you must supply an IEEE 1284 bi-directional parallel cable, maximum 6 feet. * 20 MB minimum hard disk space required for ink cartridge management). System Requirements Proper operation of the WorkCentre... for printing (XK35c and XK25c) and scanning (XK35c only) requires that your PC and you want printing and scanning (XK35c only)...
...Xerox provides a print driver, TWAIN scanner driver and Control Program (for driver installation only. Pagis Pro and MGI PhotoSuite are provided (XK35c only) if you must supply an IEEE 1284 bi-directional parallel cable, maximum 6 feet. * 20 MB minimum hard disk space required for ink cartridge management). System Requirements Proper operation of the WorkCentre... for printing (XK35c and XK25c) and scanning (XK35c only) requires that your PC and you want printing and scanning (XK35c only)...
User Guide
Page 15
... describes the installation and setup of WorkCentre Software 22 General Installation 23 Uninstalling Software 24 Windows® 3.1x 24 Windows® 95/98, or Windows® NT 24 Xerox XK35c/25c User Guide 1 The following topics are included: Page Components 2 Control Locations 3 Control Panel 5 Setup 8 Installing & Aligning Ink Cartridges 11 Using the Automatic Paper Feeder...
... describes the installation and setup of WorkCentre Software 22 General Installation 23 Uninstalling Software 24 Windows® 3.1x 24 Windows® 95/98, or Windows® NT 24 Xerox XK35c/25c User Guide 1 The following topics are included: Page Components 2 Control Locations 3 Control Panel 5 Setup 8 Installing & Aligning Ink Cartridges 11 Using the Automatic Paper Feeder...
User Guide
Page 16
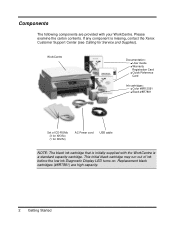
.... If any component is a standard capacity cartridge. This initial black cartridge may run out of CD-ROMs (3 for XK35c) (1 for XK25c) AC Power cord USB cable NOTE: The black ink cartridge that is initially supplied with your WorkCentre. Replacement black cartridges (#8R7881) are provided with the WorkCentre is missing, contact the Xerox Customer Support Center (see Calling for Service...
.... If any component is a standard capacity cartridge. This initial black cartridge may run out of CD-ROMs (3 for XK35c) (1 for XK25c) AC Power cord USB cable NOTE: The black ink cartridge that is initially supplied with your WorkCentre. Replacement black cartridges (#8R7881) are provided with the WorkCentre is missing, contact the Xerox Customer Support Center (see Calling for Service...
User Guide
Page 24
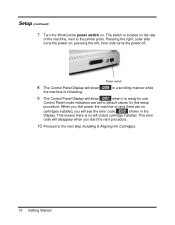
... you will show 000 in the Display. The switch is no cartridges installed, you start the next procedure. 10 Proceed to the next step Installing & Aligning Ink Cartridges. 10 Getting Started Setup (continued) 7 Turn the WorkCentre power switch on ; pressing the left (color) cartridge installed. When you first power the machine on the rear of...
... you will show 000 in the Display. The switch is no cartridges installed, you start the next procedure. 10 Proceed to the next step Installing & Aligning Ink Cartridges. 10 Getting Started Setup (continued) 7 Turn the WorkCentre power switch on ; pressing the left (color) cartridge installed. When you first power the machine on the rear of...
User Guide
Page 25
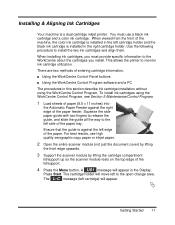
... install. For best results, use a black ink cartridge and a color ink cartridge. The cartridge holder will move left to the WorkCentre about the cartridges you must use high quality xerographic copy paper or inkjet paper. 2 Open the entire scanner module (not just the document cover) by lifting the front edge upwards. 3 Support the scanner module by lifting the...
... install. For best results, use a black ink cartridge and a color ink cartridge. The cartridge holder will move left to the WorkCentre about the cartridges you must use high quality xerographic copy paper or inkjet paper. 2 Open the entire scanner module (not just the document cover) by lifting the front edge upwards. 3 Support the scanner module by lifting the...
User Guide
Page 57
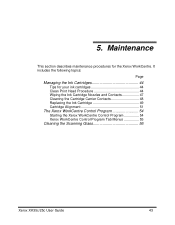
It includes the following topics: Page Managing the Ink Cartridges 44 Tips for the Xerox WorkCentre. Maintenance This section describes maintenance procedures for your ink cartridges 44 Clean Print Head Procedure 44 Wiping the Ink Cartridge Nozzles and Contacts 47 Cleaning the Cartridge Carrier Contacts 48 Replacing the Ink Cartridge 49 Cartridge Alignment 51 The Xerox WorkCentre Control Program 54 Starting the Xerox WorkCentre Control Program 54 Xerox WorkCentre Control Program Tab Menus 55 Cleaning the Scanning Glass 56 Xerox XK35c/25c User Guide 43 5.
It includes the following topics: Page Managing the Ink Cartridges 44 Tips for the Xerox WorkCentre. Maintenance This section describes maintenance procedures for your ink cartridges 44 Clean Print Head Procedure 44 Wiping the Ink Cartridge Nozzles and Contacts 47 Cleaning the Cartridge Carrier Contacts 48 Replacing the Ink Cartridge 49 Cartridge Alignment 51 The Xerox WorkCentre Control Program 54 Starting the Xerox WorkCentre Control Program 54 Xerox WorkCentre Control Program Tab Menus 55 Cleaning the Scanning Glass 56 Xerox XK35c/25c User Guide 43 5.

User Guide
Page 60
.... Double-click on LPT1. 3 The Control Program window opens. NOTE: For Windows 3.1: At system startup, open the Xerox WorkCentre group from your PC: In Windows 95/98 or Windows NT 4.0: 1 Go to Wiping the Ink Cartridge Nozzles and Contacts. 46 Maintenance To clean the Print Head Nozzles from Program Manager. The printer feeds a sheet...
.... Double-click on LPT1. 3 The Control Program window opens. NOTE: For Windows 3.1: At system startup, open the Xerox WorkCentre group from your PC: In Windows 95/98 or Windows NT 4.0: 1 Go to Wiping the Ink Cartridge Nozzles and Contacts. 46 Maintenance To clean the Print Head Nozzles from Program Manager. The printer feeds a sheet...

User Guide
Page 62
... 4 Unplug the power cord from the rear of the WorkCentre. 5 Remove both ink cartridges. 6 Use a CLEAN, LINT FREE, DRY CLOTH to clean the ink cartridge carrier contacts on the back wall of the carrier. 7 Reinstall the ink cartridges. 8 Close the cartridge compartment lid/support and the scanner module. 9 Plug the... power cord into the WorkCentre. 10 Test the ink cartridges by running the Clean Print Head procedure. Cleaning the Cartridge Carrier Contacts 1 Lift the scanner module. If the print quality is still unacceptable, contact the Xerox Customer Support Center at 1-800-TEAM XRX ...
... 4 Unplug the power cord from the rear of the WorkCentre. 5 Remove both ink cartridges. 6 Use a CLEAN, LINT FREE, DRY CLOTH to clean the ink cartridge carrier contacts on the back wall of the carrier. 7 Reinstall the ink cartridges. 8 Close the cartridge compartment lid/support and the scanner module. 9 Plug the... power cord into the WorkCentre. 10 Test the ink cartridges by running the Clean Print Head procedure. Cleaning the Cartridge Carrier Contacts 1 Lift the scanner module. If the print quality is still unacceptable, contact the Xerox Customer Support Center at 1-800-TEAM XRX ...

User Guide
Page 64
...particular procedure named To Align the Cartridge Using the WorkCentre Control Panel, starting with step 4. NOTE: If you changed the left side access location for more than 30 minutes, the print cartridge carrier moves to the Cartridge Alignment procedure. If the ink cartridge moves loosely in the carrier, ... display will show L-P . 10 Close the cover and proceed to the standby position. 50 Maintenance 8 Insert the ink cartridge in the cartridge holder, then push the ink cartridge firmly to the rear of the two LED messages, the alignment procedure will then change to r-C . If you...
...particular procedure named To Align the Cartridge Using the WorkCentre Control Panel, starting with step 4. NOTE: If you changed the left side access location for more than 30 minutes, the print cartridge carrier moves to the Cartridge Alignment procedure. If the ink cartridge moves loosely in the carrier, ... display will show L-P . 10 Close the cover and proceed to the standby position. 50 Maintenance 8 Insert the ink cartridge in the cartridge holder, then push the ink cartridge firmly to the rear of the two LED messages, the alignment procedure will then change to r-C . If you...
User Guide
Page 68
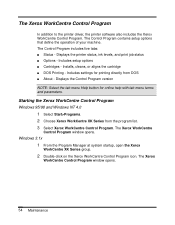
... list. 3 Select Xerox WorkCentre Control Program. Displays the printer status, ink levels, and print job status n Options - Windows 3.1x 1 From the Program Manager at system startup, open the Xerox WorkCentre XK Series group. 2 Double-click on the Xerox WorkCentre Control Program icon. The Xerox WorkCentre Control Program window opens. 54 Maintenance Includes setup options n Cartridges - Starting the Xerox WorkCentre Control Program Windows...
... list. 3 Select Xerox WorkCentre Control Program. Displays the printer status, ink levels, and print job status n Options - Windows 3.1x 1 From the Program Manager at system startup, open the Xerox WorkCentre XK Series group. 2 Double-click on the Xerox WorkCentre Control Program icon. The Xerox WorkCentre Control Program window opens. 54 Maintenance Includes setup options n Cartridges - Starting the Xerox WorkCentre Control Program Windows...
User Guide
Page 74
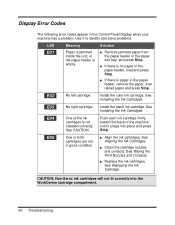
... Paper is jammed inside the unit, or the paper feeder is not installed correctly. No left cartridge Install the color ink cartridge. CAUTION: Non-Xerox ink cartridges will not fit correctly into place and press Stop. Use it snaps into the WorkCentre cartridge compartment. 60 Troubleshooting n If there is no paper in good condition. Display Error Codes The...
... Paper is jammed inside the unit, or the paper feeder is not installed correctly. No left cartridge Install the color ink cartridge. CAUTION: Non-Xerox ink cartridges will not fit correctly into place and press Stop. Use it snaps into the WorkCentre cartridge compartment. 60 Troubleshooting n If there is no paper in good condition. Display Error Codes The...
User Guide
Page 81
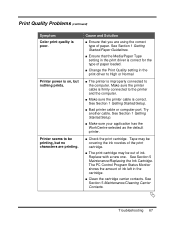
.... Try another cable. Tape may be printing, but nothing prints. See Section 5 Maintenance/Replacing the Ink Cartridge. n Change the Print Quality setting in the cartridge. n Make sure the printer cable is poor. n Make sure your application has the WorkCentre selected as the default printer. Replace with a new one. Printer seems to High or Normal...
.... Try another cable. Tape may be printing, but nothing prints. See Section 5 Maintenance/Replacing the Ink Cartridge. n Change the Print Quality setting in the cartridge. n Make sure the printer cable is poor. n Make sure your application has the WorkCentre selected as the default printer. Replace with a new one. Printer seems to High or Normal...
User Guide
Page 86
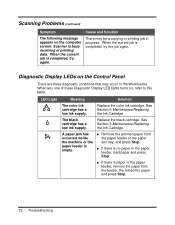
...72 Troubleshooting n Remove the jammed paper from the paper feeder or the paper exit tray, and press Stop. Replace the color ink cartridge. The black cartridge has a low ink supply. A paper jam has occurred inside the machine or the paper feeder is completed, try again. When the current job... Display LEDs on the Control Panel There are three diagnostic conditions that may be a copying or printing job in the WorkCentre. See Section 5 Maintenance/Replacing the Ink Cartridge. n If there is busy receiving or printing data. When the current job is paper in the paper feeder, load...
...72 Troubleshooting n Remove the jammed paper from the paper feeder or the paper exit tray, and press Stop. Replace the color ink cartridge. The black cartridge has a low ink supply. A paper jam has occurred inside the machine or the paper feeder is completed, try again. When the current job... Display LEDs on the Control Panel There are three diagnostic conditions that may be a copying or printing job in the WorkCentre. See Section 5 Maintenance/Replacing the Ink Cartridge. n If there is busy receiving or printing data. When the current job is paper in the paper feeder, load...


