User Guide
Page 3
... Feeder 16 Using the Menu Button 17 Changing Ink Cartridges 17 Aligning Ink Cartridges 17 Setting Paper Size Using the Control Panel 18 Testing the Print Nozzles 18 Xerox XK35c/25c User Guide i Table of Contents Preface v Safety Notes v Helpful Hints viii WorkCentre Location viii Care of Your WorkCentre viii Calling for Service and Supplies ix...
... Feeder 16 Using the Menu Button 17 Changing Ink Cartridges 17 Aligning Ink Cartridges 17 Setting Paper Size Using the Control Panel 18 Testing the Print Nozzles 18 Xerox XK35c/25c User Guide i Table of Contents Preface v Safety Notes v Helpful Hints viii WorkCentre Location viii Care of Your WorkCentre viii Calling for Service and Supplies ix...
User Guide
Page 5
... 51 The Xerox WorkCentre Control Program 54 Starting the Xerox WorkCentre Control Program 54 Xerox WorkCentre Control Program Tab Menus 55 Cleaning the Scanning Glass 56 6. Maintenance 43 Managing the Ink Cartridges 44 Tips for Avoiding Paper Jams 59 Display Error Codes 60 Printer Problems 61 Print Quality Problems 64 Paper Feeding Problems 69 Scanning Problems (XK35c only...
... 51 The Xerox WorkCentre Control Program 54 Starting the Xerox WorkCentre Control Program 54 Xerox WorkCentre Control Program Tab Menus 55 Cleaning the Scanning Glass 56 6. Maintenance 43 Managing the Ink Cartridges 44 Tips for Avoiding Paper Jams 59 Display Error Codes 60 Printer Problems 61 Print Quality Problems 64 Paper Feeding Problems 69 Scanning Problems (XK35c only...

User Guide
Page 11
... ix Model Serial Number Xerox WorkCentre XK35c or XK25c fill in keeping your WorkCentre operational and, if required, will arrange for service. Supplies To order supplies for additional product information. Calling for Service and Supplies Service A Xerox Customer Support Center Representative will...832-6979 (your country) Visit the Xerox Web site at : 1 - 800 - 822 - 2200 Part Numbers for Consumables: Black Ink Cartridge: 8R7881 Color Ink Cartridge: 8R12591 CAUTION: Non-Xerox ink cartridges will not fit correctly into the WorkCentre cartridge compartment, and may call or visit...
... ix Model Serial Number Xerox WorkCentre XK35c or XK25c fill in keeping your WorkCentre operational and, if required, will arrange for service. Supplies To order supplies for additional product information. Calling for Service and Supplies Service A Xerox Customer Support Center Representative will...832-6979 (your country) Visit the Xerox Web site at : 1 - 800 - 822 - 2200 Part Numbers for Consumables: Black Ink Cartridge: 8R7881 Color Ink Cartridge: 8R12591 CAUTION: Non-Xerox ink cartridges will not fit correctly into the WorkCentre cartridge compartment, and may call or visit...
User Guide
Page 14
Xerox provides a print driver, TWAIN scanner driver and Control Program (for driver installation only. If you do not have a scanner/image editor program; If installing the ... parallel cable, maximum 6 feet. * 20 MB minimum hard disk space required for ink cartridge management). System Requirements Proper operation of the WorkCentre for printing (XK35c and XK25c) and scanning (XK35c only) requires that your PC and you want printing and scanning (XK35c only) functions, you do not already have a USB port on your PC meets...
Xerox provides a print driver, TWAIN scanner driver and Control Program (for driver installation only. If you do not have a scanner/image editor program; If installing the ... parallel cable, maximum 6 feet. * 20 MB minimum hard disk space required for ink cartridge management). System Requirements Proper operation of the WorkCentre for printing (XK35c and XK25c) and scanning (XK35c only) requires that your PC and you want printing and scanning (XK35c only) functions, you do not already have a USB port on your PC meets...
User Guide
Page 15
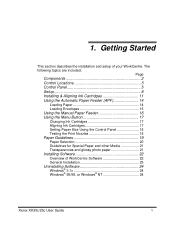
... describes the installation and setup of WorkCentre Software 22 General Installation 23 Uninstalling Software 24 Windows® 3.1x 24 Windows® 95/98, or Windows® NT 24 Xerox XK35c/25c User Guide 1 The following topics are included: Page Components 2 Control Locations 3 Control Panel 5 Setup 8 Installing & Aligning Ink Cartridges 11 Using the Automatic Paper...
... describes the installation and setup of WorkCentre Software 22 General Installation 23 Uninstalling Software 24 Windows® 3.1x 24 Windows® 95/98, or Windows® NT 24 Xerox XK35c/25c User Guide 1 The following topics are included: Page Components 2 Control Locations 3 Control Panel 5 Setup 8 Installing & Aligning Ink Cartridges 11 Using the Automatic Paper...
User Guide
Page 16
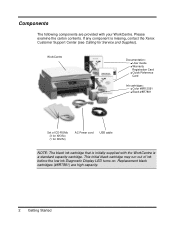
This initial black cartridge may run out of CD-ROMs (3 for XK35c) (1 for XK25c) AC Power cord USB cable NOTE: The black ink cartridge that is initially supplied with your WorkCentre. Replacement black cartridges (#8R7881) are provided with the WorkCentre is missing, contact the Xerox Customer Support Center (see Calling for Service and Supplies). W orkCentre Documentation...
This initial black cartridge may run out of CD-ROMs (3 for XK35c) (1 for XK25c) AC Power cord USB cable NOTE: The black ink cartridge that is initially supplied with your WorkCentre. Replacement black cartridges (#8R7881) are provided with the WorkCentre is missing, contact the Xerox Customer Support Center (see Calling for Service and Supplies). W orkCentre Documentation...

User Guide
Page 18
Control Locations (continued) Scanner module Cartridge compartment lid/support Ink cartridge carrier access Control Panel Lower left back of machine Spare ink cartridge compartment AC power cord socket Lower right back of machine On/Off power switch USB port IEEE 1284 Parallel port 4 Getting Started
Control Locations (continued) Scanner module Cartridge compartment lid/support Ink cartridge carrier access Control Panel Lower left back of machine Spare ink cartridge compartment AC power cord socket Lower right back of machine On/Off power switch USB port IEEE 1284 Parallel port 4 Getting Started
User Guide
Page 20
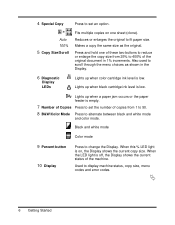
.... Lights up when a paper jam occurs or the paper feeder is empty. 7 Number of Copies Press to set an option. Lights up when black cartridge ink level is off, the Display shows the current status of the machine. When this % LED light is on one of these two buttons to reduce... to set the number of copies from 25% to 400% of the original document in the Display. 6 Diagnostic Display LEDs Lights up when color cartridge ink level is low. Also used to change the Display.
.... Lights up when a paper jam occurs or the paper feeder is empty. 7 Number of Copies Press to set an option. Lights up when black cartridge ink level is off, the Display shows the current status of the machine. When this % LED light is on one of these two buttons to reduce... to set the number of copies from 25% to 400% of the original document in the Display. 6 Diagnostic Display LEDs Lights up when color cartridge ink level is low. Also used to change the Display.

User Guide
Page 21
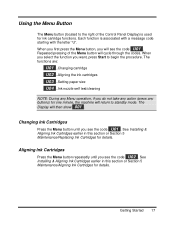
This action restores all copy menus to stop an operation or cancel a selection. Getting Started 7 Press to default settings in standby mode. Each time you press this button to start operation or activate your selection. 11 Menu 12 Start 13 Stop/Cancel Press this button, the Display shows the menu code: U01 Change cartridges U02 Align cartridges U03 Set paper size U04 Ink nozzle self test/cleaning Press to enter Menu Mode.
This action restores all copy menus to stop an operation or cancel a selection. Getting Started 7 Press to default settings in standby mode. Each time you press this button to start operation or activate your selection. 11 Menu 12 Start 13 Stop/Cancel Press this button, the Display shows the menu code: U01 Change cartridges U02 Align cartridges U03 Set paper size U04 Ink nozzle self test/cleaning Press to enter Menu Mode.
User Guide
Page 24
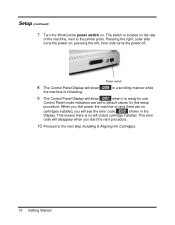
Setup (continued) 7 Turn the WorkCentre power switch on ; This means there is located on and there are set to the next step Installing & Aligning Ink Cartridges. 10 Getting Started The switch is no cartridges installed, you start the next procedure. 10 Proceed to default values for use. Power switch 8 The ...
Setup (continued) 7 Turn the WorkCentre power switch on ; This means there is located on and there are set to the next step Installing & Aligning Ink Cartridges. 10 Getting Started The switch is no cartridges installed, you start the next procedure. 10 Proceed to default values for use. Power switch 8 The ...
User Guide
Page 25
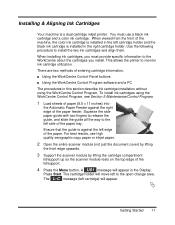
... The procedures in this section describe ink cartridge installation without using the WorkCentre Control Program, see Section 5 Maintenance/Control Program. 1 Load sheets of paper (8.5 x 11 inches) into the Automatic Paper Feeder against the left cartridge holder and the black ink cartridge is a dual cartridge inkjet printer. Installing & Aligning Ink Cartridges Your machine is installed in...
... The procedures in this section describe ink cartridge installation without using the WorkCentre Control Program, see Section 5 Maintenance/Control Program. 1 Load sheets of paper (8.5 x 11 inches) into the Automatic Paper Feeder against the left cartridge holder and the black ink cartridge is a dual cartridge inkjet printer. Installing & Aligning Ink Cartridges Your machine is installed in...
User Guide
Page 26
...11 The r-C message (right cartridge) will appear in the right cartridge holder. Press Start to indicate you have just installed the color ink cartridge in the Display. Pressing Stop indicates that there are no pieces of tape remaining on the right side of the machine until it... snaps into the cartridge holder on the cartridge. 6 Insert the black cartridge down into place. 7 Unpack the color ink cartridge. NOTE: Hold the cartridge carefully. Remove the sealing tape. 8 Insert the color cartridge down into place. 9 Close the cartridge compartment lid...
...11 The r-C message (right cartridge) will appear in the right cartridge holder. Press Start to indicate you have just installed the color ink cartridge in the Display. Pressing Stop indicates that there are no pieces of tape remaining on the right side of the machine until it... snaps into the cartridge holder on the cartridge. 6 Insert the black cartridge down into place. 7 Unpack the color ink cartridge. NOTE: Hold the cartridge carefully. Remove the sealing tape. 8 Insert the color cartridge down into place. 9 Close the cartridge compartment lid...

User Guide
Page 27
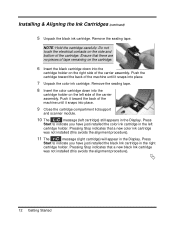
Installing & Aligning the Ink Cartridges (continued) 12 If you see the code U02 displayed, then press Start to repeat the cartridge alignment process. 14 The Display will return to ... in the Display. If there is another set appears in group "A", press Start. Repeat step 13 for these remaining five steps, from "B" through "F". 15 The Ink Cartridge alignment is not pressed, and will show 001 . An alignment test pattern sheet will print during which time the Display will then show the...
Installing & Aligning the Ink Cartridges (continued) 12 If you see the code U02 displayed, then press Start to repeat the cartridge alignment process. 14 The Display will return to ... in the Display. If there is another set appears in group "A", press Start. Repeat step 13 for these remaining five steps, from "B" through "F". 15 The Ink Cartridge alignment is not pressed, and will show 001 . An alignment test pattern sheet will print during which time the Display will then show the...
User Guide
Page 31
... U02 . Getting Started 17 The functions are: U01 ..Changing cartridge U02 ..Aligning the ink cartridges U03 ..Setting paper size U04 ..Ink nozzle self test/cleaning NOTE: During any buttons) for ink cartridge functions. Using the Menu Button The Menu button (located to the right of the... Menu button will then show 001 . The Display will cycle through the codes. See Installing & Aligning Ink Cartridges earlier in this section or Section 5 Maintenance/Aligning Ink Cartridges for details. When you select the function you see the code U01 . See Installing & Aligning...
... U02 . Getting Started 17 The functions are: U01 ..Changing cartridge U02 ..Aligning the ink cartridges U03 ..Setting paper size U04 ..Ink nozzle self test/cleaning NOTE: During any buttons) for ink cartridge functions. Using the Menu Button The Menu button (located to the right of the... Menu button will then show 001 . The Display will cycle through the codes. See Installing & Aligning Ink Cartridges earlier in this section or Section 5 Maintenance/Aligning Ink Cartridges for details. When you select the function you see the code U01 . See Installing & Aligning...

User Guide
Page 34
...machine is a high gloss, thicker paper that produces the look and feel of letter, legal and A4 in contact with different paper types. Inkjet Paper This paper has been developed specifically for printing with a laser printer. It will possess excellent contrast, sharpness and color. Glossy Photo Paper... Glossy photo paper is to assure the best possible printing performance of card making it does not require special ink jet papers. Iron-on any cotton or cotton/poly blend fabric. Your machine produces letter quality print on most out of your unique...
...machine is a high gloss, thicker paper that produces the look and feel of letter, legal and A4 in contact with different paper types. Inkjet Paper This paper has been developed specifically for printing with a laser printer. It will possess excellent contrast, sharpness and color. Glossy Photo Paper... Glossy photo paper is to assure the best possible printing performance of card making it does not require special ink jet papers. Iron-on any cotton or cotton/poly blend fabric. Your machine produces letter quality print on most out of your unique...
User Guide
Page 35
... at temperatures between 10% and 70%. These instructions provide important information regarding how to use thicker paper than meets the specifications for long periods of ink. n Do not use them . n To avoid smudging caused by fingerprints, handle transparencies and glossy photo paper carefully. n Store unused media flat. Dust and dirt may...
... at temperatures between 10% and 70%. These instructions provide important information regarding how to use thicker paper than meets the specifications for long periods of ink. n Do not use them . n To avoid smudging caused by fingerprints, handle transparencies and glossy photo paper carefully. n Store unused media flat. Dust and dirt may...
User Guide
Page 57
It includes the following topics: Page Managing the Ink Cartridges 44 Tips for the Xerox WorkCentre. Maintenance This section describes maintenance procedures for your ink cartridges 44 Clean Print Head Procedure 44 Wiping the Ink Cartridge Nozzles and Contacts 47 Cleaning the Cartridge Carrier Contacts 48 Replacing the Ink Cartridge 49 Cartridge Alignment 51 The Xerox WorkCentre Control Program 54 Starting the Xerox WorkCentre Control Program 54 Xerox WorkCentre Control Program Tab Menus 55 Cleaning the Scanning Glass 56 Xerox XK35c/25c User Guide 43 5.
It includes the following topics: Page Managing the Ink Cartridges 44 Tips for the Xerox WorkCentre. Maintenance This section describes maintenance procedures for your ink cartridges 44 Clean Print Head Procedure 44 Wiping the Ink Cartridge Nozzles and Contacts 47 Cleaning the Cartridge Carrier Contacts 48 Replacing the Ink Cartridge 49 Cartridge Alignment 51 The Xerox WorkCentre Control Program 54 Starting the Xerox WorkCentre Control Program 54 Xerox WorkCentre Control Program Tab Menus 55 Cleaning the Scanning Glass 56 Xerox XK35c/25c User Guide 43 5.
User Guide
Page 58
... the print nozzles. The problem may be installed in the same environment as the printer. n When characters are clogged. Immediately replace the ink cartridge or store it in the storage unit. The warranty will not print correctly if removed from the machine and left exposed for an ...extended period; n Do not swap the color cartridge with the black cartridge. This procedure cleans the ink cartridge by blocked nozzles on the ink cartridge. n If you have an available print cartridge storage unit, store it in an airtight plastic bag. Then it . ...
... the print nozzles. The problem may be installed in the same environment as the printer. n When characters are clogged. Immediately replace the ink cartridge or store it in the storage unit. The warranty will not print correctly if removed from the machine and left exposed for an ...extended period; n Do not swap the color cartridge with the black cartridge. This procedure cleans the ink cartridge by blocked nozzles on the ink cartridge. n If you have an available print cartridge storage unit, store it in an airtight plastic bag. Then it . ...

User Guide
Page 60
... For Windows 3.1: At system startup, open the Xerox WorkCentre group from your PC: In Windows 95/98 or Windows NT 4.0: 1 Go to Wiping the Ink Cartridge Nozzles and Contacts. 46 Maintenance Refer to Start>Programs>Xerox WorkCentre XK Series. Double-click on LPT1. 3 The ...Control Program window opens. Look for a break in the Automatic Paper Feeder. 2 Select Xerox WorkCentre Control Program on the Xerox WorkCentre Control Program icon. ...
... For Windows 3.1: At system startup, open the Xerox WorkCentre group from your PC: In Windows 95/98 or Windows NT 4.0: 1 Go to Wiping the Ink Cartridge Nozzles and Contacts. 46 Maintenance Refer to Start>Programs>Xerox WorkCentre XK Series. Double-click on LPT1. 3 The ...Control Program window opens. Look for a break in the Automatic Paper Feeder. 2 Select Xerox WorkCentre Control Program on the Xerox WorkCentre Control Program icon. ...

User Guide
Page 61
... the nozzles for about three seconds. The cartridge carrier assembly will move into the open area. 4 Remove the ink cartridge. NOTE: If you are cleaning a color ink cartridge, be caused by dried ink on the top edge of the lid/support. 2 Press Menu until the code U01 appears in the Display.... 3 Press Start. Gently blot and wipe dry. Maintenance 47 Wiping the Ink Cartridge Nozzles and Contacts If print quality does not improve after repeating the Print Head Nozzle procedure, the problem may be especially careful to wipe...
... the nozzles for about three seconds. The cartridge carrier assembly will move into the open area. 4 Remove the ink cartridge. NOTE: If you are cleaning a color ink cartridge, be caused by dried ink on the top edge of the lid/support. 2 Press Menu until the code U01 appears in the Display.... 3 Press Start. Gently blot and wipe dry. Maintenance 47 Wiping the Ink Cartridge Nozzles and Contacts If print quality does not improve after repeating the Print Head Nozzle procedure, the problem may be especially careful to wipe...


