User Guide
Page 3
Electrical Safety Information 1-10 Laser Safety Information 1-11 ...Disposal 1-22 2 Getting Started Unpacking the machine 2-2 Selecting a Location 2-3 Clearance Space 2-3 Installing the Smart Kit ® Print Cartridge 2-4 Loading Paper 2-6 Making Connections 2-8 Switching On the Machine 2-11 Installing Printer Software 2-12 System ...Handling Selecting Print Materials 3-2 Paper Type, Input Sources, and Capacities 3-2 Guidelines for Paper and Special Materials 3-3 Loading Paper 3-5 Using the Paper Tray 3-5 Using the Manual Tray 3-5 Copy Output Tray 3-6 Xerox PE220 Table of ...
Electrical Safety Information 1-10 Laser Safety Information 1-11 ...Disposal 1-22 2 Getting Started Unpacking the machine 2-2 Selecting a Location 2-3 Clearance Space 2-3 Installing the Smart Kit ® Print Cartridge 2-4 Loading Paper 2-6 Making Connections 2-8 Switching On the Machine 2-11 Installing Printer Software 2-12 System ...Handling Selecting Print Materials 3-2 Paper Type, Input Sources, and Capacities 3-2 Guidelines for Paper and Special Materials 3-3 Loading Paper 3-5 Using the Paper Tray 3-5 Using the Manual Tray 3-5 Copy Output Tray 3-6 Xerox PE220 Table of ...

User Guide
Page 6
1 Table of Contents Maintaining the Smart Kit ® Print Cartridge 8-6 Smart Kit ® Print Cartridge Storage 8-6 Expected Cartridge Life 8-6 Redistributing Print Cartridge Toner 8-6 Replacing the Smart Kit ® Print Cartridge 8-7 Setting the Notify Toner Option 8-7 Cleaning the Drum 8-8 Consumables and Replacement Parts 8-9 Replacing the ADF Rubber Pad 8-10 9 Troubleshooting Clearing Document Jams 9-2 Input ... Specifications 10-8 Paper Output Capacity 10-9 Paper Storage Environment 10-9 Envelopes 10-10 Labels 10-11 Transparencies 10-12 Table of Contents-4 Xerox PE220
1 Table of Contents Maintaining the Smart Kit ® Print Cartridge 8-6 Smart Kit ® Print Cartridge Storage 8-6 Expected Cartridge Life 8-6 Redistributing Print Cartridge Toner 8-6 Replacing the Smart Kit ® Print Cartridge 8-7 Setting the Notify Toner Option 8-7 Cleaning the Drum 8-8 Consumables and Replacement Parts 8-9 Replacing the ADF Rubber Pad 8-10 9 Troubleshooting Clearing Document Jams 9-2 Input ... Specifications 10-8 Paper Output Capacity 10-9 Paper Storage Environment 10-9 Envelopes 10-10 Labels 10-11 Transparencies 10-12 Table of Contents-4 Xerox PE220

User Guide
Page 9
Getting to know your machine Component location These are the main components of your machine: Front View 1 Welcome Automatic Document Feeder Document Guides Document Input Tray Document Output Tray Document Cover Document Glass Control Panel Paper Output Extension Paper Input Tray Front Door Output Tray (Face Down) Manual Tray Smart Kit ® Print Cartridge Xerox PE220 1-3
Getting to know your machine Component location These are the main components of your machine: Front View 1 Welcome Automatic Document Feeder Document Guides Document Input Tray Document Output Tray Document Cover Document Glass Control Panel Paper Output Extension Paper Input Tray Front Door Output Tray (Face Down) Manual Tray Smart Kit ® Print Cartridge Xerox PE220 1-3
User Guide
Page 29
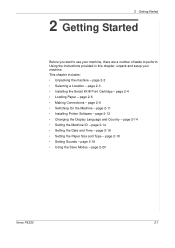
... Connections - page 2-18 • Using the Save Modes - page 2-14 • Setting the Machine ID - page 2-18 • Setting Sounds - page 2-3 • Installing the Smart Kit ® Print Cartridge - page 2-16 • Setting the Paper Size and Type - page 2-11 • Installing Printer Software - Using the instructions provided in this chapter, unpack and setup... - page 2-14 • Setting the Date and Time - 2 Getting Started 2 Getting Started Before you start to use your machine. page 2-4 • Loading Paper - page 2-20 Xerox PE220 2-1
... Connections - page 2-18 • Using the Save Modes - page 2-14 • Setting the Machine ID - page 2-18 • Setting Sounds - page 2-3 • Installing the Smart Kit ® Print Cartridge - page 2-16 • Setting the Paper Size and Type - page 2-11 • Installing Printer Software - Using the instructions provided in this chapter, unpack and setup... - page 2-14 • Setting the Date and Time - 2 Getting Started 2 Getting Started Before you start to use your machine. page 2-4 • Loading Paper - page 2-20 Xerox PE220 2-1
User Guide
Page 32
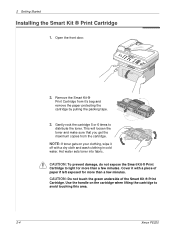
..., wipe it off with a piece of the Smart Kit ® Print Cartridge. Gently rock the cartridge 5 or 6 times to avoid touching this area. 2-4 Xerox PE220 Hot water sets toner into fabric. Remove the Smart Kit ® Print Cartridge from the cartridge. 2 Getting Started Installing the Smart Kit ® Print Cartridge 1. Cover it 's bag and remove the paper protecting the cartridge by pulling the packing tape. 3. Open the...
..., wipe it off with a piece of the Smart Kit ® Print Cartridge. Gently rock the cartridge 5 or 6 times to avoid touching this area. 2-4 Xerox PE220 Hot water sets toner into fabric. Remove the Smart Kit ® Print Cartridge from the cartridge. 2 Getting Started Installing the Smart Kit ® Print Cartridge 1. Cover it 's bag and remove the paper protecting the cartridge by pulling the packing tape. 3. Open the...
User Guide
Page 33
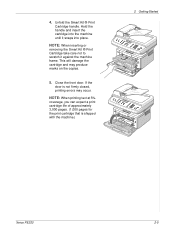
... firmly closed, printing errors may produce marks on the copies. 5. This will damage the cartridge and may occur. NOTE: When inserting or removing the Smart Kit ® Print Cartridge take care not to scratch it snaps into place. If the door is shipped with the machine.) 2 Getting Started Xerox PE220 2-5 Close the front door. Unfold the Smart Kit ® Print Cartridge handle. 4.
... firmly closed, printing errors may produce marks on the copies. 5. This will damage the cartridge and may occur. NOTE: When inserting or removing the Smart Kit ® Print Cartridge take care not to scratch it snaps into place. If the door is shipped with the machine.) 2 Getting Started Xerox PE220 2-5 Close the front door. Unfold the Smart Kit ® Print Cartridge handle. 4.
User Guide
Page 48
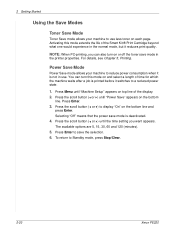
... the selection. 6. To return to Standby mode, press Stop/Clear. 2-20 Xerox PE220 Press the scroll button ( or ) until "Power Save" appears on top line of the Smart Kit ® Print Cartridge beyond what one would experience in the normal mode, but it reduces print quality. 2 Getting Started Using the Save Modes Toner Save Mode Toner Save...
... the selection. 6. To return to Standby mode, press Stop/Clear. 2-20 Xerox PE220 Press the scroll button ( or ) until "Power Save" appears on top line of the Smart Kit ® Print Cartridge beyond what one would experience in the normal mode, but it reduces print quality. 2 Getting Started Using the Save Modes Toner Save Mode Toner Save...

User Guide
Page 149
page 8-2. • Cleaning Your Machine - page 8-6. • Consumables and Replacement Parts - page 8-9. • Replacing the ADF Rubber Pad - 8 Maintenance 8 Maintenance This chapter provides information for maintaining the machine and replacing the print cartridge. This chapter includes: • Clearing the Memory - page 8-3. • Maintaining the Smart Kit ® Print Cartridge - page 8-10. Xerox PE220 8-1
page 8-2. • Cleaning Your Machine - page 8-6. • Consumables and Replacement Parts - page 8-9. • Replacing the ADF Rubber Pad - 8 Maintenance 8 Maintenance This chapter provides information for maintaining the machine and replacing the print cartridge. This chapter includes: • Clearing the Memory - page 8-3. • Maintaining the Smart Kit ® Print Cartridge - page 8-10. Xerox PE220 8-1
User Guide
Page 154
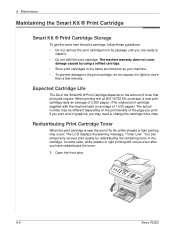
... the Smart Kit ® Print Cartridge Smart Kit ® Print Cartridge Storage To get the most from the print cartridge, follow these guidelines: • Do not remove the print cartridge from its life, white streaks or light printing may need to light for more often. In some case, white streaks or light printing still occurs even after you may occur. Open the front door. 8-6 Xerox PE220
... the Smart Kit ® Print Cartridge Smart Kit ® Print Cartridge Storage To get the most from the print cartridge, follow these guidelines: • Do not remove the print cartridge from its life, white streaks or light printing may need to light for more often. In some case, white streaks or light printing still occurs even after you may occur. Open the front door. 8-6 Xerox PE220

User Guide
Page 155
... to redistribute the toner. At this area. 4. Reinstall the cartridge and close the front door. Replacing the Smart Kit ® Print Cartridge When the display on the cartridge to avoid touching this stage, the print cartridges needs to be preset by your service agent or the dealer...automatically sends a fax to notify them. Xerox PE220 8-7 Hot water sets toner into fabric. The fax number can be replaced. See Installing the Smart Kit ® Print Cartridge on your service agent or dealer when the machine is securely closed , printing error may occur. CAUTION: Do not ...
... to redistribute the toner. At this area. 4. Reinstall the cartridge and close the front door. Replacing the Smart Kit ® Print Cartridge When the display on the cartridge to avoid touching this stage, the print cartridges needs to be preset by your service agent or the dealer...automatically sends a fax to notify them. Xerox PE220 8-7 Hot water sets toner into fabric. The fax number can be replaced. See Installing the Smart Kit ® Print Cartridge on your service agent or dealer when the machine is securely closed , printing error may occur. CAUTION: Do not ...

User Guide
Page 157
Xerox PE220 8-9 We strongly recommend that these items are installed by a trained service professional, except for the ADF rubber pad refer to avoid print quality problems and paper feed problems resulting from worn parts. For the print cartridge refer to Replacing the Smart Kit ® Print Cartridge on page 8-10. The following items should be replaced after you have printed the...
Xerox PE220 8-9 We strongly recommend that these items are installed by a trained service professional, except for the ADF rubber pad refer to avoid print quality problems and paper feed problems resulting from worn parts. For the print cartridge refer to Replacing the Smart Kit ® Print Cartridge on page 8-10. The following items should be replaced after you have printed the...

User Guide
Page 166
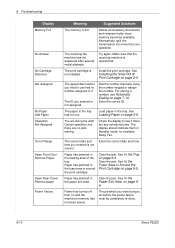
... Comm. The machine has a communication problem. The loaded document has jammed in the tray. • Use only recommended print materials. See Installing the Smart Kit ® Print Cartridge on . Clear the document jam. Front or Rear Cover Open Enter Again Low Heat Error Open Heat Error Over Heat ... wait 10 seconds. If the problem persists, call for service. 9-8 Xerox PE220 If you want to send the pages that the recommended print side of print materials is facing up in the fuser unit. The print cartridge is a problem in the tray. Error CRU Fuse Error Document Jam ...
... Comm. The machine has a communication problem. The loaded document has jammed in the tray. • Use only recommended print materials. See Installing the Smart Kit ® Print Cartridge on . Clear the document jam. Front or Rear Cover Open Enter Again Low Heat Error Open Heat Error Over Heat ... wait 10 seconds. If the problem persists, call for service. 9-8 Xerox PE220 If you want to send the pages that the recommended print side of print materials is facing up in the fuser unit. The print cartridge is a problem in the tray. Error CRU Fuse Error Document Jam ...
User Guide
Page 168
... to do before the power failure must be completely re-done. 9-10 Xerox PE220 Clear the jam. Clear the jam. The job which you entered is not installed. Alternatively, split the transmission into more memory becomes available. See Installing the Smart Kit ® Print Cartridge on page 2-6. For storing a number, see if there are no number...
... to do before the power failure must be completely re-done. 9-10 Xerox PE220 Clear the jam. Clear the jam. The job which you entered is not installed. Alternatively, split the transmission into more memory becomes available. See Installing the Smart Kit ® Print Cartridge on page 2-6. For storing a number, see if there are no number...
User Guide
Page 169
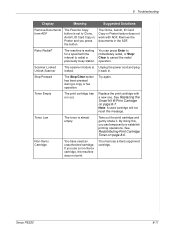
..., ID Card Copy or Poster and you press the button. Xerox PE220 9-11 Toner Empty The print cartridge has run out. Take out the print cartridge and gently shake it back in the ADF. You can temporarily re-establish printing operations. Retry Redial? See Replacing the Smart Kit ® Print Cartridge on page 8-6. The machine is almost empty. Stop Pressed The...
..., ID Card Copy or Poster and you press the button. Xerox PE220 9-11 Toner Empty The print cartridge has run out. Take out the print cartridge and gently shake it back in the ADF. You can temporarily re-establish printing operations. Retry Redial? See Replacing the Smart Kit ® Print Cartridge on page 8-6. The machine is almost empty. Stop Pressed The...

User Guide
Page 171
...If possible, attach the cable to ensure that is working properly and print a job. Check the printer properties to another computer that all of the print settings are correct. Xerox PE220 9-13 The machine is indicating a system error. Clear the paper jam... not installed. The machine may be configured incorrectly. See Installing the Smart Kit ® Print Cartridge on page 5-1. You can also try using a different printer cable. The print cartridge is not receiving power. 9 Troubleshooting Printing Problems Condition Possible cause Suggested solutions The machine does not...
...If possible, attach the cable to ensure that is working properly and print a job. Check the printer properties to another computer that all of the print settings are correct. Xerox PE220 9-13 The machine is indicating a system error. Clear the paper jam... not installed. The machine may be configured incorrectly. See Installing the Smart Kit ® Print Cartridge on page 5-1. You can also try using a different printer cable. The print cartridge is not receiving power. 9 Troubleshooting Printing Problems Condition Possible cause Suggested solutions The machine does not...

User Guide
Page 175
...If the amount of the page at even intervals: The print cartridge may be damaged. Remove the print cartridge and install a new one . Cleaning the Drum on page 8-7. Replacing the Smart Kit ® Print Cartridge on page 8-8. Check the machine's environment: very dry... you use inferior quality paper; Xerox PE220 9-17 Replacing the Smart Kit ® Print Cartridge on page 8-7. Replacing the Smart Kit ® Print Cartridge on page 8-7. Toner smear Clean the inside the print cartridge has probably been scratched. Replacing the Smart Kit ® Print Cartridge on the page: The drum ...
...If the amount of the page at even intervals: The print cartridge may be damaged. Remove the print cartridge and install a new one . Cleaning the Drum on page 8-7. Replacing the Smart Kit ® Print Cartridge on page 8-8. Check the machine's environment: very dry... you use inferior quality paper; Xerox PE220 9-17 Replacing the Smart Kit ® Print Cartridge on page 8-7. Replacing the Smart Kit ® Print Cartridge on page 8-7. Toner smear Clean the inside the print cartridge has probably been scratched. Replacing the Smart Kit ® Print Cartridge on the page: The drum ...

User Guide
Page 177
... Character Voids A Horizontal stripes AaBbCc AaBbCc AaBbCc AaBbCc AaBbCc Curl Clean the inside of the machine. Replacing the Smart Kit ® Print Cartridge on page 8-3. The paper may require repair. Clean the inside of the machine. Xerox PE220 9 Troubleshooting Condition Suggested solutions Back of the machine may require repair. Cleaning the Inside on page 10-6. Paper...
... Character Voids A Horizontal stripes AaBbCc AaBbCc AaBbCc AaBbCc AaBbCc Curl Clean the inside of the machine. Replacing the Smart Kit ® Print Cartridge on page 8-3. The paper may require repair. Clean the inside of the machine. Xerox PE220 9 Troubleshooting Condition Suggested solutions Back of the machine may require repair. Cleaning the Inside on page 10-6. Paper...

User Guide
Page 180
...Suggested solutions Faxes are not received Fax mode should show up on page 3-2. 9-22 Xerox PE220 The print cartridge may be selected. Contact the other machine operator to store the document. Make sure ... not be faulty. The incoming fax has blank spaces or is paper in the user option setting. Replace the print cartridge, referring to see if the display shows "Memory Full". The machine dials a number, but a connection with ... the document is loaded in memory. automatically. Check to Replacing the Smart Kit ® Print Cartridge on the document glass.
...Suggested solutions Faxes are not received Fax mode should show up on page 3-2. 9-22 Xerox PE220 The print cartridge may be selected. Contact the other machine operator to store the document. Make sure ... not be faulty. The incoming fax has blank spaces or is paper in the user option setting. Replace the print cartridge, referring to see if the display shows "Memory Full". The machine dials a number, but a connection with ... the document is loaded in memory. automatically. Check to Replacing the Smart Kit ® Print Cartridge on the document glass.

User Guide
Page 186
...Less than 35 seconds Temperature: 50 oF to 89 oF (10 oC to 32 oC) Humidity: 20 % to 80 % RH LCD 16 characters x 2 lines Smart Kit ® Print Cartridge lifeb 3,000 pages (for starter, 1,000 pages) @ ISO 19752 5 % coverage SET dimension (W x D x H) 17.2 x 14.7x 14.5 in.... (438 x 374 x 368 mm) Weight 10.4 Kg (including consumables) Package weight Paper: 1.2 Kg Plastic: 0.5 Kg Duty cycle (Monthly) Print: Up to 4,200 pages a.Sound Pressure Level, ISO7779 b.The number of pages may be affected by operating environment, printing interval, media type, and media size. 10-2 Xerox PE220
...Less than 35 seconds Temperature: 50 oF to 89 oF (10 oC to 32 oC) Humidity: 20 % to 80 % RH LCD 16 characters x 2 lines Smart Kit ® Print Cartridge lifeb 3,000 pages (for starter, 1,000 pages) @ ISO 19752 5 % coverage SET dimension (W x D x H) 17.2 x 14.7x 14.5 in.... (438 x 374 x 368 mm) Weight 10.4 Kg (including consumables) Package weight Paper: 1.2 Kg Plastic: 0.5 Kg Duty cycle (Monthly) Print: Up to 4,200 pages a.Sound Pressure Level, ISO7779 b.The number of pages may be affected by operating environment, printing interval, media type, and media size. 10-2 Xerox PE220


