System Administration Guide
Page 5
...Network Installation Using Internet Services 7-1 Introduction 7-1 Information Checklist 7-2 Using CentreWare Internet Services 7-3 Introduction 7-3 Network Communication Setup 7-4 Enabling Internet Services 7-5 Configuring the Network 7-6 Ethernet 7-7 AppleTalk 7-8 NetWare 7-11 TCP/IP 7-14 SNMP...Installation Procedure 8-3 Driver Installation 8-4 Workstation Setup 8-7 Test Print or Scan 8-10 9 Scan to Email 9-1 Introduction 9-1 Email Overview 9-2 Information Checklist 9-3 Configuring SMTP 9-4 SMTP IP Address 9-5 Xerox WorkCentre M20i System Administration Guide Page iii
...Network Installation Using Internet Services 7-1 Introduction 7-1 Information Checklist 7-2 Using CentreWare Internet Services 7-3 Introduction 7-3 Network Communication Setup 7-4 Enabling Internet Services 7-5 Configuring the Network 7-6 Ethernet 7-7 AppleTalk 7-8 NetWare 7-11 TCP/IP 7-14 SNMP...Installation Procedure 8-3 Driver Installation 8-4 Workstation Setup 8-7 Test Print or Scan 8-10 9 Scan to Email 9-1 Introduction 9-1 Email Overview 9-2 Information Checklist 9-3 Configuring SMTP 9-4 SMTP IP Address 9-5 Xerox WorkCentre M20i System Administration Guide Page iii
System Administration Guide
Page 6
...LDAP Directory Setup (Internal Address Book 9-18 Primary LDAP IP Address 9-19 Email Setup using Internet Services 9-20 Enabling Internet Services 9-20 LDAP Directory 9-21 SMTP Server 9-22 Email Setup 9-23 ...Setup 10-5 Create a Mailbox 10-5 Delete a Mailbox 10-7 Fax Setup using Internet Services 10-8 Enabling Internet Services 10-8 Fax General Setup 10-9 Fax Phone Book Setup 10-10 Testing ...10-11 11 Administration Tools 11-1 Introduction 11-1 Department Codes 11-2 Creating Departments 11-2 Printing Department Data 11-4 Managing Departments 11-5 Page iv Xerox WorkCentre M20i...
...LDAP Directory Setup (Internal Address Book 9-18 Primary LDAP IP Address 9-19 Email Setup using Internet Services 9-20 Enabling Internet Services 9-20 LDAP Directory 9-21 SMTP Server 9-22 Email Setup 9-23 ...Setup 10-5 Create a Mailbox 10-5 Delete a Mailbox 10-7 Fax Setup using Internet Services 10-8 Enabling Internet Services 10-8 Fax General Setup 10-9 Fax Phone Book Setup 10-10 Testing ...10-11 11 Administration Tools 11-1 Introduction 11-1 Department Codes 11-2 Creating Departments 11-2 Printing Department Data 11-4 Managing Departments 11-5 Page iv Xerox WorkCentre M20i...
System Administration Guide
Page 127
The following information is provided: ¾ Email Overview 9-2 ¾ Information Checklist 9-3 ¾ Configuring SMTP 9-4 ¾ Configuring Email Settings 9-13 ¾ LDAP Directory Setup (Internal Address Book). . 9-18 ¾ Email Setup using Internet Services 9-20 ¾ Email forwarding 9-27 ¾ Test Email Transmission 9-30 Xerox WorkCentre M20i System Administration Guide Page 9-1 9 Scan to Email Introduction This chapter explains how to setup and enable the Email feature of WorkCentre M20i.
The following information is provided: ¾ Email Overview 9-2 ¾ Information Checklist 9-3 ¾ Configuring SMTP 9-4 ¾ Configuring Email Settings 9-13 ¾ LDAP Directory Setup (Internal Address Book). . 9-18 ¾ Email Setup using Internet Services 9-20 ¾ Email forwarding 9-27 ¾ Test Email Transmission 9-30 Xerox WorkCentre M20i System Administration Guide Page 9-1 9 Scan to Email Introduction This chapter explains how to setup and enable the Email feature of WorkCentre M20i.
System Administration Guide
Page 130
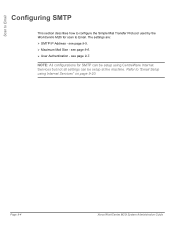
The settings are: ¾ SMTP IP Address - see page 9-7. Scan to Email Configuring SMTP This section describes how to configure the Simple Mail Transfer Protocol used by the WorkCentre M20i for SMTP can be setup at the machine. Page 9-4 Xerox WorkCentre M20i System Administration Guide NOTE: All configurations for scan to "Email Setup using CentreWare Internet Services but not all settings can be setup using Internet Services" on page 9-20. see page 9-6. ¾ User Authentication - Refer to Email. see page 9-5. ¾ Maximum Mail Size -
The settings are: ¾ SMTP IP Address - see page 9-7. Scan to Email Configuring SMTP This section describes how to configure the Simple Mail Transfer Protocol used by the WorkCentre M20i for SMTP can be setup at the machine. Page 9-4 Xerox WorkCentre M20i System Administration Guide NOTE: All configurations for scan to "Email Setup using CentreWare Internet Services but not all settings can be setup using Internet Services" on page 9-20. see page 9-6. ¾ User Authentication - Refer to Email. see page 9-5. ¾ Maximum Mail Size -
System Administration Guide
Page 131
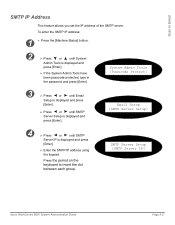
Press the period on the keyboard to Email SMTP IP Address This feature allows you set the IP address of the SMTP server. System Admin Tools [Passcode Protect] 3 ¾ Press or until Email Setup is displayed and press [Enter]. ¾ Press or until SMTP ...using the keypad. Email Setup [SMTP Server Setup] 4 ¾ Press or until SMTP Server Setup is displayed and press [Enter]. ¾ If the System Admin Tools have been passcode protected, type in the password and press [Enter]. SMTP Server Setup [SMTP Server IP] Xerox WorkCentre M20i System Administration Guide...
Press the period on the keyboard to Email SMTP IP Address This feature allows you set the IP address of the SMTP server. System Admin Tools [Passcode Protect] 3 ¾ Press or until Email Setup is displayed and press [Enter]. ¾ Press or until SMTP ...using the keypad. Email Setup [SMTP Server Setup] 4 ¾ Press or until SMTP Server Setup is displayed and press [Enter]. ¾ If the System Admin Tools have been passcode protected, type in the password and press [Enter]. SMTP Server Setup [SMTP Server IP] Xerox WorkCentre M20i System Administration Guide...
System Administration Guide
Page 132
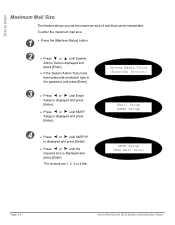
...SMTP Setup [Max Mail Size] Page 9-6 Xerox WorkCentre M20i System Administration Guide To enter the maximum mail size: 1 ¾ Press the [Machine Status] button. 2 ¾ Press or until System Admin Tools is displayed and press [Enter]. The choices are 1, 2, 3 or 4 Mb. Scan to Email ...be transmitted. System Admin Tools [Passcode Protect] 3 ¾ Press or until Email Setup is displayed and press [Enter]. ¾ Press or until the required size is displayed and press [Enter]. Email Setup [SMTP Setup] 4 ¾ Press or until SMTP IP is displayed and press [Enter...
...SMTP Setup [Max Mail Size] Page 9-6 Xerox WorkCentre M20i System Administration Guide To enter the maximum mail size: 1 ¾ Press the [Machine Status] button. 2 ¾ Press or until System Admin Tools is displayed and press [Enter]. The choices are 1, 2, 3 or 4 Mb. Scan to Email ...be transmitted. System Admin Tools [Passcode Protect] 3 ¾ Press or until Email Setup is displayed and press [Enter]. ¾ Press or until the required size is displayed and press [Enter]. Email Setup [SMTP Setup] 4 ¾ Press or until SMTP IP is displayed and press [Enter...
System Administration Guide
Page 133
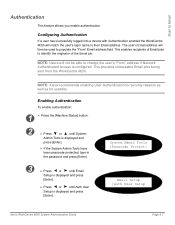
... field. System Admin Tools [Passcode Protect] Email Setup [Auth User Setup Xerox WorkCentre M20i System Administration Guide Page 9-7 This enables recipients of the Email job. Scan to identify the originator of Email jobs to Email Authentication This feature allows you enable authentication. This prevents untraceable Email jobs being sent from the WorkCentre M20i. The user's Email address will match the user's login name...
... field. System Admin Tools [Passcode Protect] Email Setup [Auth User Setup Xerox WorkCentre M20i System Administration Guide Page 9-7 This enables recipients of the Email job. Scan to identify the originator of Email jobs to Email Authentication This feature allows you enable authentication. This prevents untraceable Email jobs being sent from the WorkCentre M20i. The user's Email address will match the user's login name...

System Administration Guide
Page 134
Otherwise choose Disable and press [Enter]. Auth User Setup [User Auth] User Auth [Enable] Page 9-8 Xerox WorkCentre M20i System Administration Guide Scan to Email 4 ¾ Press or until User Auth is displayed and press [Enter]. 5 ¾ If you want to enable User Authentication, press or until Enable is displayed and press [Enter].
Otherwise choose Disable and press [Enter]. Auth User Setup [User Auth] User Auth [Enable] Page 9-8 Xerox WorkCentre M20i System Administration Guide Scan to Email 4 ¾ Press or until User Auth is displayed and press [Enter]. 5 ¾ If you want to enable User Authentication, press or until Enable is displayed and press [Enter].
System Administration Guide
Page 135
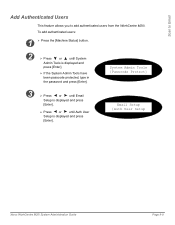
... Authenticated Users This feature allows you to add authenticated users from the WorkCentre M20i. Email Setup [Auth User Setup Xerox WorkCentre M20i System Administration Guide Page 9-9 System Admin Tools [Passcode Protect] 3 ¾ Press or until Email Setup is displayed and press [Enter]. ¾ Press or until System Admin Tools is displayed and press [Enter]. To add authenticated users: 1 ¾ Press...
... Authenticated Users This feature allows you to add authenticated users from the WorkCentre M20i. Email Setup [Auth User Setup Xerox WorkCentre M20i System Administration Guide Page 9-9 System Admin Tools [Passcode Protect] 3 ¾ Press or until Email Setup is displayed and press [Enter]. ¾ Press or until System Admin Tools is displayed and press [Enter]. To add authenticated users: 1 ¾ Press...
System Administration Guide
Page 137
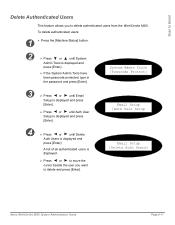
... to move the cursor beside the user you to delete and press [Enter]. Email Setup [Delete Auth Users] Xerox WorkCentre M20i System Administration Guide Page 9-11 Scan to Email Delete Authenticated Users This feature allows you want to delete authenticated users from the WorkCentre M20i. To delete authenticated users: 1 ¾ Press the [Machine Status] button. 2 ¾ Press or...
... to move the cursor beside the user you to delete and press [Enter]. Email Setup [Delete Auth Users] Xerox WorkCentre M20i System Administration Guide Page 9-11 Scan to Email Delete Authenticated Users This feature allows you want to delete authenticated users from the WorkCentre M20i. To delete authenticated users: 1 ¾ Press the [Machine Status] button. 2 ¾ Press or...
System Administration Guide
Page 139
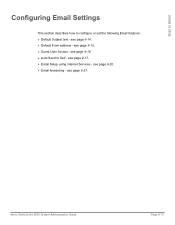
see page 9-20. ¾ Email forwarding - see page 9-27. see page 9-15. ¾ Guest User Access - Xerox WorkCentre M20i System Administration Guide Page 9-13 see page 9-17. ¾ Email Setup using Internet Services - see page 9-14. ¾ Default From address - Scan to Email Configuring Email Settings This section describes how to Self - see page 9-16. ¾ Auto Send to configure or set the following Email features: ¾ Default Subject text -
see page 9-20. ¾ Email forwarding - see page 9-27. see page 9-15. ¾ Guest User Access - Xerox WorkCentre M20i System Administration Guide Page 9-13 see page 9-17. ¾ Email Setup using Internet Services - see page 9-14. ¾ Default From address - Scan to Email Configuring Email Settings This section describes how to Self - see page 9-16. ¾ Auto Send to configure or set the following Email features: ¾ Default Subject text -
System Administration Guide
Page 140
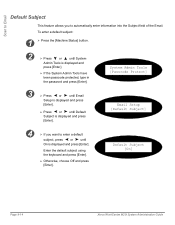
...; If the System Admin Tools have been passcode protected, type in the password and press [Enter]. Default Subject [On] Page 9-14 Xerox WorkCentre M20i System Administration Guide System Admin Tools [Passcode Protect] 3 ¾ Press or until Email Setup is displayed and press [Enter]. ¾ Press or until On is displayed and press [Enter]. Scan to...
...; If the System Admin Tools have been passcode protected, type in the password and press [Enter]. Default Subject [On] Page 9-14 Xerox WorkCentre M20i System Administration Guide System Admin Tools [Passcode Protect] 3 ¾ Press or until Email Setup is displayed and press [Enter]. ¾ Press or until On is displayed and press [Enter]. Scan to...
System Administration Guide
Page 141
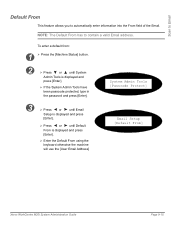
...; Press or until Default From is displayed and press [Enter]. ¾ Enter the Default From using the keyboard otherwise the machine will use the [User Email Address] System Admin Tools [Passcode Protect] Email Setup [Default From] Xerox WorkCentre M20i System Administration Guide Page 9-15 Scan to Email Default From This feature allows you to contain a valid...
...; Press or until Default From is displayed and press [Enter]. ¾ Enter the Default From using the keyboard otherwise the machine will use the [User Email Address] System Admin Tools [Passcode Protect] Email Setup [Default From] Xerox WorkCentre M20i System Administration Guide Page 9-15 Scan to Email Default From This feature allows you to contain a valid...

System Administration Guide
Page 142
Guest User Access [On] Page 9-16 Xerox WorkCentre M20i System Administration Guide Enter the Guest User Login ID and password using the keyboard...System Admin Tools have been passcode protected, type in the password and press [Enter]. 3 ¾ Press or until Email Setup is displayed and press [Enter]. ¾ Press or until On is displayed and press [Enter]. NOTE: "Guest" is...valid Default From address has to have been enabled. System Admin Tools [Passcode Protect] Email Setup [Guest User Access] 4 ¾ If you to permit a guest user to have been entered and Authentication ...
Guest User Access [On] Page 9-16 Xerox WorkCentre M20i System Administration Guide Enter the Guest User Login ID and password using the keyboard...System Admin Tools have been passcode protected, type in the password and press [Enter]. 3 ¾ Press or until Email Setup is displayed and press [Enter]. ¾ Press or until On is displayed and press [Enter]. NOTE: "Guest" is...valid Default From address has to have been enabled. System Admin Tools [Passcode Protect] Email Setup [Guest User Access] 4 ¾ If you to permit a guest user to have been entered and Authentication ...
System Administration Guide
Page 143
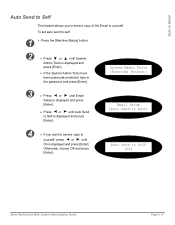
Otherwise, choose Off and press [Enter]. Scan to Email Auto Send to Self This feature allows you want to send a copy to yourself, press or until Auto Send to Self is displayed and press [... Tools is displayed and press [Enter]. System Admin Tools [Passcode Protect] 3 ¾ Press or until Email Setup is displayed and press [Enter]. ¾ Press or until On is displayed and press [Enter]. Email Setup [Auto Send to Self] 4 ¾ If you to send a copy of the Email to Self [On] Xerox WorkCentre M20i System Administration Guide Page 9-17
Otherwise, choose Off and press [Enter]. Scan to Email Auto Send to Self This feature allows you want to send a copy to yourself, press or until Auto Send to Self is displayed and press [... Tools is displayed and press [Enter]. System Admin Tools [Passcode Protect] 3 ¾ Press or until Email Setup is displayed and press [Enter]. ¾ Press or until On is displayed and press [Enter]. Email Setup [Auto Send to Self] 4 ¾ If you to send a copy of the Email to Self [On] Xerox WorkCentre M20i System Administration Guide Page 9-17
System Administration Guide
Page 144
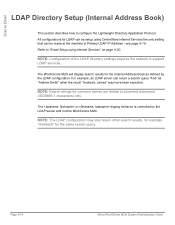
... is controlled by the LDAP configuration. Page 9-18 Xerox WorkCentre M20i System Administration Guide NOTE: Configuration of the LDAP directory settings requires the network to accented characters (ISO8859-1 characters) only. see page 9-19. Scan to Email LDAP Directory Setup (Internal Address Book) This section describes how to "Email Setup using CentreWare Internet Services the only setting that...
... is controlled by the LDAP configuration. Page 9-18 Xerox WorkCentre M20i System Administration Guide NOTE: Configuration of the LDAP directory settings requires the network to accented characters (ISO8859-1 characters) only. see page 9-19. Scan to Email LDAP Directory Setup (Internal Address Book) This section describes how to "Email Setup using CentreWare Internet Services the only setting that...
System Administration Guide
Page 145
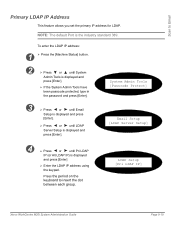
System Admin Tools [Passcode Protect] Email Setup [LDAP Server Setup] 4 ¾ Press or until LDAP Server Setup is displayed and press [Enter]. Scan to insert the dot between each group. LDAP Setup [Pri LDAP IP] Xerox WorkCentre M20i System Administration Guide Page 9-19 NOTE: The default Port is displayed and press ...190; If the System Admin Tools have been passcode protected, type in the password and press [Enter]. 3 ¾ Press or until Email Setup is displayed and press [Enter]. ¾ Press or until Pri LDAP IP (or Alt LDAP IP) is the industry standard 389. ...
System Admin Tools [Passcode Protect] Email Setup [LDAP Server Setup] 4 ¾ Press or until LDAP Server Setup is displayed and press [Enter]. Scan to insert the dot between each group. LDAP Setup [Pri LDAP IP] Xerox WorkCentre M20i System Administration Guide Page 9-19 NOTE: The default Port is displayed and press ...190; If the System Admin Tools have been passcode protected, type in the password and press [Enter]. 3 ¾ Press or until Email Setup is displayed and press [Enter]. ¾ Press or until Pri LDAP IP (or Alt LDAP IP) is the industry standard 389. ...
System Administration Guide
Page 146
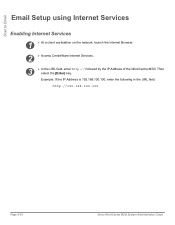
Scan to Email Email Setup using Internet Services Enabling Internet Services 1 ¾ At a client workstation on the network, launch the Internet Browser. 2 ¾ Access CentreWare Internet Services. 3 ¾ In the URL field, enter http:// followed by the IP Address of the WorkCentre M20i. Example: If the IP Address is 192.168.100.100, enter the following in the URL field: http://192.168.100.100 Page 9-20 Xerox WorkCentre M20i System Administration Guide Then select the [Enter] key.
Scan to Email Email Setup using Internet Services Enabling Internet Services 1 ¾ At a client workstation on the network, launch the Internet Browser. 2 ¾ Access CentreWare Internet Services. 3 ¾ In the URL field, enter http:// followed by the IP Address of the WorkCentre M20i. Example: If the IP Address is 192.168.100.100, enter the following in the URL field: http://192.168.100.100 Page 9-20 Xerox WorkCentre M20i System Administration Guide Then select the [Enter] key.
System Administration Guide
Page 149
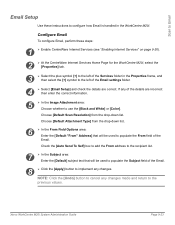
...used to populate the From field of the details are correct. Xerox WorkCentre M20i System Administration Guide Page 9-23 Choose [Default Scan Resolution] from the drop-down list. If any changes. Scan to Email Email Setup Use these steps: 1 ¾ Enable CentreWare Internet Services ...(see "Enabling Internet Services" on page 9-20). 2 ¾ At the CentreWare Internet Services Home Page for the WorkCentre M20i, select the [Properties] tab. 3 ¾...
...used to populate the From field of the details are correct. Xerox WorkCentre M20i System Administration Guide Page 9-23 Choose [Default Scan Resolution] from the drop-down list. If any changes. Scan to Email Email Setup Use these steps: 1 ¾ Enable CentreWare Internet Services ...(see "Enabling Internet Services" on page 9-20). 2 ¾ At the CentreWare Internet Services Home Page for the WorkCentre M20i, select the [Properties] tab. 3 ¾...
System Administration Guide
Page 216
... Macro Installation 11-30 Printer Definition 11-23 Printer Status 11-21 Index-ii Xerox WorkCentre M20i System Administration Guide Counters Checking 11-26 trolCentre 11-35 Email Setup 9-23 Downloading PostScript Fonts using ControlCentre Enabling 7-5 11-36 Enabling Internet Services 9-... 11-18 Ethernet Configuration 7-7 Drum Replacement 11-17 Fax General Setup 10-9 Fax Phone Book Setup 10-10 E General Settings 11-27 Email Forwarding 9-27 Email Setup 9-23 Energy Star 1-18 Ethernet Configuration 7-7 Ethernet Port Setup 2-3 F Group Address Book 9-26 HTTP 7-26 HTTP Configuration ...
... Macro Installation 11-30 Printer Definition 11-23 Printer Status 11-21 Index-ii Xerox WorkCentre M20i System Administration Guide Counters Checking 11-26 trolCentre 11-35 Email Setup 9-23 Downloading PostScript Fonts using ControlCentre Enabling 7-5 11-36 Enabling Internet Services 9-... 11-18 Ethernet Configuration 7-7 Drum Replacement 11-17 Fax General Setup 10-9 Fax Phone Book Setup 10-10 E General Settings 11-27 Email Forwarding 9-27 Email Setup 9-23 Energy Star 1-18 Ethernet Configuration 7-7 Ethernet Port Setup 2-3 F Group Address Book 9-26 HTTP 7-26 HTTP Configuration ...


