Xerox M20I Support Question
Xerox M20I Support Question
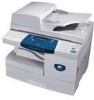
Find answers below for this question about Xerox M20I - WorkCentre B/W Laser.Need a Xerox M20I manual? We have 4 online manuals for this item!
Question posted by Donrab on May 15th, 2014
How To Set Up Email On Workcentre M20i At Home
The person who posted this question about this Xerox product did not include a detailed explanation. Please use the "Request More Information" button to the right if more details would help you to answer this question.
Current Answers
Answer #1: Posted by freginold on June 14th, 2014 5:03 AM
freginold

Member since:
December 20th, 2011 Points: 23,254,995

Member since:
December 20th, 2011 Points: 23,254,995
Hi, you can find instructions for setting up scanning to email starting on page 9-1 of the M20i's system administration guide.
Related Xerox M20I Manual Pages
User Guide - Page 85
...Color Original
Resolution
¾ Using the Navigation Keys, select the setting required for Email jobs are no documents in the rear left corner.
¾... Panel.
¾ Basic features available for the feature and press [Enter]. Xerox CopyCentre C20, WorkCentre M20 and WorkCentre M20i User Guide
Page 5-3
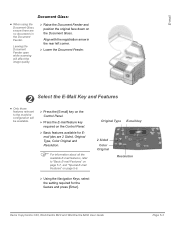
E-mail
Document Glass:
z When using the Document Glass, ensure there are...
User Guide - Page 95
..., except you have been entered, press [Enter]. Xerox CopyCentre C20, WorkCentre M20 and WorkCentre M20i User Guide
Page 5-13 A list of E-mail addresses which match the characters entered. Then press [Enter].
4 ¾ Use [Add] to activate the job.
The machine will search for Email addresses on the LDAP server which match the characters entered...
System Administration Guide - Page 6
...Delete Authenticated Users 9-11
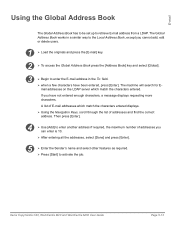
Configuring Email Settings 9-13 Default Subject 9-14 Default From 9-15 Guest User Access 9-16 Auto Send to Self 9-17
LDAP Directory Setup (Internal Address Book 9-18 Primary LDAP IP Address 9-19
Email Setup using Internet Services 9-20... 11-2 Printing Department Data 11-4 Managing Departments 11-5
Page iv
Xerox WorkCentre M20i System Administration Guide
System Administration Guide - Page 7
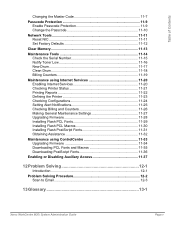
... 11-9 Enable Passcode Protection 11-9 Change the Passcode 11-10
Network Tools 11-11 Reset NIC 11-11 Set Factory Defaults 11-12
Clear Memory 11-13
Maintenance Tools 11-14 Check the Serial Number 11-15 Notify Toner...-37
12 Problem Solving 12-1
Introduction 12-1
Problem Solving Procedure 12-2 Scan to Email 12-3
13 Glossary 13-1
Xerox WorkCentre M20i System Administration Guide
Page v
System Administration Guide - Page 65

...WorkCentre M20i to install the driver.
4
¾ Insert the CD ROM with Test Print on a home...is the host name of the WorkCentre M20i registered with a message regarding the...[Next] again and the WorkCentre M20i driver will be loaded onto...choice.
5 ¾ Continue with the WorkCentre M20i drivers into the workstation and select [... address of the WorkCentre M20i and "printer-host-name" is ...
System Administration Guide - Page 95
...
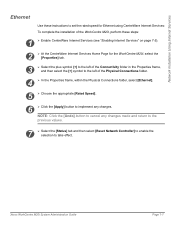
Ethernet
Use these instructions to set the rated speed for Ethernet using CentreWare Internet Services: To complete the installation of the WorkCentre M20i, perform these steps:
1
¾ Enable CentreWare Internet Services (see "Enabling Internet Services" on page 7-5).
2
¾ At the CentreWare Internet Services Home Page for the WorkCentre M20i, select the [Properties] tab.
3
¾...
System Administration Guide - Page 96
...There are two stages required to install the device on page 7-5).
2
¾ At the CentreWare Internet Services Home Page for the WorkCentre M20i, select the [Properties] tab.
4
... select [AppleTalk].
6
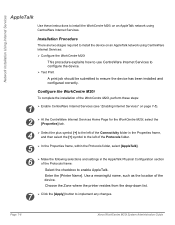
¾ Make the following selections and settings in the AppleTalk Physical Configuration section of the device. Network Installation Using Internet Services
AppleTalk
Use these steps:
1
...
System Administration Guide - Page 100

...name. Page 7-12
Xerox WorkCentre M20i System Administration Guide Network Installation Using Internet Services
6
¾ Obtain and record the following selections and settings in the Properties frame, ...; At the CentreWare Internet Services Home Page for the WorkCentre M20i, select the [Properties] tab.
3
¾ Select the plus symbol [+] to the left of the device. Enter a value from the ...
System Administration Guide - Page 102

... Physical Connection field, Ethernet will be submitted to install the device on page 7-5).
2
¾ At the CentreWare Internet Services Home Page for the device will have been setup when completing the Enabling CentreWare Internet Services section. Configure the WorkCentre M20i
NOTE: The TCP/IP settings for the WorkCentre M20i, select the [Properties] tab.
3
¾ Select the plus symbol...
System Administration Guide - Page 105
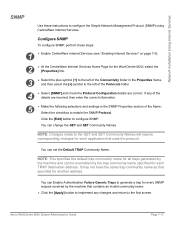
... to implement any of the frame: Select the checkbox to the GET and SET Community Names will require corresponding changes for each application that uses the protocol.
If...Home Page for every SNMP request received by the trap community name specified for each TRAP destination address.
You can be overridden by the machine that specified fro another address.
Xerox WorkCentre M20i...
System Administration Guide - Page 107
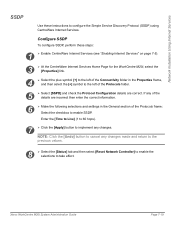
... Services Home Page for the WorkCentre M20i, select... the [Properties] link.
4
¾ Select the plus symbol [+] to the left of the Connectivity folder in the General section of the Protocols folder.
5
¾ Select [SSPD] and check the Protocol Configuration details are incorrect then enter the correct information.
6
¾ Make the following selections and settings...
System Administration Guide - Page 108
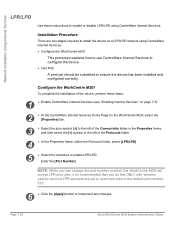
...device has been installed and configured correctly.
Installation Procedure
There are set to send print jobs to the default port number, 515.
6 ¾ Click the [Apply] button to enable or disable LPR/LPD using CentreWare Internet Services:
¾ Configure the WorkCentre M20i... the device on page 7-5).
2
¾ At the CentreWare Internet Services Home Page for the WorkCentre M20i, select...
System Administration Guide - Page 112

... CentreWare Internet Services (see "Enabling Internet Services" on page 7-5).
2
¾ At the CentreWare Internet Services Home Page for the device will have been setup when completing the Enabling CentreWare Internet Services section. NOTE: The HTTP settings for the WorkCentre M20i, select the [Properties] tab.
3
¾ Select the plus symbol [+] to the left of the Connectivity...
System Administration Guide - Page 114

...] to enable the selections to 99. Page 7-26
Xerox WorkCentre M20i System Administration Guide Network Installation Using Internet Services
HTTP
Use these steps:
1
¾ Enable CentreWare Internet Services (see "Enabling Internet Services" on page 7-5).
3
¾ At the CentreWare Internet Services Home Page for the device will have been setup when completing the Enabling CentreWare...
System Administration Guide - Page 149
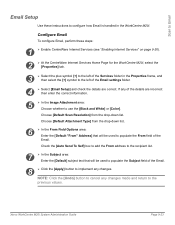
... Internet Services (see "Enabling Internet Services" on page 9-20).
2
¾ At the CentreWare Internet Services Home Page for the WorkCentre M20i, select the [Properties] tab.
3
¾ Select the plus symbol [+] to the left of the Email settings folder.
4
¾ Select [Email Setup] and check the details are incorrect then enter the correct information.
5
¾ In the...
System Administration Guide - Page 150
...Email
User Authentication
Use these steps:
1
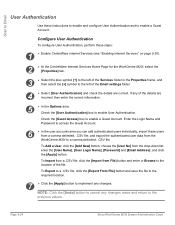
¾ Enable CentreWare Internet Services (see "Enabling Internet Services" on page 9-20).
2
¾ At the CentreWare Internet Services Home Page for the WorkCentre M20i... from the
WorkCentre M20i to enable User Authentication. enter the [User Name], [User Login Name], [Password] and [Email Address];
If any of the Email settings folder.
4...
System Administration Guide - Page 151
... [Name] and [Email Address];
and click the [Apply] button. Xerox WorkCentre M20i System Administration Guide
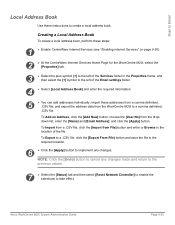
Page 9-25 Creating a Local Address Book
To create a local address book, perform these steps:
1
¾ Enable CentreWare Internet Services (see "Enabling Internet Services" on page 9-20).
2
¾ At the CentreWare Internet Services Home Page for the WorkCentre M20i, select the...
System Administration Guide - Page 152
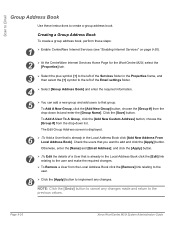
... Address Book click [Add New Address From Local Address Book]. Scan to Email
Group Address Book
Use these steps:
1
¾ Enable CentreWare Internet Services (see "Enabling Internet Services" on page 9-20).
2
¾ At the CentreWare Internet Services Home Page for the WorkCentre M20i, select the [Properties] tab.
3
¾ Select the plus symbol [+] to the...
System Administration Guide - Page 193
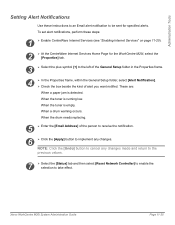
..." on page 11-20).
2
¾ At the CentreWare Internet Services Home Page for specified alerts. When the toner is detected.
Xerox WorkCentre M20i System Administration Guide
Page 11-25 To set alert notifications, perform these instructions to an Email alert notification to be sent for the WorkCentre M20i, select the [Properties] tab.
3
¾ Select the plus symbol...
System Administration Guide - Page 209
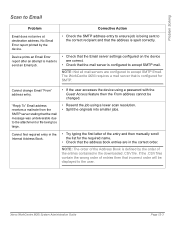
... order. Problem Solving
Scan to accept SMTP Email. Cannot change Email "From" address entry.
• If the user accesses the device using a lower scan resolution. • Split the originals into smaller jobs.
NOTE: The order of the entry and then manually scroll the list for SMTP. Xerox WorkCentre M20i System Administration Guide
Page 12-3
Cannot...
Similar Questions


How To Set The Time Out On A Xerox Workcentre M20i
(Posted by fano 10 years ago)

How To Set Up Email On A Xerox Workcentre M20i
(Posted by jacteach 10 years ago)

How To Set Up Emailing Through My Workcentre M20i?
(Posted by shukijorda 10 years ago)