WorkCentre M15/M15i User Guide
Page 3
Table of Modes 3-10 Xerox WorkCentre M15/M15i User Guide Page i Canada 1-17 Environmental Compliance 1-18 2 Getting Started 2-1 Unpacking 2-2 Making Connections 2-4 Installing Drum and Toner Cartridges 2-6 Loading Paper 2-8 Setting the Language (M15 only 2-11 Setting the Language and Country (M15i only 2-12 Setting the Local ID and Name (M15i Only 2-13 Setting the Date and Time (M15i Only 2-15 Installing...
Table of Modes 3-10 Xerox WorkCentre M15/M15i User Guide Page i Canada 1-17 Environmental Compliance 1-18 2 Getting Started 2-1 Unpacking 2-2 Making Connections 2-4 Installing Drum and Toner Cartridges 2-6 Loading Paper 2-8 Setting the Language (M15 only 2-11 Setting the Language and Country (M15i only 2-12 Setting the Local ID and Name (M15i Only 2-13 Setting the Date and Time (M15i Only 2-15 Installing...
WorkCentre M15/M15i User Guide
Page 25
2 Getting Started Ø Unpacking 2-2 Ø Making Connections 2-4 Ø Installing Drum and Toner Cartridges 2-6 Ø Loading Paper 2-8 Ø Setting the Language (M15 only 2-11 Ø Setting the Language and Country (M15i only) . . 2-12 Ø Setting the Local ID and Name (M15i Only) . . . . 2-13 Ø Setting the Date and Time (M15i Only 2-15 Ø Installing Software 2-16 Xerox WorkCentre M15/M15i User Guide Page 2-1
2 Getting Started Ø Unpacking 2-2 Ø Making Connections 2-4 Ø Installing Drum and Toner Cartridges 2-6 Ø Loading Paper 2-8 Ø Setting the Language (M15 only 2-11 Ø Setting the Language and Country (M15i only) . . 2-12 Ø Setting the Local ID and Name (M15i Only) . . . . 2-13 Ø Setting the Date and Time (M15i Only 2-15 Ø Installing Software 2-16 Xerox WorkCentre M15/M15i User Guide Page 2-1
WorkCentre M15/M15i User Guide
Page 27
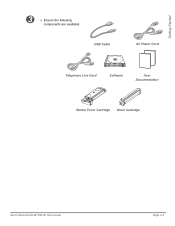
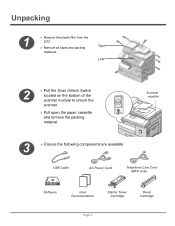
Getting Started 3 Ø Ensure the following components are available: USB Cable AC Power Cord Telephone Line Cord Software User Documentation Starter Toner Cartridge Drum Cartridge Xerox WorkCentre M15/M15i User Guide Page 2-3
Getting Started 3 Ø Ensure the following components are available: USB Cable AC Power Cord Telephone Line Cord Software User Documentation Starter Toner Cartridge Drum Cartridge Xerox WorkCentre M15/M15i User Guide Page 2-3
WorkCentre M15/M15i User Guide
Page 30
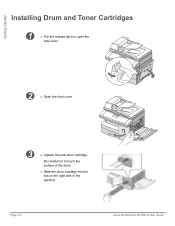
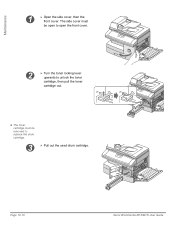
Be careful not to open the side cover. 2 Ø Open the front cover. 3 Ø Unpack the new drum cartridge. Page 2-6 Xerox WorkCentre M15/M15i User Guide Getting Started Installing Drum and Toner Cartridges 1 Ø Pull the release latch to touch the surface of the drum. Ø Slide the drum cartridge into the slot on the right side of the opening.
Be careful not to open the side cover. 2 Ø Open the front cover. 3 Ø Unpack the new drum cartridge. Page 2-6 Xerox WorkCentre M15/M15i User Guide Getting Started Installing Drum and Toner Cartridges 1 Ø Pull the release latch to touch the surface of the drum. Ø Slide the drum cartridge into the slot on the right side of the opening.
WorkCentre M15/M15i User Guide
Page 133
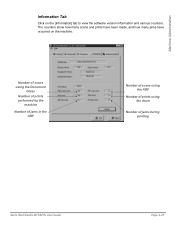
Machine Administration Information Tab Click on the machine. The counters show how many scans and prints have been made, and how many jams have occurred on the [Information] tab to view the software version information and various counters. Number of scans using the Document Glass Number of prints performed by the machine Number of jams in the ADF Number of scans using the ADF Number of prints using the drum Number of jams during printing Xerox WorkCentre M15/M15i User Guide Page 9-25
Machine Administration Information Tab Click on the machine. The counters show how many scans and prints have been made, and how many jams have occurred on the [Information] tab to view the software version information and various counters. Number of scans using the Document Glass Number of prints performed by the machine Number of jams in the ADF Number of scans using the ADF Number of prints using the drum Number of jams during printing Xerox WorkCentre M15/M15i User Guide Page 9-25
WorkCentre M15/M15i User Guide
Page 138
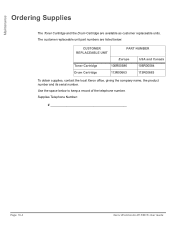
Supplies Telephone Number: Page 10-4 Xerox WorkCentre M15/M15i User Guide Use the space below : CUSTOMER REPLACEABLE UNIT PART NUMBER Europe USA and Canada Toner Cartridge 106R00586 106R00584 Drum Cartridge 113R00663 113R00663 To obtain supplies, contact the local Xerox office, giving the company name, the product number and its serial number. Maintenance Ordering Supplies The Toner Cartridge and the Drum Cartridge are listed below to keep a record of the telephone number. The customer replaceable unit part numbers are available as customer replaceable units.
Supplies Telephone Number: Page 10-4 Xerox WorkCentre M15/M15i User Guide Use the space below : CUSTOMER REPLACEABLE UNIT PART NUMBER Europe USA and Canada Toner Cartridge 106R00586 106R00584 Drum Cartridge 113R00663 113R00663 To obtain supplies, contact the local Xerox office, giving the company name, the product number and its serial number. Maintenance Ordering Supplies The Toner Cartridge and the Drum Cartridge are listed below to keep a record of the telephone number. The customer replaceable unit part numbers are available as customer replaceable units.
WorkCentre M15/M15i User Guide
Page 143
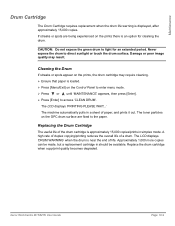
...then press [Enter]. Ø Press [Enter] to light for cleaning the drum. Replacing the Drum Cartridge The useful life of life. The LCD displays 'DRUM WARNING' when the drum is near the end of the drum cartridge is an option for an extended period. Damage or poor image quality ...15,000 copies. A high rate of duplex copying/printing reduces the overall life of paper, and prints it out. Xerox WorkCentre M15/M15i User Guide Page 10-9 Maintenance Drum Cartridge The Drum Cartridge requires replacement when the drum life warning is loaded. Ø Press [Menu/Exit] on the prints, the...
...then press [Enter]. Ø Press [Enter] to light for cleaning the drum. Replacing the Drum Cartridge The useful life of life. The LCD displays 'DRUM WARNING' when the drum is near the end of the drum cartridge is an option for an extended period. Damage or poor image quality ...15,000 copies. A high rate of duplex copying/printing reduces the overall life of paper, and prints it out. Xerox WorkCentre M15/M15i User Guide Page 10-9 Maintenance Drum Cartridge The Drum Cartridge requires replacement when the drum life warning is loaded. Ø Press [Menu/Exit] on the prints, the...
WorkCentre M15/M15i User Guide
Page 144
The side cover must be open to open the front cover. 2 Ø Turn the toner locking lever upwards to replace the drum cartridge. 3 Ø Pull out the used drum cartridge. Page 10-10 Xerox WorkCentre M15/M15i User Guide l The toner cartridge must be removed to unlock the toner cartridge, then pull the toner cartridge out. Maintenance 1 Ø Open the side cover, then the front cover.
The side cover must be open to open the front cover. 2 Ø Turn the toner locking lever upwards to replace the drum cartridge. 3 Ø Pull out the used drum cartridge. Page 10-10 Xerox WorkCentre M15/M15i User Guide l The toner cartridge must be removed to unlock the toner cartridge, then pull the toner cartridge out. Maintenance 1 Ø Open the side cover, then the front cover.
WorkCentre M15/M15i User Guide
Page 145
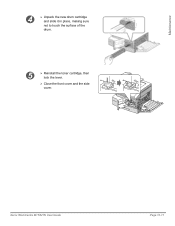
Maintenance 4 Ø Unpack the new drum cartridge and slide it in place, making sure not to touch the surface of the drum. 5 Ø Reinstall the toner cartridge, then lock the lever. Ø Close the front cover and the side cover. Xerox WorkCentre M15/M15i User Guide Page 10-11
Maintenance 4 Ø Unpack the new drum cartridge and slide it in place, making sure not to touch the surface of the drum. 5 Ø Reinstall the toner cartridge, then lock the lever. Ø Close the front cover and the side cover. Xerox WorkCentre M15/M15i User Guide Page 10-11
WorkCentre M15/M15i User Guide
Page 146
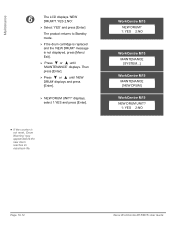
Then press [Enter]. Ø Press or until 'MAINTENANCE' displays. message is not reset, 'Drum Warning' may appear before the new drum reaches its maximum life. WorkCentre M15 NEW DRUM? 1: YES 2:NO WorkCentre M15 MAINTENANCE [SYSTEM...] WorkCentre M15 MAINTENANCE [NEW DRUM] WorkCentre M15 NEW DRUM UNIT? 1: YES 2:NO Page 10-12 Xerox WorkCentre M15/M15i User Guide l If the counter is not displayed, press [Menu/ Exit]. Ø Press or...
Then press [Enter]. Ø Press or until 'MAINTENANCE' displays. message is not reset, 'Drum Warning' may appear before the new drum reaches its maximum life. WorkCentre M15 NEW DRUM? 1: YES 2:NO WorkCentre M15 MAINTENANCE [SYSTEM...] WorkCentre M15 MAINTENANCE [NEW DRUM] WorkCentre M15 NEW DRUM UNIT? 1: YES 2:NO Page 10-12 Xerox WorkCentre M15/M15i User Guide l If the counter is not displayed, press [Menu/ Exit]. Ø Press or...
WorkCentre M15/M15i User Guide
Page 152
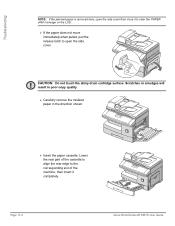
... or smudges will result in poor copy quality Ø Carefully remove the misfeed paper in the direction shown. Ø Insert the paper cassette. Page 11-6 Xerox WorkCentre M15/M15i User Guide Lower the rear part of the cassette to align the rear edge to the corresponding slot of the machine, then insert it to... does not move immediately when pulled, pull the release latch to open the side cover then close it completely. CAUTION: Do not touch the shiny drum cartridge surface.
... or smudges will result in poor copy quality Ø Carefully remove the misfeed paper in the direction shown. Ø Insert the paper cassette. Page 11-6 Xerox WorkCentre M15/M15i User Guide Lower the rear part of the cassette to align the rear edge to the corresponding slot of the machine, then insert it to... does not move immediately when pulled, pull the release latch to open the side cover then close it completely. CAUTION: Do not touch the shiny drum cartridge surface.

WorkCentre M15/M15i User Guide
Page 159
...as dark marks on page 11-11. Refer to the normal operating temperature. Overheat The printer has overheated. Xerox WorkCentre M15/M15i User Guide Page 11-13 Refer to the ADF. Replace the Drum cartridge when copy/print quality is not securely latched. Unplug the power cord and plug it locks into place....feeding from Load paper in the paper cassette. Clear the jam. the bypass tray. Close the side cover until it back in the LSU (Laser Scanning Unit). on the edge of the error is in Clear the document jam. If the problem persists, call for service. Load the ...
...as dark marks on page 11-11. Refer to the normal operating temperature. Overheat The printer has overheated. Xerox WorkCentre M15/M15i User Guide Page 11-13 Refer to the ADF. Replace the Drum cartridge when copy/print quality is not securely latched. Unplug the power cord and plug it locks into place....feeding from Load paper in the paper cassette. Clear the jam. the bypass tray. Close the side cover until it back in the LSU (Laser Scanning Unit). on the edge of the error is in Clear the document jam. If the problem persists, call for service. Load the ...
WorkCentre M15/M15i User Guide
Page 161
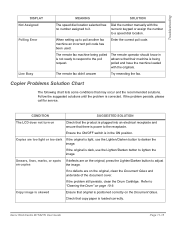
...manually with the originals. Copies are on the Document Glass. If the problem still persists, clean the Drum Cartridge. The remote fax machine being polled and have the machine loaded with the numeric keypad or ...chart lists some conditions that their machine is being polled is not ready to respond to "Cleaning the Drum" on Check that the product is plugged into an electrical receptacle and ensure that there is dark,... the Document Glass and underside of the document cover. Xerox WorkCentre M15/M15i User Guide Page 11-15 Check that original is loaded correctly.
...manually with the originals. Copies are on the Document Glass. If the problem still persists, clean the Drum Cartridge. The remote fax machine being polled and have the machine loaded with the numeric keypad or ...chart lists some conditions that their machine is being polled is not ready to respond to "Cleaning the Drum" on Check that the product is plugged into an electrical receptacle and ensure that there is dark,... the Document Glass and underside of the document cover. Xerox WorkCentre M15/M15i User Guide Page 11-15 Check that original is loaded correctly.
WorkCentre M15/M15i User Guide
Page 163
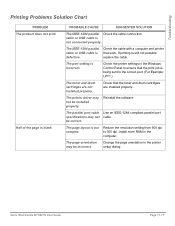
...or USB cable is not connected properly. Check the printer settings in the Windows Control Panel to ensure that the toner and drum cartridges are not installed properly. Reinstall the software. The page orientation may not be installed properly. Check that the print ... Reduce the resolution setting from 600 dpi to the correct port. (For Example: LPT1.) The toner and drum cartridges are installed properly. If printing is incorrect. Xerox WorkCentre M15/M15i User Guide Page 11-17 Install more RAM in the printer setup dialog. Check the cable with a computer...
...or USB cable is not connected properly. Check the printer settings in the Windows Control Panel to ensure that the toner and drum cartridges are not installed properly. Reinstall the software. The page orientation may not be installed properly. Check that the print ... Reduce the resolution setting from 600 dpi to the correct port. (For Example: LPT1.) The toner and drum cartridges are installed properly. If printing is incorrect. Xerox WorkCentre M15/M15i User Guide Page 11-17 Install more RAM in the printer setup dialog. Check the cable with a computer...

WorkCentre M15/M15i User Guide
Page 166
... or black stripes are made on the machine, clean the drum using the instructions "Cleaning the Drum" on the original Check with the party sending the original that the original was placed correctly when scanned at the remote FAX. Page 11-20 Xerox WorkCentre M15/M15i User Guide For example, dirty scan glass or dirty scan...
... or black stripes are made on the machine, clean the drum using the instructions "Cleaning the Drum" on the original Check with the party sending the original that the original was placed correctly when scanned at the remote FAX. Page 11-20 Xerox WorkCentre M15/M15i User Guide For example, dirty scan glass or dirty scan...

WorkCentre M15/M15i User Guide
Page 174
Specifications General Specifications ITEM Input paper tray capacity Collate tray capacity Toner cartridge life Drum life Operating Environment Paper size and weight Original document width and weight ADF capacity Power rating Power consumption Weight Dimensions (WxDxH) DESCRIPTION Cassette: 550 sheets ... AC100 ~ 127V (US, Canada), 50/60 Hz 19 W in Power save mode 85 W in Standby mode 350 W during operation 22. 85 kg / 50.37 lb (Drum and Toner Cartridges included) 560 x 429 x 456 mm (22 x 17 x 18 inches) Page 12-6 Xerox WorkCentre M15/M15i User Guide
Specifications General Specifications ITEM Input paper tray capacity Collate tray capacity Toner cartridge life Drum life Operating Environment Paper size and weight Original document width and weight ADF capacity Power rating Power consumption Weight Dimensions (WxDxH) DESCRIPTION Cassette: 550 sheets ... AC100 ~ 127V (US, Canada), 50/60 Hz 19 W in Power save mode 85 W in Standby mode 350 W during operation 22. 85 kg / 50.37 lb (Drum and Toner Cartridges included) 560 x 429 x 456 mm (22 x 17 x 18 inches) Page 12-6 Xerox WorkCentre M15/M15i User Guide

WorkCentre M15/M15i User Guide
Page 177
... System Data Options 9-6 Character Assignment 3-12 Cleaning Control Panel and LCD Display 10-3 Document Feeder and Collate Tray 10-3 Cleaning the Drum 10-9 Clearing Memory PHONEBK/MEMORY 9-16 SYSTEM DATA 9-16 SYSTEM ID 9-16 TX-RX JOURNAL 9-16 Clearing the Memory 9-16 Collated... Type 4-6 Paper Supply 4-6 Reduce/Enlarge 4-7 start 4-5 Copy Features 4-6 Copy quantity 4-4 Copying Procedure 4-2 Counters Information 9-25 Customer Replaceable Units 10-5 Drum Cartridge 10-9 Toner Cartridge 10-5 Customer support 1-5 Xerox WorkCentre M15/M15i User Guide Page Index-1 Index Index Numerics 1 - 2 -
... System Data Options 9-6 Character Assignment 3-12 Cleaning Control Panel and LCD Display 10-3 Document Feeder and Collate Tray 10-3 Cleaning the Drum 10-9 Clearing Memory PHONEBK/MEMORY 9-16 SYSTEM DATA 9-16 SYSTEM ID 9-16 TX-RX JOURNAL 9-16 Clearing the Memory 9-16 Collated... Type 4-6 Paper Supply 4-6 Reduce/Enlarge 4-7 start 4-5 Copy Features 4-6 Copy quantity 4-4 Copying Procedure 4-2 Counters Information 9-25 Customer Replaceable Units 10-5 Drum Cartridge 10-9 Toner Cartridge 10-5 Customer support 1-5 Xerox WorkCentre M15/M15i User Guide Page Index-1 Index Index Numerics 1 - 2 -

WorkCentre M15/M15i User Guide
Page 178
... 9-18 I Information Sources 1-4 Information Tab 9-25 Inserting a Pause 3-12 Installing ControlCentre 5.0 9-20 Installing Drum and Toner Cartridges 2-6 Installing Software 2-16 Introduction 1-2 K Keypad Character Assignment 3-12 Keypad Dialing 6-14 L Laser Safety 1-10 LCD Error Messages 11-13 Page Index-2 Xerox WorkCentre M15/M15i User Guide Index D Date and Time, setting up 2-15, 9-11 Delay RX Poll / RX...
... 9-18 I Information Sources 1-4 Information Tab 9-25 Inserting a Pause 3-12 Installing ControlCentre 5.0 9-20 Installing Drum and Toner Cartridges 2-6 Installing Software 2-16 Introduction 1-2 K Keypad Character Assignment 3-12 Keypad Dialing 6-14 L Laser Safety 1-10 LCD Error Messages 11-13 Page Index-2 Xerox WorkCentre M15/M15i User Guide Index D Date and Time, setting up 2-15, 9-11 Delay RX Poll / RX...

WorkCentre M15/M15i User Guide
Page 180
... 1-6, 1-9 Overview 9-2 Regulatory Information 1-9 Software Installation 2-16 Related Information Sources 1-4 Solutions, Copier Problems 11-15 Replacing the Drum Cartridge 10-9 Solutions, Faxing Problems 11-19 Replacing the Toner Cartridge 10-5, 10-8 Solutions, Printing Problems 11-17 Reports 9-...Fault Clearance 11-3 System Data Options 9-3 Faxing Problems Solution Chart 11-19 Settings Tab 9-22 General Problems 11-2 Page Index-4 Xerox WorkCentre M15/M15i User Guide Schedule Job Information 9-18 mation 10-8 Selecting Start 4-5, 6-5 Toner Save Mode 10-5 Sending a Fax 6-2 Toner...
... 1-6, 1-9 Overview 9-2 Regulatory Information 1-9 Software Installation 2-16 Related Information Sources 1-4 Solutions, Copier Problems 11-15 Replacing the Drum Cartridge 10-9 Solutions, Faxing Problems 11-19 Replacing the Toner Cartridge 10-5, 10-8 Solutions, Printing Problems 11-17 Reports 9-...Fault Clearance 11-3 System Data Options 9-3 Faxing Problems Solution Chart 11-19 Settings Tab 9-22 General Problems 11-2 Page Index-4 Xerox WorkCentre M15/M15i User Guide Schedule Job Information 9-18 mation 10-8 Selecting Start 4-5, 6-5 Toner Save Mode 10-5 Sending a Fax 6-2 Toner...
Xerox WorkCentre M15/M15i Quick Start Guide
Page 3
Scanner module 3 Ø Ensure the following components are available: USB Cable AC Power Cord Telephone Line Cord (M15i only) Software User Documentation Starter Toner Cartridge Drum Cartridge Page 3 Unpacking 1 Ø Remove the plastic film from the LCD. Ø Remove all tapes and packing materials. Tape LCD 2 Ø Pull the Scan Unlock Switch located on the bottom of the scanner module to unlock the scanner. Ø Pull open the paper cassette and remove the packing material.
Scanner module 3 Ø Ensure the following components are available: USB Cable AC Power Cord Telephone Line Cord (M15i only) Software User Documentation Starter Toner Cartridge Drum Cartridge Page 3 Unpacking 1 Ø Remove the plastic film from the LCD. Ø Remove all tapes and packing materials. Tape LCD 2 Ø Pull the Scan Unlock Switch located on the bottom of the scanner module to unlock the scanner. Ø Pull open the paper cassette and remove the packing material.


