Quick Use Guide
Page 14
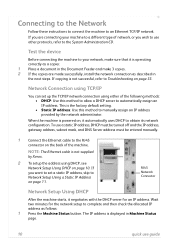
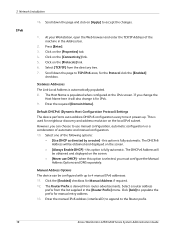
...a static IP address, DHCP must be turned off and the IP address, gateway address, subnet mask, and DNS Server address must be entered manually. 1 Connect the Ethernet cable to the RJ45 connector on page 11. NOTE: The Ethernet cable is powered on, it automatically uses DHCP to ...address, skip to obtain its network configuration. This is displayed in Machine Status page. 10 quick use other protocols, refer to manually assign an IP address provided by Xerox. 2 To setup the address using either of the following methods: • DHCP: Use this method to the System Administration ...
...a static IP address, DHCP must be turned off and the IP address, gateway address, subnet mask, and DNS Server address must be entered manually. 1 Connect the Ethernet cable to the RJ45 connector on page 11. NOTE: The Ethernet cable is powered on, it automatically uses DHCP to ...address, skip to obtain its network configuration. This is displayed in Machine Status page. 10 quick use other protocols, refer to manually assign an IP address provided by Xerox. 2 To setup the address using either of the following methods: • DHCP: Use this method to the System Administration ...
Quick Use Guide
Page 26
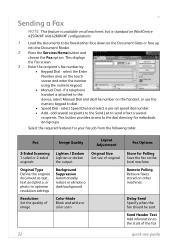
Sending a Fax NOTE: This feature is available on all machines, but is attached to the device, select Manual Dial and dial the number on the handset, or use guide This displays the Fax screen. 3 Enter the recipient's fax number by: • Keypad Dial - ... Original Size Set size of the fax 22 quick use the numeric keypad to dial. • Speed Dial - select the Enter Number area on WorkCentre 4250X/XF and 4260X/XF configurations. 1 Load the documents to be sent Send Header Text Add information to several recipients. if a telephone handset is standard on the...
Sending a Fax NOTE: This feature is available on all machines, but is attached to the device, select Manual Dial and dial the number on the handset, or use guide This displays the Fax screen. 3 Enter the recipient's fax number by: • Keypad Dial - ... Original Size Set size of the fax 22 quick use the numeric keypad to dial. • Speed Dial - select the Enter Number area on WorkCentre 4250X/XF and 4260X/XF configurations. 1 Load the documents to be sent Send Header Text Add information to several recipients. if a telephone handset is standard on the...
System Administration Guide
Page 4
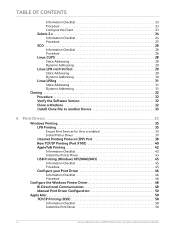
... 45 Procedure 45 Configure your Print Driver 46 Information Checklist 46 Procedure 46 Configure the Windows Printer Driver 48 Bi-Directional Communication 48 Manual Print Driver Configuration 50 Apple Mac 50 TCP/IP Printing (OSX 50 Information Checklist 50 Install the Print Driver 50 iv Xerox WorkCentre 4250/4260 Series System Administration Guide
... 45 Procedure 45 Configure your Print Driver 46 Information Checklist 46 Procedure 46 Configure the Windows Printer Driver 48 Bi-Directional Communication 48 Manual Print Driver Configuration 50 Apple Mac 50 TCP/IP Printing (OSX 50 Information Checklist 50 Install the Print Driver 50 iv Xerox WorkCentre 4250/4260 Series System Administration Guide
System Administration Guide
Page 7
... Phonebook 103 Setting up a Cover Sheet 104 Setup Fax Options 104 Setup Phonebook Preferences 105 User Preferences 105 Xerox WorkCentre 4250/4260 Series System Administration Guide vii Automatically 102 Configure the Printer Driver - Manually 102 Use the Feature 102 Windows 102 Mac OS Users 103 Add Fax Recipient 103 Add Recipient from the...
... Phonebook 103 Setting up a Cover Sheet 104 Setup Fax Options 104 Setup Phonebook Preferences 105 User Preferences 105 Xerox WorkCentre 4250/4260 Series System Administration Guide vii Automatically 102 Configure the Printer Driver - Manually 102 Use the Feature 102 Windows 102 Mac OS Users 103 Add Fax Recipient 103 Add Recipient from the...
System Administration Guide
Page 11
...802.11 Wireless Adapter 187 Management Information Base (MIB 187 Enable/Disable System Timer Values 188 At the machine 188 Xerox WorkCentre 4250/4260 Series System Administration Guide xi TABLE OF CONTENTS Alert Notification 167 General Device Alerts 167 To Edit... Xerox or Administrator Support Contact Details 168 18 Software Upgrade ...169 Overview 169 When should I upgrade the software 169 How do I upgrade the software 169 1. Manual Upgrade using Print File Submission 170 Manual upgrade using CentreWare Internet Services 170 Information...
...802.11 Wireless Adapter 187 Management Information Base (MIB 187 Enable/Disable System Timer Values 188 At the machine 188 Xerox WorkCentre 4250/4260 Series System Administration Guide xi TABLE OF CONTENTS Alert Notification 167 General Device Alerts 167 To Edit... Xerox or Administrator Support Contact Details 168 18 Software Upgrade ...169 Overview 169 When should I upgrade the software 169 How do I upgrade the software 169 1. Manual Upgrade using Print File Submission 170 Manual upgrade using CentreWare Internet Services 170 Information...
System Administration Guide
Page 30
..., automatic configuration or a combination of automatic and manual configuration. 10. this option is derived from router advertisements. Select a router address prefix from the directory tree. 7. Click [Add] to accept the changes. 1. 3 Network Installation IPv6 16. Scroll down the page to the Router prefix. 18 Xerox WorkCentre 4250/4260 Series System Administration Guide Scroll...
..., automatic configuration or a combination of automatic and manual configuration. 10. this option is derived from router advertisements. Select a router address prefix from the directory tree. 7. Click [Add] to accept the changes. 1. 3 Network Installation IPv6 16. Scroll down the page to the Router prefix. 18 Xerox WorkCentre 4250/4260 Series System Administration Guide Scroll...

System Administration Guide
Page 47
Xerox WorkCentre 4250/4260 Series System Administration Guide 35 Click on [Control Panel]. 5. Click on [Start]. 4. The following areas are specific to install the print drivers on [...; USB Printing (Windows XP/2000/2003) on page 45 • Configure your Print Driver on page 46 • Bi-Directional Communication on page 48 • Manual Print Driver Configuration on page 50 • TCP/IP Printing (OSX) on page 50 • Configure your Apple Mac Print Driver on page 52 •...
Xerox WorkCentre 4250/4260 Series System Administration Guide 35 Click on [Control Panel]. 5. Click on [Start]. 4. The following areas are specific to install the print drivers on [...; USB Printing (Windows XP/2000/2003) on page 45 • Configure your Print Driver on page 46 • Bi-Directional Communication on page 48 • Manual Print Driver Configuration on page 50 • TCP/IP Printing (OSX) on page 50 • Configure your Apple Mac Print Driver on page 52 •...
System Administration Guide
Page 58
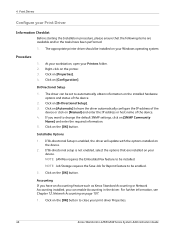
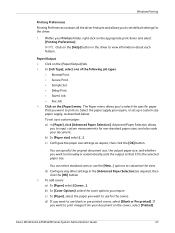
Click on the [OK] button. Installable Options 1. Click on the [OK] button. Right-click on [Manual] and enter the IP address or host name of the device. 4. Click on [Automatic] to change the default SNMP settings, click on your device. If.... The appropriate printer driver should be set to be installed. NOTE: LAN Fax requires the Embedded Fax feature to close your print driver Properties. 46 Xerox WorkCentre 4250/4260 Series System Administration Guide If you can be installed on the [OK] button to be enabled. 3. 4 Print Drivers Configure your Print Driver ...
Click on the [OK] button. Installable Options 1. Click on the [OK] button. Right-click on [Manual] and enter the IP address or host name of the device. 4. Click on [Automatic] to change the default SNMP settings, click on your device. If.... The appropriate printer driver should be set to be installed. NOTE: LAN Fax requires the Embedded Fax feature to close your print driver Properties. 46 Xerox WorkCentre 4250/4260 Series System Administration Guide If you can be installed on the [OK] button to be enabled. 3. 4 Print Drivers Configure your Print Driver ...
System Administration Guide
Page 59
... paper supply, as described below. d) If you want to print images from your document. If you want to manually or automatically scale the output so that you want to customize the sizes. Xerox WorkCentre 4250/4260 Series System Administration Guide 47 c) Configure the paper size settings as required, then click the [OK] button...
... paper supply, as described below. d) If you want to print images from your document. If you want to manually or automatically scale the output so that you want to customize the sizes. Xerox WorkCentre 4250/4260 Series System Administration Guide 47 c) Configure the paper size settings as required, then click the [OK] button...

System Administration Guide
Page 61
... and click on the [OK] button to your operating system: 4. g) Click on [Bi-Directional Setup]. 4. d) Click on [Print Test Page]. Xerox WorkCentre 4250/4260 Series System Administration Guide 49 Click on [Manual] and enter the IP Address or Host Name of the machine. b) Click on [Printing Preferences]. d) Click on [Installable Options]. f) Change any...
... and click on the [OK] button to your operating system: 4. g) Click on [Bi-Directional Setup]. 4. d) Click on [Print Test Page]. Xerox WorkCentre 4250/4260 Series System Administration Guide 49 Click on [Manual] and enter the IP Address or Host Name of the machine. b) Click on [Printing Preferences]. d) Click on [Installable Options]. f) Change any...

System Administration Guide
Page 62
...] menu, click on [Print Test Page]. 8. 4 Print Drivers Manual Print Driver Configuration To configure the printer driver without using Bi-Directional communication: 1. Click on [Printing Preferences]. 10. Click on the [OK] button. 6. Open the CD and select the required language, if necessary. 50 Xerox WorkCentre 4250/4260 Series System Administration Guide b) Right-click...
...] menu, click on [Print Test Page]. 8. 4 Print Drivers Manual Print Driver Configuration To configure the printer driver without using Bi-Directional communication: 1. Click on [Printing Preferences]. 10. Click on the [OK] button. 6. Open the CD and select the required language, if necessary. 50 Xerox WorkCentre 4250/4260 Series System Administration Guide b) Right-click...
System Administration Guide
Page 67
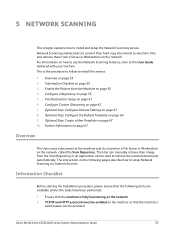
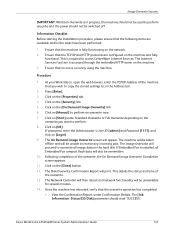
... Guide delivered with your machine. Network Scanning enables Users to convert their image from the Scan Repository or an application can manually retrieve their hard copy documents to setup Network Scanning via Internet Services. Optional Step: Configure General Settings on the network.... network. 2. Ensure that the following pages describe how to electronic files and retrieve them from the Machine on page 56 5. Xerox WorkCentre 4250/4260 Series System Administration Guide 55 Optional Step: Configure the Default Template on page 62 7. Configure Custom Filenaming on page ...
... Guide delivered with your machine. Network Scanning enables Users to convert their image from the Scan Repository or an application can manually retrieve their hard copy documents to setup Network Scanning via Internet Services. Optional Step: Configure General Settings on the network.... network. 2. Ensure that the following pages describe how to electronic files and retrieve them from the Machine on page 56 5. Xerox WorkCentre 4250/4260 Series System Administration Guide 55 Optional Step: Configure the Default Template on page 62 7. Configure Custom Filenaming on page ...
System Administration Guide
Page 76
...least one filing location. Click on the device are created using Internet Services will see 2 options: • File • Fax 64 Xerox WorkCentre 4250/4260 Series System Administration Guide Destination Services 7. Job Log 10. Click on the [Refresh Template List Now] button. Once the ...Default Template has been configured all subsequent templates that are updated automatically. To update the Template Pool List manually, click on [Apply]. Before the Default Template can be used, at least one filing location must be deleted. Press [Enter]. ...
...least one filing location. Click on the device are created using Internet Services will see 2 options: • File • Fax 64 Xerox WorkCentre 4250/4260 Series System Administration Guide Destination Services 7. Job Log 10. Click on the [Refresh Template List Now] button. Once the ...Default Template has been configured all subsequent templates that are updated automatically. To update the Template Pool List manually, click on [Apply]. Before the Default Template can be used, at least one filing location must be deleted. Press [Enter]. ...
System Administration Guide
Page 87
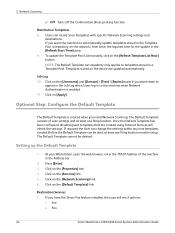
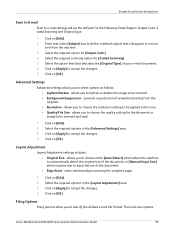
...to one or more e-mail recipients. E-mail Addressing Recipient addresses can be enabled on page 77 to the global, or corporate address book. Xerox WorkCentre 4250/4260 Series System Administration Guide 75 Overview on page 77 6. Configure the Feature on page 75 2. i.e. The Smart Key can be...the .com key (Smart Key). The end user can access the E-mail feature. Information Checklist on page 76 5. Enter a recipient address manually at the email keyboard screen. LDAP provides access to setup the Smart Key. Configure SMTP on page 76 3. See steps in General on the...
...to one or more e-mail recipients. E-mail Addressing Recipient addresses can be enabled on page 77 to the global, or corporate address book. Xerox WorkCentre 4250/4260 Series System Administration Guide 75 Overview on page 77 6. Configure the Feature on page 75 2. i.e. The Smart Key can be...the .com key (Smart Key). The end user can access the E-mail feature. Information Checklist on page 76 5. Enter a recipient address manually at the email keyboard screen. LDAP provides access to setup the Smart Key. Configure SMTP on page 76 3. See steps in General on the...
System Administration Guide
Page 91
...settings allows you to choose either [Auto Detect] which allows the machine to automatically detect the original size of the document, or [Manual Input Size] which requires user to input the size of unwanted shading from the originals. • Resolution - Click on [OK...reproduction of the document. • Edge Erase - Layout Adjustment Layout Adjustment settings includes: • Original Size - There are two options: Xerox WorkCentre 4250/4260 Series System Administration Guide 79 allows you to e-mail settings will appear in the [Subject] box to accept the changes. 7. ...
...settings allows you to choose either [Auto Detect] which allows the machine to automatically detect the original size of the document, or [Manual Input Size] which requires user to input the size of unwanted shading from the originals. • Resolution - Click on [OK...reproduction of the document. • Edge Erase - Layout Adjustment Layout Adjustment settings includes: • Original Size - There are two options: Xerox WorkCentre 4250/4260 Series System Administration Guide 79 allows you to e-mail settings will appear in the [Subject] box to accept the changes. 7. ...

System Administration Guide
Page 113
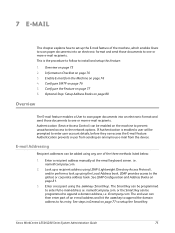
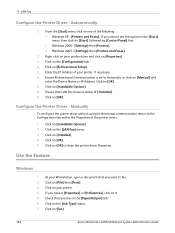
...installed on page 102 5. LAN fax can be enabled in its existing configuration. 2. Ensure that the following items are detailed below. Xerox WorkCentre 4250/4260 Series System Administration Guide 101 NOTE: LAN Fax is the procedure to follow to set up the LAN Fax feature of the... machine. The appropriate printer driver must be enabled automatically, with Bi-directional communication or manually. For full instructions, see Chapter 4, Print Drivers on your printer driver to fax machines directly from their computers. Enable LAN Fax (...
...installed on page 102 5. LAN fax can be enabled in its existing configuration. 2. Ensure that the following items are detailed below. Xerox WorkCentre 4250/4260 Series System Administration Guide 101 NOTE: LAN Fax is the procedure to follow to set up the LAN Fax feature of the... machine. The appropriate printer driver must be enabled automatically, with Bi-directional communication or manually. For full instructions, see Chapter 4, Print Drivers on your printer driver to fax machines directly from their computers. Enable LAN Fax (...
System Administration Guide
Page 114
... Ensure Bi-directional Communication is set to close the printer driver Properties. Click on [File] then [Print]. 3. Configure the Printer Driver - Manually To configure the printer driver without using bi-directional communication return to fax. 2. At your printer, if necessary. 6. Click on the [LAN ...], click on [Manual] and enter the Device Name or IP Address. If you cannot see this option in the [Start] menu, then click on the [Paper/Output] tab. 6. 11 LAN Fax Configure the Printer Driver - Click on [Fax]. 102 Xerox WorkCentre 4250/4260 Series System...
... Ensure Bi-directional Communication is set to close the printer driver Properties. Click on [File] then [Print]. 3. Configure the Printer Driver - Manually To configure the printer driver without using bi-directional communication return to fax. 2. At your printer, if necessary. 6. Click on the [LAN ...], click on [Manual] and enter the Device Name or IP Address. If you cannot see this option in the [Start] menu, then click on the [Paper/Output] tab. 6. 11 LAN Fax Configure the Printer Driver - Click on [Fax]. 102 Xerox WorkCentre 4250/4260 Series System...

System Administration Guide
Page 138
...you click [Not Enrolled] a window appears to enter the administrator user name and password. Communication with Xerox. NOTE: Automatically detecting proxy settings may overwrite manual settings. The Auto Detect process will then try a direct connection. button on the Smart eSolutions setup ... 4. If you click [Settings], you want to save changes. 126 Xerox WorkCentre 4250/4260 Series System Administration Guide The options are found. 11. Machine Serial Number displays the serial number of manual settings. If the HTTP Proxy Server is the default state for Auto Detect...
...you click [Not Enrolled] a window appears to enter the administrator user name and password. Communication with Xerox. NOTE: Automatically detecting proxy settings may overwrite manual settings. The Auto Detect process will then try a direct connection. button on the Smart eSolutions setup ... 4. If you click [Settings], you want to save changes. 126 Xerox WorkCentre 4250/4260 Series System Administration Guide The options are found. 11. Machine Serial Number displays the serial number of manual settings. If the HTTP Proxy Server is the default state for Auto Detect...
System Administration Guide
Page 153
... functionality will also be unable to receive any jobs and the power should not be unavailable for several minutes. 14. Xerox WorkCentre 4250/4260 Series System Administration Guide 141 Ensure that the overwrite operation has completed: • View the Confirmation Report, ...your Workstation, open the web browser, enter the TCP/IP Address of the machine that the following items are configured on [Manual] to access CentreWare Internet Services. The Disk Overwrite Confirmation Report will appear. Information Checklist Before starting the Installation procedure, please ensure...
... functionality will also be unable to receive any jobs and the power should not be unavailable for several minutes. 14. Xerox WorkCentre 4250/4260 Series System Administration Guide 141 Ensure that the overwrite operation has completed: • View the Confirmation Report, ...your Workstation, open the web browser, enter the TCP/IP Address of the machine that the following items are configured on [Manual] to access CentreWare Internet Services. The Disk Overwrite Confirmation Report will appear. Information Checklist Before starting the Installation procedure, please ensure...
System Administration Guide
Page 181
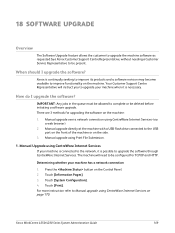
... CentreWare Internet Services. Your Customer Support Centre Representative will need to improve functionality on the machine. How do I upgrade the software? Xerox WorkCentre 4250/4260 Series System Administration Guide 169 Manual upgrade over a network connection using CentreWare Internet Services If your machine is connected to the network, it is continually seeking to improve...
... CentreWare Internet Services. Your Customer Support Centre Representative will need to improve functionality on the machine. How do I upgrade the software? Xerox WorkCentre 4250/4260 Series System Administration Guide 169 Manual upgrade over a network connection using CentreWare Internet Services If your machine is connected to the network, it is continually seeking to improve...


