Quick Use Guide
Page 5
...WorkCentre 4250/4260 Series. Xerox WorkCentre 4250/4260 Series Quick Use Guide Thank you will successfully: Connect the WorkCentre 4250/4260 Series Printer to a network Set-up the WorkCentre 4250/4260 Series Printer Install optional features Operate the WorkCentre 4250/4260 Series Printer Contents Install the WorkCentre... 4250/4260 Series 3 Switch On the Machine 5 Your WorkCentre 4250/4260 7 Connecting to the Network 10 Install Print Drivers...
...WorkCentre 4250/4260 Series. Xerox WorkCentre 4250/4260 Series Quick Use Guide Thank you will successfully: Connect the WorkCentre 4250/4260 Series Printer to a network Set-up the WorkCentre 4250/4260 Series Printer Install optional features Operate the WorkCentre 4250/4260 Series Printer Contents Install the WorkCentre... 4250/4260 Series 3 Switch On the Machine 5 Your WorkCentre 4250/4260 7 Connecting to the Network 10 Install Print Drivers...

Quick Use Guide
Page 9
... Power cord to configure the machine is successful. 8 Remove the Product Enablement Key and select Next on the display. Follow the instructions on continuously (about 10 seconds), the configuration is as follows: 1 Locate the tube containing the Product Enablement Key. Switch On the Machine Once the machine has been assembled it...
... Power cord to configure the machine is successful. 8 Remove the Product Enablement Key and select Next on the display. Follow the instructions on continuously (about 10 seconds), the configuration is as follows: 1 Locate the tube containing the Product Enablement Key. Switch On the Machine Once the machine has been assembled it...

Quick Use Guide
Page 10
... the information. 11 The next 4 screens will allow you do not have successfully completed the System Settings portion of the Xerox Installation Wizard. Select either A4 or 8.5 x 11 inches and select Next. 10 The Customer Support and Supplies Numbers screen is for the Page Pack Passcode. NOTE: This is displayed. NOTE: In...
... the information. 11 The next 4 screens will allow you do not have successfully completed the System Settings portion of the Xerox Installation Wizard. Select either A4 or 8.5 x 11 inches and select Next. 10 The Customer Support and Supplies Numbers screen is for the Page Pack Passcode. NOTE: This is displayed. NOTE: In...
Quick Use Guide
Page 14
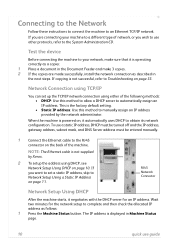
... is operating correctly as a copier. 1 Place a document in Machine Status page. 10 quick use other protocols, refer to Troubleshooting on page 10. Test the device Before connecting the machine to your machine to manually assign an IP address provided by Xerox. 2 To setup the address using DHCP, see Network Setup Using DHCP on...
... is operating correctly as a copier. 1 Place a document in Machine Status page. 10 quick use other protocols, refer to Troubleshooting on page 10. Test the device Before connecting the machine to your machine to manually assign an IP address provided by Xerox. 2 To setup the address using DHCP, see Network Setup Using DHCP on...
Quick Use Guide
Page 16
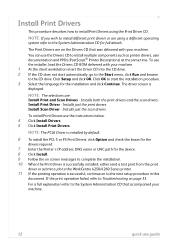
... language for the device. 8 Click Install. 9 Follow the on screen messages to complete the installation. 10 When the Print Driver is successfully installed, either send a test print from the print driver or submit a job to the WorkCentre 4250/4260 Series printer. 11 If the printing operation is displayed. For a full explanation refer...
... language for the device. 8 Click Install. 9 Follow the on screen messages to complete the installation. 10 When the Print Driver is successfully installed, either send a test print from the print driver or submit a job to the WorkCentre 4250/4260 Series printer. 11 If the printing operation is displayed. For a full explanation refer...
Quick Use Guide
Page 18
9 Enter the Login Name and Password. 10 Click Apply to confirm your selections click Apply. Click Edit in the General group to specify a default From: address. 13 When you have made your settings. 11 From the Properties menu, click Services > E-mail Settings > Defaults. 12 To amend the settings on all of the E-mail features including setting up address books, please refer to send e-mails from the device. NOTE: A From: address is required to the System Administration CD. 14 quick use guide NOTE: For more information on the E-mail Setup screen, click Edit for each options group.
9 Enter the Login Name and Password. 10 Click Apply to confirm your selections click Apply. Click Edit in the General group to specify a default From: address. 13 When you have made your settings. 11 From the Properties menu, click Services > E-mail Settings > Defaults. 12 To amend the settings on all of the E-mail features including setting up address books, please refer to send e-mails from the device. NOTE: A From: address is required to the System Administration CD. 14 quick use guide NOTE: For more information on the E-mail Setup screen, click Edit for each options group.
Quick Use Guide
Page 19
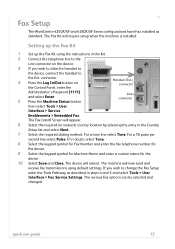
... In/Out button on the device. 3 If you wish to the Ext. For a 10 pulse per second line select Pulse. The various Fax options can be selected and changed. Fax Setup The WorkCentre 4250X/XF and 4260X/XF Series configurations have Fax installed as described in steps 4 and 5 and select Tools ... and enter the fax telephone number for the device. 9 Select the keypad symbol for Machine Name and enter a custom name for the device. 10 Select Save and Close. If in the Country Setup list and select Next. 7 Select the required dialing method. The Fax Install Screen will now...
... In/Out button on the device. 3 If you wish to the Ext. For a 10 pulse per second line select Pulse. The various Fax options can be selected and changed. Fax Setup The WorkCentre 4250X/XF and 4260X/XF Series configurations have Fax installed as described in steps 4 and 5 and select Tools ... and enter the fax telephone number for the device. 9 Select the keypad symbol for Machine Name and enter a custom name for the device. 10 Select Save and Close. If in the Country Setup list and select Next. 7 Select the required dialing method. The Fax Install Screen will now...
Quick Use Guide
Page 37
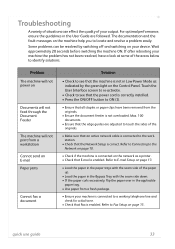
... Documents will not feed through the Document Feeder The machine will not power on the Control Panel. Refer to Connecting to the Network on page 10. • Check if the machine is connected on the network as indicated by switching off and switching on page 13. • Load the paper in...
... Documents will not feed through the Document Feeder The machine will not power on the Control Panel. Refer to Connecting to the Network on page 10. • Check if the machine is connected on the network as indicated by switching off and switching on page 13. • Load the paper in...

Quick Use Guide
Page 41
... (US, Canada) Tijuana Mountain Time (US, Canada) Central America -12.0 -11.0 -11.0 -10.0 -9.0 -8.0 -8.0 -7.0 -6.0 Switzerland Luxembourg Austria Croatia Czech Republic Finland Denmark Sweden Poland Central Time -6.0 ... +2.0 Irkutsk +8.0 +2.0 Ulaan Bataar +8.0 +3.0 Kuala Lumpur +8.0 +3.0 Singapore +8.0 +3.0 Taipei +8.0 +3.0 Seoul +9.0 +3.5 Yakutsk +9.0 +4.0 Guam +10.0 +4.0 Port Moresby +10.0 +4.0 Vladivostok +10.0 +4.0 Magadan +11.0 +4.0 Soloman Islands +11.0 +4.5 New Caledonia +11.0 +5.0 Fiji +12.0 +5.0 Kamchatka +12.0 +5.0 Marshall Islands ...
... (US, Canada) Tijuana Mountain Time (US, Canada) Central America -12.0 -11.0 -11.0 -10.0 -9.0 -8.0 -8.0 -7.0 -6.0 Switzerland Luxembourg Austria Croatia Czech Republic Finland Denmark Sweden Poland Central Time -6.0 ... +2.0 Irkutsk +8.0 +2.0 Ulaan Bataar +8.0 +3.0 Kuala Lumpur +8.0 +3.0 Singapore +8.0 +3.0 Taipei +8.0 +3.0 Seoul +9.0 +3.5 Yakutsk +9.0 +4.0 Guam +10.0 +4.0 Port Moresby +10.0 +4.0 Vladivostok +10.0 +4.0 Magadan +11.0 +4.0 Soloman Islands +11.0 +4.5 New Caledonia +11.0 +5.0 Fiji +12.0 +5.0 Kamchatka +12.0 +5.0 Marshall Islands ...
System Administration Guide
Page 3
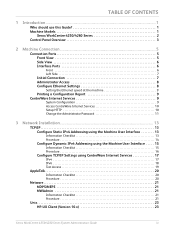
TABLE OF CONTENTS 1 Introduction ...1 Who should use this Guide 1 Machine Models 1 Xerox WorkCentre 4250/4260 Series 2 Control Panel Overview 3 2 Machine Connection ...5 Connection Ports 5 Front View 5...the machine 9 Printing a Configuration Report 9 CentreWare Internet Services 9 System Configuration 9 Access CentreWare Internet Services 10 Setup HTTP 10 Change the Administrator Password 11 3 Network Installation ...13 TCP/IP 13 Configure Static IPv4 Addressing using the ...Unix 23 HP-UX Client (Version 10.x 23 Xerox WorkCentre 4250/4260 Series System Administration Guide iii
TABLE OF CONTENTS 1 Introduction ...1 Who should use this Guide 1 Machine Models 1 Xerox WorkCentre 4250/4260 Series 2 Control Panel Overview 3 2 Machine Connection ...5 Connection Ports 5 Front View 5...the machine 9 Printing a Configuration Report 9 CentreWare Internet Services 9 System Configuration 9 Access CentreWare Internet Services 10 Setup HTTP 10 Change the Administrator Password 11 3 Network Installation ...13 TCP/IP 13 Configure Static IPv4 Addressing using the ...Unix 23 HP-UX Client (Version 10.x 23 Xerox WorkCentre 4250/4260 Series System Administration Guide iii
System Administration Guide
Page 7
... General 95 Test the Server Fax 96 10 Embedded Fax ...97 Overview 97 Server Fax and Embedded Fax 97 Information Checklist 97 Enable Embedded Fax from Phonebook 103 Setting up a Cover Sheet 104 Setup Fax Options 104 Setup Phonebook Preferences 105 User Preferences 105 Xerox WorkCentre 4250/4260 Series System Administration Guide vii...
... General 95 Test the Server Fax 96 10 Embedded Fax ...97 Overview 97 Server Fax and Embedded Fax 97 Information Checklist 97 Enable Embedded Fax from Phonebook 103 Setting up a Cover Sheet 104 Setup Fax Options 104 Setup Phonebook Preferences 105 User Preferences 105 Xerox WorkCentre 4250/4260 Series System Administration Guide vii...
System Administration Guide
Page 19
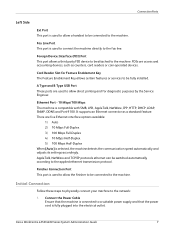
... and for Feature Enablement Key The Feature Enablement Key allows certain features or services to be connected to the machine. Ethernet Port - 10 Mbps/100 Mbps The machine is fully plugged into the electrical outlet. Foreign Device Interface (FDI) Port This port allows a third ... Follow these steps to physically connect your machine to the network: 1. FDIs are access and accounting devices, such as a standard feature. Xerox WorkCentre 4250/4260 Series System Administration Guide 7 Connection Ports Left Side Ext Port This port is used to connect the machine directly to the fax...
... and for Feature Enablement Key The Feature Enablement Key allows certain features or services to be connected to the machine. Ethernet Port - 10 Mbps/100 Mbps The machine is fully plugged into the electrical outlet. Foreign Device Interface (FDI) Port This port allows a third ... Follow these steps to physically connect your machine to the network: 1. FDIs are access and accounting devices, such as a standard feature. Xerox WorkCentre 4250/4260 Series System Administration Guide 7 Connection Ports Left Side Ext Port This port is used to connect the machine directly to the fax...
System Administration Guide
Page 20
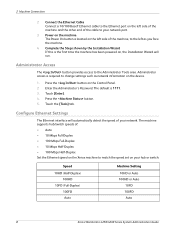
... switch: Speed 10HD (Half-Duplex) 100HD 10FD (Full-Duplex) 100FD Auto Machine Setting 10HD or Auto 100HD or Auto 10FD 100FD Auto 8 Xerox WorkCentre 4250/4260 Series System Administration Guide Press the button on your network. Enter the Administrator's Password. The default is required to your network port....on the Control Panel. 2. Connect the Ethernet Cable Connect a 10/100 BaseT Ethernet cable to the Ethernet port on the left side of : • Auto • 10 Mbps Full-Duplex • 100 Mbps Full-Duplex • 10 Mbps Half-Duplex • 100 Mbps Half-Duplex Set the Ethernet...
... switch: Speed 10HD (Half-Duplex) 100HD 10FD (Full-Duplex) 100FD Auto Machine Setting 10HD or Auto 100HD or Auto 10FD 100FD Auto 8 Xerox WorkCentre 4250/4260 Series System Administration Guide Press the button on your network. Enter the Administrator's Password. The default is required to your network port....on the Control Panel. 2. Connect the Ethernet Cable Connect a 10/100 BaseT Ethernet cable to the Ethernet port on the left side of : • Auto • 10 Mbps Full-Duplex • 100 Mbps Full-Duplex • 10 Mbps Half-Duplex • 100 Mbps Half-Duplex Set the Ethernet...

System Administration Guide
Page 21
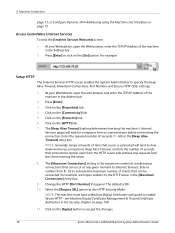
... Services allows Administrators to enter the Tools Pathway. 2. Touch [Confirm] to print a Configuration Report: 1. Many features available on the machine. Touch [Physical Media]. 10. Press the button on Xerox WorkCentre 4250/4260 Series System Administration Guide 9 Touch [Tools]. 6. Touch [Network Setting]. 9. The default Username is admin and the default Password is 1111. 3. See...
... Services allows Administrators to enter the Tools Pathway. 2. Touch [Confirm] to print a Configuration Report: 1. Many features available on the machine. Touch [Physical Media]. 10. Press the button on Xerox WorkCentre 4250/4260 Series System Administration Guide 9 Touch [Tools]. 6. Touch [Network Setting]. 9. The default Username is admin and the default Password is 1111. 3. See...
System Administration Guide
Page 22
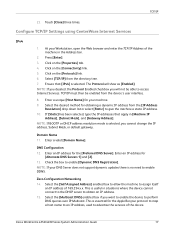
...of simultaneous connections that can occur at any requests from the HTTP server side without any given moment to accept the changes. 10 Xerox WorkCentre 4250/4260 Series System Administration Guide NOTE: The machine must have a Machine Digital Certificate configured to the HTTP server in ...the [Require SSL] option as the HTTP Security Mode. Click on the [Connectivity] link. 5. The [Maximum Connections] setting is 80. 10. At your Workstation, open sockets) to enable Secure HTTP - The [Keep Alive Timeout] setting determines how long the machine's Internet Services pages...
...of simultaneous connections that can occur at any requests from the HTTP server side without any given moment to accept the changes. 10 Xerox WorkCentre 4250/4260 Series System Administration Guide NOTE: The machine must have a Machine Digital Certificate configured to the HTTP server in ...the [Require SSL] option as the HTTP Security Mode. Click on the [Connectivity] link. 5. The [Maximum Connections] setting is 80. 10. At your Workstation, open sockets) to enable Secure HTTP - The [Keep Alive Timeout] setting determines how long the machine's Internet Services pages...
System Administration Guide
Page 26
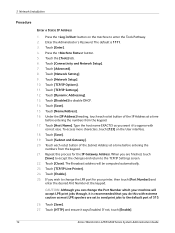
... is recommended that you do this process for your machine will be computed automatically. 23. Touch [Network Setting]. 9. Touch [Network Setup]. 10. Touch [Dynamic Addressing]. 13. Touch [Enable]. 25. Under the [IP Address] heading, touch each octet button of 515. 26. ...Number] and enter the desired Port Number at a time before entering the numbers from the keypad. 21. If not, touch [Enable]. 14 Xerox WorkCentre 4250/4260 Series System Administration Guide Press the button on the User interface. 18. Touch [Connectivity and Network Setup]. 7. Touch [Save]. ...
... is recommended that you do this process for your machine will be computed automatically. 23. Touch [Network Setting]. 9. Touch [Network Setup]. 10. Touch [Dynamic Addressing]. 13. Touch [Enable]. 25. Under the [IP Address] heading, touch each octet button of 515. 26. ...Number] and enter the desired Port Number at a time before entering the numbers from the keypad. 21. If not, touch [Enable]. 14 Xerox WorkCentre 4250/4260 Series System Administration Guide Press the button on the User interface. 18. Touch [Connectivity and Network Setup]. 7. Touch [Save]. ...
System Administration Guide
Page 28
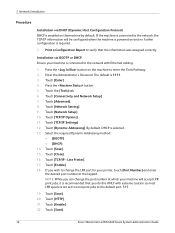
... DHCP Ensure your machine will be configured when the machine is powered on and no further configuration is required. 1. Touch [Network Setting]. 9. Touch [Save]. 16 Xerox WorkCentre 4250/4260 Series System Administration Guide Installation via DHCP (Dynamic Host Configuration Protocol) DHCP is enabled on the machine by default. Enter the Administrator's Password... network with extreme caution as most LPR spoolers are set to send print jobs to change the port number at the keypad. Touch [Network Setup]. 10. Print a Configuration Report to enter the Tools Pathway. 2.
... DHCP Ensure your machine will be configured when the machine is powered on and no further configuration is required. 1. Touch [Network Setting]. 9. Touch [Save]. 16 Xerox WorkCentre 4250/4260 Series System Administration Guide Installation via DHCP (Dynamic Host Configuration Protocol) DHCP is enabled on the machine by default. Enter the Administrator's Password... network with extreme caution as most LPR spoolers are set to send print jobs to change the port number at the keypad. Touch [Network Setup]. 10. Print a Configuration Report to enter the Tools Pathway. 2.
System Administration Guide
Page 29
... able to give the machine a static IP address. 10. Enter a unique [Host Name] for [Alternate DNS Servers 1] and [2]. 13. Select the desired method for obtaining a dynamic IP address from the directory tree. 7. Enter a valid [Domain Name]. Enter an IP address for your machine. 9. Xerox WorkCentre 4250/4260 Series System Administration Guide 17 NOTE...
... able to give the machine a static IP address. 10. Enter a unique [Host Name] for [Alternate DNS Servers 1] and [2]. 13. Select the desired method for obtaining a dynamic IP address from the directory tree. 7. Enter a valid [Domain Name]. Enter an IP address for your machine. 9. Xerox WorkCentre 4250/4260 Series System Administration Guide 17 NOTE...
System Administration Guide
Page 30
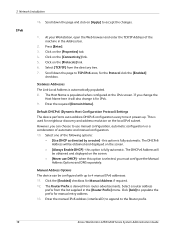
...subnet. Manual Address Options The device can choose to accept the changes. 1. Click [Add] to the Router prefix. 18 Xerox WorkCentre 4250/4260 Series System Administration Guide If you must configure the Manual Address Options and DNS separately. Enter the required [Domain Name.... 9. Click on the screen. • [Never use manual configuration, automatic configuration or a combination of automatic and manual configuration. 10. The DHCPv6 Address will also change the Host Name here it will be configured with up . Default DHCPv6 (Dynamic Host Configuration Protocol...
...subnet. Manual Address Options The device can choose to accept the changes. 1. Click [Add] to the Router prefix. 18 Xerox WorkCentre 4250/4260 Series System Administration Guide If you must configure the Manual Address Options and DNS separately. Enter the required [Domain Name.... 9. Click on the screen. • [Never use manual configuration, automatic configuration or a combination of automatic and manual configuration. 10. The DHCPv6 Address will also change the Host Name here it will be configured with up . Default DHCPv6 (Dynamic Host Configuration Protocol...
System Administration Guide
Page 32
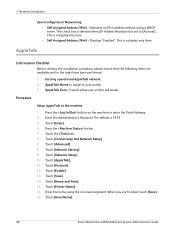
.... Enter the Administrator's Password. Touch the [Tools] tab. 6. Touch [Connectivity and Network Setup]. 7. Displays "Enabled". Touch [Network Setup]. 10. Enter the name using a DHCP server. Touch [AppleTalk]. 11. Touch [Area Name]. 20 Xerox WorkCentre 4250/4260 Series System Administration Guide AppleTalk Zone (if used) where your printer. 3. Allocates an IPv4 address without using...
.... Enter the Administrator's Password. Touch the [Tools] tab. 6. Touch [Connectivity and Network Setup]. 7. Displays "Enabled". Touch [Network Setup]. 10. Enter the name using a DHCP server. Touch [AppleTalk]. 11. Touch [Area Name]. 20 Xerox WorkCentre 4250/4260 Series System Administration Guide AppleTalk Zone (if used) where your printer. 3. Allocates an IPv4 address without using...


