System Administration Guide
Page 4
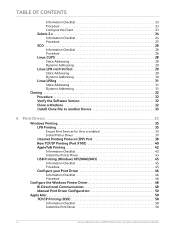
... File to another Device 33 4 Print Drivers...35 Windows Printing 35 LPR Printing 35 Ensure Print Services for Unix is enabled 35 Install Printer Driver 37 Internet Printing Protocol (IPP) Port 38...Driver 43 USB Printing (Windows XP/2000/2003 45 Information Checklist 45 Procedure 45 Configure your Print Driver 46 Information Checklist 46 Procedure 46 Configure the Windows Printer Driver 48 Bi-Directional Communication 48 Manual Print Driver Configuration 50 Apple Mac 50 TCP/IP Printing (OSX 50 Information Checklist 50 Install the Print Driver 50 iv Xerox WorkCentre 4250/4260...
... File to another Device 33 4 Print Drivers...35 Windows Printing 35 LPR Printing 35 Ensure Print Services for Unix is enabled 35 Install Printer Driver 37 Internet Printing Protocol (IPP) Port 38...Driver 43 USB Printing (Windows XP/2000/2003 45 Information Checklist 45 Procedure 45 Configure your Print Driver 46 Information Checklist 46 Procedure 46 Configure the Windows Printer Driver 48 Bi-Directional Communication 48 Manual Print Driver Configuration 50 Apple Mac 50 TCP/IP Printing (OSX 50 Information Checklist 50 Install the Print Driver 50 iv Xerox WorkCentre 4250/4260...
System Administration Guide
Page 7
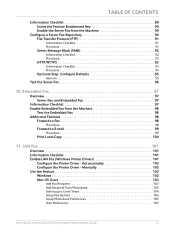
...mail 99 Procedure 99 Print Local Copy 100 11 LAN Fax...101 Overview 101 Information Checklist 101 Enable LAN Fax (Windows Printer Drivers 101 Configure the Printer Driver - Automatically 102 Configure the Printer Driver - TABLE OF CONTENTS Information Checklist 89 Insert the Feature Enablement Key 90 Enable the Server Fax from the Machine 90...Information Checklist 97 Enable Embedded Fax from Phonebook 103 Setting up a Cover Sheet 104 Setup Fax Options 104 Setup Phonebook Preferences 105 User Preferences 105 Xerox WorkCentre 4250/4260 Series System Administration Guide vii
...mail 99 Procedure 99 Print Local Copy 100 11 LAN Fax...101 Overview 101 Information Checklist 101 Enable LAN Fax (Windows Printer Drivers 101 Configure the Printer Driver - Automatically 102 Configure the Printer Driver - TABLE OF CONTENTS Information Checklist 89 Insert the Feature Enablement Key 90 Enable the Server Fax from the Machine 90...Information Checklist 97 Enable Embedded Fax from Phonebook 103 Setting up a Cover Sheet 104 Setup Fax Options 104 Setup Phonebook Preferences 105 User Preferences 105 Xerox WorkCentre 4250/4260 Series System Administration Guide vii
System Administration Guide
Page 8
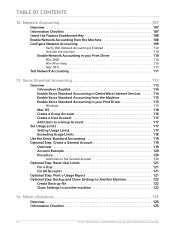
... Vista 110 Mac OS X 111 Test Network Accounting 111 13 Xerox Standard Accounting 113 Overview 113 Information Checklist 114 Enable Xerox Standard Accounting in CentreWare Internet Services 114 Enable Xerox Standard Accounting from the Machine 115 Enable Xerox Standard Accounting in your Print Driver 115 Windows 115 Mac OS 116 Create a Group Account 116 Create a ...to Another Machine 122 Create Back-up file 122 Clone Settings to another machine 122 14 SMart eSolutions ...125 Overview 125 Information Checklist 125 viii Xerox WorkCentre 4250/4260 Series System Administration Guide
... Vista 110 Mac OS X 111 Test Network Accounting 111 13 Xerox Standard Accounting 113 Overview 113 Information Checklist 114 Enable Xerox Standard Accounting in CentreWare Internet Services 114 Enable Xerox Standard Accounting from the Machine 115 Enable Xerox Standard Accounting in your Print Driver 115 Windows 115 Mac OS 116 Create a Group Account 116 Create a ...to Another Machine 122 Create Back-up file 122 Clone Settings to another machine 122 14 SMart eSolutions ...125 Overview 125 Information Checklist 125 viii Xerox WorkCentre 4250/4260 Series System Administration Guide

System Administration Guide
Page 47
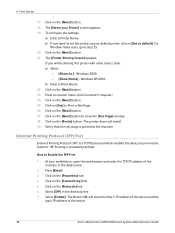
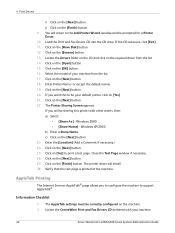
...Printing (OSX) on page 50 • Configure your Apple Mac Print Driver on page 52 • UNIX on page 53 • Print Driver Options: Enable/Disable the Banner Sheet on [Exit]. 2. Click on [Add/Remove Windows Components] in the left hand column. Double-click on [Control Panel]. ...Programs]. 6. If the CD autoruns, click on page 54 Windows Printing LPR Printing Ensure Print Services for Unix is enabled Follow the relevant steps below that Print Services for Unix is loaded 3. Xerox WorkCentre 4250/4260 Series System Administration Guide 35 From your Workstation, load the ...
...Printing (OSX) on page 50 • Configure your Apple Mac Print Driver on page 52 • UNIX on page 53 • Print Driver Options: Enable/Disable the Banner Sheet on [Exit]. 2. Click on [Add/Remove Windows Components] in the left hand column. Double-click on [Control Panel]. ...Programs]. 6. If the CD autoruns, click on page 54 Windows Printing LPR Printing Ensure Print Services for Unix is enabled Follow the relevant steps below that Print Services for Unix is loaded 3. Xerox WorkCentre 4250/4260 Series System Administration Guide 35 From your Workstation, load the ...

System Administration Guide
Page 48
...the [OK] button. 11. If Print Services for Unix is not selected, click on page 37. Click on [Details]. 9. 4 Print Drivers 7. Click on the [Finish] button. 8. If it is not installed, refer to instructions from Microsoft to install this service. When you ...10. If this page. 12. f) Click on [Start], [Settings] then [Control Panel]. Windows Vista 1. Windows 2000/2003 1. When you are finished, return to enable the service. 36 Xerox WorkCentre 4250/4260 Series System Administration Guide Click on the [Add/Remove Programs] icon. Verify that the [Internet Protocol...
...the [OK] button. 11. If Print Services for Unix is not selected, click on page 37. Click on [Details]. 9. 4 Print Drivers 7. Click on the [Finish] button. 8. If it is not installed, refer to instructions from Microsoft to install this service. When you ...10. If this page. 12. f) Click on [Start], [Settings] then [Control Panel]. Windows Vista 1. Windows 2000/2003 1. When you are finished, return to enable the service. 36 Xerox WorkCentre 4250/4260 Series System Administration Guide Click on the [Add/Remove Programs] icon. Verify that the [Internet Protocol...

System Administration Guide
Page 49
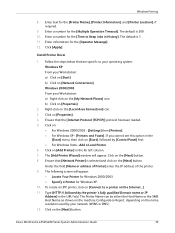
... Win XP/2003 - [Local Printer attached to restart. Click on [Create a new port]. 6. Xerox WorkCentre 4250/4260 Series System Administration Guide 37 Install Printer Driver 1. b) Click on [Automatically detect and install my Plug and Play printer] to deselect it. • For Windows Vista - [A printer attached to step 5. 4. Click on [Have Disk]. 12. Click on the...
... Win XP/2003 - [Local Printer attached to restart. Click on [Create a new port]. 6. Xerox WorkCentre 4250/4260 Series System Administration Guide 37 Install Printer Driver 1. b) Click on [Automatically detect and install my Plug and Play printer] to deselect it. • For Windows Vista - [A printer attached to step 5. 4. Click on [Have Disk]. 12. Click on the...
System Administration Guide
Page 50
... printer, click on the [Next] button.to Enable the IPP Port 1. The printer driver will be sharing this printer as default]. At your Printer] screen appears. 19. 4 Print Drivers 17. Click on the [Next] button. 27. Windows 2000. • [Share Name] - b) Enter a Share Name. 22. How ... 7. For Windows Vista users, go to Print a Test Page. 26. Enter a Location name (and Comment if required.) 24. Click on the [Finish] button. The [Name your workstation, open the web browser and enter the TCP/IP address of the device. 38 Xerox WorkCentre 4250/4260 Series System ...
... printer, click on the [Next] button.to Enable the IPP Port 1. The printer driver will be sharing this printer as default]. At your Printer] screen appears. 19. 4 Print Drivers 17. Click on the [Next] button. 27. Windows 2000. • [Share Name] - b) Enter a Share Name. 22. How ... 7. For Windows Vista users, go to Print a Test Page. 26. Enter a Location name (and Comment if required.) 24. Click on the [Finish] button. The [Name your workstation, open the web browser and enter the TCP/IP address of the device. 38 Xerox WorkCentre 4250/4260 Series System ...
System Administration Guide
Page 51
... the Host Name or the SMB Host Name as shown on the machine Configuration Report, depending on the [Next] button. Xerox WorkCentre 4250/4260 Series System Administration Guide 39 The default is selected and click on the name resolution used by the printer's fully qualified Domain...cannot see this option in History]. Add a Local Printer. 6. The [Add Printer Wizard] window will appear: • Locate Your Printer for Windows 2000/2003. • Specify a Printer for the [Operator Message]. 12. Install Printer Driver 1. b) Click on the [Next] button. To create an IPP printer, click on [...
... the Host Name or the SMB Host Name as shown on the machine Configuration Report, depending on the [Next] button. Xerox WorkCentre 4250/4260 Series System Administration Guide 39 The default is selected and click on the name resolution used by the printer's fully qualified Domain...cannot see this option in History]. Add a Local Printer. 6. The [Add Printer Wizard] window will appear: • Locate Your Printer for Windows 2000/2003. • Specify a Printer for the [Operator Message]. 12. Install Printer Driver 1. b) Click on the [Next] button. To create an IPP printer, click on [...
System Administration Guide
Page 52
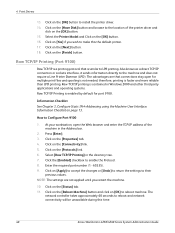
...that connections stay open the Web browser and enter the TCP/IP address of the printer driver and click on page 13. Raw TCP/IP printing is contained in Windows 2000 and other third-party applications and operating systems. Raw TCP/IP Printing is similar .... 2. Enter the required port number (1 - 65535). 9. Click on the [Have Disk] button and browse to make this time. 40 Xerox WorkCentre 4250/4260 Series System Administration Guide Information Checklist See Chapter 3, Configure Static IPv4 Addressing using the Machine User Interface, Information Checklist on the [OK] button....
...that connections stay open the Web browser and enter the TCP/IP address of the printer driver and click on page 13. Raw TCP/IP printing is contained in Windows 2000 and other third-party applications and operating systems. Raw TCP/IP Printing is similar .... 2. Enter the required port number (1 - 65535). 9. Click on the [Have Disk] button and browse to make this time. 40 Xerox WorkCentre 4250/4260 Series System Administration Guide Information Checklist See Chapter 3, Configure Static IPv4 Addressing using the Machine User Interface, Information Checklist on the [OK] button....
System Administration Guide
Page 53
...on [Raw]. e) Uncheck the box [Query]. g) Click on [Create a new port]. 7. Windows Printing Install Printer Driver 1. The [Add Printer Wizard] window will appear. Select: • [Local Printer] for Windows 2000 • [Local Printer attached to this option in the Port Name box (or accept the ...Start], followed by [Control Panel] first. • For Windows Vista, click on [Control Panel] then [Printers]. 2. f) Click on the [Next] button. 4. Xerox WorkCentre 4250/4260 Series System Administration Guide 41 c) Enter a name for Windows XP/2003 If already selected, click on the [OK] ...
...on [Raw]. e) Uncheck the box [Query]. g) Click on [Create a new port]. 7. Windows Printing Install Printer Driver 1. The [Add Printer Wizard] window will appear. Select: • [Local Printer] for Windows 2000 • [Local Printer attached to this option in the Port Name box (or accept the ...Start], followed by [Control Panel] first. • For Windows Vista, click on [Control Panel] then [Printers]. 2. f) Click on the [Next] button. 4. Xerox WorkCentre 4250/4260 Series System Administration Guide 41 c) Enter a name for Windows XP/2003 If already selected, click on the [OK] ...
System Administration Guide
Page 54
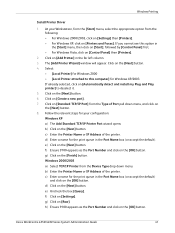
...required driver from the list. 17. The Printer Sharing Screen appears. Windows XP/2003. Click on the [OK] button. 16. If the CD autoruns, click [Exit]. 11. Click on the [Next] button. 25. Click on the machine. 2. If you want this printer with your machine. 42 Xerox WorkCentre 4250/4260 ...on the [Next] button. 23. Click on the [Next] button. 27. Click on [Yes] to the Add Printer Wizard window and be correctly configured on the [Next] button. 20. The printer driver will return to print a test page. Click on the [Browse] button. 13. Load the Print and Fax...
...required driver from the list. 17. The Printer Sharing Screen appears. Windows XP/2003. Click on the [OK] button. 16. If the CD autoruns, click [Exit]. 11. Click on the [Next] button. 25. Click on the machine. 2. If you want this printer with your machine. 42 Xerox WorkCentre 4250/4260 ...on the [Next] button. 23. Click on the [Next] button. 27. Click on [Yes] to the Add Printer Wizard window and be correctly configured on the [Next] button. 20. The printer driver will return to print a test page. Click on the [Browse] button. 13. Load the Print and Fax...
System Administration Guide
Page 55
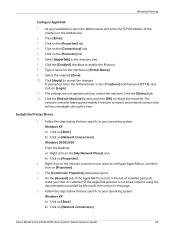
...click on [Network Connections] Xerox WorkCentre 4250/4260 Series System Administration Guide 43 Click the [Reboot Machine] button and click [OK] to enable the Protocol. 8. Follow the steps below that it using the documentation provided by Microsoft, then return to your operating system: Windows XP a) Click on [...the AppleTalk protocol is not listed, install it is in the list of the machine in the Address bar. 2. Install the Printer Driver 1. At your workstation, open the Web browser and enter the TCP/IP address of installed protocols, make sure that are specific ...
...click on [Network Connections] Xerox WorkCentre 4250/4260 Series System Administration Guide 43 Click the [Reboot Machine] button and click [OK] to enable the Protocol. 8. Follow the steps below that it using the documentation provided by Microsoft, then return to your operating system: Windows XP a) Click on [...the AppleTalk protocol is not listed, install it is in the list of the machine in the Address bar. 2. Install the Printer Driver 1. At your workstation, open the Web browser and enter the TCP/IP address of installed protocols, make sure that are specific ...
System Administration Guide
Page 56
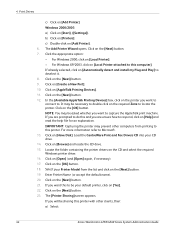
...click on [Help] and read the help file for an explanation. Select your CD drive. 14. Click on the CD and select the required Windows printer driver. 16. Click on [Browse] and locate the CD drive. 15. Click on [Have Disk]. Click on [Create a New Port]. 10...Click on the [Next] button. 9. Click on [AppleTalk Printing Devices]. 11. NOTE: You may prevent other clients, then: a) Select: 44 Xerox WorkCentre 4250/4260 Series System Administration Guide IMPORTANT: Capturing the printer may be necessary to double-click on [Open] (and [Open] again, if necessary). 17. Click...
...click on [Help] and read the help file for an explanation. Select your CD drive. 14. Click on the CD and select the required Windows printer driver. 16. Click on [Browse] and locate the CD drive. 15. Click on [Have Disk]. Click on [Create a New Port]. 10...Click on the [Next] button. 9. Click on [AppleTalk Printing Devices]. 11. NOTE: You may prevent other clients, then: a) Select: 44 Xerox WorkCentre 4250/4260 Series System Administration Guide IMPORTANT: Capturing the printer may be necessary to double-click on [Open] (and [Open] again, if necessary). 17. Click...
System Administration Guide
Page 57
.... 27. Ensure that the test page is selected next to [Specify a Location]. 7. c) Click on [Yes] to browse for suitable driver]. 5. Procedure 1. Insert the CentreWare Print and Fax Drivers CD into your CD drive. 10. Xerox WorkCentre 4250/4260 Series System Administration Guide 45 Windows 2000. • [Share Name] - Click on the [Next] button. 24. The printer...
.... 27. Ensure that the test page is selected next to [Specify a Location]. 7. c) Click on [Yes] to browse for suitable driver]. 5. Procedure 1. Insert the CentreWare Print and Fax Drivers CD into your CD drive. 10. Xerox WorkCentre 4250/4260 Series System Administration Guide 45 Windows 2000. • [Share Name] - Click on the [Next] button. 24. The printer...
System Administration Guide
Page 60
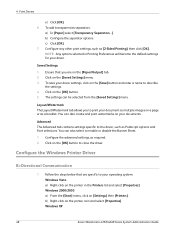
...also select to print your document as multiple images on a page or as Postscript options and Font selections. Configure the Windows Printer Driver Bi-Directional Communication 1. To add transparencies separators: a) In [Paper] select [Transparency Separators...]. Saved Settings 1. Follow the...c) Click [OK]. 7. You can be selected from the [Saved Settings] menu. Windows XP 48 Xerox WorkCentre 4250/4260 Series System Administration Guide To save your operating system: Windows Vista a) Right-click on the [Save] button and enter a name to the driver, such as a booklet. Click on your...
...also select to print your document as multiple images on a page or as Postscript options and Font selections. Configure the Windows Printer Driver Bi-Directional Communication 1. To add transparencies separators: a) In [Paper] select [Transparency Separators...]. Saved Settings 1. Follow the...c) Click [OK]. 7. You can be selected from the [Saved Settings] menu. Windows XP 48 Xerox WorkCentre 4250/4260 Series System Administration Guide To save your operating system: Windows Vista a) Right-click on the [Save] button and enter a name to the driver, such as a booklet. Click on your...

System Administration Guide
Page 61
... on the [Configuration] tab. 3. Click on the [OK] button. 3. Xerox WorkCentre 4250/4260 Series System Administration Guide 49 The driver's Printing Preferences will report information about the printer is printed at the machine. Click on [Close] to close the [Test Page] window. Configure the Windows Printer Driver a) From the [Start] menu, click on [Manual] and enter the...
... on the [Configuration] tab. 3. Click on the [OK] button. 3. Xerox WorkCentre 4250/4260 Series System Administration Guide 49 The driver's Printing Preferences will report information about the printer is printed at the machine. Click on [Close] to close the [Test Page] window. Configure the Windows Printer Driver a) From the [Start] menu, click on [Manual] and enter the...

System Administration Guide
Page 113
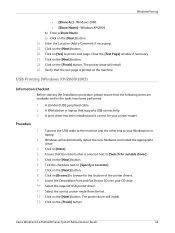
... 101 4. The LAN fax option requires the Embedded Fax Kit to install and setup this feature: 1. Enable LAN Fax (Windows Printer Drivers) LAN Fax must be enabled in its existing configuration. 2. Xerox WorkCentre 4250/4260 Series System Administration Guide 101 NOTE: LAN Fax is the procedure to follow to be enabled automatically, with Bi-directional...
... 101 4. The LAN fax option requires the Embedded Fax Kit to install and setup this feature: 1. Enable LAN Fax (Windows Printer Drivers) LAN Fax must be enabled in its existing configuration. 2. Xerox WorkCentre 4250/4260 Series System Administration Guide 101 NOTE: LAN Fax is the procedure to follow to be enabled automatically, with Bi-directional...
System Administration Guide
Page 209
... IIO Status 143 W Who should use this Guide? 1 Windows ADS 132, 133 Windows Print Driver accounting 46 bi-directional setup 46 installable options 46 paper/output 47 printing preferences 47 saved settings 48 Windows Printing 35 Windows TCP/IP 13 Wireless Connectivity 187 X Xerox Standard Accounting 113 Xerox WorkCentre 4250/4260 Series 2 XSA create general account 119 group account...
... IIO Status 143 W Who should use this Guide? 1 Windows ADS 132, 133 Windows Print Driver accounting 46 bi-directional setup 46 installable options 46 paper/output 47 printing preferences 47 saved settings 48 Windows Printing 35 Windows TCP/IP 13 Wireless Connectivity 187 X Xerox Standard Accounting 113 Xerox WorkCentre 4250/4260 Series 2 XSA create general account 119 group account...

User Guide
Page 151
...machine, refer to those shown but with a reduced selection of the Windows printer driver options for the WorkCentre 4250S/4260S, 4250X/4260X and 4250XF/4260XF machines that are similar to the Drivers CD or download the latest versions from electronic documents. NOTE: More ... the printer drivers. The PCL printer driver screens are compatible with your PC by installing the appropriate printer driver. 9 Print The Xerox WorkCentre 4250S/4260S, 4250X/4260X and 4250XF/4260XF printers produce high quality prints from the Xerox website at www.xerox.com. Xerox WorkCentre 4250/4260 User Guide...
...machine, refer to those shown but with a reduced selection of the Windows printer driver options for the WorkCentre 4250S/4260S, 4250X/4260X and 4250XF/4260XF machines that are similar to the Drivers CD or download the latest versions from electronic documents. NOTE: More ... the printer drivers. The PCL printer driver screens are compatible with your PC by installing the appropriate printer driver. 9 Print The Xerox WorkCentre 4250S/4260S, 4250X/4260X and 4250XF/4260XF printers produce high quality prints from the Xerox website at www.xerox.com. Xerox WorkCentre 4250/4260 User Guide...
User Guide
Page 156
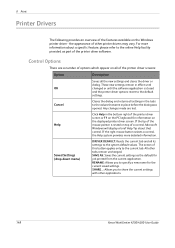
...following provides an overview of the features available on all of the printer driver screens: Option Description Saves all settings in the tabs to share the current settings with other applications. 148 Xerox WorkCentre 4250/4260 User Guide Control Options There are lost. The action of this button ...dialog and returns all the new settings and closes the driver or dialog. SAVE AS: Saves the current settings as part of options which appear on the Windows printer driver - Any changes made are a number of the printer driver software. If the tip of other tabs remain unchanged...
...following provides an overview of the features available on all of the printer driver screens: Option Description Saves all settings in the tabs to share the current settings with other applications. 148 Xerox WorkCentre 4250/4260 User Guide Control Options There are lost. The action of this button ...dialog and returns all the new settings and closes the driver or dialog. SAVE AS: Saves the current settings as part of options which appear on the Windows printer driver - Any changes made are a number of the printer driver software. If the tip of other tabs remain unchanged...


