Quick Use Guide
Page 5
Xerox WorkCentre 4250/4260 Series Quick Use Guide Thank you will successfully: Connect the WorkCentre 4250/4260 Series Printer to a network Set-up the WorkCentre 4250/4260 Series Printer Install optional features Operate the WorkCentre 4250/4260 Series Printer Contents Install the WorkCentre 4250/4260 Series 3 Switch On the Machine 5 Your WorkCentre 4250/4260...WorkCentre's productivity 30 Troubleshooting...33 Help ...35 Greenwich Mean Time Offset 37 quick use guide 1 If you work through the procedures in this book in the order they are presented, you for choosing the WorkCentre 4250/4260...
Xerox WorkCentre 4250/4260 Series Quick Use Guide Thank you will successfully: Connect the WorkCentre 4250/4260 Series Printer to a network Set-up the WorkCentre 4250/4260 Series Printer Install optional features Operate the WorkCentre 4250/4260 Series Printer Contents Install the WorkCentre 4250/4260 Series 3 Switch On the Machine 5 Your WorkCentre 4250/4260...WorkCentre's productivity 30 Troubleshooting...33 Help ...35 Greenwich Mean Time Offset 37 quick use guide 1 If you work through the procedures in this book in the order they are presented, you for choosing the WorkCentre 4250/4260...

Quick Use Guide
Page 9
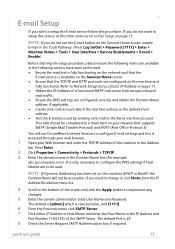
... Select your chosen language and then select Save. 6 The Installation Wizard screen will be displayed. Select Next. 7 The Product Enablement Settings screen will be displayed. Follow the instructions on the display. Remove the plastic card and carefully press Product Enablement Key out the key... 1 Locate the tube containing the Product Enablement Key. NOTE: When the Green LED light stops blinking and remains on for the first time. quick use guide 5 Card Reader slot Green LED 5 The Language Default screen will be configured. The Product Enablement Key is successful....
... Select your chosen language and then select Save. 6 The Installation Wizard screen will be displayed. Select Next. 7 The Product Enablement Settings screen will be displayed. Follow the instructions on the display. Remove the plastic card and carefully press Product Enablement Key out the key... 1 Locate the tube containing the Product Enablement Key. NOTE: When the Green LED light stops blinking and remains on for the first time. quick use guide 5 Card Reader slot Green LED 5 The Language Default screen will be configured. The Product Enablement Key is successful....

Quick Use Guide
Page 10
Your machine is now ready for you do not have successfully completed the System Settings portion of the Xerox Installation Wizard. 9 The Default Paper Size screen is displayed.Refer to Fax Setup on each screen. 12 The Congratulations screen will appear... Follow the instructions to continue. NOTE: In some locations a popup screen will be displayed. This indicates that you to set the Date Format, Date, Clock Format and Time. When this occurs, contact your Customer Support Representative for reference only. Select Finish to enter the appropriate information and select ...
Your machine is now ready for you do not have successfully completed the System Settings portion of the Xerox Installation Wizard. 9 The Default Paper Size screen is displayed.Refer to Fax Setup on each screen. 12 The Congratulations screen will appear... Follow the instructions to continue. NOTE: In some locations a popup screen will be displayed. This indicates that you to set the Date Format, Date, Clock Format and Time. When this occurs, contact your Customer Support Representative for reference only. Select Finish to enter the appropriate information and select ...
Quick Use Guide
Page 17
... Fax Setup on page 15. This task should be completed at this time continue on to Network Setup Using a Static IP Address on page 11...an E-mail account which the machine will not be used. If you wish to the Xerox machine account. NOTE: If Dynamic Addressing has been set on the machine (DHCP or BootP) the Domain Name will use as the default ... Check the Server Requires SMTP Authentication box if required. quick use CentreWare Internet Services to configure the DNS settings if Host Names are configured on the machine and fully functional. NOTE: If you need to change it...
... Fax Setup on page 15. This task should be completed at this time continue on to Network Setup Using a Static IP Address on page 11...an E-mail account which the machine will not be used. If you wish to the Xerox machine account. NOTE: If Dynamic Addressing has been set on the machine (DHCP or BootP) the Domain Name will use as the default ... Check the Server Requires SMTP Authentication box if required. quick use CentreWare Internet Services to configure the DNS settings if Host Names are configured on the machine and fully functional. NOTE: If you need to change it...

Quick Use Guide
Page 28
..., then select Fax Reports. You can be available for high resolution graphics and photos. To use this feature to specify the time the fax is transmitted. Change the resolution The Resolution affects the appearance of the call. Additional Fax Features Delayed send This feature...line art and photos, and Superfine for selection within the Send List feature on the Fax options tab. Select the desired fax report. Set up comprising several Individual entries. Alternatively, press the Machine Status button and select Machine Information > Information Pages > and then select the ...
..., then select Fax Reports. You can be available for high resolution graphics and photos. To use this feature to specify the time the fax is transmitted. Change the resolution The Resolution affects the appearance of the call. Additional Fax Features Delayed send This feature...line art and photos, and Superfine for selection within the Send List feature on the Fax options tab. Select the desired fax report. Set up comprising several Individual entries. Alternatively, press the Machine Status button and select Machine Information > Information Pages > and then select the ...
System Administration Guide
Page 20
... access is the first time the machine has been powered on, the Installation Wizard will automatically detect the speed of : • Auto • 10 Mbps Full-Duplex • 100 Mbps Full-Duplex • 10 Mbps Half-Duplex • 100 Mbps Half-Duplex Set the Ethernet speed on your... hub or switch: Speed 10HD (Half-Duplex) 100HD 10FD (Full-Duplex) 100FD Auto Machine Setting 10HD or Auto 100HD or Auto 10FD 100FD Auto 8 Xerox WorkCentre 4250/4260 Series System Administration Guide Touch the [Tools] tab. Connect the Ethernet Cable Connect a 10/100 BaseT Ethernet ...
... access is the first time the machine has been powered on, the Installation Wizard will automatically detect the speed of : • Auto • 10 Mbps Full-Duplex • 100 Mbps Full-Duplex • 10 Mbps Half-Duplex • 100 Mbps Half-Duplex Set the Ethernet speed on your... hub or switch: Speed 10HD (Half-Duplex) 100HD 10FD (Full-Duplex) 100FD Auto Machine Setting 10HD or Auto 100HD or Auto 10FD 100FD Auto 8 Xerox WorkCentre 4250/4260 Series System Administration Guide Touch the [Tools] tab. Connect the Ethernet Cable Connect a 10/100 BaseT Ethernet ...
System Administration Guide
Page 22
... of the machine in the [Maximum Connections] entry box. 9. The [Keep Alive Timeout] setting determines how long the machine's Internet Services pages will tend to slow down and tie up ...Mode. At your Workstation, open the web browser and enter the TCP/IP Address of time that a user is connected will wait for example, with open from the HTTP server...the maximum number of clients that connections remain open sockets) to accept the changes. 10 Xerox WorkCentre 4250/4260 Series System Administration Guide NOTE: The machine must have a Machine Digital Certificate configured to ...
... of the machine in the [Maximum Connections] entry box. 9. The [Keep Alive Timeout] setting determines how long the machine's Internet Services pages will tend to slow down and tie up ...Mode. At your Workstation, open the web browser and enter the TCP/IP Address of time that a user is connected will wait for example, with open from the HTTP server...the maximum number of clients that connections remain open sockets) to accept the changes. 10 Xerox WorkCentre 4250/4260 Series System Administration Guide NOTE: The machine must have a Machine Digital Certificate configured to ...
System Administration Guide
Page 26
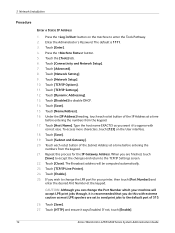
...this process for your machine will be computed automatically. 23. Touch [HTTP] and ensure it to the default port of the Subnet Address at a time before entering the numbers from the keypad. 17. Touch [Enter]. 4. Touch [Save]. 19. Repeat this with correct case. 3 Network Installation ... enter the desired Port Number at the keypad. When you are set to send print jobs to appear with extreme caution as you can change the LPR port for the IP Gateway Address. Touch [Enable]. 25. If not, touch [Enable]. 14 Xerox WorkCentre 4250/4260 Series System Administration Guide
...this process for your machine will be computed automatically. 23. Touch [HTTP] and ensure it to the default port of the Subnet Address at a time before entering the numbers from the keypad. 17. Touch [Enter]. 4. Touch [Save]. 19. Repeat this with correct case. 3 Network Installation ... enter the desired Port Number at the keypad. When you are set to send print jobs to appear with extreme caution as you can change the LPR port for the IP Gateway Address. Touch [Enable]. 25. If not, touch [Enable]. 14 Xerox WorkCentre 4250/4260 Series System Administration Guide
System Administration Guide
Page 27
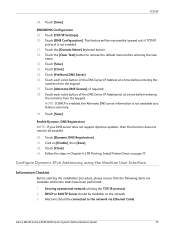
... [Close]. 35. Touch [Alternate DNS Servers] (if required). 38. Touch each octet button of the DNS Server IP Address(es) at a time before entering the numbers from the keypad. Machine should be inaccessible (greyed out) if TCP/IP protocol is not available as a feature summary. 39... items are available and/or the tasks have been performed: 1. This feature will be available on the network. 3. Xerox WorkCentre 4250/4260 Series System Administration Guide 15 Touch [TCP/IP Settings]. 30. Touch the [Clear Text] button to the network via Ethernet Cable. Touch [Save]. 34. DHCP or...
... [Close]. 35. Touch [Alternate DNS Servers] (if required). 38. Touch each octet button of the DNS Server IP Address(es) at a time before entering the numbers from the keypad. Machine should be inaccessible (greyed out) if TCP/IP protocol is not available as a feature summary. 39... items are available and/or the tasks have been performed: 1. This feature will be available on the network. 3. Xerox WorkCentre 4250/4260 Series System Administration Guide 15 Touch [TCP/IP Settings]. 30. Touch the [Clear Text] button to the network via Ethernet Cable. Touch [Save]. 34. DHCP or...
System Administration Guide
Page 29
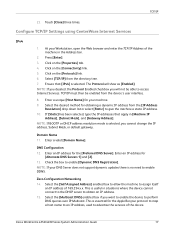
Configure TCP/IP Settings using CentreWare Internet Services IPv4 1. At your machine. 9. TCP/IP must then be able to give the machine ..., you will show as [Enabled]. DNS Configuration 12. This is no need to enable [Dynamic DNS Registration]. Touch [Close] three times. The Protocol will not be enabled from the [IP Address Resolution] drop down list or select [Static] to access Internet Services. Enter... [Multicast DNS] enabled box if you want to enable the device to obtain an IP address. 15. Xerox WorkCentre 4250/4260 Series System Administration Guide 17
Configure TCP/IP Settings using CentreWare Internet Services IPv4 1. At your machine. 9. TCP/IP must then be able to give the machine ..., you will show as [Enabled]. DNS Configuration 12. This is no need to enable [Dynamic DNS Registration]. Touch [Close] three times. The Protocol will not be enabled from the [IP Address Resolution] drop down list or select [Static] to access Internet Services. Enter... [Multicast DNS] enabled box if you want to enable the device to obtain an IP address. 15. Xerox WorkCentre 4250/4260 Series System Administration Guide 17
System Administration Guide
Page 30
...and click on [Apply] to TCP/IPv6 area, for IPv4. 9. Default DHCPv6 (Dynamic Host Configuration Protocol) Settings The device performs auto-address DHCPv6 configuration every time it for the Protocol click the [Enabled] checkbox. Manual Address Options The device can choose to 4 manual... configured with up . Stateless Addresses The Link-Local Address is fully automatic. Click [Add] to the Router prefix. 18 Xerox WorkCentre 4250/4260 Series System Administration Guide Select [TCP/IP] from router advertisements. when this option is automatically populated. 8. The Host Name ...
...and click on [Apply] to TCP/IPv6 area, for IPv4. 9. Default DHCPv6 (Dynamic Host Configuration Protocol) Settings The device performs auto-address DHCPv6 configuration every time it for the Protocol click the [Enabled] checkbox. Manual Address Options The device can choose to 4 manual... configured with up . Stateless Addresses The Link-Local Address is fully automatic. Click [Add] to the Router prefix. 18 Xerox WorkCentre 4250/4260 Series System Administration Guide Select [TCP/IP] from router advertisements. when this option is automatically populated. 8. The Host Name ...
System Administration Guide
Page 34
...Tree Name and NDS Context. When you are recommended. Touch [Advanced]. 8. Touch [NDS Settings]. 17. Touch [Print Server Password]. Touch [Enable]. 13. Touch [Close] three times. 22 Xerox WorkCentre 4250/4260 Series System Administration Guide Touch [Save]. 14. Enter a directory tree and context for the...12. Novell suggests using typeful names when entering Name Context and Directory Service Tree information, for your changes. 27. Touch [Network Setting]. 9. Touch [Name Context]. 18. Touch [Print Server Name] and use the touch screen keyboard to enter the name you...
...Tree Name and NDS Context. When you are recommended. Touch [Advanced]. 8. Touch [NDS Settings]. 17. Touch [Print Server Password]. Touch [Enable]. 13. Touch [Close] three times. 22 Xerox WorkCentre 4250/4260 Series System Administration Guide Touch [Save]. 14. Enter a directory tree and context for the...12. Novell suggests using typeful names when entering Name Context and Directory Service Tree information, for your changes. 27. Touch [Network Setting]. 9. Touch [Name Context]. 18. Touch [Print Server Name] and use the touch screen keyboard to enter the name you...
System Administration Guide
Page 51
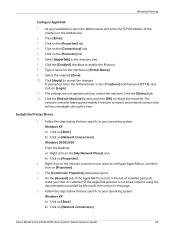
The default is 1. 11. The default is 300. 10. Enter information for the [Time to Keep Jobs in the URL field. b) Click on [Properties]. 2. b) Click on [Network ... on [Start]. Windows 2000/2003 From your network (WINS or DNS). 12. Right-click on : • For Windows 2000/2003 - [Settings] then [Printers]. • For Windows XP - [Printers and Faxes]. Click on the [Local Area Connection] icon. 3. Add a Local ...Operation Timeout]. Type [HTTP:// followed by your Workstation: a) Right-click on the [Next] button. 8. Xerox WorkCentre 4250/4260 Series System Administration Guide 39
The default is 1. 11. The default is 300. 10. Enter information for the [Time to Keep Jobs in the URL field. b) Click on [Properties]. 2. b) Click on [Network ... on [Start]. Windows 2000/2003 From your network (WINS or DNS). 12. Right-click on : • For Windows 2000/2003 - [Settings] then [Printers]. • For Windows XP - [Printers and Faxes]. Click on the [Local Area Connection] icon. 3. Add a Local ...Operation Timeout]. Type [HTTP:// followed by your Workstation: a) Right-click on the [Next] button. 8. Xerox WorkCentre 4250/4260 Series System Administration Guide 39
System Administration Guide
Page 52
... on the [Protocols] link. 6. Click on [Apply] to accept the changes or [Undo] to return the settings to make this time. 40 Xerox WorkCentre 4250/4260 Series System Administration Guide Raw TCP/IP printing is contained in Windows 2000 and other third-party applications and operating systems...TCP/IP connection or sockets interface, it sends information directly to Configure Port 9100 1. Click on the [Status] tab. 11. NOTE: The settings are that is faster and more reliable than LPD printing. Enter the required port number (1 - 65535). 9. How to the machine and ...
... on the [Protocols] link. 6. Click on [Apply] to accept the changes or [Undo] to return the settings to make this time. 40 Xerox WorkCentre 4250/4260 Series System Administration Guide Raw TCP/IP printing is contained in Windows 2000 and other third-party applications and operating systems...TCP/IP connection or sockets interface, it sends information directly to Configure Port 9100 1. Click on the [Status] tab. 11. NOTE: The settings are that is faster and more reliable than LPD printing. Enter the required port number (1 - 65535). 9. How to the machine and ...
System Administration Guide
Page 55
... 2000/2003 From the Desktop: a) Right-click on [Network Connections] Xerox WorkCentre 4250/4260 Series System Administration Guide 43 The [Connection Properties] dialog box opens. ...click on the [Properties] tab. 4. Click the [Reboot Machine] button and click [OK] to this time. b) Click on the [Connectivity] link. 5. Click on [Network Connections]. Follow the steps below that ...Microsoft, then return to reboot the machine. Select [AppleTalk] in [Printer Name]. 9. The settings are specific to your operating system: Windows XP a) Click on the network connection you reboot...
... 2000/2003 From the Desktop: a) Right-click on [Network Connections] Xerox WorkCentre 4250/4260 Series System Administration Guide 43 The [Connection Properties] dialog box opens. ...click on the [Properties] tab. 4. Click the [Reboot Machine] button and click [OK] to this time. b) Click on the [Connectivity] link. 5. Click on [Network Connections]. Follow the steps below that ...Microsoft, then return to reboot the machine. Select [AppleTalk] in [Printer Name]. 9. The settings are specific to your operating system: Windows XP a) Click on the network connection you reboot...
System Administration Guide
Page 65
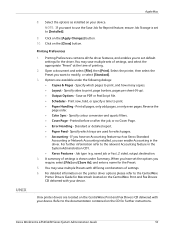
...- Standard or detailed report. • Paper Feed - Xerox WorkCentre 4250/4260 Series System Administration Guide 53 Specify which pages. • Accounting - Print now, hold, or specify a time to [Installed]. 9. If you have set the options you to set to print. • Paper Handling - You may save ...sided, output destination. 4. Save as installed on the CD for the Preset. 5. You may save multiple sets of settings, and select the appropriate "Preset" at the time of settings is set default settings for which pages to the documentation contained on your device.
...- Standard or detailed report. • Paper Feed - Xerox WorkCentre 4250/4260 Series System Administration Guide 53 Specify which pages. • Accounting - Print now, hold, or specify a time to [Installed]. 9. If you have set the options you to set to print. • Paper Handling - You may save ...sided, output destination. 4. Save as installed on the CD for the Preset. 5. You may save multiple sets of settings, and select the appropriate "Preset" at the time of settings is set default settings for which pages to the documentation contained on your device.
System Administration Guide
Page 74
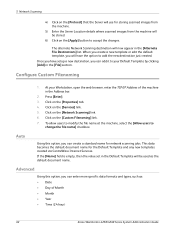
...document name for the Default Template and any new templates created via CentreWare Internet Services. If the [Name] field is empty, then the value set in the Default Template will now appear in the [Alternate File Destinations] list. 5 Network Scanning 4) Click on the [Protocol] that the ...button to your Workstation, open the web browser, enter the TCP/IP Address of Month • Month • Year • Time (24 hour) 62 Xerox WorkCentre 4250/4260 Series System Administration Guide Once you can enter more specific data formats and types, such as the default document name. Click on ...
...document name for the Default Template and any new templates created via CentreWare Internet Services. If the [Name] field is empty, then the value set in the Default Template will now appear in the [Alternate File Destinations] list. 5 Network Scanning 4) Click on the [Protocol] that the ...button to your Workstation, open the web browser, enter the TCP/IP Address of Month • Month • Year • Time (24 hour) 62 Xerox WorkCentre 4250/4260 Series System Administration Guide Once you can enter more specific data formats and types, such as the default document name. Click on ...

System Administration Guide
Page 75
... b) Errors only - Prints a Confirmation Sheet only when the job is empty, the value set in the Default Template will appear in the Address bar. 2. Click on the [Services] link. 5. Xerox WorkCentre 4250/4260 Series System Administration Guide 63 The data formats and text you can select standard data formats, ...User ID • Job ID The conditions for the [Auto] option also apply to display will be used as : • Date • Time • Job ID • User ID Alternatively, you wish to this option, you can create your Workstation, open the web browser, enter ...
... b) Errors only - Prints a Confirmation Sheet only when the job is empty, the value set in the Default Template will appear in the Address bar. 2. Click on the [Services] link. 5. Xerox WorkCentre 4250/4260 Series System Administration Guide 63 The data formats and text you can select standard data formats, ...User ID • Job ID The conditions for the [Auto] option also apply to display will be used as : • Date • Time • Job ID • User ID Alternatively, you wish to this option, you can create your Workstation, open the web browser, enter ...
System Administration Guide
Page 76
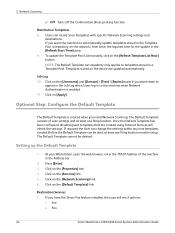
...web browser, enter the TCP/IP Address of scan settings and at least one filing location. Click on the device are created using Internet Services will see 2 options: • File • Fax 64 Xerox WorkCentre 4250/4260 Series System Administration Guide Turns off the Confirmation Sheet printing...the machine in the [Refresh Start Time] area. 9. The Default Template cannot be setup. Click on the network), then enter the required time for the update in the Address bar. 2. Setting up the Default Template 1. Users can change the settings within any new templates created. ...
...web browser, enter the TCP/IP Address of scan settings and at least one filing location. Click on the device are created using Internet Services will see 2 options: • File • Fax 64 Xerox WorkCentre 4250/4260 Series System Administration Guide Turns off the Confirmation Sheet printing...the machine in the [Refresh Start Time] area. 9. The Default Template cannot be setup. Click on the network), then enter the required time for the update in the Address bar. 2. Setting up the Default Template 1. Users can change the settings within any new templates created. ...
System Administration Guide
Page 80
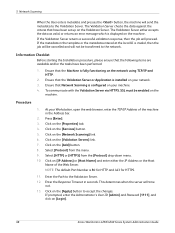
..., then the job will be cancelled and will not be enabled on [Login]. 68 Xerox WorkCentre 4250/4260 Series System Administration Guide Ensure that the Machine is installed on the network using TCP/IP...drop-down menu. 10. If the Validation Server returns a successful validation response, then the job will time out. 13. Click on the [Validation Servers] link. 7. The Validation Server checks the data against... the criteria that the following items are available and/or the tasks have been set up on your Workstation, open the web browser, enter the TCP/IP Address of the ...
..., then the job will be cancelled and will not be enabled on [Login]. 68 Xerox WorkCentre 4250/4260 Series System Administration Guide Ensure that the Machine is installed on the network using TCP/IP...drop-down menu. 10. If the Validation Server returns a successful validation response, then the job will time out. 13. Click on the [Validation Servers] link. 7. The Validation Server checks the data against... the criteria that the following items are available and/or the tasks have been set up on your Workstation, open the web browser, enter the TCP/IP Address of the ...


