Quick Use Guide
Page 5
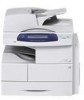
... presented, you for choosing the WorkCentre 4250/4260 Series. Xerox WorkCentre 4250/4260 Series Quick Use Guide Thank you will successfully: Connect the WorkCentre 4250/4260 Series Printer to a network Set-up the WorkCentre 4250/4260 Series Printer Install optional features Operate the WorkCentre 4250/4260 Series Printer Contents Install the WorkCentre 4250/4260 Series 3 Switch On the Machine 5 Your WorkCentre 4250/4260 7 Connecting to the...
... presented, you for choosing the WorkCentre 4250/4260 Series. Xerox WorkCentre 4250/4260 Series Quick Use Guide Thank you will successfully: Connect the WorkCentre 4250/4260 Series Printer to a network Set-up the WorkCentre 4250/4260 Series Printer Install optional features Operate the WorkCentre 4250/4260 Series Printer Contents Install the WorkCentre 4250/4260 Series 3 Switch On the Machine 5 Your WorkCentre 4250/4260 7 Connecting to the...

Quick Use Guide
Page 7
Features WorkCentre 4250 WorkCentre 4250S/ 4260S WorkCentre 4250X/ 4260X WorkCentre 4250XF/ 4260XF Digital Copying Standard Standard Standard Standard Direct/Network - Install the WorkCentre 4250/4260 Series 1 Unpack the machine and any hardware options. 2 Locate the Installation Instructions. 3 Follow the Installation Instructions to assemble the machine and hardware options. Standard Standard Standard Standard Standard Standard Fax Paper Tray 1 & Bypass Paper Tray 2 High...
Features WorkCentre 4250 WorkCentre 4250S/ 4260S WorkCentre 4250X/ 4260X WorkCentre 4250XF/ 4260XF Digital Copying Standard Standard Standard Standard Direct/Network - Install the WorkCentre 4250/4260 Series 1 Unpack the machine and any hardware options. 2 Locate the Installation Instructions. 3 Follow the Installation Instructions to assemble the machine and hardware options. Standard Standard Standard Standard Standard Standard Fax Paper Tray 1 & Bypass Paper Tray 2 High...
Quick Use Guide
Page 8
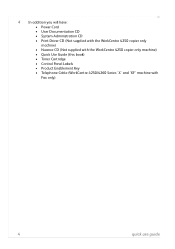
4 In addition you will have: • Power Cord • User Documentation CD • System Administration CD • Print Driver CD (Not supplied with the WorkCentre 4250 copier only machine) • Nuance CD (Not supplied with the WorkCentre 4250 copier only machine) • Quick Use Guide (this book) • Toner Cartridge • Control Panel Labels • Product Enablement Key • Telephone Cable (WorkCentre 4250/4260 Series 'X' and 'XF' machine with Fax only). 4 quick use guide
4 In addition you will have: • Power Cord • User Documentation CD • System Administration CD • Print Driver CD (Not supplied with the WorkCentre 4250 copier only machine) • Nuance CD (Not supplied with the WorkCentre 4250 copier only machine) • Quick Use Guide (this book) • Toner Cartridge • Control Panel Labels • Product Enablement Key • Telephone Cable (WorkCentre 4250/4260 Series 'X' and 'XF' machine with Fax only). 4 quick use guide

Quick Use Guide
Page 9
... the plastic card and carefully press Product Enablement Key out the key. 2 Connect the Power cord to configure the machine is delivered in a plastic tube inside the box with the machine. Follow the instructions on the machine. 4 Install the Product Enablement Key into the Card Reader Slot at the back of the...and remains on continuously (about 10 seconds), the configuration is switched on the display. This is done using the Product Enablement Key when the machine is successful. 8 Remove the Product Enablement Key and select Next on for the first time. The procedure to the...
... the plastic card and carefully press Product Enablement Key out the key. 2 Connect the Power cord to configure the machine is delivered in a plastic tube inside the box with the machine. Follow the instructions on the machine. 4 Install the Product Enablement Key into the Card Reader Slot at the back of the...and remains on continuously (about 10 seconds), the configuration is switched on the display. This is done using the Product Enablement Key when the machine is successful. 8 Remove the Product Enablement Key and select Next on for the first time. The procedure to the...

Quick Use Guide
Page 10
...select Next. NOTE: In some locations a popup screen will appear asking for the passcode. 13 The machine will allow you have successfully completed the System Settings portion of the Xerox Installation Wizard. NOTE: This is for you to use guide Follow the instructions to continue. Select ...either A4 or 8.5 x 11 inches and select Next. 10 The Customer Support and Supplies Numbers screen is complete the machine will be displayed. When ...
...select Next. NOTE: In some locations a popup screen will appear asking for the passcode. 13 The machine will allow you have successfully completed the System Settings portion of the Xerox Installation Wizard. NOTE: This is for you to use guide Follow the instructions to continue. Select ...either A4 or 8.5 x 11 inches and select Next. 10 The Customer Support and Supplies Numbers screen is complete the machine will be displayed. When ...
Quick Use Guide
Page 12
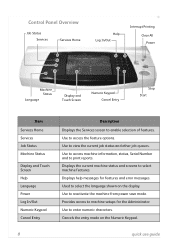
...8 quick use guide Cancels the entry made on the display. Displays help messages for the Administrator. Use to select machine features. Displays the current machine status and screens to enter numeric characters. Control Panel Overview Job Status Services Services Home Help Log In/Out Interrupt ...Printing Clear All Power Machine Status Language Display and Touch Screen Numeric Keypad Cancel Entry Stop Start Item Services Home Services Job Status Machine Status Display and Touch Screen Help Language Power Log In/Out Numeric ...
...8 quick use guide Cancels the entry made on the display. Displays help messages for the Administrator. Use to select machine features. Displays the current machine status and screens to enter numeric characters. Control Panel Overview Job Status Services Services Home Help Log In/Out Interrupt ...Printing Clear All Power Machine Status Language Display and Touch Screen Numeric Keypad Cancel Entry Stop Start Item Services Home Services Job Status Machine Status Display and Touch Screen Help Language Power Log In/Out Numeric ...
Quick Use Guide
Page 14
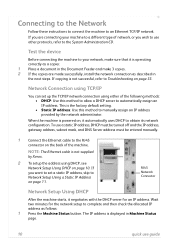
...the factory default setting. • Static IP address: Use this method to allow a DHCP server to manually assign an IP address provided by Xerox. 2 To setup the address using TCP/IP You can set a static IP address, skip to complete and then check the allocated IP address as... TCP/IP network. NOTE: The Ethernet cable is displayed in the next steps. The IP address is not supplied by the network administrator. When the machine is operating correctly as a copier. 1 Place a document in the Document Feeder and make 3 copies. 2 If the copies are connecting your network, make...
...the factory default setting. • Static IP address: Use this method to allow a DHCP server to manually assign an IP address provided by Xerox. 2 To setup the address using TCP/IP You can set a static IP address, skip to complete and then check the allocated IP address as... TCP/IP network. NOTE: The Ethernet cable is displayed in the next steps. The IP address is not supplied by the network administrator. When the machine is operating correctly as a copier. 1 Place a document in the Document Feeder and make 3 copies. 2 If the copies are connecting your network, make...
Quick Use Guide
Page 15
... has not properly allocated an address or DHCP is not enabled on the Control Panel, enter the Administrator's Password [1111] and select Enter. 2 Press the Machine Status button then select Tools > Connectivity and Network Setup > Advanced > Network Setting > Network Setup > TCP/IP Options. 3 Select HTTP and Enable. Select Save. 8 If you...
... has not properly allocated an address or DHCP is not enabled on the Control Panel, enter the Administrator's Password [1111] and select Enter. 2 Press the Machine Status button then select Tools > Connectivity and Network Setup > Advanced > Network Setting > Network Setup > TCP/IP Options. 3 Select HTTP and Enable. Select Save. 8 If you...
Quick Use Guide
Page 16
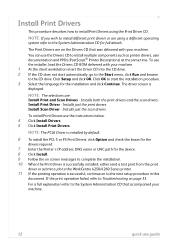
... describes how to start automatically, go to the Start menu, click Run and browse to Troubleshooting on the Drivers CD that accompanied your machine. NOTE: The selections are using the Print Driver CD. Install Scan Driver - To install Print Drivers use guide For a full explanation... send a test print from the print driver or submit a job to the WorkCentre 4250/4260 Series printer. 11 If the printing operation is displayed. To use the installer, load the Drivers CD-ROM delivered with your machine. 12 quick use the instructions below. 4 Click Install Drivers. 5 Click Install...
... describes how to start automatically, go to the Start menu, click Run and browse to Troubleshooting on the Drivers CD that accompanied your machine. NOTE: The selections are using the Print Driver CD. Install Scan Driver - To install Print Drivers use guide For a full explanation... send a test print from the print driver or submit a job to the WorkCentre 4250/4260 Series printer. 11 If the printing operation is displayed. To use the installer, load the Drivers CD-ROM delivered with your machine. 12 quick use the instructions below. 4 Click Install Drivers. 5 Click Install...
Quick Use Guide
Page 17
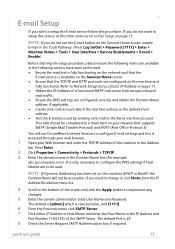
... Addressing has been set on your Web browser and enter the TCP/IP address of the SMTP Server. It is only necessary to the Xerox machine account. quick use as the default From address. • Test the E-mail account by sending an E-mail to configure the DNS settings...> Enable). Before starting the setup procedure, please ensure the following items are available or the following actions have been performed: • Ensure the machine is fully functioning on the network and that the E-mail service is available on the Services Home screen. • Ensure that accepts inbound mail ...
... Addressing has been set on your Web browser and enter the TCP/IP address of the SMTP Server. It is only necessary to the Xerox machine account. quick use as the default From address. • Test the E-mail account by sending an E-mail to configure the DNS settings...> Enable). Before starting the setup procedure, please ensure the following items are available or the following actions have been performed: • Ensure the machine is fully functioning on the network and that the E-mail service is available on the Services Home screen. • Ensure that accepts inbound mail ...
Quick Use Guide
Page 19
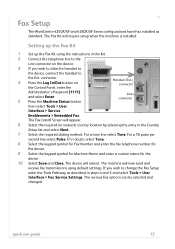
...receive fax transmissions using the instructions in steps 4 and 5 and select Tools > User Interface > Fax Service Settings. The device will require setup when the machine is installed. If in the Country Setup list and select Next. 7 Select the required dialing method. Setting up the Fax Kit 1 Set up the ... Log In/Out button on the device. 3 If you wish to change the Fax Setup enter the Tools Pathway as standard. Fax Setup The WorkCentre 4250X/XF and 4260X/XF Series configurations have Fax installed as described in the Kit. 2 Connect the telephone line to the Ext. If you ...
...receive fax transmissions using the instructions in steps 4 and 5 and select Tools > User Interface > Fax Service Settings. The device will require setup when the machine is installed. If in the Country Setup list and select Next. 7 Select the required dialing method. Setting up the Fax Kit 1 Set up the ... Log In/Out button on the device. 3 If you wish to change the Fax Setup enter the Tools Pathway as standard. Fax Setup The WorkCentre 4250X/XF and 4260X/XF Series configurations have Fax installed as described in the Kit. 2 Connect the telephone line to the Ext. If you ...
Quick Use Guide
Page 20
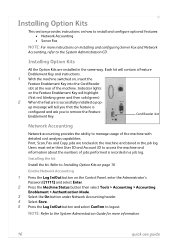
... is successfully installed a pop- Card Reader slot Network Accounting Network accounting provides the ability to manage usage of the machine. NOTE: Refer to access the machine and information about the numbers of jobs performed is configured and ask you that the feature is recorded in the job...Fax NOTE: For more information. 16 quick use guide Installing Option Kits All the Option Kits are tracked at the rear of the machine with detailed cost analysis capabilities. Users must enter their User ID and Account ID to the System Administration Guide for more instructions on...
... is successfully installed a pop- Card Reader slot Network Accounting Network accounting provides the ability to manage usage of the machine. NOTE: Refer to access the machine and information about the numbers of jobs performed is configured and ask you that the feature is recorded in the job...Fax NOTE: For more information. 16 quick use guide Installing Option Kits All the Option Kits are tracked at the rear of the machine with detailed cost analysis capabilities. Users must enter their User ID and Account ID to the System Administration Guide for more instructions on...
Quick Use Guide
Page 21
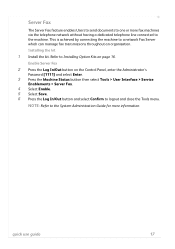
...Tools menu. Enable Server Fax 2 Press the Log In/Out button on the Control Panel, enter the Administrator's Password [1111] and select Enter. 3 Press the Machine Status button then select Tools > User Interface > Service Enablements > Server Fax. 4 Select Enable. 5 Select Save. 6 Press the Log In/Out button and... select Confirm to Installing Option Kits on page 16. This is achieved by connecting the machine to a network Fax Server which can manage fax transmissions throughout an organisation. NOTE: Refer to the System Administration Guide for more fax...
...Tools menu. Enable Server Fax 2 Press the Log In/Out button on the Control Panel, enter the Administrator's Password [1111] and select Enter. 3 Press the Machine Status button then select Tools > User Interface > Service Enablements > Server Fax. 4 Select Enable. 5 Select Save. 6 Press the Log In/Out button and... select Confirm to Installing Option Kits on page 16. This is achieved by connecting the machine to a network Fax Server which can manage fax transmissions throughout an organisation. NOTE: Refer to the System Administration Guide for more fax...

Quick Use Guide
Page 23
... Creating booklets A sequential set of the preset reduce/enlarge ratios or select More to fit on the type and quality of the output. The machine produces 2-sided prints automatically, which when folded, produces a booklet with all the pages in a reduced size, onto one side of a sheet of ...paper. The machine will also reduce and correctly position each image to access custom settings. It is used for creating handouts, storyboards or documents used to be reduced...
... Creating booklets A sequential set of the preset reduce/enlarge ratios or select More to fit on the type and quality of the output. The machine produces 2-sided prints automatically, which when folded, produces a booklet with all the pages in a reduced size, onto one side of a sheet of ...paper. The machine will also reduce and correctly position each image to access custom settings. It is used for creating handouts, storyboards or documents used to be reduced...
Quick Use Guide
Page 24
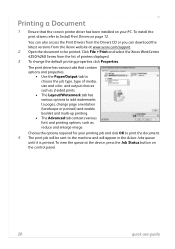
.../support. 2 Open the document to be sent to the machine and will be printed. To install the print drivers refer to Install Print Drivers on page 12. Click File > Print and select the Xerox WorkCentre 4250/4260 Series from the Xerox website at the device, press the Job Status button on the control panel. 20...
.../support. 2 Open the document to be sent to the machine and will be printed. To install the print drivers refer to Install Print Drivers on page 12. Click File > Print and select the Xerox WorkCentre 4250/4260 Series from the Xerox website at the device, press the Job Status button on the control panel. 20...
Quick Use Guide
Page 26
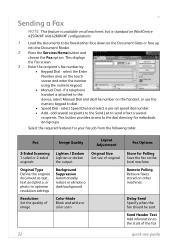
... Polling Retrieve faxes stored on other machines Delay Send Specify when the fax should be faxed either face down on the Document Glass or face up into the Document Feeder. 2 Press the Services Home button and choose the Fax option. if a telephone handset is standard on WorkCentre 4250X/XF and 4260X/XF... groups. add several recipients to the Send List to send a fax to dial. • Speed Dial - Sending a Fax NOTE: This feature is available on all machines, but is attached to the device, select Manual Dial and dial the number on the handset, or use guide select the Enter Number area on...
... Polling Retrieve faxes stored on other machines Delay Send Specify when the fax should be faxed either face down on the Document Glass or face up into the Document Feeder. 2 Press the Services Home button and choose the Fax option. if a telephone handset is standard on WorkCentre 4250X/XF and 4260X/XF... groups. add several recipients to the Send List to send a fax to dial. • Speed Dial - Sending a Fax NOTE: This feature is available on all machines, but is attached to the device, select Manual Dial and dial the number on the handset, or use guide select the Enter Number area on...

Quick Use Guide
Page 28
Alternatively, press the Machine Status button and select Machine Information > Information Pages > and then select the desired report. 24 quick use this option, select the Fax tab and choose from the available options under ...
Alternatively, press the Machine Status button and select Machine Information > Information Pages > and then select the desired report. 24 quick use this option, select the Fax tab and choose from the available options under ...
Quick Use Guide
Page 31
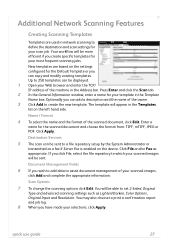
... to print a confirmation report and job log. 8 When you have made your selections, click Apply. You may also choose to assist document management of the machine in the Address bar. New templates are used in network scanning to 250 templates can add a description and the name of the scanned document, click...
... to print a confirmation report and job log. 8 When you have made your selections, click Apply. You may also choose to assist document management of the machine in the Address bar. New templates are used in network scanning to 250 templates can add a description and the name of the scanned document, click...

Quick Use Guide
Page 35
... address or fax numbers. On-line Address Book The Address Book comes in handy when you can obtain information about the machine, and any jobs sent to the machine, from the comfort of your web browser and enter the IP address of the device. Address Numbers registered for each of..., access Tools and explore the Feature Defaults and Copy Service Settings. As a user, you have built up to the machine can be either the Machine Status, Job Status or one of the machine, media it contains, jobs in Internet Services > Properties > Services > E-mail Settings. quick use guide 31 The various...
... address or fax numbers. On-line Address Book The Address Book comes in handy when you can obtain information about the machine, and any jobs sent to the machine, from the comfort of your web browser and enter the IP address of the device. Address Numbers registered for each of..., access Tools and explore the Feature Defaults and Copy Service Settings. As a user, you have built up to the machine can be either the Machine Status, Job Status or one of the machine, media it contains, jobs in Internet Services > Properties > Services > E-mail Settings. quick use guide 31 The various...
Quick Use Guide
Page 36
...can be sent as meeting notes. Moments later it for a presentation, as handouts or as E-mail attachments to your imagination. 32 quick use your machine to print and create documents tailored to a specified E-mail recipient or recipients. For example, the Booklet Creation feature enables the production of booklets or ...multi-page copies from 1 or 2-sided originals. You are customer replaceable, meaning you to call out a Xerox service representative. This enables you can replace the consumable without having to reduce down time.
...can be sent as meeting notes. Moments later it for a presentation, as handouts or as E-mail attachments to your imagination. 32 quick use your machine to print and create documents tailored to a specified E-mail recipient or recipients. For example, the Booklet Creation feature enables the production of booklets or ...multi-page copies from 1 or 2-sided originals. You are customer replaceable, meaning you to call out a Xerox service representative. This enables you can replace the consumable without having to reduce down time.


