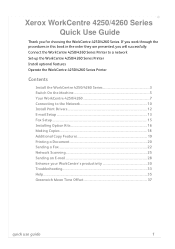
Quick Use Guide
Page 5
... presented, you for choosing the WorkCentre 4250/4260 Series. Xerox WorkCentre 4250/4260 Series Quick Use Guide Thank you will successfully: Connect the WorkCentre 4250/4260 Series Printer to a network Set-up the WorkCentre 4250/4260 Series Printer Install optional features Operate the WorkCentre 4250/4260 Series Printer Contents Install the WorkCentre 4250/4260 Series 3 Switch On the Machine 5 Your WorkCentre 4250/4260 7 Connecting to the...
... presented, you for choosing the WorkCentre 4250/4260 Series. Xerox WorkCentre 4250/4260 Series Quick Use Guide Thank you will successfully: Connect the WorkCentre 4250/4260 Series Printer to a network Set-up the WorkCentre 4250/4260 Series Printer Install optional features Operate the WorkCentre 4250/4260 Series Printer Contents Install the WorkCentre 4250/4260 Series 3 Switch On the Machine 5 Your WorkCentre 4250/4260 7 Connecting to the...

Quick Use Guide
Page 7
Features WorkCentre 4250 WorkCentre 4250S/ 4260S WorkCentre 4250X/ 4260X WorkCentre 4250XF/ 4260XF Digital Copying Standard Standard Standard Standard Direct/Network - E-mail - Standard Standard Standard Standard Standard Standard Fax Paper Tray 1 & Bypass Paper Tray 2 High Capacity ...NOTE: The type of the following configurations. The result will be one of stand available depends on the configuration. Install the WorkCentre 4250/4260 Series 1 Unpack the machine and any hardware options. 2 Locate the Installation Instructions. 3 Follow the Installation Instructions to ...
Features WorkCentre 4250 WorkCentre 4250S/ 4260S WorkCentre 4250X/ 4260X WorkCentre 4250XF/ 4260XF Digital Copying Standard Standard Standard Standard Direct/Network - E-mail - Standard Standard Standard Standard Standard Standard Fax Paper Tray 1 & Bypass Paper Tray 2 High Capacity ...NOTE: The type of the following configurations. The result will be one of stand available depends on the configuration. Install the WorkCentre 4250/4260 Series 1 Unpack the machine and any hardware options. 2 Locate the Installation Instructions. 3 Follow the Installation Instructions to ...
Quick Use Guide
Page 20
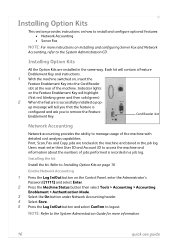
... Enter. 2 Press the Machine Status button then select Tools > Accounting > Accounting Enablement > Authentication Mode. 3 Select the On button under Network Accounting header. 4 Select Save. 5 Press the Log In/Out button and select Confirm to access the machine and information about the numbers of... provides the ability to the System Administration Guide for more instructions on installing and configuring Server Fax and Network Accounting, refer to the System Administration CD. Print, Scan, Fax and Copy jobs are installed in the job log. Each kit will highlight (first red, ...
... Enter. 2 Press the Machine Status button then select Tools > Accounting > Accounting Enablement > Authentication Mode. 3 Select the On button under Network Accounting header. 4 Select Save. 5 Press the Log In/Out button and select Confirm to access the machine and information about the numbers of... provides the ability to the System Administration Guide for more instructions on installing and configuring Server Fax and Network Accounting, refer to the System Administration CD. Print, Scan, Fax and Copy jobs are installed in the job log. Each kit will highlight (first red, ...
Quick Use Guide
Page 29
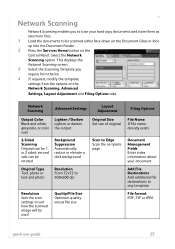
...as electronic files. 1 Load the documents to any template File format PDF, TIF or JPEG quick use guide 25 Network Scanning Network Scanning enables you require from the list. 4 If required, modify the template settings from the options on the Control Panel. This displays the... Network Scanning screen. 3 Select the Scanning Template you to scan your document Add File Destinations Add additional file destinations to be scanned either face down on the Document Glass or face up into the Document Feeder. 2...
...as electronic files. 1 Load the documents to any template File format PDF, TIF or JPEG quick use guide 25 Network Scanning Network Scanning enables you require from the list. 4 If required, modify the template settings from the options on the Control Panel. This displays the... Network Scanning screen. 3 Select the Scanning Template you to scan your document Add File Destinations Add additional file destinations to be scanned either face down on the Document Glass or face up into the Document Feeder. 2...
Quick Use Guide
Page 30
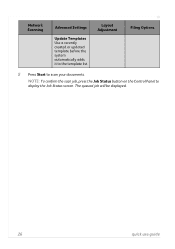
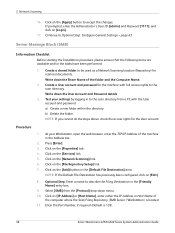
The queued job will be displayed. 26 quick use guide Network Scanning Advanced Settings Update Templates Use a recently created or updated template before the system automatically adds it to the template list Layout Adjustment Filing Options 5 Press Start to display the Job Status screen. NOTE: To confirm the scan job, press the Job Status button on the Control Panel to scan your documents.
The queued job will be displayed. 26 quick use guide Network Scanning Advanced Settings Update Templates Use a recently created or updated template before the system automatically adds it to the template list Layout Adjustment Filing Options 5 Press Start to display the Job Status screen. NOTE: To confirm the scan job, press the Job Status button on the Control Panel to scan your documents.
Quick Use Guide
Page 31
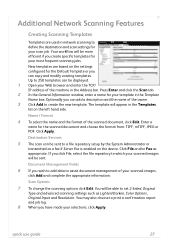
... will be sent. Your workflow will be more efficient if you can copy and modify existing templates. New templates are used in network scanning to print a confirmation report and job log. 8 When you can add a description and the name of the machine in the Address bar. Optionally you create ...
... will be sent. Your workflow will be more efficient if you can copy and modify existing templates. New templates are used in network scanning to print a confirmation report and job log. 8 When you can add a description and the name of the machine in the Address bar. Optionally you create ...
System Administration Guide
Page 5
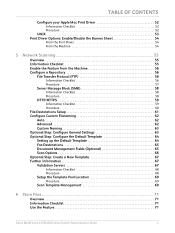
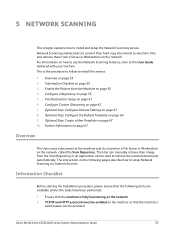
...52 UNIX 53 Print Driver Options: Enable/Disable the Banner Sheet 54 From the Print Driver 54 From the Machine 54 5 Network Scanning ...55 Overview 55 Information Checklist 55 Enable the Feature from the Machine 56 Configure a Repository 56 File Transfer Protocol (FTP...Scan Options 66 Optional Step: Create a New Template 67 Further Information 67 Validation Servers 67 Information Checklist 68 Procedure 68 Setup the Template Pool Location 69 Procedure 69 Scan Template Management 69 6 Store Files...71 Overview 71 Information Checklist 71 Use the Feature 71 Xerox WorkCentre 4250...
...52 UNIX 53 Print Driver Options: Enable/Disable the Banner Sheet 54 From the Print Driver 54 From the Machine 54 5 Network Scanning ...55 Overview 55 Information Checklist 55 Enable the Feature from the Machine 56 Configure a Repository 56 File Transfer Protocol (FTP...Scan Options 66 Optional Step: Create a New Template 67 Further Information 67 Validation Servers 67 Information Checklist 68 Procedure 68 Setup the Template Pool Location 69 Procedure 69 Scan Template Management 69 6 Store Files...71 Overview 71 Information Checklist 71 Use the Feature 71 Xerox WorkCentre 4250...
System Administration Guide
Page 11
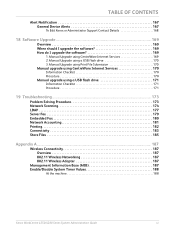
... 173 Network Scanning 174 LDAP 177 Server Fax 179 Embedded Fax 180 Network Accounting 181 Printing 182 Connectivity 183 Store Files 185 Appendix A...187 Wireless Connectivity 187 Overview 187 802.11 Wireless Networking 187 802.11 Wireless Adapter 187 Management Information Base (MIB 187 Enable/Disable System Timer Values 188 At the machine 188 Xerox WorkCentre 4250...
... 173 Network Scanning 174 LDAP 177 Server Fax 179 Embedded Fax 180 Network Accounting 181 Printing 182 Connectivity 183 Store Files 185 Appendix A...187 Wireless Connectivity 187 Overview 187 802.11 Wireless Networking 187 802.11 Wireless Adapter 187 Management Information Base (MIB 187 Enable/Disable System Timer Values 188 At the machine 188 Xerox WorkCentre 4250...
System Administration Guide
Page 13
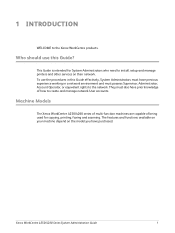
..., setup and manage printers and other services on the model you have prior knowledge of being used for copying, printing, faxing and scanning. The features and functions available on your machine depend on their network. Machine Models The Xerox WorkCentre 4250/4260 series of multi-function machines are capable of how to create and manage...
..., setup and manage printers and other services on the model you have prior knowledge of being used for copying, printing, faxing and scanning. The features and functions available on your machine depend on their network. Machine Models The Xerox WorkCentre 4250/4260 series of multi-function machines are capable of how to create and manage...

System Administration Guide
Page 14
Optional 2 Xerox WorkCentre 4250/4260 Series System Administration Guide A Document Feeder, Paper Tray and Bypass Tray are also provided and 2-sided copying and printing are supported. Features WorkCentre 4250 WorkCentre 4250S/ 4260S WorkCentre 4250X/ 4260X WorkCentre 4250XF/ 4260XF Digital Copying Standard Standard Standard Standard Direct / Network Printing Standard Standard Standard Scan Standard Standard Standard E-mail Standard Standard Standard Fax Optional Optional Standard...
Optional 2 Xerox WorkCentre 4250/4260 Series System Administration Guide A Document Feeder, Paper Tray and Bypass Tray are also provided and 2-sided copying and printing are supported. Features WorkCentre 4250 WorkCentre 4250S/ 4260S WorkCentre 4250X/ 4260X WorkCentre 4250XF/ 4260XF Digital Copying Standard Standard Standard Standard Direct / Network Printing Standard Standard Standard Scan Standard Standard Standard E-mail Standard Standard Standard Fax Optional Optional Standard...
System Administration Guide
Page 44
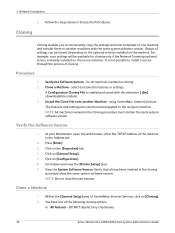
... machine and transfer them to conveniently copy the settings and scan templates of one of CentreWare Internet Services, click on the [Properties] tab. 4. 3 Network Installation 2. for cloning only if the Network Scanning optional service is created and saved with the same system ...software version. select and save the features or settings. Click on [Cloning]. 2. Click on [Configuration]. 6. Scroll down and view the [Printer Setup] area. 7. DO NOT deselect any checkboxes. 32 Xerox WorkCentre 4250...
... machine and transfer them to conveniently copy the settings and scan templates of one of CentreWare Internet Services, click on the [Properties] tab. 4. 3 Network Installation 2. for cloning only if the Network Scanning optional service is created and saved with the same system ...software version. select and save the features or settings. Click on [Cloning]. 2. Click on [Configuration]. 6. Scroll down and view the [Printer Setup] area. 7. DO NOT deselect any checkboxes. 32 Xerox WorkCentre 4250...
System Administration Guide
Page 67
... Step: Configure the Default Template on page 61 6. Xerox WorkCentre 4250/4260 Series System Administration Guide 55 Ensure that the machine is stored on a File Server or Workstation on the machine so that the following pages describe how to install and setup the Network Scanning service. Network Scanning enables Users to convert their image from the Machine...
... Step: Configure the Default Template on page 61 6. Xerox WorkCentre 4250/4260 Series System Administration Guide 55 Ensure that the machine is stored on a File Server or Workstation on the machine so that the following pages describe how to install and setup the Network Scanning service. Network Scanning enables Users to convert their image from the Machine...
System Administration Guide
Page 68
... on the Server or Workstation where images scanned by the machine will be stored. 56 Xerox WorkCentre 4250/4260 Series System Administration Guide SMB (Server Message Block) - The default is accomplished through the use 4 different ways to transfer a scanned image to a Web Server. 4. Touch [Network Scanning]. 9. This is used to scan to the repository: 1. This is used to...
... on the Server or Workstation where images scanned by the machine will be stored. 56 Xerox WorkCentre 4250/4260 Series System Administration Guide SMB (Server Message Block) - The default is accomplished through the use 4 different ways to transfer a scanned image to a Web Server. 4. Touch [Network Scanning]. 9. This is used to scan to the repository: 1. This is used to...
System Administration Guide
Page 69
... is used. 12. Write down the Directory Path Structure. 3. Click on the [Network Scanning] link. 6. Enter the User Account and Password in the [Friendly Name] entry box. 9. Xerox WorkCentre 4250/4260 Series System Administration Guide 57 Create a User account and password which has read and... write access to access the Scan folder. 14. Optional Step: Enter a name to the directory, starting...
... is used. 12. Write down the Directory Path Structure. 3. Click on the [Network Scanning] link. 6. Enter the User Account and Password in the [Friendly Name] entry box. 9. Xerox WorkCentre 4250/4260 Series System Administration Guide 57 Create a User account and password which has read and... write access to access the Scan folder. 14. Optional Step: Enter a name to the directory, starting...
System Administration Guide
Page 70
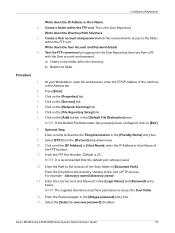
...scan directory. Click on the [Network Scanning] link. 6. Optional Step: Enter a name to Optional Step: Configure General Settings - Continue to describe the Filing Destination in the Address bar. 2. Test your Workstation, open the web browser, enter the TCP/IP Address of the computer where the Scan Filing Repository (SMB Server / Workstation) is 139). 58 Xerox WorkCentre 4250...8. page 63. b) Delete the folder. 5 Network Scanning 16. Click on the [Apply] button to be used as a Network Scanning location (Repository) for scanned documents. Create a shared folder to accept the ...
...scan directory. Click on the [Network Scanning] link. 6. Optional Step: Enter a name to Optional Step: Configure General Settings - Continue to describe the Filing Destination in the Address bar. 2. Test your Workstation, open the web browser, enter the TCP/IP Address of the computer where the Scan Filing Repository (SMB Server / Workstation) is 139). 58 Xerox WorkCentre 4250...8. page 63. b) Delete the folder. 5 Network Scanning 16. Click on the [Apply] button to be used as a Network Scanning location (Repository) for scanned documents. Create a shared folder to accept the ...
System Administration Guide
Page 71
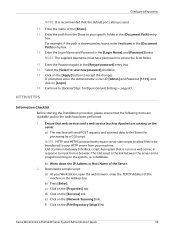
...your HTTP server from a browser. b) Write down the IP Address or Host Name of the [Share]. 13. Xerox WorkCentre 4250/4260 Series System Administration Guide 59 Enter the name of the Server. 2. Enter the path from the Share to...response to the Server for processing by a CGI script. For example, if the path is sharename/wc/scans, enter /wc/scans in the Address bar. Continue to save new password] checkbox. 17. HTTP/HTTPS Information Checklist Before starting.... CGI (Common Gateway Interface) script. c) Click on the system, i.e a database. e) Click on the [Network Scanning] link.
...your HTTP server from a browser. b) Write down the IP Address or Host Name of the [Share]. 13. Xerox WorkCentre 4250/4260 Series System Administration Guide 59 Enter the name of the Server. 2. Enter the path from the Share to...response to the Server for processing by a CGI script. For example, if the path is sharename/wc/scans, enter /wc/scans in the Address bar. Continue to save new password] checkbox. 17. HTTP/HTTPS Information Checklist Before starting.... CGI (Common Gateway Interface) script. c) Click on the system, i.e a database. e) Click on the [Network Scanning] link.
User Guide
Page 95
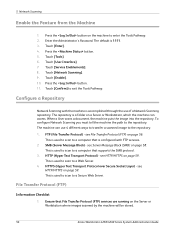
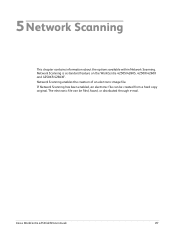
5 Network Scanning This chapter contains information about the options available within Network Scanning. Xerox WorkCentre 4250/4260 User Guide 87 The electronic file can be filed, faxed, or distributed through e-mail. If Network Scanning has been enabled, an electronic file can be created from a hard copy original. Network Scanning is a standard feature on the WorkCentre 4250S/4260S, 4250X/4260X and 4250XF/4260XF. Network Scanning enables the creation of an electronic image file.
5 Network Scanning This chapter contains information about the options available within Network Scanning. Xerox WorkCentre 4250/4260 User Guide 87 The electronic file can be filed, faxed, or distributed through e-mail. If Network Scanning has been enabled, an electronic file can be created from a hard copy original. Network Scanning is a standard feature on the WorkCentre 4250S/4260S, 4250X/4260X and 4250XF/4260XF. Network Scanning enables the creation of an electronic image file.
User Guide
Page 102
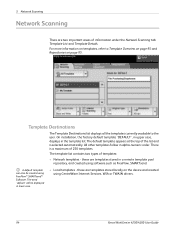
...of the list and is a maximum of 250 templates. The template list contains two types of information under the Network Scanning tab: Template List and Template Details. Template Destinations The Template Destinations list displays all the templates currently available to... will be created using FreeFlow™ SMARTsend™ Software. 5 Network Scanning Network Scanning There are templates stored locally on the device and created using CentreWare Internet Services, WIA or TWAIN drivers. 94 Xerox WorkCentre 4250/4260 User Guide For more information on templates, refer to the user...
...of the list and is a maximum of 250 templates. The template list contains two types of information under the Network Scanning tab: Template List and Template Details. Template Destinations The Template Destinations list displays all the templates currently available to... will be created using FreeFlow™ SMARTsend™ Software. 5 Network Scanning Network Scanning There are templates stored locally on the device and created using CentreWare Internet Services, WIA or TWAIN drivers. 94 Xerox WorkCentre 4250/4260 User Guide For more information on templates, refer to the user...

User Guide
Page 174
... Choice Set Fax Defaults (NOTE: only available if Embedded fax is enabled) Set Copy Defaults E-mail Network Scanning Network Accounting On Demand Image Overwrite Embedded Fax Server Fax USB Port Reduce/Enlarge Preset Basic Copy Preset Fax Country...Fax Defaults Transmission Defaults Mailbox Setup Documents Received in Mailbox Fax Report Error Correction Mode Software Upgrade Network Setting Physical Media Authentication Mode Network Accounting Setup Foreign Interface Device Setup Job Operation Right Immediate Overwrite On Demand Overwrite (when enabled) 166 Xerox WorkCentre 4250/4260 User Guide
... Choice Set Fax Defaults (NOTE: only available if Embedded fax is enabled) Set Copy Defaults E-mail Network Scanning Network Accounting On Demand Image Overwrite Embedded Fax Server Fax USB Port Reduce/Enlarge Preset Basic Copy Preset Fax Country...Fax Defaults Transmission Defaults Mailbox Setup Documents Received in Mailbox Fax Report Error Correction Mode Software Upgrade Network Setting Physical Media Authentication Mode Network Accounting Setup Foreign Interface Device Setup Job Operation Right Immediate Overwrite On Demand Overwrite (when enabled) 166 Xerox WorkCentre 4250/4260 User Guide

Evaluator Guide
Page 12
...; Custom sizes: 3.9 x 5.8 in . card reader not included) One-year on-site Xerox Total Satisfaction Guarantee 12 Xerox WorkCentre® 4250/4260 Evaluator Guide Section 3: Technical Specifications, Supplies and Support Resources Configuration Summary The following sections ...4250: Up to 200,000 pages/month; 4260: Up to 216 x 356 mm Bypass Tray: 100 sheets; Custom sizes: 3.9 x 5.8 in ./99 x 147 mm to PC Desktop® Personal Edition (includes 1 seat of PaperPort®, OmniPage®, Image Retriever), Color scanning Xerox Standard Accounting (tracks copy, print, scan, fax), Network...
...; Custom sizes: 3.9 x 5.8 in . card reader not included) One-year on-site Xerox Total Satisfaction Guarantee 12 Xerox WorkCentre® 4250/4260 Evaluator Guide Section 3: Technical Specifications, Supplies and Support Resources Configuration Summary The following sections ...4250: Up to 200,000 pages/month; 4260: Up to 216 x 356 mm Bypass Tray: 100 sheets; Custom sizes: 3.9 x 5.8 in ./99 x 147 mm to PC Desktop® Personal Edition (includes 1 seat of PaperPort®, OmniPage®, Image Retriever), Color scanning Xerox Standard Accounting (tracks copy, print, scan, fax), Network...

