Statement of Volatility - WorkCentre 4150
Page 1
... user image in the form of 100 minutes after power off. Date: 4/10/2007 Subject: Volatility statement for the WorkCentre 4150 multifunction printer The WorkCentre 4150 does not retain any device information. cycling power or printing a page will retain latent images in the print controller (raster... PEK's (Product Enablement Key). This key can only be used once. A procedure for scanning. The WorkCentre 4150 hard disk drive will remove the image. The WorkCentre 4150 does not retain any hard disk data can be used to completion a latent image may exist in the...
... user image in the form of 100 minutes after power off. Date: 4/10/2007 Subject: Volatility statement for the WorkCentre 4150 multifunction printer The WorkCentre 4150 does not retain any device information. cycling power or printing a page will retain latent images in the print controller (raster... PEK's (Product Enablement Key). This key can only be used once. A procedure for scanning. The WorkCentre 4150 hard disk drive will remove the image. The WorkCentre 4150 does not retain any hard disk data can be used to completion a latent image may exist in the...
Getting Started Guide
Page 5
Xerox WorkCentre 4150 Getting Started Guide Thank you will successfully: Connect the WorkCentre Set-up the WorkCentre Install optional features Operate the WorkCentre Contents Install the WorkCentre 3 Switch On the WorkCentre 4 Your WorkCentre 6 Connecting to the Network 9 Install Print Drivers 11 E-mail Setup 12 Fax Setup 14 Installing ...17 Printing a Document 19 Sending a Fax 21 Network Scanning 23 Sending an E-mail 25 LAN Fax 27 Enhance your WorkCentre's productivity 29 Troubleshooting 31 Help 33 getting started guide 1 If you work through the procedures in this book in ...
Xerox WorkCentre 4150 Getting Started Guide Thank you will successfully: Connect the WorkCentre Set-up the WorkCentre Install optional features Operate the WorkCentre Contents Install the WorkCentre 3 Switch On the WorkCentre 4 Your WorkCentre 6 Connecting to the Network 9 Install Print Drivers 11 E-mail Setup 12 Fax Setup 14 Installing ...17 Printing a Document 19 Sending a Fax 21 Network Scanning 23 Sending an E-mail 25 LAN Fax 27 Enhance your WorkCentre's productivity 29 Troubleshooting 31 Help 33 getting started guide 1 If you work through the procedures in this book in ...
Getting Started Guide
Page 6
... ordering consumables and print media go to www.xerox.com/support. 2 getting started guide All Xerox products mentioned in the User Guide. For the latest information go to the relevant sections in this document is correct at any of other companies are displayed on your WorkCentre, please refer to change the information without...
... ordering consumables and print media go to www.xerox.com/support. 2 getting started guide All Xerox products mentioned in the User Guide. For the latest information go to the relevant sections in this document is correct at any of other companies are displayed on your WorkCentre, please refer to change the information without...
Getting Started Guide
Page 7
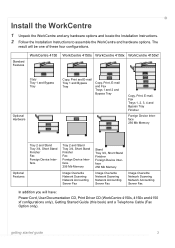
... any hardware options and locate the Installation Instructions. 2 Follow the Installation Instructions to assemble the WorkCentre and hardware options. Standard Features WorkCentre 4150 WorkCentre 4150s WorkCentre 4150x WorkCentre 4150xf Copy Tray 1 and Bypass Tray Optional Hardware Copy, Print and E-mail Tray 1 and ... Short Stand Finisher Fax Foreign Device Interface. The result will have: Power Cord, User Documentation CD, Print Driver CD (WorkCentre 4150s, 4150x and 4150 xf configurations only), Getting Started Guide (this book) and a Telephone Cable (Fax Option only). Tray 2 and Stand ...
... any hardware options and locate the Installation Instructions. 2 Follow the Installation Instructions to assemble the WorkCentre and hardware options. Standard Features WorkCentre 4150 WorkCentre 4150s WorkCentre 4150x WorkCentre 4150xf Copy Tray 1 and Bypass Tray Optional Hardware Copy, Print and E-mail Tray 1 and ... Short Stand Finisher Fax Foreign Device Interface. The result will have: Power Cord, User Documentation CD, Print Driver CD (WorkCentre 4150s, 4150x and 4150 xf configurations only), Getting Started Guide (this book) and a Telephone Cable (Fax Option only). Tray 2 and Stand ...

Getting Started Guide
Page 8
... the instructions on for the first time. The Product Enablement Key is as follows: 1 Locate the tube containing the Product Enablement Key. Switch On the WorkCentre Once the WorkCentre has been assembled it must be displayed.
... the instructions on for the first time. The Product Enablement Key is as follows: 1 Locate the tube containing the Product Enablement Key. Switch On the WorkCentre Once the WorkCentre has been assembled it must be displayed.
Getting Started Guide
Page 9
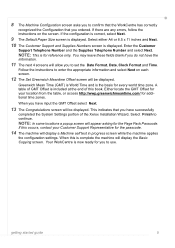
... is complete the machine will display the Basic Copying screen. Greenwich Mean Time (GMT) is World Time and is for reference only. Your WorkCentre is now ready for the passcode. 14 The machine will be displayed. This indicates that you to use. Either locate the GMT Offset for... applies the configuration settings. If the configuration is correct, select Next. 9 The Default Paper Size screen is included at the end of the Xerox Installation Wizard. You may leave these fields blank if you do not have the information. 11 The next 4 screens will allow you have successfully...
... is complete the machine will display the Basic Copying screen. Greenwich Mean Time (GMT) is World Time and is for reference only. Your WorkCentre is now ready for the passcode. 14 The machine will be displayed. This indicates that you to use. Either locate the GMT Offset for... applies the configuration settings. If the configuration is correct, select Next. 9 The Default Paper Size screen is included at the end of the Xerox Installation Wizard. You may leave these fields blank if you do not have the information. 11 The next 4 screens will allow you have successfully...
Getting Started Guide
Page 10
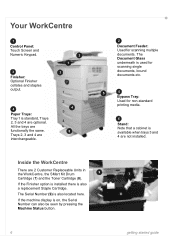
All the trays are 2 Customer Replaceable Units in the WorkCentre, the SMart Kit Drum 9 Cartridge (7) and the Toner Cartridge (8). Inside the WorkCentre There are functionally the same. The Document Glass underneath is used for scanning single ... 3 1 2 4 3 4 6 2 Document Feeder: Used for non-standard printing media. 6 Stand: Note that a cabinet is also a replacement Staple Cartridge. Your WorkCentre 1 Control Panel: Touch Screen and Numeric Keypad. 3 Finisher: Optional Finisher collates and staples output. 4 Paper Trays: Tray 1 is also located here. If the machine ...
All the trays are 2 Customer Replaceable Units in the WorkCentre, the SMart Kit Drum 9 Cartridge (7) and the Toner Cartridge (8). Inside the WorkCentre There are functionally the same. The Document Glass underneath is used for scanning single ... 3 1 2 4 3 4 6 2 Document Feeder: Used for non-standard printing media. 6 Stand: Note that a cabinet is also a replacement Staple Cartridge. Your WorkCentre 1 Control Panel: Touch Screen and Numeric Keypad. 3 Finisher: Optional Finisher collates and staples output. 4 Paper Trays: Tray 1 is also located here. If the machine ...
Getting Started Guide
Page 11
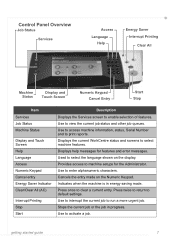
... language shown on the Numeric Keypad. Use to run a more urgent job. Use to interrupt the current job to enter alphanumeric characters. Displays the current WorkCentre status and screens to print reports. Indicates when the machine is in progress. Use to access machine information, status, Serial Number and to select machine...
... language shown on the Numeric Keypad. Use to run a more urgent job. Use to interrupt the current job to enter alphanumeric characters. Displays the current WorkCentre status and screens to print reports. Indicates when the machine is in progress. Use to access machine information, status, Serial Number and to select machine...

Getting Started Guide
Page 13
... this method to allow a DHCP server to automatically assign an IP address. RJ45 Network Connector Network Setup Using DHCP 1 After the WorkCentre starts, it is not successful, refer to Troubleshooting on , it automatically uses DHCP to obtain its network configuration. Wait two minutes ... the DHCP server for the network setup to manually assign an IP address provided by Xerox. 2 Continue on page 10. NOTE: The Ethernet cable is a 4150s, 4150x or 4150xf, follow these instructions to connect the WorkCentre to Tools > Connectivity and Network Setup > Network Setup > TCP/ IP Options ...
... this method to allow a DHCP server to automatically assign an IP address. RJ45 Network Connector Network Setup Using DHCP 1 After the WorkCentre starts, it is not successful, refer to Troubleshooting on , it automatically uses DHCP to obtain its network configuration. Wait two minutes ... the DHCP server for the network setup to manually assign an IP address provided by Xerox. 2 Continue on page 10. NOTE: The Ethernet cable is a 4150s, 4150x or 4150xf, follow these instructions to connect the WorkCentre to Tools > Connectivity and Network Setup > Network Setup > TCP/ IP Options ...
Getting Started Guide
Page 15
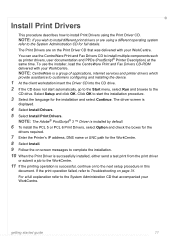
... Print Drivers, select Option and check the boxes for the drivers required. 7 Enter the Printer's IP address, DNS name or UNC path for the WorkCentre. 8 Select Install. 9 Follow the on screen messages to complete the installation. 10 When the Print Driver is successfully installed, either send a test ...print from the print driver or submit a job to the WorkCentre. 11 If the printing operation is successful, continue on to the System Administration CD for the installation and select Continue. Click OK to the...
... Print Drivers, select Option and check the boxes for the drivers required. 7 Enter the Printer's IP address, DNS name or UNC path for the WorkCentre. 8 Select Install. 9 Follow the on screen messages to complete the installation. 10 When the Print Driver is successfully installed, either send a test ...print from the print driver or submit a job to the WorkCentre. 11 If the printing operation is successful, continue on to the System Administration CD for the installation and select Continue. Click OK to the...

Getting Started Guide
Page 16
...the following items are available or have been performed. • Ensure the WorkCentre is fully functioning on the network and that the E-mail service is available ... the IP Address Resolution menu list. 4 Scroll to the bottom of the WorkCentre in the Domain Name box (for example: abc.xyz.company.com). E-mail.... NOTE: If Dynamic Addressing has been set on your WorkCentre is [admin] which the WorkCentre will use Internet Services to Fax Setup. You will not...button to setup this service at a mail client on the WorkCentre (DHCP or BootP) the Domain Name will use as the default ...
...the following items are available or have been performed. • Ensure the WorkCentre is fully functioning on the network and that the E-mail service is available ... the IP Address Resolution menu list. 4 Scroll to the bottom of the WorkCentre in the Domain Name box (for example: abc.xyz.company.com). E-mail.... NOTE: If Dynamic Addressing has been set on your WorkCentre is [admin] which the WorkCentre will use Internet Services to Fax Setup. You will not...button to setup this service at a mail client on the WorkCentre (DHCP or BootP) the Domain Name will use as the default ...
Getting Started Guide
Page 18
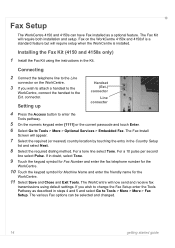
Installing the Fax Kit (4150 and 4150s only) 1 Install the Fax Kit using default settings. Connecting 2 Connect the telephone line to the Line connector on the WorkCentre 4150x and 4150xf is installed. The WorkCentre will require both installation and setup. For a tone line select Tone. The Fax Kit will now send and receive fax... in steps 4 and 5 and select Go to the Ext. For a 10 pulse per second line select Pulse. If in the Kit. Fax Setup The WorkCentre 4150 and 4150s can be selected and changed. 14 getting started guide If you wish to attach a handset to the...
Installing the Fax Kit (4150 and 4150s only) 1 Install the Fax Kit using default settings. Connecting 2 Connect the telephone line to the Line connector on the WorkCentre 4150x and 4150xf is installed. The WorkCentre will require both installation and setup. For a tone line select Tone. The Fax Kit will now send and receive fax... in steps 4 and 5 and select Go to the Ext. For a 10 pulse per second line select Pulse. If in the Kit. Fax Setup The WorkCentre 4150 and 4150s can be selected and changed. 14 getting started guide If you wish to attach a handset to the...
Getting Started Guide
Page 19
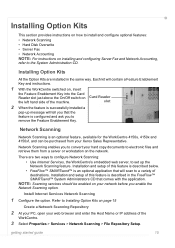
... are installed in the FreeFlow™ SMARTsend™ System Administrators CD that the feature is an optional feature, available for the WorkCentre 4150s, 4150x and 4150xf, and can be enabled on your network before you that comes with the application. Installation and setup of ... services should be purchased from a server or workstation on page 15 Create a Network Scanning Repository 2 At your PC, open your Xerox Sales Representative. Network Scanning enables you to remove the Feature Enablement Key. Install Internet Services Network Scanning 1 Configure the option. getting ...
... are installed in the FreeFlow™ SMARTsend™ System Administrators CD that the feature is an optional feature, available for the WorkCentre 4150s, 4150x and 4150xf, and can be enabled on your network before you that comes with the application. Installation and setup of ... services should be purchased from a server or workstation on page 15 Create a Network Scanning Repository 2 At your PC, open your Xerox Sales Representative. Network Scanning enables you to remove the Feature Enablement Key. Install Internet Services Network Scanning 1 Configure the option. getting ...
Getting Started Guide
Page 20
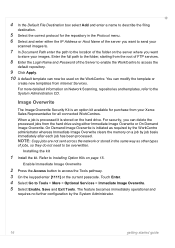
...server you want to send your scanned images to. 7 In Document Path enter the path to the location of the Server to enable the WorkCentre to access the default repository. 9 Click Apply. 10 A default template can modify the template or create new templates from the hard drive .... Installing the kit 1 Install the kit. For more detailed information on the WorkCentre. For security, you want to store your Xerox Sales Representative for the repository in the same way as required by the WorkCentre administrator whereas Immediate Image Overwrite clears the memory on the hard drive. On Demand...
...server you want to send your scanned images to. 7 In Document Path enter the path to the location of the Server to enable the WorkCentre to access the default repository. 9 Click Apply. 10 A default template can modify the template or create new templates from the hard drive .... Installing the kit 1 Install the kit. For more detailed information on the WorkCentre. For security, you want to store your Xerox Sales Representative for the repository in the same way as required by the WorkCentre administrator whereas Immediate Image Overwrite clears the memory on the hard drive. On Demand...
Getting Started Guide
Page 22
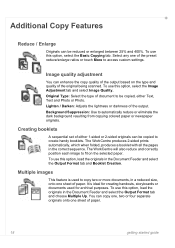
... be reduced or enlarged between 25% and 400%. Creating booklets A sequential set of either Text, Text and Photo or Photo. The WorkCentre produces 2-sided prints automatically, which when folded, produces a booklet with all the pages in the Document Feeder and select the Output Format... tab and select Image Quality. Background Suppression: Use to fit on the type and quality of the original being scanned. The WorkCentre will also reduce and correctly position each image to automatically reduce or eliminate the dark background resulting from copying colored paper or newspaper...
... be reduced or enlarged between 25% and 400%. Creating booklets A sequential set of either Text, Text and Photo or Photo. The WorkCentre produces 2-sided prints automatically, which when folded, produces a booklet with all the pages in the Document Feeder and select the Output Format... tab and select Image Quality. Background Suppression: Use to fit on the type and quality of the original being scanned. The WorkCentre will also reduce and correctly position each image to automatically reduce or eliminate the dark background resulting from copying colored paper or newspaper...
Getting Started Guide
Page 23
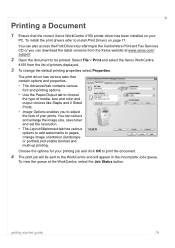
The print driver has various tabs that the correct Xerox WorkCentre 4150 printer driver has been installed on page 11. You can also access the Print Drivers by referring to the CentreWare Print and Fax Services CD ... printers displayed. 3 To change image orientation (landscape or portrait) and enable booklet and multi-up printing. Select File > Print and select the Xerox WorkCentre 4150 from the Xerox website at the WorkCentre, select the Job Status button. You can reduce and enlarge the image size, save toner and set the resolution. • The Layout/Watermark...
The print driver has various tabs that the correct Xerox WorkCentre 4150 printer driver has been installed on page 11. You can also access the Print Drivers by referring to the CentreWare Print and Fax Services CD ... printers displayed. 3 To change image orientation (landscape or portrait) and enable booklet and multi-up printing. Select File > Print and select the Xerox WorkCentre 4150 from the Xerox website at the WorkCentre, select the Job Status button. You can reduce and enlarge the image size, save toner and set the resolution. • The Layout/Watermark...
Getting Started Guide
Page 25
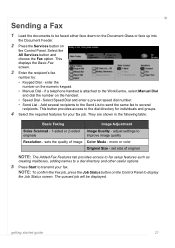
... color Original Size - They are shown in the following table: Basic Faxing Image Adjustment Sides Scanned - 1-sided or 2-sided Image Quality - adjust settings to the WorkCentre, select Manual Dial and dial the number on the Control Panel to several recipients to the Send List to send the same fax to display...
... color Original Size - They are shown in the following table: Basic Faxing Image Adjustment Sides Scanned - 1-sided or 2-sided Image Quality - adjust settings to the WorkCentre, select Manual Dial and dial the number on the Control Panel to several recipients to the Send List to send the same fax to display...
Getting Started Guide
Page 26
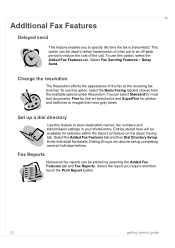
.... To use this option, select the Added Fax Features tab. To use this feature to store destination names, fax numbers and transmission settings in your WorkCentre. Enter Individual fax details. This option can select Standard for most text documents, Fine for line art and photos and SuperFine for selection within the...
.... To use this option, select the Added Fax Features tab. To use this feature to store destination names, fax numbers and transmission settings in your WorkCentre. Enter Individual fax details. This option can select Standard for most text documents, Fine for line art and photos and SuperFine for selection within the...

Getting Started Guide
Page 28
... and job log. 8 When you can copy and modify existing templates. Your new template will appear in the Templates list on the WorkCentre. You may also choose to assist document management of the machine in the Template Name box. Your workflow will appear in the Template...destination and scan settings for your scanned images will be sent. Additional Network Scanning Features Creating a Scanning Templates Templates are based on the WorkCentre. 24 getting started guide Input the Administrator's user name and passcode [admin/1111]. Destination Services 5 The scan can be sent to ...
... and job log. 8 When you can copy and modify existing templates. Your new template will appear in the Templates list on the WorkCentre. You may also choose to assist document management of the machine in the Template Name box. Your workflow will appear in the Template...destination and scan settings for your scanned images will be sent. Additional Network Scanning Features Creating a Scanning Templates Templates are based on the WorkCentre. 24 getting started guide Input the Administrator's user name and passcode [admin/1111]. Destination Services 5 The scan can be sent to ...
Getting Started Guide
Page 30
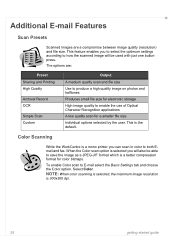
.... NOTE: When color scanning is selected, the maximum image resolution is the default. This is 300x300 dpi. 26 getting started guide Color Scanning While the WorkCentre is a better compression format for a smaller file size Individual options selected by the user. Select Color. This feature enables you can scan in color to...
.... NOTE: When color scanning is selected, the maximum image resolution is the default. This is 300x300 dpi. 26 getting started guide Color Scanning While the WorkCentre is a better compression format for a smaller file size Individual options selected by the user. Select Color. This feature enables you can scan in color to...


