
Quick Reference Poster
Page 1
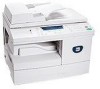
...Optional) Stop Start Document Input Tray Bypass Tray CCOOPPYY Basic Copying 1. and press Start. Part No. 032N00474 GENERAL SETUP FAX SETUP WORKCENTRE 4118X (4-IN-1) ONLY Setting the Paper Size Creating a Mailbox Speed Dial Setup 1. Press Machine Status, select Reports using the navigation ... to print a confirmation page after each chosen feature using the numeric keypad, then press Enter. FAX WORKCENTRE 4118X (4-IN-1) ONLY Sending a Fax 1. Manual Dial ¾ Press Manual Dial. Select either 15, 30, 60 or 120 minutes. Secure Receive If Secure Receive is enabled,...
...Optional) Stop Start Document Input Tray Bypass Tray CCOOPPYY Basic Copying 1. and press Start. Part No. 032N00474 GENERAL SETUP FAX SETUP WORKCENTRE 4118X (4-IN-1) ONLY Setting the Paper Size Creating a Mailbox Speed Dial Setup 1. Press Machine Status, select Reports using the navigation ... to print a confirmation page after each chosen feature using the numeric keypad, then press Enter. FAX WORKCENTRE 4118X (4-IN-1) ONLY Sending a Fax 1. Manual Dial ¾ Press Manual Dial. Select either 15, 30, 60 or 120 minutes. Secure Receive If Secure Receive is enabled,...

Quick Reference Poster
Page 1
... and press Start to send the fax. Enter the Mailbox Number using the Control Panel. 4. Select MSG Confirm and press Enter. 4. FAX WORKCENTRE 4118X (4-IN-1) ONLY Sending a Fax 1. Speed Dial ¾ Press Speed Dial and enter the Speed Dial number (1 - 200). Load originals ...navigation keys and press Enter. 2. Group Dial ¾ Press Speed Dial and enter the Group Dial number (1 - 200). Manual Dial ¾ Press Manual Dial. Press Pause/Redial. Use the navigation keys to the Group, enter the required name. Secure Receive If Secure Receive is...
... and press Start to send the fax. Enter the Mailbox Number using the Control Panel. 4. Select MSG Confirm and press Enter. 4. FAX WORKCENTRE 4118X (4-IN-1) ONLY Sending a Fax 1. Speed Dial ¾ Press Speed Dial and enter the Speed Dial number (1 - 200). Load originals ...navigation keys and press Enter. 2. Group Dial ¾ Press Speed Dial and enter the Group Dial number (1 - 200). Manual Dial ¾ Press Manual Dial. Press Pause/Redial. Use the navigation keys to the Group, enter the required name. Secure Receive If Secure Receive is...

Quick Use Guide
Page 22
... multiple destinations for a fax job (4 in 1 only). Use to stop an operation at any time. Stop Use to activate a job. Use to dial a fax number manually (4 in 1 only). Use to add a pause when storing a number in the dial directory (4 in 1 only). Clear/Clear All (AC) Press once to clear all programmed... twice to clear a current entry e.g. Use to access setup menus and customise the machine. quick_use.book Page 20 Thursday, March 2, 2006 9:38 AM Machine Status Manual Group Manual Dial Speed Dial Pause/Redial Numeric Keypad Start Use to enter alphanumeric characters.
... multiple destinations for a fax job (4 in 1 only). Use to stop an operation at any time. Stop Use to activate a job. Use to dial a fax number manually (4 in 1 only). Use to add a pause when storing a number in the dial directory (4 in 1 only). Clear/Clear All (AC) Press once to clear all programmed... twice to clear a current entry e.g. Use to access setup menus and customise the machine. quick_use.book Page 20 Thursday, March 2, 2006 9:38 AM Machine Status Manual Group Manual Dial Speed Dial Pause/Redial Numeric Keypad Start Use to enter alphanumeric characters.
Quick Use Guide
Page 26
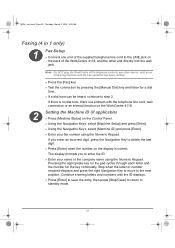
...digit. ¾ Press [Enter] when the number on the display is a problem with the telephone line cord, wall connection or an internal function on the WorkCentre 4118. 2 Setting the Machine ID (if applicable) ¾ Press [Machine Status] on the Control Panel. ¾ Using the Navigation Keys, select [Machine... and numbers until the Fax operation has been verified. ¾ Press the [Fax] key. ¾ Test the connection by pressing the [Manual Dial] key and listen for the key continually. Stop when the letter or number required displays and press the right Navigation Key to move to...
...digit. ¾ Press [Enter] when the number on the display is a problem with the telephone line cord, wall connection or an internal function on the WorkCentre 4118. 2 Setting the Machine ID (if applicable) ¾ Press [Machine Status] on the Control Panel. ¾ Using the Navigation Keys, select [Machine... and numbers until the Fax operation has been verified. ¾ Press the [Fax] key. ¾ Test the connection by pressing the [Manual Dial] key and listen for the key continually. Stop when the letter or number required displays and press the right Navigation Key to move to...

Quick Use Guide
Page 27
... original into the Document Feeder or place face-down on the Document Glass. ¾ Press the [Fax] key to activate Fax mode. ¾ Press the [Manual Dial] key and listen for the dial tone. ¾ Use the telephone keypad to send the fax. Original Type ¾ Press the [Fax] key to...
... original into the Document Feeder or place face-down on the Document Glass. ¾ Press the [Fax] key to activate Fax mode. ¾ Press the [Manual Dial] key and listen for the dial tone. ¾ Use the telephone keypad to send the fax. Original Type ¾ Press the [Fax] key to...

System Administration Guide
Page 14
... print drivers. Customer If you are encountered during the WorkCentre 4118 installation, refer to the Problem Solving chapter for additional information on the Gateway Address, Subnet Mask Address and Primary DNS, if needed. Xerox If problems are going to configure TCP/IP manually, you need to obtain and record the following items are...
... print drivers. Customer If you are encountered during the WorkCentre 4118 installation, refer to the Problem Solving chapter for additional information on the Gateway Address, Subnet Mask Address and Primary DNS, if needed. Xerox If problems are going to configure TCP/IP manually, you need to obtain and record the following items are...

System Administration Guide
Page 17
Xerox WorkCentre 4118 System Administration Guide Page 2-5 To enter the addresses manually, you need to obtain the following: ¾ TCP/IP Address ¾ Gateway Address ¾ Subnet Mask Address ¾ Primary DNS Server Address Installation Procedure There are three stages required to install the WorkCentre 4118 in a TCP/IP networking environment: ¾ Network Communication Setup...
Xerox WorkCentre 4118 System Administration Guide Page 2-5 To enter the addresses manually, you need to obtain the following: ¾ TCP/IP Address ¾ Gateway Address ¾ Subnet Mask Address ¾ Primary DNS Server Address Installation Procedure There are three stages required to install the WorkCentre 4118 in a TCP/IP networking environment: ¾ Network Communication Setup...

System Administration Guide
Page 21
... type in the password and press [Enter]. Basic Network Installation Manually setting TCP/IP Addresses At the WorkCentre 4118, perform these steps: HINT: Xerox CentreWare Internet Services can also be used to configure the WorkCentre 4118, refer to know the following information: ¾ The ...[Machine Status] button. 3 ¾ Press or until Network Setup displays and press [Enter]. System Admin Tools [Network Setup] Xerox WorkCentre 4118 System Administration Guide Page 2-9 When manually making the TCP/IP settings, you will need to the Internet Services chapter for instructions.
... type in the password and press [Enter]. Basic Network Installation Manually setting TCP/IP Addresses At the WorkCentre 4118, perform these steps: HINT: Xerox CentreWare Internet Services can also be used to configure the WorkCentre 4118, refer to know the following information: ¾ The ...[Machine Status] button. 3 ¾ Press or until Network Setup displays and press [Enter]. System Admin Tools [Network Setup] Xerox WorkCentre 4118 System Administration Guide Page 2-9 When manually making the TCP/IP settings, you will need to the Internet Services chapter for instructions.

System Administration Guide
Page 22
Page 2-10 Xerox WorkCentre 4118 System Administration Guide Press the to move between fields, use to correct mistakes. IP Address [xxx.xxx.xxx.xxx] 9 ¾ Continue with Workstation Setup on page 2-11. Network] Config Network [Manual] 7 ¾ For each address, press or until Manual displays and press [Enter]. Manual [IP Address] 8 ¾ Enter the address using...
Page 2-10 Xerox WorkCentre 4118 System Administration Guide Press the to move between fields, use to correct mistakes. IP Address [xxx.xxx.xxx.xxx] 9 ¾ Continue with Workstation Setup on page 2-11. Network] Config Network [Manual] 7 ¾ For each address, press or until Manual displays and press [Enter]. Manual [IP Address] 8 ¾ Enter the address using...

System Administration Guide
Page 56
... that you can change Port number see "Using CentreWare Internet Services" on page 73. Page 6-4 Xerox WorkCentre 4118 System Administration Guide Config Network [TCP/IP] TCP/IP [Manual] 8 ¾ Press or until Manual displays and press [Enter]. LPD/LPD [Enable] NOTE: While you do this ONLY with extreme caution... as most LPR spoolers are set to send print jobs to the default port number, 515. Manual [LPD/LPD] 9 ¾ To enable or disable LPD/LPD, press or until the required setting, [Enable] or [Disable] displays, enter ...
... that you can change Port number see "Using CentreWare Internet Services" on page 73. Page 6-4 Xerox WorkCentre 4118 System Administration Guide Config Network [TCP/IP] TCP/IP [Manual] 8 ¾ Press or until Manual displays and press [Enter]. LPD/LPD [Enable] NOTE: While you do this ONLY with extreme caution... as most LPR spoolers are set to send print jobs to the default port number, 515. Manual [LPD/LPD] 9 ¾ To enable or disable LPD/LPD, press or until the required setting, [Enable] or [Disable] displays, enter ...

System Administration Guide
Page 61
Advanced TCP/IP Setup 6 ¾ Press or until TCP/IP displays and press [Enter]. 7 ¾ Press or until Manual displays and press [Enter]. 8 ¾ Press or until HTTP displays and press [Enter]. 9 ¾ To enable or disable HTTP, press or until the required setting, [Enable] or [Disable] displays and press [Enter]. Config Network [TCP/IP] TCP/IP [Manual] Manual [HTTP] HTTP [Enable] Xerox WorkCentre 4118 System Administration Guide Page 6-9
Advanced TCP/IP Setup 6 ¾ Press or until TCP/IP displays and press [Enter]. 7 ¾ Press or until Manual displays and press [Enter]. 8 ¾ Press or until HTTP displays and press [Enter]. 9 ¾ To enable or disable HTTP, press or until the required setting, [Enable] or [Disable] displays and press [Enter]. Config Network [TCP/IP] TCP/IP [Manual] Manual [HTTP] HTTP [Enable] Xerox WorkCentre 4118 System Administration Guide Page 6-9

System Administration Guide
Page 98
... in the Unified Driver Configurator. The Add Printer Wizard displays. 2 ¾ Click [Next] to continue. 3 ¾ Select the Manual Selection radio button and click [Next]. 4 ¾ Select Xerox WorkCentre 4118 series. 5 ¾ Scroll to Xerox WC 4118 series (PS) and click [Next]. 6 ¾ Choose a name for the printer and provide its text description. ¾... and click [Add Printer]. A 4118 series icon should now display in as "root" prior to verify the install. 8 ¾ Select [Finished] when complete. Page 8-12 Xerox WorkCentre 4118 System Administration Guide
... in the Unified Driver Configurator. The Add Printer Wizard displays. 2 ¾ Click [Next] to continue. 3 ¾ Select the Manual Selection radio button and click [Next]. 4 ¾ Select Xerox WorkCentre 4118 series. 5 ¾ Scroll to Xerox WC 4118 series (PS) and click [Next]. 6 ¾ Choose a name for the printer and provide its text description. ¾... and click [Add Printer]. A 4118 series icon should now display in as "root" prior to verify the install. 8 ¾ Select [Finished] when complete. Page 8-12 Xerox WorkCentre 4118 System Administration Guide

System Administration Guide
Page 121
...TCP/IP Addresses 2-7 B Basic Network Installation 2-1 Automatically setting TCP/IP Addresses 2-7 Basic TCP/IP Settings 2-5 Ethernet Port Setup 2-3 Information Checklist 2-2 Manually setting TCP/IP Addresses 2-9 Network Communication Setup 2-7 TCP/IP Enabling or Disabling 2-6 Test Print 2-11 Workstation Setup 2-11 Basic TCP/IP Settings ...9-2 Setup using Internet Services 9-3 Testing 9-5 G Glossary 12-1 H HTTP Configuration 7-22 HTTP Enabling/Disabling 6-8 I Information Sources 1-4 Internet Services 7-1 AppleTalk Configuration 7-8 Xerox WorkCentre 4118 System Administration Guide Index-1
...TCP/IP Addresses 2-7 B Basic Network Installation 2-1 Automatically setting TCP/IP Addresses 2-7 Basic TCP/IP Settings 2-5 Ethernet Port Setup 2-3 Information Checklist 2-2 Manually setting TCP/IP Addresses 2-9 Network Communication Setup 2-7 TCP/IP Enabling or Disabling 2-6 Test Print 2-11 Workstation Setup 2-11 Basic TCP/IP Settings ...9-2 Setup using Internet Services 9-3 Testing 9-5 G Glossary 12-1 H HTTP Configuration 7-22 HTTP Enabling/Disabling 6-8 I Information Sources 1-4 Internet Services 7-1 AppleTalk Configuration 7-8 Xerox WorkCentre 4118 System Administration Guide Index-1

System Administration Guide
Page 122
... 8-12 Macintosh Driver Installation 8-4 Test Print 8-11 Test Scan 8-11 Windows Driver Installation 8-6 Workstation Setup 8-8 LPR/LPD Configuration 7-16 LPR/LPD Enabling/Disabling 6-3 M Manually setting TCP/IP Addresses 2-9 N NetWare 3-1 Information Checklist 3-2 IP NDPS Printing 3-4 NetWare Environments 3-3 Test Print 3-5 Network Tools Reset NIC 10-2 Set Factory Defaults 10...Information Sources 1-4 Reset NIC 10-2 S Serial number 1-5 Set Factory Defaults 10-3 SNMP Configuration 7-13 SSDP Configuration 7-15 T TCP/IP Configuration 7-10 Index-2 Xerox WorkCentre 4118 System Administration Guide
... 8-12 Macintosh Driver Installation 8-4 Test Print 8-11 Test Scan 8-11 Windows Driver Installation 8-6 Workstation Setup 8-8 LPR/LPD Configuration 7-16 LPR/LPD Enabling/Disabling 6-3 M Manually setting TCP/IP Addresses 2-9 N NetWare 3-1 Information Checklist 3-2 IP NDPS Printing 3-4 NetWare Environments 3-3 Test Print 3-5 Network Tools Reset NIC 10-2 Set Factory Defaults 10...Information Sources 1-4 Reset NIC 10-2 S Serial number 1-5 Set Factory Defaults 10-3 SNMP Configuration 7-13 SSDP Configuration 7-15 T TCP/IP Configuration 7-10 Index-2 Xerox WorkCentre 4118 System Administration Guide

User Guide
Page 17
...of the equipment, and could create a dangerous condition. ¾ Use supplies and cleaning materials only as specified in the user manuals. There are fastened with screws. Disconnect the power cord from the electrical outlet and contact your copier/printer. ¾ Do...any maintenance procedure that is not specifically described in the documentation that is specifically described in the Xerox installation procedure will produce ozone during normal operation. Xerox WorkCentre 4118 User Guide Page 1-9 Please contact your Authorized local dealer for further information. ¾ Never...
...of the equipment, and could create a dangerous condition. ¾ Use supplies and cleaning materials only as specified in the user manuals. There are fastened with screws. Disconnect the power cord from the electrical outlet and contact your copier/printer. ¾ Do...any maintenance procedure that is not specifically described in the documentation that is specifically described in the Xerox installation procedure will produce ozone during normal operation. Xerox WorkCentre 4118 User Guide Page 1-9 Please contact your Authorized local dealer for further information. ¾ Never...
User Guide
Page 18
...government, national and international agencies as the beam is likely to cause harmful interference in hazardous light exposure. With specific regard to laser safety, the equipment complies with performance standards for a class A digital device, pursuant to Part 15 of children. ¾ ... the United States and Canada. Page 1-10 Xerox WorkCentre 4118 User Guide Welcome If you need additional information about ozone, please request the Xerox publication Ozone by calling 1-800-828-6571 in accordance with the instruction manual, may cause harmful interference to radio communications....
...government, national and international agencies as the beam is likely to cause harmful interference in hazardous light exposure. With specific regard to laser safety, the equipment complies with performance standards for a class A digital device, pursuant to Part 15 of children. ¾ ... the United States and Canada. Page 1-10 Xerox WorkCentre 4118 User Guide Welcome If you need additional information about ozone, please request the Xerox publication Ozone by calling 1-800-828-6571 in accordance with the instruction manual, may cause harmful interference to radio communications....

User Guide
Page 41
...dial a fax number manually (4 in 1 only). an incorrect number or character entry. Xerox WorkCentre 4118 User Guide Page 2-11 Use to stop an operation at any time. Stop Use to access setup menus and customize the machine. Getting Started Display Job Status Machine Status Manual Group Manual Dial Speed Dial Pause... to add a pause when storing a number in the dial directory (4 in 1 only). Use to redial the last phone number called or to manually enter multiple destinations for a fax job (4 in 1 only). Use to view the current job status, add pages to jobs in memory and to...
...dial a fax number manually (4 in 1 only). an incorrect number or character entry. Xerox WorkCentre 4118 User Guide Page 2-11 Use to stop an operation at any time. Stop Use to access setup menus and customize the machine. Getting Started Display Job Status Machine Status Manual Group Manual Dial Speed Dial Pause... to add a pause when storing a number in the dial directory (4 in 1 only). Use to redial the last phone number called or to manually enter multiple destinations for a fax job (4 in 1 only). Use to view the current job status, add pages to jobs in memory and to...

User Guide
Page 95
... heard, press [Start] to dial the fax number with the ¾ Press [Manual Dial]. telephone line open. Manual Dialing ¾ Load the originals and select [Fax]. The fax is audible and the LCD displays 'Phone'. ¾ Dial the fax number. Xerox WorkCentre 4118 User Guide Page 5-7 displays. z Numbers which have been entered. Then select...
... heard, press [Start] to dial the fax number with the ¾ Press [Manual Dial]. telephone line open. Manual Dialing ¾ Load the originals and select [Fax]. The fax is audible and the LCD displays 'Phone'. ¾ Dial the fax number. Xerox WorkCentre 4118 User Guide Page 5-7 displays. z Numbers which have been entered. Then select...

User Guide
Page 111
...activate Fax Duplex. You can be heard, press [Start] and replace the handset. This option is received pick up the external phone handset or press [Manual Dial]. Use to the machine. Use to set fax jobs to print 2 sided, with the binding edge on page 5-22. Use to set fax ...jobs to print 2 sided, with the binding edge on the long edge. Use to set the default Lighten/Darken setting. Xerox WorkCentre 4118 User Guide Page 5-23 If a fax tone can receive a call and immediately switches to fax receive mode. If the machine detects a fax tone, ...
...activate Fax Duplex. You can be heard, press [Start] and replace the handset. This option is received pick up the external phone handset or press [Manual Dial]. Use to the machine. Use to set fax jobs to print 2 sided, with the binding edge on page 5-22. Use to set fax ...jobs to print 2 sided, with the binding edge on the long edge. Use to set the default Lighten/Darken setting. Xerox WorkCentre 4118 User Guide Page 5-23 If a fax tone can receive a call and immediately switches to fax receive mode. If the machine detects a fax tone, ...

User Guide
Page 160
Select [Yes] and press [Enter]. To reset the counter manually refer to Standby mode. ) If the counter is not reset, 'Drum Warning' may appear before the new drum reaches its maximum life. Page 9-10 Xerox WorkCentre 4118 User Guide Maintenance 6 ¾ Reinstall the toner cartridge, then lock the lever. ¾ Close the front cover and the side cover. ¾ The display shows [New Drum Unit?]. The machine returns to the "Maintenance Tools" on page 8-10.
Select [Yes] and press [Enter]. To reset the counter manually refer to Standby mode. ) If the counter is not reset, 'Drum Warning' may appear before the new drum reaches its maximum life. Page 9-10 Xerox WorkCentre 4118 User Guide Maintenance 6 ¾ Reinstall the toner cartridge, then lock the lever. ¾ Close the front cover and the side cover. ¾ The display shows [New Drum Unit?]. The machine returns to the "Maintenance Tools" on page 8-10.


