User Guide
Page 12
...additional information about ozone, please request the Xerox publication Ozone by calling 1-800-828-6571 in the Xerox installation procedure will produce ozone during all consumables away from the reach of children. • Never throw toner, toner cartridges or toner containers into an open flame. ... than those specified herein may result in hazardous light exposure. Certification is dependent on reciprocity agreements, which include requirements for laser product set by the following Agency using the Safety Standards listed. In other than air and is based on copy volume...
...additional information about ozone, please request the Xerox publication Ozone by calling 1-800-828-6571 in the Xerox installation procedure will produce ozone during all consumables away from the reach of children. • Never throw toner, toner cartridges or toner containers into an open flame. ... than those specified herein may result in hazardous light exposure. Certification is dependent on reciprocity agreements, which include requirements for laser product set by the following Agency using the Safety Standards listed. In other than air and is based on copy volume...
User Guide
Page 58
... 2 - Depending on the Internet: IMAGE: monochrome (TIFF) or color (JPEG). Time-out before the task is deleted following a print error in relation to save toner cartridge ink. 81 -
... 2 - Depending on the Internet: IMAGE: monochrome (TIFF) or color (JPEG). Time-out before the task is deleted following a print error in relation to save toner cartridge ink. 81 -
User Guide
Page 119
...paper that has been kept in the paper tray for a long time. • Read the safety rules in normal mode. The initial toner cartridge can produce up to 6000 pages (when printing on Letter paper with a 5% area coverage) or 10000 pages ITU No. 1 in the ... chapter at the end of pages per print operation. 7-1 Consumables There are 2 customer replaceable units in the machine: • Toner Cartridge: - 006R01297 • Drum Cartridge - 013R00628 Toner Cartridge The standard toner cartridge can produce up to 2000 pages (when printing on Letter paper with a 5% area coverage).
...paper that has been kept in the paper tray for a long time. • Read the safety rules in normal mode. The initial toner cartridge can produce up to 6000 pages (when printing on Letter paper with a 5% area coverage) or 10000 pages ITU No. 1 in the ... chapter at the end of pages per print operation. 7-1 Consumables There are 2 customer replaceable units in the machine: • Toner Cartridge: - 006R01297 • Drum Cartridge - 013R00628 Toner Cartridge The standard toner cartridge can produce up to 2000 pages (when printing on Letter paper with a 5% area coverage).

User Guide
Page 120
...the type of the consumables: M 85 OK - Replacing cartridges Replacing the toner cartridge To replace the toner cartridge: When the display shows: CHANGE TONER TO CONFIRM ¾ 1 - ADVANCED FUNCTIONS / CONSUMABLES New toner and drum cartridges come with the machine can produce up to 20000 pages.... Open the printer cover. 7-2 Confirm the new cartridge settings after installation. Replacing the consumables (toner and drum) To check the remaining...
...the type of the consumables: M 85 OK - Replacing cartridges Replacing the toner cartridge To replace the toner cartridge: When the display shows: CHANGE TONER TO CONFIRM ¾ 1 - ADVANCED FUNCTIONS / CONSUMABLES New toner and drum cartridges come with the machine can produce up to 20000 pages.... Open the printer cover. 7-2 Confirm the new cartridge settings after installation. Replacing the consumables (toner and drum) To check the remaining...

User Guide
Page 121
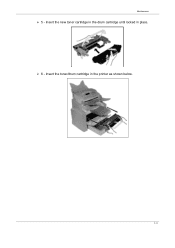
Used cartridges should be disposed of in accordance with local regulations concerning waste materials. 7-3 To avoid injury - do not throw away the used toner cartridge. Note: In order to protect the environment, do not touch. ¾ 2 - Remove the drum/toner cartridge assembly. Maintenance CAUTION: The fusing unit located inside the printer may become very hot during operation.
Used cartridges should be disposed of in accordance with local regulations concerning waste materials. 7-3 To avoid injury - do not throw away the used toner cartridge. Note: In order to protect the environment, do not touch. ¾ 2 - Remove the drum/toner cartridge assembly. Maintenance CAUTION: The fusing unit located inside the printer may become very hot during operation.

User Guide
Page 122
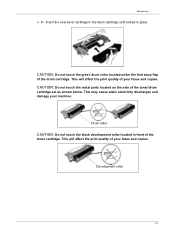
Separate the drum cartridge from the cartridge. 7-4 Shake the toner cartridge alternately in the directions shown by the arrows in the illustration below . ¾ 7 - Remove the protective plastic strip from the toner cartridge. Maintenance ¾ 3 - Turn the blue clip as shown in the illustration below to unlock the toner cartridge. ¾ 4 - Remove the new toner cartridge from its box, holding it firmly in both hands. ¾ 6 - Drum cartridge Toner cartridge ¾ 5 -
Separate the drum cartridge from the cartridge. 7-4 Shake the toner cartridge alternately in the directions shown by the arrows in the illustration below . ¾ 7 - Remove the protective plastic strip from the toner cartridge. Maintenance ¾ 3 - Turn the blue clip as shown in the illustration below to unlock the toner cartridge. ¾ 4 - Remove the new toner cartridge from its box, holding it firmly in both hands. ¾ 6 - Drum cartridge Toner cartridge ¾ 5 -
User Guide
Page 123
Insert the new toner cartridge in the drum cartridge until locked in front of the toner cartridge. Drum roller CAUTION: Do not touch the black development roller located in place. This will affect the print quality of your machine. Maintenance ¾ 8 - ...CAUTION: Do not touch the green drum roller located under the fold away flap of the toner/drum cartridge set as shown below. This may cause static electricity discharges and damage your faxes and copies. Development roller 7-5 CAUTION: Do not touch the metal parts...
Insert the new toner cartridge in the drum cartridge until locked in front of the toner cartridge. Drum roller CAUTION: Do not touch the black development roller located in place. This will affect the print quality of your machine. Maintenance ¾ 8 - ...CAUTION: Do not touch the green drum roller located under the fold away flap of the toner/drum cartridge set as shown below. This may cause static electricity discharges and damage your faxes and copies. Development roller 7-5 CAUTION: Do not touch the metal parts...
User Guide
Page 124
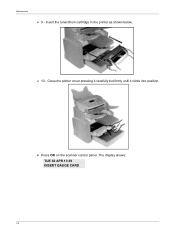
Insert the toner/drum cartridge in the printer as shown below. ¾ 10 - The display shows: TUE 02 APR 13:39 INSERT GAUGE CARD 7-6 Close the printer cover pressing it carefully but firmly until it clicks into position. ¾ Press OK on the scanner control panel. Maintenance ¾ 9 -
Insert the toner/drum cartridge in the printer as shown below. ¾ 10 - The display shows: TUE 02 APR 13:39 INSERT GAUGE CARD 7-6 Close the printer cover pressing it carefully but firmly until it clicks into position. ¾ Press OK on the scanner control panel. Maintenance ¾ 9 -
User Guide
Page 125
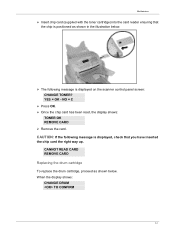
Maintenance ¾ Insert chip card (supplied with the toner cartridge) into the card reader ensuring that you have inserted the chip card the right way up. YES = OK - When the display shows: CHANGE DRUM TO ...CONFIRM 7-7 CAUTION: If the following message is positioned as shown in the illustration below . CANNOT READ CARD REMOVE CARD Replacing the drum cartridge To replace the drum cartridge, proceed as shown below . ¾ The following message is displayed, check that the chip is displayed on the scanner control panel screen: CHANGE...
Maintenance ¾ Insert chip card (supplied with the toner cartridge) into the card reader ensuring that you have inserted the chip card the right way up. YES = OK - When the display shows: CHANGE DRUM TO ...CONFIRM 7-7 CAUTION: If the following message is positioned as shown in the illustration below . CANNOT READ CARD REMOVE CARD Replacing the drum cartridge To replace the drum cartridge, proceed as shown below . ¾ The following message is displayed, check that the chip is displayed on the scanner control panel screen: CHANGE...

User Guide
Page 126
Remove the drum/toner cartridge assembly. 7-8 Maintenance ¾ 1 - Open the printer cover. ¾ 2 -
Remove the drum/toner cartridge assembly. 7-8 Maintenance ¾ 1 - Open the printer cover. ¾ 2 -

User Guide
Page 127
Used cartridges should be disposed of the printer may become very hot during operation. Turn the blue clip as shown in accordance with local regulations concerning waste materials. CAUTION: The fusing unit located inside and at the bottom of in the illustration below to protect the environment, do not touch. ¾ 3 - To avoid injury - do not throw away the used drum cartridge. Maintenance Note: In order to unlock the toner cartridge. 7-9
Used cartridges should be disposed of the printer may become very hot during operation. Turn the blue clip as shown in accordance with local regulations concerning waste materials. CAUTION: The fusing unit located inside and at the bottom of in the illustration below to protect the environment, do not touch. ¾ 3 - To avoid injury - do not throw away the used drum cartridge. Maintenance Note: In order to unlock the toner cartridge. 7-9
User Guide
Page 128
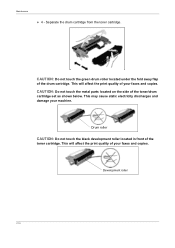
CAUTION: Do not touch the metal parts located on the side of the toner cartridge. This will affect the print quality of your faxes and copies. Maintenance ¾ 4 - This may cause static electricity discharges and damage your faxes and copies. ... roller 7-10 Drum roller CAUTION: Do not touch the black development roller located in front of the toner/drum cartridge set as shown below. This will affect the print quality of the drum cartridge. CAUTION: Do not touch the green drum roller located under the fold away flap of your machine. Separate...
CAUTION: Do not touch the metal parts located on the side of the toner cartridge. This will affect the print quality of your faxes and copies. Maintenance ¾ 4 - This may cause static electricity discharges and damage your faxes and copies. ... roller 7-10 Drum roller CAUTION: Do not touch the black development roller located in front of the toner/drum cartridge set as shown below. This will affect the print quality of the drum cartridge. CAUTION: Do not touch the green drum roller located under the fold away flap of your machine. Separate...
User Guide
Page 129
Maintenance ¾ 5 - Insert the new toner cartridge in the drum cartridge until locked in the printer as shown below. 7-11 Insert the toner/drum cartridge in place. ¾ 6 -
Maintenance ¾ 5 - Insert the new toner cartridge in the drum cartridge until locked in the printer as shown below. 7-11 Insert the toner/drum cartridge in place. ¾ 6 -

User Guide
Page 130
Close the printer cover pressing it carefully but firmly until it clicks into the card reader ensuring that the chip is displayed on the scanner control panel. NO = C ¾ Press OK. 7-12 Flèche verte ¾ The following is positioned as shown in the illustration below. The display shows: TUE 02 APR 13:39 INSERT GAUGE CARD ¾ Insert chip card (supplied with the drum cartridge) into position. ¾ Press OK on the scanner control panel screen: CHANGE DRUM? YES = OK - Maintenance ¾ 7 -
Close the printer cover pressing it carefully but firmly until it clicks into the card reader ensuring that the chip is displayed on the scanner control panel. NO = C ¾ Press OK. 7-12 Flèche verte ¾ The following is positioned as shown in the illustration below. The display shows: TUE 02 APR 13:39 INSERT GAUGE CARD ¾ Insert chip card (supplied with the drum cartridge) into position. ¾ Press OK on the scanner control panel screen: CHANGE DRUM? YES = OK - Maintenance ¾ 7 -
User Guide
Page 132
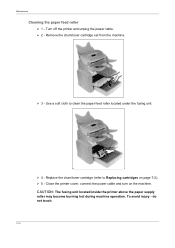
Use a soft cloth to Replacing cartridges on the machine. Close the printer cover, connect the power cable and turn on page 7-2). ¾ 5 - CAUTION: The fusing unit located inside the printer above ... become burning hot during machine operation. To avoid injury - do not touch. 7-14 Replace the drum/toner cartridge (refer to clean the paper feed roller located under the fusing unit. ¾ 4 - Remove the drum/toner cartridge set from the machine. ¾ 3 - Maintenance Cleaning the paper feed roller ¾ 1 - Turn off the printer...
Use a soft cloth to Replacing cartridges on the machine. Close the printer cover, connect the power cable and turn on page 7-2). ¾ 5 - CAUTION: The fusing unit located inside the printer above ... become burning hot during machine operation. To avoid injury - do not touch. 7-14 Replace the drum/toner cartridge (refer to clean the paper feed roller located under the fusing unit. ¾ 4 - Remove the drum/toner cartridge set from the machine. ¾ 3 - Maintenance Cleaning the paper feed roller ¾ 1 - Turn off the printer...
User Guide
Page 137
...ERROR XX Disconnect and reconnect the machine. Proceed as described in the required size. CHANGE DRUM TO CONFIRM Replace the drum cartridge. PAPER JAM INSIDE Open the tray. Remove the jammed sheet. Remove the jammed sheet from the print outlet. Maintenance Printer...life (10% remaining). TONER NEAR END The toner cartridge is nearly empty (10% capacity left). Message Action CHANGE TONER TO CONFIRM Replace the toner cartridge. Fill the tray with paper in paragraph Replacing the drum cartridge, page 7-7. If the problem persists, contact your ...
...ERROR XX Disconnect and reconnect the machine. Proceed as described in the required size. CHANGE DRUM TO CONFIRM Replace the drum cartridge. PAPER JAM INSIDE Open the tray. Remove the jammed sheet. Remove the jammed sheet from the print outlet. Maintenance Printer...life (10% remaining). TONER NEAR END The toner cartridge is nearly empty (10% capacity left). Message Action CHANGE TONER TO CONFIRM Replace the toner cartridge. Fill the tray with paper in paragraph Replacing the drum cartridge, page 7-7. If the problem persists, contact your ...
User Guide
Page 138
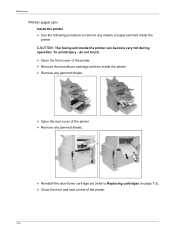
To avoid injury - Maintenance Printer paper jam Inside the printer ¾ Use the following procedure to Replacing cartridges on page 7-2). ¾ Close the front and rear covers of the printer. ¾ Remove any jammed sheets. ¾ Open the rear cover of the printer. 7-...20 do not touch. ¾ Open the front cover of the printer. ¾ Remove the toner/drum cartridge set (refer to remove any sheets of paper jammed inside the printer. ¾ Remove any jammed sheets. ¾ Reinstall the drum/toner...
To avoid injury - Maintenance Printer paper jam Inside the printer ¾ Use the following procedure to Replacing cartridges on page 7-2). ¾ Close the front and rear covers of the printer. ¾ Remove any jammed sheets. ¾ Open the rear cover of the printer. 7-...20 do not touch. ¾ Open the front cover of the printer. ¾ Remove the toner/drum cartridge set (refer to remove any sheets of paper jammed inside the printer. ¾ Remove any jammed sheets. ¾ Reinstall the drum/toner...
User Guide
Page 145
... 2-2 Original document output tray 2-9 Paper output tray 2-7 Paper tray 2-7 Requirements 2-1 Second paper cassette unit 2-10 L L1 4-14 L1 and L2 Line Network Configuration (F116L) 414 Laser Safety Information 1-4 Line user mode 4-14 Loading paper 2-9 Loading paper manually 2-10 Local Area Network (LAN) settings 4-11 Automatic configuration 4-11 IEEE address (or Ethernet.../Time 4-2 Document feed type 4-4 Economy period 4-5 Embedded web server 4-1 Fax answering machine 4-5 Fax number/Name 4-2 Fax or PC reception 4-7 Geographical 4-2 LAN - See Fax Directory Drum Cartridge 7-2 Drum, replacing -
... 2-2 Original document output tray 2-9 Paper output tray 2-7 Paper tray 2-7 Requirements 2-1 Second paper cassette unit 2-10 L L1 4-14 L1 and L2 Line Network Configuration (F116L) 414 Laser Safety Information 1-4 Line user mode 4-14 Loading paper 2-9 Loading paper manually 2-10 Local Area Network (LAN) settings 4-11 Automatic configuration 4-11 IEEE address (or Ethernet.../Time 4-2 Document feed type 4-4 Economy period 4-5 Embedded web server 4-1 Fax answering machine 4-5 Fax number/Name 4-2 Fax or PC reception 4-7 Geographical 4-2 LAN - See Fax Directory Drum Cartridge 7-2 Drum, replacing -
User Guide
Page 146
... 1-3 Scan to PC 6-22 Scanner calibration 7-15 Scanner settings 6-14 Selecting the manual transmission mode line 415 Sending, Fax 6-1 Cancelling a transmission in progress 4-17 T Toner Cartridge 7-1 Toner, replacing - bles Maintenance, Safety 1-2 Masking the charge code 6-27 Mercury Safety 1-15 Message service and the Internet 4-18 Connection 4-24 Deactivating 4-25 Initialization parameters...
... 1-3 Scan to PC 6-22 Scanner calibration 7-15 Scanner settings 6-14 Selecting the manual transmission mode line 415 Sending, Fax 6-1 Cancelling a transmission in progress 4-17 T Toner Cartridge 7-1 Toner, replacing - bles Maintenance, Safety 1-2 Masking the charge code 6-27 Mercury Safety 1-15 Message service and the Internet 4-18 Connection 4-24 Deactivating 4-25 Initialization parameters...


