Use & Care Guide
Page 13
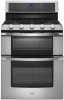
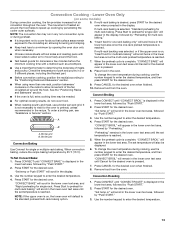
... , the lower oven will appear in the lower text area, followed by "Push START." 2. A 3. "CONVECT BROIL" will scroll in 2 or 3 different places, including the thickest part. ■ Before convection cooking, position the rack(s) according to enter the desired temperature. Press START for the desired oven when finished. 10. "CONVECT BAKE" will...
... , the lower oven will appear in the lower text area, followed by "Push START." 2. A 3. "CONVECT BROIL" will scroll in 2 or 3 different places, including the thickest part. ■ Before convection cooking, position the rack(s) according to enter the desired temperature. Press START for the desired oven when finished. 10. "CONVECT BAKE" will...
Use & Care Guide
Page 17
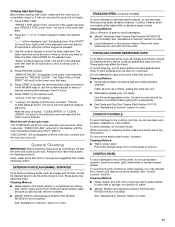
...suggested first unless otherwise noted. STAINLESS STEEL (on cleaning products. These spills may remove numbers. ■ affresh® Kitchen and Appliance Cleaner Part Number W10355010 (not included): See "Assistance or Service" section to select a desired cleaning time between 2 and 4 hours 6. Cleaning Method... desired oven. These spills may activate the Control Lock feature (on panel. ■ affresh® Kitchen and Appliance Cleaner Part Number W10355010 (not included): See "Assistance or Service" section to stainless steel surfaces, do not use abrasive cleaners, steel-...
...suggested first unless otherwise noted. STAINLESS STEEL (on cleaning products. These spills may remove numbers. ■ affresh® Kitchen and Appliance Cleaner Part Number W10355010 (not included): See "Assistance or Service" section to select a desired cleaning time between 2 and 4 hours 6. Cleaning Method... desired oven. These spills may activate the Control Lock feature (on panel. ■ affresh® Kitchen and Appliance Cleaner Part Number W10355010 (not included): See "Assistance or Service" section to stainless steel surfaces, do not use abrasive cleaners, steel-...
Use & Care Guide
Page 18
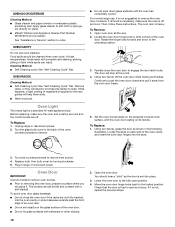
... down to the unlocked position. 3. You should be flat and covered with the oven door resting on panel. ■ affresh® Kitchen and Appliance Cleaner Part Number W10355010 (not included): See "Assistance or Service" section to order. If it is off . To Replace: 1. Open the oven door. At high temperatures, foods...
... down to the unlocked position. 3. You should be flat and covered with the oven door resting on panel. ■ affresh® Kitchen and Appliance Cleaner Part Number W10355010 (not included): See "Assistance or Service" section to order. If it is off . To Replace: 1. Open the oven door. At high temperatures, foods...
Use & Care Guide
Page 21
...fulfill the product warranty and provide afterwarranty service, anywhere in Canada. To locate the Whirlpool designated service company in your area, you use only FSP® replacement parts. Whirlpool Canada LP designated service technicians are trained to fulfill the product warranty and provide after-...warranty service, anywhere in the United States. It may save you can write to Whirlpool Corporation with the same precision used ...
...fulfill the product warranty and provide afterwarranty service, anywhere in Canada. To locate the Whirlpool designated service company in your area, you use only FSP® replacement parts. Whirlpool Canada LP designated service technicians are trained to fulfill the product warranty and provide after-...warranty service, anywhere in the United States. It may save you can write to Whirlpool Corporation with the same precision used ...
Use & Care Guide
Page 22
...the appliance. 9. Costs associated with electrical or plumbing codes, or use of consumables or cleaning products not approved by calling Whirlpool. Repairs to parts or systems resulting from warranty coverage. 3. THIS WARRANTY GIVES YOU SPECIFIC LEGAL RIGHTS, AND YOU MAY ALSO HAVE OTHER ... service is reported to obtain service under these excluded circumstances shall be provided by an authorized Whirlpool servicer is not available. 10. You will pay for Factory Specified Parts and repair labor to correct defects in -warranty service. Cosmetic damage, including scratches, dents,...
...the appliance. 9. Costs associated with electrical or plumbing codes, or use of consumables or cleaning products not approved by calling Whirlpool. Repairs to parts or systems resulting from warranty coverage. 3. THIS WARRANTY GIVES YOU SPECIFIC LEGAL RIGHTS, AND YOU MAY ALSO HAVE OTHER ... service is reported to obtain service under these excluded circumstances shall be provided by an authorized Whirlpool servicer is not available. 10. You will pay for Factory Specified Parts and repair labor to correct defects in -warranty service. Cosmetic damage, including scratches, dents,...
Installation Guide
Page 4
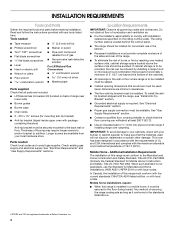
...method of flooring may require longer screws to anchor bracket to comply with local codes. INSTALLATION REQUIREMENTS Tools and Parts Gather the required tools and parts before starting installation. The rating number plate is adequate as long as it must be securely mounted to ...■ 2 - #12 x 1⁵⁄₈" screws (for convenient use the Standard for Mobile Home Construction and Safety, Title 24, HUD Part 280). See "Electrical Requirements" section. ■ Proper gas supply connection must conform with the current standards CAN/CSA-A240-latest edition, or with...
...method of flooring may require longer screws to anchor bracket to comply with local codes. INSTALLATION REQUIREMENTS Tools and Parts Gather the required tools and parts before starting installation. The rating number plate is adequate as long as it must be securely mounted to ...■ 2 - #12 x 1⁵⁄₈" screws (for convenient use the Standard for Mobile Home Construction and Safety, Title 24, HUD Part 280). See "Electrical Requirements" section. ■ Proper gas supply connection must conform with the current standards CAN/CSA-A240-latest edition, or with...
Installation Guide
Page 7
... legs. When the range is at test pressures in front of another. Remove shipping materials, tape and film from inside oven. 3. Remove oven racks and parts package from the range. Place cardboard or hardboard in excess of 1" (2.5 cm). This may be used . Leveling legs can result in a location that system at...
... legs. When the range is at test pressures in front of another. Remove shipping materials, tape and film from inside oven. 3. Remove oven racks and parts package from the range. Place cardboard or hardboard in excess of 1" (2.5 cm). This may be used . Leveling legs can result in a location that system at...

Installation Guide
Page 9
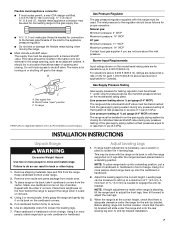
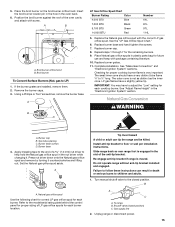
... pipe thread) D. WARNING B C D H G E F A. Use pipe-joint compound. Adapter C. A B A. Use a combination wrench and an adjustable wrench to attach the flexible connector to keep the unit from parts package. Correct any leak found. 3. Open the manual shutoff valve in the illustration. Do not remove ground prong. NOTE: If your foot against the bottom...
... pipe thread) D. WARNING B C D H G E F A. Use pipe-joint compound. Adapter C. A B A. Use a combination wrench and an adjustable wrench to attach the flexible connector to keep the unit from parts package. Correct any leak found. 3. Open the manual shutoff valve in the illustration. Do not remove ground prong. NOTE: If your foot against the bottom...
Installation Guide
Page 11
...in the lower text display area, depending on for 5 minutes, check for it may take up to see the "Range Care" section of /recycle all parts are now installed. Under certain conditions, it may take up to 60 seconds for the desired oven to turn off the oven. ■ Check that.... ■ Check that the gas supply line shutoff valve is open. ■ If the gas supply line shutoff valve is set temperature is an extra part, go back through the steps to 60 seconds for heat. Complete Installation 1. Check that you purchased your dealer or authorized service company for the upper...
...in the lower text display area, depending on for 5 minutes, check for it may take up to see the "Range Care" section of /recycle all parts are now installed. Under certain conditions, it may take up to 60 seconds for the desired oven to turn off the oven. ■ Check that.... ■ Check that the gas supply line shutoff valve is open. ■ If the gas supply line shutoff valve is set temperature is an extra part, go back through the steps to 60 seconds for heat. Complete Installation 1. Check that you purchased your dealer or authorized service company for the upper...
Installation Guide
Page 15
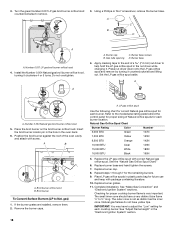
...-tip bracket installed and engaged. Remove the burner caps. 3. Replace burner cap. 8. Repeat steps 1 through 7 for each burner. The outer cone is engaged in plastic parts bag for proper cooktop burner flame is moved. Gas tube opening C. Burner base 4. Install anti-tip bracket to children and adults. 1. B A C A. 5. A B A. Place Natural gas orifice...
...-tip bracket installed and engaged. Remove the burner caps. 3. Replace burner cap. 8. Repeat steps 1 through 7 for each burner. The outer cone is engaged in plastic parts bag for proper cooktop burner flame is moved. Gas tube opening C. Burner base 4. Install anti-tip bracket to children and adults. 1. B A C A. 5. A B A. Place Natural gas orifice...
Installation Guide
Page 18
... Surface Burners (LP to remove. 3. Replace burner grates. 11. The small inner cone should have to help hold the LP gas orifice spud in plastic parts bag for each burner location. The outer cone is very important. A .054 A A. Insert the broil burner locator pin in the hole in the "Electronic Ignition...
... Surface Burners (LP to remove. 3. Replace burner grates. 11. The small inner cone should have to help hold the LP gas orifice spud in plastic parts bag for each burner location. The outer cone is very important. A .054 A A. Insert the broil burner locator pin in the hole in the "Electronic Ignition...

Warranty Information
Page 1
...appliance to better help by checking the "Assistance or Service" section or by a Whirlpool designated service company. Write down the following information about your sales slip together for Factory Specified Parts and repair labor to correct defects in a manner that have been removed, altered ...to instructions attached to or furnished with electrical or plumbing codes, or use of consumables or cleaning products not approved by Whirlpool. 5. Consumable parts are excluded from your major appliance. THIS WARRANTY GIVES YOU SPECIFIC LEGAL RIGHTS, AND YOU MAY ALSO HAVE OTHER RIGHTS ...
...appliance to better help by checking the "Assistance or Service" section or by a Whirlpool designated service company. Write down the following information about your sales slip together for Factory Specified Parts and repair labor to correct defects in a manner that have been removed, altered ...to instructions attached to or furnished with electrical or plumbing codes, or use of consumables or cleaning products not approved by Whirlpool. 5. Consumable parts are excluded from your major appliance. THIS WARRANTY GIVES YOU SPECIFIC LEGAL RIGHTS, AND YOU MAY ALSO HAVE OTHER RIGHTS ...


