Whirlpool WFE525S0JW Support and Manuals
Get Help and Manuals for this Whirlpool item
View All Support Options Below
Free Whirlpool WFE525S0JW manuals!
Problems with Whirlpool WFE525S0JW?
Ask a Question
Free Whirlpool WFE525S0JW manuals!
Problems with Whirlpool WFE525S0JW?
Ask a Question
Popular Whirlpool WFE525S0JW Manual Pages
Owners Manual - Page 3
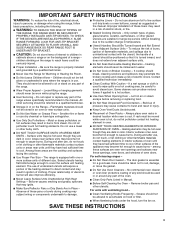
...repair or replace any part of the range. Smother fire or flame or use a towel or other servicing...INSTRUCTIONS
3
They should never be allowed to sit or stand on any part...specifically recommended in a risk of Oven Racks - TO CHECK IF THE DEVICES ARE INSTALLED... may result in Manual. No commercial oven...Surface Units Unattended at High Heat Settings - Flammable materials should not be...
Owners Manual - Page 4
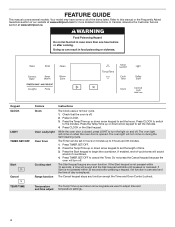
... to 9 hours and 59 minutes. 1. FEATURE GUIDE
This manual covers several models.
Press the Temp/Time up and down arrow keypad to set in food poisoning or sickness.
Press CLOCK or ... Range function
Instructions
The Clock uses a 12-hour cycle. 1. Press TIMER SET/OFF to adjust time and
and time adjust temperature settings.
4 In Canada, reference the Customer Service section at ...
Owners Manual - Page 8
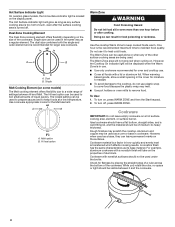
... On indicator light will not glow red when cycling on some models)
The Melt cooking element offers flexibility due to a wide range of settings between it to remove food. To turn off .
Aluminum and... and outer element and is the recommended maximum time to touch, even after cooking. The lowest setting can be visible between Hi and Melt. Melt option B. To Use: 1.
However, when used...
Owners Manual - Page 9
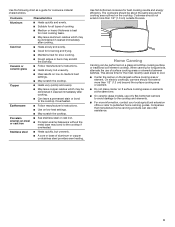
...if overheated.
■■ Follow manufacturer's instructions.
■■ Use on low heat settings.
■■ May scratch the cooktop... leave copper residue which may bond to published home canning guides. Home Canning
Canning can also offer assistance.
9 Cookware ... at the same time. ■■ On ceramic glass models, use of aluminum or copper on the largest surface cooking...
Owners Manual - Page 11

...the normal cooking mode (not Sabbath mode compliant). To Bake Using Sabbath Mode: 1. Press and hold TIMER SET/OFF for 5 seconds. "SAb" will be displayed. Press the Start keypad while "SAb" is Sabbath ... 5. Press KEEP WARM. 2. Press and hold TIMER SET/OFF for too long, the heating elements will stop flashing and remain on some models):
WARNING
Food Poisoning Hazard
Do not let food sit ...
Owners Manual - Page 12

... will shut off until the oven door is closed. NOTE: On models with convection, the convection fan may run in time due to this...that when you place your food in positions 2 and 5. Insert your set plastics, paper, or other items that no bakeware piece is opened ...racks are level. Do not open for a flat rack, as a guide. Oven Temperature
While in use the Convect Bake function and place flat...
Owners Manual - Page 13

On convection range models, the fan will run while preheating and may...roasting, position racks according to clear the display. Changing the temperature when broiling allows more information. On lower settings, the broil element will continue to count down the time. All timers, including any active Cook Time ... burners cycle on and off in the "Feature Guide" section. 1. Press COOK TIME.
Owners Manual - Page 14
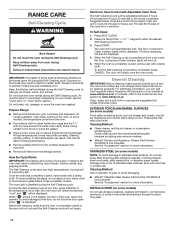
... to the Customer Service section at any ...Part Number W10355010 (not included): See the "Accessories" section for heavy soil. Failure to enter the desired Self-Cleaning cycle time.
3. To avoid damage to a powdery ash. To Self-Clean: 1. If the temperature is completely cooled, remove ash with porcelain. Press the Temp/Time "+" or "-" keypad to follow label instructions on your model...
Owners Manual - Page 16

...models, the oven control lockout is not the proper size.
Push in the "Feature Guide" section. Delay Start is in this manual or visit producthelp.whirlpool.com. Error code... Installation Instructions.
See the "Warranty" section for service. See the "Sabbath Mode" section.
16 TROUBLESHOOTING
First try the solutions suggested here. In Canada, visit www.whirlpool.ca. Operation
Problem ...
Owners Manual - Page 17

....
See the Installation Instructions. Oven was opened...models) Order Part Number W10355049
Affresh® Cooktop Cleaner (ceramic glass models) Order Part Number W10355051
Affresh® Stainless Steel Cleaner (stainless steel models) Order Part Number W10355016
Affresh® Kitchen and Appliance Cleaner Order Part Number W10355010
Cooktop Scraper (ceramic glass models) Order Part...
Owners Manual - Page 18
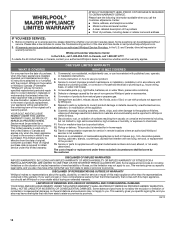
... do not allow limitations on how to review the Troubleshooting section of product replacement,
5. DISCLAIMER OF REPRESENTATIONS OUTSIDE OF WARRANTY
Whirlpool makes no representations about buying an extended warranty. WHIRLPOOL SHALL NOT BE LIABLE FOR INCIDENTAL OR CONSEQUENTIAL DAMAGES. and Canada, direct all requests for service or repair of merchantability or fitness, so this...
Installation Instructions - Page 3

...codes. Check local codes. See "Electrical Requirements" section. The model/serial/rating plate is marked for wood floors)
Parts Supplied Check that the materials used will need to floor or wall. To install...1/4" (6.4 mm) drive ratchet
■■ 1/4" (6.4 mm) nut driver
■■ 3/8" (1 cm) and 5/16" (7.9 mm) nut driver
■■ 1/8" (3.2 mm) drill bit (for use with upturned ...
Installation Instructions - Page 5

... to a 3-wire system: Local codes may permit the use a 50 A rated cord with a qualified electrician or service technician if you will not fit the outlet, have a proper outlet installed by a white cover. See the...neutral terminal connected to the neutral by a link. Connectors on the model/serial rating plate. Only
If codes permit and a separate ground wire is used, it is recommended....
Installation Instructions - Page 8

...model, remove the plastic tag holding three 10-32 hex nuts from the middle post of the terminal block. A
B 4. Add strain relief. C
A. Terminal block cover C. Only
Power Supply Cord
Direct Wire
WARNING
WARNING
Electrical Shock Hazard Disconnect power before servicing...the back of the 3 terminal blocks and set aside. Failure to follow these instructions can result in death, fire, or ...
Installation Instructions - Page 14

... rear slides on other side of the Use and Care Guide or User Instructions.
7.
Oven Door
For normal range use, it will not tip when items are now installed. However, if removal is necessary, make sure drawer is heavy. Open oven door all parts are placed in the drawer glide. 3. Open the oven door...
Whirlpool WFE525S0JW Reviews
We have not received any reviews for Whirlpool yet.