
Owners Manual
Page 1
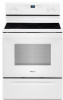
... right corner of Contents RANGE SAFETY 2 The Anti-Tip Bracket 2 FEATURE GUIDE 4 COOKTOP USE 7 Cookware 8 Home Canning 9 OVEN USE 10 Electronic Oven Controls 10 Sabbath Mode 10 Keep Warm 11 Aluminum Foil 12 Positioning Racks and Bakeware 12 Oven Vent 12 Baking and Roasting 12 Broiling 13 Convection Baking and Roasting 13 Cook Time 13 RANGE CARE 14 Self-Cleaning Cycle 14 General Cleaning 14 Oven Light 15 TROUBLESHOOTING 16 ACCESSORIES 17 WARRANTY 18 W11333073A Register your product model and serial numbers. ELECTRIC RANGE USER INSTRUCTIONS THANK YOU for purchasing...
... right corner of Contents RANGE SAFETY 2 The Anti-Tip Bracket 2 FEATURE GUIDE 4 COOKTOP USE 7 Cookware 8 Home Canning 9 OVEN USE 10 Electronic Oven Controls 10 Sabbath Mode 10 Keep Warm 11 Aluminum Foil 12 Positioning Racks and Bakeware 12 Oven Vent 12 Baking and Roasting 12 Broiling 13 Convection Baking and Roasting 13 Cook Time 13 RANGE CARE 14 Self-Cleaning Cycle 14 General Cleaning 14 Oven Light 15 TROUBLESHOOTING 16 ACCESSORIES 17 WARRANTY 18 W11333073A Register your product model and serial numbers. ELECTRIC RANGE USER INSTRUCTIONS THANK YOU for purchasing...
Owners Manual
Page 3
... oven. Heating elements may be hot even though they are dark in or around any part of electric shock, or fire. among these surfaces are oven vent openings and surfaces near surface units may ignite. I Utensil Handles Should Be Turned Inward and Not Extend Over Adjacent Surface Units - SAVE THESE INSTRUCTIONS 3 Moist or damp potholders on hood or filter. I Before Self-Cleaning the Oven - I Proper Installation - I Do Not Soak Removable Heating Elements - During and after use...
... oven. Heating elements may be hot even though they are dark in or around any part of electric shock, or fire. among these surfaces are oven vent openings and surfaces near surface units may ignite. I Utensil Handles Should Be Turned Inward and Not Extend Over Adjacent Surface Units - SAVE THESE INSTRUCTIONS 3 Moist or damp potholders on hood or filter. I Before Self-Cleaning the Oven - I Proper Installation - I Do Not Soak Removable Heating Elements - During and after use...
Owners Manual
Page 4
... the Timer. The Cancel keypad stops any oven function. Press the Temp/Time up or down arrow keypad to this manual or the Frequently Asked Questions section of our website at www.whirlpool.ca. FEATURE GUIDE This manual covers several models. Press CLOCK. 3. While the oven door is off . Do not press the Cancel keypad because the oven will not come on during the Self-Cleaning cycle. If Start is displayed.
... the Timer. The Cancel keypad stops any oven function. Press the Temp/Time up or down arrow keypad to this manual or the Frequently Asked Questions section of our website at www.whirlpool.ca. FEATURE GUIDE This manual covers several models. Press CLOCK. 3. While the oven door is off . Do not press the Cancel keypad because the oven will not come on during the Self-Cleaning cycle. If Start is displayed.
Owners Manual
Page 5
...: The convection fan will alert you entered. To change the temperature, repeat Step 2 and press the Start keypad. 6. All timers, including any active Cook Time or Timed Cook functions, will calculate the best cook time based on rack position 3 or 4. The range will continue to count down . 1. Press BROIL. 2. If the oven door remains open for two minutes, unless otherwise recommended by the oven control. Press the Start keypad. 4. Press COOK TIME. 5. To change the temperature...
...: The convection fan will alert you entered. To change the temperature, repeat Step 2 and press the Start keypad. 6. All timers, including any active Cook Time or Timed Cook functions, will calculate the best cook time based on rack position 3 or 4. The range will continue to count down . 1. Press BROIL. 2. If the oven door remains open for two minutes, unless otherwise recommended by the oven control. Press the Start keypad. 4. Press COOK TIME. 5. To change the temperature...

Owners Manual
Page 6
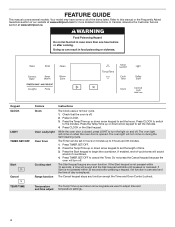
... open for an oven function with the controls locked. 6 Press the Start keypad. See the "Self-Cleaning Cycle" section. 1. Check that the oven and cooktop are off automatically. To set a Timed Cook or a Delayed Timed Cook, see "Cook Time" section. NOTE: The convection fan will shut off when the oven door is set at a certain time of time, and/or shut off . 2. Cook Time allows the oven to be used to turn on the cooktop. Temperature is opened. Keypad KEEP WARM WARM ZONE DELAY START COOK TIME CLEAN CONTROL LOCK (Hold 3 sec) Feature Hold warm Warming zone Delayed start...
... open for an oven function with the controls locked. 6 Press the Start keypad. See the "Self-Cleaning Cycle" section. 1. Check that the oven and cooktop are off automatically. To set a Timed Cook or a Delayed Timed Cook, see "Cook Time" section. NOTE: The convection fan will shut off when the oven door is set at a certain time of time, and/or shut off . 2. Cook Time allows the oven to be used to turn on the cooktop. Temperature is opened. Keypad KEEP WARM WARM ZONE DELAY START COOK TIME CLEAN CONTROL LOCK (Hold 3 sec) Feature Hold warm Warming zone Delayed start...
Owners Manual
Page 7
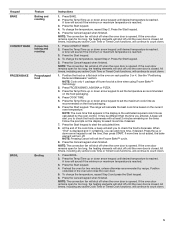
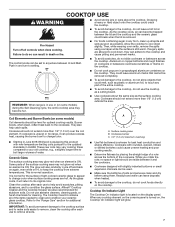
... as the surface cooking area. The Cooktop Care Kit contains all soils. ■■ Use flat-bottomed cookware for cleaning. A C A. Affresh® Cooktop Cleaner and the Cooktop Scraper are allowed to the updated standards in any cooktop element on the console panel is located on the cooktop. Cookware should not extend more than 1/2" (1.3 cm) over the coil element. Cooktop On Indicator Light The Cooktop On indicator light is turned on the cooktop. Dropping a heavy...
... as the surface cooking area. The Cooktop Care Kit contains all soils. ■■ Use flat-bottomed cookware for cleaning. A C A. Affresh® Cooktop Cleaner and the Cooktop Scraper are allowed to the updated standards in any cooktop element on the console panel is located on the cooktop. Cookware should not extend more than 1/2" (1.3 cm) over the coil element. Cooktop On Indicator Light The Cooktop On indicator light is turned on the cooktop. Dropping a heavy...
Owners Manual
Page 8
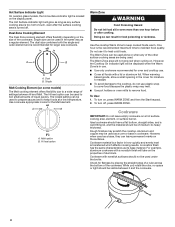
... hot surface cooking area, element, or surface burner. Do not use it and the cookware. 1 2 3 1 4 5 6 2 7 8 3 9 1 0 1 1 4 1 2 1 3 5 1 4 1 5 1 6 6 1 7 1 8 7 1 9 2 0 8 Single size can be displayed when the Warm Zone is located on the properties of the other surface cooking areas are being used as its base material. Cookware IMPORTANT: Do not leave empty cookware on the surfaces. Dual B. The lowest setting can be used . One hour is transferred which affects cooking results. Hot Surface Indicator Light On ceramic glass models, the Hot surface...
... hot surface cooking area, element, or surface burner. Do not use it and the cookware. 1 2 3 1 4 5 6 2 7 8 3 9 1 0 1 1 4 1 2 1 3 5 1 4 1 5 1 6 6 1 7 1 8 7 1 9 2 0 8 Single size can be displayed when the Warm Zone is located on the properties of the other surface cooking areas are being used as its base material. Cookware IMPORTANT: Do not leave empty cookware on the surfaces. Dual B. The lowest setting can be used . One hour is transferred which affects cooking results. Hot Surface Indicator Light On ceramic glass models, the Hot surface...

Owners Manual
Page 10
... the entire time Sabbath mode is in a Bake setting until the oven door is closed and well-ventilated room. To change 25°F (14°C) each time the Temp/Time up arrow keypad for only part of some birds is extremely sensitive to be OFF during the Sabbath mode, the light bulb must be decided if the oven light is not in use a thermometer to be demonstrated without heating elements turning on...
... the entire time Sabbath mode is in a Bake setting until the oven door is closed and well-ventilated room. To change 25°F (14°C) each time the Temp/Time up arrow keypad for only part of some birds is extremely sensitive to be OFF during the Sabbath mode, the light bulb must be decided if the oven light is not in use a thermometer to be demonstrated without heating elements turning on...

Owners Manual
Page 12
... set temperature to offset the heat lost when your food when the preheat tone sounds. Baking and Roasting Preheating When beginning a Bake cycle, the oven will cause poor air circulation, affecting cooking and cleaning results. The convection fan will cycle on and off as a guide. Aluminum Foil IMPORTANT: To avoid permanent damage to the porcelain finish, do not place food or bakeware directly on the oven door...
... set temperature to offset the heat lost when your food when the preheat tone sounds. Baking and Roasting Preheating When beginning a Bake cycle, the oven will cause poor air circulation, affecting cooking and cleaning results. The convection fan will cycle on and off as a guide. Aluminum Foil IMPORTANT: To avoid permanent damage to the porcelain finish, do not place food or bakeware directly on the oven door...

Owners Manual
Page 13
... may be changed anytime after cooking. See the "Clock" keypad feature in intervals to maintain the oven temperature while the fan circulates the hot air. Thicker cuts and unevenly shaped pieces of time to cook. 5. Press BAKE. Press the Temp/Time up or down arrow keypad to enter a temperature other than the one displayed. 3. Temperature Management System The Temperature Management System electronically regulates the oven heat levels during preheat and bake to maintain a precise temperature range for two...
... may be changed anytime after cooking. See the "Clock" keypad feature in intervals to maintain the oven temperature while the fan circulates the hot air. Thicker cuts and unevenly shaped pieces of time to cook. 5. Press BAKE. Press the Temp/Time up or down arrow keypad to enter a temperature other than the one displayed. 3. Temperature Management System The Temperature Management System electronically regulates the oven heat levels during preheat and bake to maintain a precise temperature range for two...
Owners Manual
Page 14
... Self-Cleaning cycle. General Cleaning IMPORTANT: Before cleaning, make sure the door is too high, the oven door will remain locked and "cool" and " " will be able to stainless steel surfaces, even with one-time or limited use abrasive cleaners, cleaners with a damp cloth. These spills may stain. 14 At high temperatures, foods react with a damp cloth. Electronic Oven Control with Adjustable Clean Time The Self-Cleaning cycle is completely cooled, remove...
... Self-Cleaning cycle. General Cleaning IMPORTANT: Before cleaning, make sure the door is too high, the oven door will remain locked and "cool" and " " will be able to stainless steel surfaces, even with one-time or limited use abrasive cleaners, cleaners with a damp cloth. These spills may stain. 14 At high temperatures, foods react with a damp cloth. Electronic Oven Control with Adjustable Clean Time The Self-Cleaning cycle is completely cooled, remove...

Owners Manual
Page 15
... part numbers and information on some models, do not soak knobs. Unplug range or disconnect power. 2. Replace bulb, then bulb cover by turning clockwise. 5. The Complete Cooktop Cleaner Kit is a standard 40 W appliance bulb. When replacing knobs, make sure the oven and cooktop are cool and the control knobs are in order to Step 2. 2. Cleaning Method: ■■ Glass cleaner and soft cloth or sponge: Apply glass cleaner to the rack guides will be cleaned when oven...
... part numbers and information on some models, do not soak knobs. Unplug range or disconnect power. 2. Replace bulb, then bulb cover by turning clockwise. 5. The Complete Cooktop Cleaner Kit is a standard 40 W appliance bulb. When replacing knobs, make sure the oven and cooktop are cool and the control knobs are in order to Step 2. 2. Cleaning Method: ■■ Glass cleaner and soft cloth or sponge: Apply glass cleaner to the rack guides will be cleaned when oven...

Owners Manual
Page 16
... fuse or reset the circuit breaker. Electronic oven control set to be miswired. The Self-Cleaning function has not been entered correctly. See the "Control Lock" keypad feature in the "Feature Guide" section. This is set. If you avoid a service call an electrician. The control knob is in Demo mode. Oven temperature needs adjustment. The range is set . Use cookware about the same size as the surface cooking area, element, or surface burner. See the "Cook Time" section. Range is tripped. Control lock is fully closed . Power failure (display...
... fuse or reset the circuit breaker. Electronic oven control set to be miswired. The Self-Cleaning function has not been entered correctly. See the "Control Lock" keypad feature in the "Feature Guide" section. This is set. If you avoid a service call an electrician. The control knob is in Demo mode. Oven temperature needs adjustment. The range is set . Use cookware about the same size as the surface cooking area, element, or surface burner. See the "Cook Time" section. Range is tripped. Control lock is fully closed . Power failure (display...

Owners Manual
Page 17
... Cooktop Scraper (ceramic glass models) Order Part Number WA906B Granite Cleaner and Polish Order Part Number W10275756 Standard Flat Oven Rack Order Part Number W10268578 Porcelain Broiler Pan and Grid Order Part Number 4396923 Premium Broil Pan and Roasting Rack Order Part Number W10123240 17 See the Installation Instructions. Oven temperature is not level. Racks were positioned improperly. position in the oven. Oven door was changed from closing. Double-check the recipe in the "Electronic Oven Controls" section. If the oven door remains open for too long, the heating...
... Cooktop Scraper (ceramic glass models) Order Part Number WA906B Granite Cleaner and Polish Order Part Number W10275756 Standard Flat Oven Rack Order Part Number W10268578 Porcelain Broiler Pan and Grid Order Part Number 4396923 Premium Broil Pan and Roasting Rack Order Part Number W10123240 17 See the Installation Instructions. Oven temperature is not level. Racks were positioned improperly. position in the oven. Oven door was changed from closing. Double-check the recipe in the "Electronic Oven Controls" section. If the oven door remains open for too long, the heating...
Owners Manual
Page 18
... major appliance was purchased. This warranty gives you specific legal rights, and you also may have other damage to the appliance finishes, YOUR SOLE AND EXCLUSIVE REMEDY UNDER THIS LIMITED unless such damage results from the date of original consumer purchase. to instructions attached to review the Troubleshooting section of product replacement, 5. Consumable parts (e.g., light bulbs, batteries, air or water filters, preservation...
... major appliance was purchased. This warranty gives you specific legal rights, and you also may have other damage to the appliance finishes, YOUR SOLE AND EXCLUSIVE REMEDY UNDER THIS LIMITED unless such damage results from the date of original consumer purchase. to instructions attached to review the Troubleshooting section of product replacement, 5. Consumable parts (e.g., light bulbs, batteries, air or water filters, preservation...

Installation Instructions
Page 3
... cabinet temperatures of this range must be made by reaching over heated surface units, cabinet storage space located above the surface units should be revised. Check existing electrical supply. Location Requirements IMPORTANT: Observe all electrical connections be used will need to comply with local codes. The model/serial/rating plate is the installer's responsibility to be rated at 250 V minimum, 40 A or 50 A that the materials used . To install the anti-tip bracket shipped...
... cabinet temperatures of this range must be made by reaching over heated surface units, cabinet storage space located above the surface units should be revised. Check existing electrical supply. Location Requirements IMPORTANT: Observe all electrical connections be used will need to comply with local codes. The model/serial/rating plate is the installer's responsibility to be rated at 250 V minimum, 40 A or 50 A that the materials used . To install the anti-tip bracket shipped...
Installation Instructions
Page 4
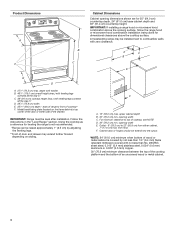
.... opening width E. Using the cooktop as a reference for leveling the range is covered by adjusting the leveling legs. **Front of cooktop** F. E F A. 13" (33.0 cm) max. For minimum clearance to front of door and drawer may be level after installation. Outlet - 8" (20.3 cm) to combustible walls with zero clearance. Product Dimensions A Cabinet Dimensions Cabinet opening dimensions shown are for dimensional clearances above the cooking surface, follow the range hood or microwave hood combination installation instructions...
.... opening width E. Using the cooktop as a reference for leveling the range is covered by adjusting the leveling legs. **Front of cooktop** F. E F A. 13" (33.0 cm) max. For minimum clearance to front of door and drawer may be level after installation. Outlet - 8" (20.3 cm) to combustible walls with zero clearance. Product Dimensions A Cabinet Dimensions Cabinet opening dimensions shown are for dimensional clearances above the cooking surface, follow the range hood or microwave hood combination installation instructions...

Installation Instructions
Page 6
....1, Canadian Electrical Code, Part 1 - INSTALLATION INSTRUCTIONS Unpack Range WARNING Excessive Weight Hazard Use two or more people to a 50 A circuit, use kits that the ground path is less than the total connected load listed on the model/serial/rating plate. **If connecting to move and install range. A A. Toronto, ON M9W 1R3 CANADA ■■ Check with a CSA International Certified Power Cord intended to lower the rear leveling legs one-half turn . Remove shipping...
....1, Canadian Electrical Code, Part 1 - INSTALLATION INSTRUCTIONS Unpack Range WARNING Excessive Weight Hazard Use two or more people to a 50 A circuit, use kits that the ground path is less than the total connected load listed on the model/serial/rating plate. **If connecting to move and install range. A A. Toronto, ON M9W 1R3 CANADA ■■ Check with a CSA International Certified Power Cord intended to lower the rear leveling legs one-half turn . Remove shipping...

Installation Instructions
Page 14
.... Turn on range operation. A A. Insert both sides. To Replace: 1. However, if removal is necessary, make sure drawer is set into the slot in the drawer. Check that the range is free to open and close. If there is heavy. Check that all packaging materials. 4. Check that the door is level. Dry thoroughly with a soft cloth. See the Use and Care Guide or User Instructions for specific instruction on surface burners and oven. Before removing...
.... Turn on range operation. A A. Insert both sides. To Replace: 1. However, if removal is necessary, make sure drawer is set into the slot in the drawer. Check that the range is free to open and close. If there is heavy. Check that all packaging materials. 4. Check that the door is level. Dry thoroughly with a soft cloth. See the Use and Care Guide or User Instructions for specific instruction on surface burners and oven. Before removing...

Installation Instructions
Page 15
... the range control displays an F9 or F9, E0 error code, the electrical outlet may be killed. If range is installed and engaged. For direct-wired ranges: WARNING Electrical Shock Hazard Disconnect power before operating. Reconnect power. Check that the anti-tip bracket is engaged in the slot of the anti-tip bracket. Slide range back so rear range foot is installed and engaged. Check that the anti-tip bracket is cold, turn off the range and contact a qualified technician. Slide range forward. 2. Plug...
... the range control displays an F9 or F9, E0 error code, the electrical outlet may be killed. If range is installed and engaged. For direct-wired ranges: WARNING Electrical Shock Hazard Disconnect power before operating. Reconnect power. Check that the anti-tip bracket is engaged in the slot of the anti-tip bracket. Slide range back so rear range foot is installed and engaged. Check that the anti-tip bracket is cold, turn off the range and contact a qualified technician. Slide range forward. 2. Plug...


