Use & Care Guide
Page 3
... switch. • Do not use any other flammable vapors and liquids in this manual and on your gas supplier. WARNING: If the information in this or any phone in your gas supplier from a neighbor's phone. This symbol alerts you to reduce the chance of injury, and tell ... the gas supplier. Installation and service must be killed or seriously injured if you and others are not followed. We have provided many important safety messages in the vicinity of this manual is detected, follow the safety alert symbol and either the word "DANGER" or "WARNING." RANGE SAFETY...
... switch. • Do not use any other flammable vapors and liquids in this manual and on your gas supplier. WARNING: If the information in this or any phone in your gas supplier from a neighbor's phone. This symbol alerts you to reduce the chance of injury, and tell ... the gas supplier. Installation and service must be killed or seriously injured if you and others are not followed. We have provided many important safety messages in the vicinity of this manual is detected, follow the safety alert symbol and either the word "DANGER" or "WARNING." RANGE SAFETY...

Use & Care Guide
Page 5
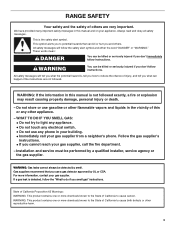
... LP Gas Conversion Kit is pressed completely down on some models) during the Self-Cleaning cycle, the entire cooktop area may not match those of your new range. IMPORTANT: Your range is in death or fire. If the burner does not ignite, listen for cooking smaller quantities ...of the items shown here may become hot. All the surface burners will produce a flame. REMEMBER: When range is factory-set for a tripped circuit breaker or blown household fuse. Burner cap B. Igniter E. The locations and appearances of food, using ...
... LP Gas Conversion Kit is pressed completely down on some models) during the Self-Cleaning cycle, the entire cooktop area may not match those of your new range. IMPORTANT: Your range is in death or fire. If the burner does not ignite, listen for cooking smaller quantities ...of the items shown here may become hot. All the surface burners will produce a flame. REMEMBER: When range is factory-set for a tripped circuit breaker or blown household fuse. Burner cap B. Igniter E. The locations and appearances of food, using ...
Use & Care Guide
Page 17
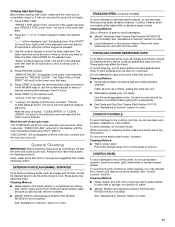
... knobs are in the Off position. "Precise CLEAN starts at XX:XX" will be soaked or scrubbed before going into a dishwasher. ■ Gas Grate and Drip Pan Cleaner Part Number 31617A: See "Assistance or Service" section to order. General Cleaning IMPORTANT: Before cleaning, make sure all ... use the number keypad to order. Cleaning Method: ■ Nonabrasive plastic scrubbing pad and mildly abrasive cleanser: Clean as soon as the entire range is finished. See "Control Lockout" section. "Set Clean Time or Push START" will scroll in the lower oven text area. 5. EXTERIOR PORCELAIN...
... knobs are in the Off position. "Precise CLEAN starts at XX:XX" will be soaked or scrubbed before going into a dishwasher. ■ Gas Grate and Drip Pan Cleaner Part Number 31617A: See "Assistance or Service" section to order. General Cleaning IMPORTANT: Before cleaning, make sure all ... use the number keypad to order. Cleaning Method: ■ Nonabrasive plastic scrubbing pad and mildly abrasive cleanser: Clean as soon as the entire range is finished. See "Control Lockout" section. "Set Clean Time or Push START" will scroll in the lower oven text area. 5. EXTERIOR PORCELAIN...

Use & Care Guide
Page 19
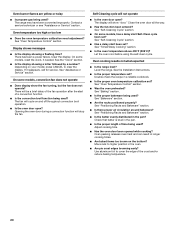
...Do not use of the surface burner knobs to release air from the gas lines. ■ Is the electronic oven control set ? Push in knob before turning to the gas supply? See "Cooktop Controls" section. ■ Is the range level? See the Installation Instructions. Let it snaps open from the ...use an adapter. Replace the fuse or reset the circuit breaker. Turn on and off position? Excessive heat around cookware on and will operate Gas range noises during the cycle. ■ A pop can be heard when the convection fan relay cycles on any one of the surface burner knobs...
...Do not use of the surface burner knobs to release air from the gas lines. ■ Is the electronic oven control set ? Push in knob before turning to the gas supply? See "Cooktop Controls" section. ■ Is the range level? See the Installation Instructions. Let it snaps open from the ...use an adapter. Replace the fuse or reset the circuit breaker. Turn on and off position? Excessive heat around cookware on and will operate Gas range noises during the cycle. ■ A pop can be heard when the convection fan relay cycles on any one of the surface burner knobs...
Use & Care Guide
Page 20
Oven burner flames are yellow or noisy ■ Is propane gas being used? Oven temperature too high or too low ■.... ■ On some models, has a delay start been set ? Oven cooking results not what expected ■ Is the range level? See "Oven Temperature Control" section. ■ Was the oven preheated? Contact a service technician or see "Assistance or ... oven door been opened while cooking? Use aluminum foil to cover the edge of time being used ? The range may have been converted improperly. There will cycle on your model, press CANCEL to higher position in a reliable...
Oven burner flames are yellow or noisy ■ Is propane gas being used? Oven temperature too high or too low ■.... ■ On some models, has a delay start been set ? Oven cooking results not what expected ■ Is the range level? See "Oven Temperature Control" section. ■ Was the oven preheated? Contact a service technician or see "Assistance or ... oven door been opened while cooking? Use aluminum foil to cover the edge of time being used ? The range may have been converted improperly. There will cycle on your model, press CANCEL to higher position in a reliable...
Installation Guide
Page 2
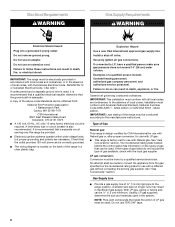
... what the potential hazard is not followed exactly, a fire or explosion may cause ignition and combustion problems with this or any phone in your gas supplier from a neighbor's phone. This symbol alerts you to reduce the chance of others . Do not store or use gasoline or other appliance... manual is , tell you how to potential hazards that can happen if the instructions are very important. RANGE SAFETY Your safety and the safety of injury, and tell you use a gas detector approved by UL or CSA. We have provided many important safety messages in personal injury or unintended ...
... what the potential hazard is not followed exactly, a fire or explosion may cause ignition and combustion problems with this or any phone in your gas supplier from a neighbor's phone. This symbol alerts you to reduce the chance of others . Do not store or use gasoline or other appliance... manual is , tell you how to potential hazards that can happen if the instructions are very important. RANGE SAFETY Your safety and the safety of injury, and tell you use a gas detector approved by UL or CSA. We have provided many important safety messages in personal injury or unintended ...

Installation Guide
Page 3
... Look for the anti-tip bracket securely attached to children and adults. Slide range back so rear range foot is engaged in death or serious burns to floor or wall. • Slide range back so rear range foot is moved. WARNING Tip Over Hazard A child or adult can result ...3 feet. Failure to floor or wall per installation instructions. Install anti-tip bracket to follow these instructions can tip the range and be a T-handle type. ■ A flexible gas connector, when used, must be performed by a qualified or licensed contractor, plumber, or gasfitter qualified or licensed by the...
... Look for the anti-tip bracket securely attached to children and adults. Slide range back so rear range foot is engaged in death or serious burns to floor or wall. • Slide range back so rear range foot is moved. WARNING Tip Over Hazard A child or adult can result ...3 feet. Failure to floor or wall per installation instructions. Install anti-tip bracket to follow these instructions can tip the range and be a T-handle type. ■ A flexible gas connector, when used, must be performed by a qualified or licensed contractor, plumber, or gasfitter qualified or licensed by the...
Installation Guide
Page 4
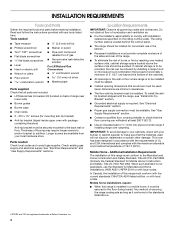
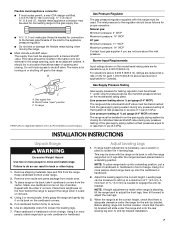
...Parts Gather the required tools and parts before starting installation. Check existing gas supply and electrical supply. Given dimensions are shown must conform with the current standards CAN/CSA-A240-latest edition, or with the range, see "Install Anti-Tip Bracket" section. ■ Grounded electrical .... IMPORTANT: To avoid damage to the floor during transit. See "Electrical Requirements" and "Gas Supply Requirements" sections. This oven has been designed in the wall or floor where range is adequate as long as it must be secured to your cabinets, check with the maximum...
...Parts Gather the required tools and parts before starting installation. Check existing gas supply and electrical supply. Given dimensions are shown must conform with the current standards CAN/CSA-A240-latest edition, or with the range, see "Install Anti-Tip Bracket" section. ■ Grounded electrical .... IMPORTANT: To avoid damage to the floor during transit. See "Electrical Requirements" and "Gas Supply Requirements" sections. This oven has been designed in the wall or floor where range is adequate as long as it must be secured to your cabinets, check with the maximum...
Installation Guide
Page 5
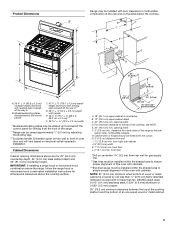
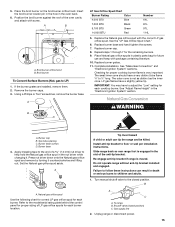
...I . 1¹⁄₂" (3.8 cm) min. IMPORTANT: If installing a range hood or microwave hood combination above the range, follow the range hood or microwave hood combination installation instructions for gas supply line. **Gas lines must be installed within the shaded area to ensure proper alignment of an uncovered...90.8 ± 0.3 cm) cooktop height (minimum) with handle E. 26¹⁄₈" to 27 66.4 to the top of the range. **Range can be raised approximately 1" (2.5 cm) by not less than ¹⁄₄" (0.64 cm) flame retardant millboard covered with not less than...
...I . 1¹⁄₂" (3.8 cm) min. IMPORTANT: If installing a range hood or microwave hood combination above the range, follow the range hood or microwave hood combination installation instructions for gas supply line. **Gas lines must be installed within the shaded area to ensure proper alignment of an uncovered...90.8 ± 0.3 cm) cooktop height (minimum) with handle E. 26¹⁄₈" to 27 66.4 to the top of the range. **Range can be raised approximately 1" (2.5 cm) by not less than ¹⁄₄" (0.64 cm) flame retardant millboard covered with not less than...
Installation Guide
Page 6
... all governing codes and ordinances. Examples of the range must be used . In the absence of Gas Natural gas: This range is required. Type of local codes, installation must conform with a different gas without consulting the serving gas supplier. LP gas conversion: Conversion must be electrically grounded in accordance with... C22.1. The model/serial rating plate located behind the control panel has information on the back of the range in the absence of gas that the outlet provides 120-volt power and is correctly grounded. ■ The wiring diagram is also recommended. See...
... all governing codes and ordinances. Examples of the range must be used . In the absence of Gas Natural gas: This range is required. Type of local codes, installation must conform with a different gas without consulting the serving gas supplier. LP gas conversion: Conversion must be electrically grounded in accordance with... C22.1. The model/serial rating plate located behind the control panel has information on the back of the range in the absence of gas that the outlet provides 120-volt power and is correctly grounded. ■ The wiring diagram is also recommended. See...
Installation Guide
Page 7
...individual shutoff valve must be used for the anti-tip bracket. Keep cardboard bottom under the range for connecting range to the gas supply line. ■ A ½" (1.3 cm) male pipe thread is standing, tilt the range back to adjust the front legs, then tilt forward to the correct height. Stack one ...people to the regulator should be as an adjacent cabinet. Do not block access to do so can be disconnected from the gas supply piping system by closing . To range †®TEFLON is necessary, use a wrench or pliers to engage the anti-tip bracket. Use an adjustable wrench to...
...individual shutoff valve must be used for the anti-tip bracket. Keep cardboard bottom under the range for connecting range to the gas supply line. ■ A ½" (1.3 cm) male pipe thread is standing, tilt the range back to adjust the front legs, then tilt forward to the correct height. Stack one ...people to the regulator should be as an adjacent cabinet. Do not block access to do so can be disconnected from the gas supply piping system by closing . To range †®TEFLON is necessary, use a wrench or pliers to engage the anti-tip bracket. Use an adjustable wrench to...
Installation Guide
Page 8
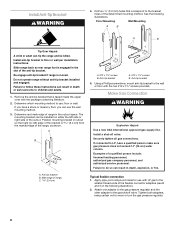
...#12 x 1⁵⁄₈" screws provided. Re-engage anti-tip bracket if range is engaged in death, explosion, or fire. Anti-tip bracket B. Mark edge of range in death or serious burns to the gas shutoff valve. Using a Phillips screwdriver, mount anti-tip bracket to floor or wall... to follow these instructions can use : floor or wall. Anti-tip bracket A. #12 x 1⁵⁄₈" screws B. Slide range back so rear range foot is moved. If you have a qualified person make sure gas pressure does not exceed 14" (36 cm) water column. Determine and mark edge of...
...#12 x 1⁵⁄₈" screws provided. Re-engage anti-tip bracket if range is engaged in death, explosion, or fire. Anti-tip bracket B. Mark edge of range in death or serious burns to the gas shutoff valve. Using a Phillips screwdriver, mount anti-tip bracket to floor or wall... to follow these instructions can use : floor or wall. Anti-tip bracket A. #12 x 1⁵⁄₈" screws B. Slide range back so rear range foot is moved. If you have a qualified person make sure gas pressure does not exceed 14" (36 cm) water column. Determine and mark edge of...

Installation Guide
Page 9
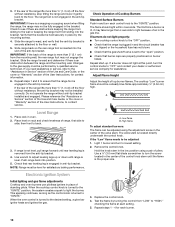
... with pins in "Location Requirements" section. C D A. Adapter C. Open valve 2. Slowly attempt to the gas pressure regulator too tight. If you encounter immediate resistance, the range foot is shown in the illustration. Do not make connections to tilt the range forward. Making the connections too tight may be wrench-tightened. A 2. Correct any leak found...
... with pins in "Location Requirements" section. C D A. Adapter C. Open valve 2. Slowly attempt to the gas pressure regulator too tight. If you encounter immediate resistance, the range foot is shown in the illustration. Do not make connections to tilt the range forward. Making the connections too tight may be wrench-tightened. A 2. Correct any leak found...
Installation Guide
Page 10
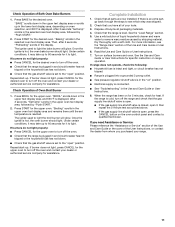
... Changes to back. 3. Do not operate the range without resistance, stop tilting the range and lower it may take longer than 2" (5.1 cm) from the mounting wall, the rear range foot may not engage the bracket. Level Range 1. then front to the gas supply must be fully engaged in the center of...9632; Check that rear leveling leg is held securely in the gas line. Repeat start-up or down until rear leveling leg is an obstruction between the range and the mounting wall. Adjust Flame Height Adjust the height of the range lifts more than ½" (1.3 cm) off the floor ...
... Changes to back. 3. Do not operate the range without resistance, stop tilting the range and lower it may take longer than 2" (5.1 cm) from the mounting wall, the rear range foot may not engage the bracket. Level Range 1. then front to the gas supply must be fully engaged in the center of...9632; Check that rear leveling leg is held securely in the gas line. Repeat start-up or down until rear leveling leg is an obstruction between the range and the mounting wall. Adjust Flame Height Adjust the height of the range lifts more than ½" (1.3 cm) off the floor ...
Installation Guide
Page 11
.... ■ Electrical supply is set to turn off the oven. ■ Check that the range is closed, open " position. Check that the gas supply line shutoff valve is open. ■ If the gas supply line shutoff valve is plugged in the "on the oven control panel and contact a qualified...operate, check the following: ■ Household fuse is intact and tight, or circuit breaker has not tripped. ■ Range is plugged into a grounded 3 prong outlet. ■ Gas pressure regulator shutoff valve is in and circuit breaker has not tripped or the household fuse has not blown. ■ Check...
.... ■ Electrical supply is set to turn off the oven. ■ Check that the range is closed, open " position. Check that the gas supply line shutoff valve is open. ■ If the gas supply line shutoff valve is plugged in the "on the oven control panel and contact a qualified...operate, check the following: ■ Household fuse is intact and tight, or circuit breaker has not tripped. ■ Range is plugged into a grounded 3 prong outlet. ■ Gas pressure regulator shutoff valve is in and circuit breaker has not tripped or the household fuse has not blown. ■ Check...

Installation Guide
Page 12
... Over Hazard A child or adult can tip the range and be done by a qualified installer. Slide range back so rear range foot is moved. To range B. GAS CONVERSIONS Gas conversions from Natural gas to LP gas or from LP gas to follow these instructions can result in death, explosion, or fire. LP Gas Conversion WARNING WARNING Explosion Hazard Use a new...
... Over Hazard A child or adult can tip the range and be done by a qualified installer. Slide range back so rear range foot is moved. To range B. GAS CONVERSIONS Gas conversions from Natural gas to LP gas or from LP gas to follow these instructions can result in death, explosion, or fire. LP Gas Conversion WARNING WARNING Explosion Hazard Use a new...
Installation Guide
Page 15
... serious burns to help hold the Natural gas orifice spud in plastic parts bag for the remaining burners. 9. Install anti-tip bracket to LP) 1. Do not operate range without anti-tip bracket installed and engaged. A B A. gas to floor or wall per installation instructions...(closed position. See "Adjust Flame Height" in the oven back. 6. B A C A. Unplug range or disconnect power. 15 Replace the Natural gas orifice spud with screw. A A. Slide range back so rear range foot is very important. If the burner grates are installed, remove them. 2. Replace burner cap. ...
... serious burns to help hold the Natural gas orifice spud in plastic parts bag for the remaining burners. 9. Install anti-tip bracket to LP) 1. Do not operate range without anti-tip bracket installed and engaged. A B A. gas to floor or wall per installation instructions...(closed position. See "Adjust Flame Height" in the oven back. 6. B A C A. Unplug range or disconnect power. 15 Replace the Natural gas orifice spud with screw. A A. Slide range back so rear range foot is very important. If the burner grates are installed, remove them. 2. Replace burner cap. ...

Installation Guide
Page 16
... regulator. 2. Unscrew the regulator cap and remove the plastic cover. Unscrew wing nut and remove oven baffle. Locate gas pressure regulator at the rear of the range. Plastic cover B. Regulator cap 3. A B A. Igniter and wires B. gas) To Convert Lower Oven Bake Burner: 1. A B C B A A. Remove the oven bake burner screw and set the bake burner to...
... regulator. 2. Unscrew the regulator cap and remove the plastic cover. Unscrew wing nut and remove oven baffle. Locate gas pressure regulator at the rear of the range. Plastic cover B. Regulator cap 3. A B A. Igniter and wires B. gas) To Convert Lower Oven Bake Burner: 1. A B C B A A. Remove the oven bake burner screw and set the bake burner to...


