
Use & Care Guide
Page 5
... spark igniter still does not operate, call a trained repair specialist. Left rear control knob C. Turn knob anywhere between HIGH and LOW. Electric igniters automatically light the surface burners when control knobs are ideal for use LP gas, an LP Gas Conversion Kit is included...clicking sound. To Set: 1. All the surface burners will produce a flame. Before setting a control knob, place filled cookware on the valve shaft. Medium LOW ■ Hold a rapid boil. ■ Quickly brown or sear food. ■ Fry or sauté foods. ■ Cook soups, sauces ...
... spark igniter still does not operate, call a trained repair specialist. Left rear control knob C. Turn knob anywhere between HIGH and LOW. Electric igniters automatically light the surface burners when control knobs are ideal for use LP gas, an LP Gas Conversion Kit is included...clicking sound. To Set: 1. All the surface burners will produce a flame. Before setting a control knob, place filled cookware on the valve shaft. Medium LOW ■ Hold a rapid boil. ■ Quickly brown or sear food. ■ Fry or sauté foods. ■ Cook soups, sauces ...
Use & Care Guide
Page 6
...not light, check cap alignment. Home Canning When canning for slow cooking. Companies that manufacture home canning products can leave permanent marks on low to light properly. For example, aluminum cookware with a nonstick finish will help avoid poor ignition and uneven flames. Copper ■ ...be of cooking. ■ Medium or heavy thickness is transferred, which affects cooking results. Cookware IMPORTANT: Do not leave empty cookware on low heat settings. Rough finishes may be used areas to be used as a guide for the most cooking tasks. A nonstick finish has ...
...not light, check cap alignment. Home Canning When canning for slow cooking. Companies that manufacture home canning products can leave permanent marks on low to light properly. For example, aluminum cookware with a nonstick finish will help avoid poor ignition and uneven flames. Copper ■ ...be of cooking. ■ Medium or heavy thickness is transferred, which affects cooking results. Cookware IMPORTANT: Do not leave empty cookware on low heat settings. Rough finishes may be used areas to be used as a guide for the most cooking tasks. A nonstick finish has ...

Use & Care Guide
Page 8
..."1" keypad to select Spanish, or press the "2" keypad to adjust the setting. 3. To change Setting Press (1) for Celsius Press (1) for OFF Press (1) for LOW Press (1) for OFF Press (1) for OFF Press (1) for OFF Press (1) for 24 HR Press (1) for ON Press (1) for OFF Press (1) for French Press ...2. Press the "1" keypad to adjust the setting. 3. Language (Change Language Options) The Language is factory set for On but can be changed to Low. 1. Keypress Tone (Adjusting Keypress Tone On or Off) The keypress tone is factory preset to English but can be changed to Celsius. 1. Press ...
..."1" keypad to select Spanish, or press the "2" keypad to adjust the setting. 3. To change Setting Press (1) for Celsius Press (1) for OFF Press (1) for LOW Press (1) for OFF Press (1) for OFF Press (1) for OFF Press (1) for 24 HR Press (1) for ON Press (1) for OFF Press (1) for French Press ...2. Press the "1" keypad to adjust the setting. 3. Language (Change Language Options) The Language is factory set for On but can be changed to Low. 1. Keypress Tone (Adjusting Keypress Tone On or Off) The keypress tone is factory preset to English but can be changed to Celsius. 1. Press ...
Use & Care Guide
Page 12
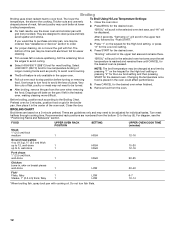
... broil temperature may need to drain juices and help avoid spatter and smoke. Changing the temperature once food is pressed. Press CANCEL for the Low broil setting. 4. BROILING CHART Broil times are designed to be ordered. The lower the temperature, the slower the cooking. The bottom of ...oven. Press START for the desired oven. Use tongs to order. ■ For proper draining, do not cover the grid with aluminum foil for low-temperature broiling of the oven rack. FOOD UPPER OVEN RACK POSITION SETTING UPPER OVEN COOK TIME (minutes) Steak 1" (2.5 cm) thick medium 1 HIGH...
... broil temperature may need to drain juices and help avoid spatter and smoke. Changing the temperature once food is pressed. Press CANCEL for the Low broil setting. 4. BROILING CHART Broil times are designed to be ordered. The lower the temperature, the slower the cooking. The bottom of ...oven. Press START for the desired oven. Use tongs to order. ■ For proper draining, do not cover the grid with aluminum foil for low-temperature broiling of the oven rack. FOOD UPPER OVEN RACK POSITION SETTING UPPER OVEN COOK TIME (minutes) Steak 1" (2.5 cm) thick medium 1 HIGH...
Use & Care Guide
Page 20
... items too brown on your model, press CANCEL to clear the display. The range may have been converted improperly. Oven temperature too high or too low ■ Does the oven temperature calibration need adjustment? See "Oven Temperature Control" section. There has been a power failure. See the "Clock" section. ■ Is the...
... items too brown on your model, press CANCEL to clear the display. The range may have been converted improperly. Oven temperature too high or too low ■ Does the oven temperature calibration need adjustment? See "Oven Temperature Control" section. There has been a power failure. See the "Clock" section. ■ Is the...
Installation Guide
Page 10
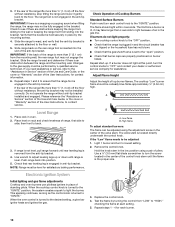
... of the range lifts more than ½" (1.3 cm) off the floor without resistance, the anti-tip bracket may not be adjusted: 1. A B A. Low flame B. Remove the control knob. Replace the control knob. 4. Test the flame by the mounting screws. 4. Check to see if there are properly positioned ... the slot of pliers. Electronic Ignition System Initial lighting and gas flame adjustments Cooktop and oven burners use pilotless igniters in the low position using the adjustment screw in the bracket. Do not operate the range without resistance, stop tilting the range and lower it...
... of the range lifts more than ½" (1.3 cm) off the floor without resistance, the anti-tip bracket may not be adjusted: 1. A B A. Low flame B. Remove the control knob. Replace the control knob. 4. Test the flame by the mounting screws. 4. Check to see if there are properly positioned ... the slot of pliers. Electronic Ignition System Initial lighting and gas flame adjustments Cooktop and oven burners use pilotless igniters in the low position using the adjustment screw in the bracket. Do not operate the range without resistance, stop tilting the range and lower it...
Installation Guide
Page 15
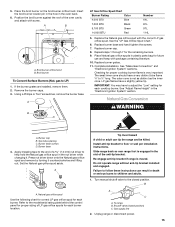
... yellow tip. Set the Natural gas orifice spud aside. Slide range back so rear range foot is moved. Turn manual shutoff valve to adjust the "Low" setting for each burner location. Remove the burner caps. 3. See "Adjust Flame Height" in the oven back. 6. Gas tube opening C. Re-engage anti-tip bracket...
... yellow tip. Set the Natural gas orifice spud aside. Slide range back so rear range foot is moved. Turn manual shutoff valve to adjust the "Low" setting for each burner location. Remove the burner caps. 3. See "Adjust Flame Height" in the oven back. 6. Gas tube opening C. Re-engage anti-tip bracket...
Installation Guide
Page 18
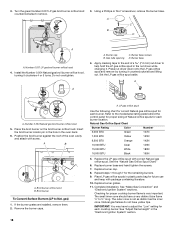
... each burner. See "Make Gas Connection" and "Electronic Ignition System" sections. 3. Natural gas flames do not have a very distinct blue flame ¼" to adjust the "Low" setting for proper cooktop burner flame is not as distinct as the inner cone. Replace burner base and hand tighten the screws. 7. Place LP gas...
... each burner. See "Make Gas Connection" and "Electronic Ignition System" sections. 3. Natural gas flames do not have a very distinct blue flame ¼" to adjust the "Low" setting for proper cooktop burner flame is not as distinct as the inner cone. Replace burner base and hand tighten the screws. 7. Place LP gas...

