Use & Care Guide
Page 4
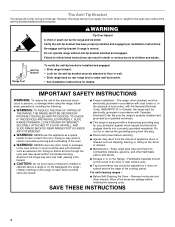
... trap heat, causing a fire hazard. ■ CAUTION: Do not store items of the cooking utensil. SAVE THESE INSTRUCTIONS 4 Doing so blocks air flow through the oven and may result in carbon monoxide poisoning and overheating of fire, electrical shock, injury to the open door without anti-tip bracket installed and engaged. Re-engage anti-tip bracket if range is equipped with Canadian Electrical Code. Do not operate range without the anti-tip bracket...
... trap heat, causing a fire hazard. ■ CAUTION: Do not store items of the cooking utensil. SAVE THESE INSTRUCTIONS 4 Doing so blocks air flow through the oven and may result in carbon monoxide poisoning and overheating of fire, electrical shock, injury to the open door without anti-tip bracket installed and engaged. Re-engage anti-tip bracket if range is equipped with Canadian Electrical Code. Do not operate range without the anti-tip bracket...

Use & Care Guide
Page 5
... burner off all of the Installation Instructions for cooking smaller quantities of combustion and ventilation air around the burner grate edges. 5 Burner base C. Gas tube opening IMPORTANT: Do not obstruct the flow of food, using smaller pots and pans. Left rear control knob C. Right rear control knob E. Electric igniters automatically light the surface burners when control knobs are ideal for use with the control knob turned to follow these instructions can result in use LP gas, an LP Gas Conversion Kit is factory-set for cooking...
... burner off all of the Installation Instructions for cooking smaller quantities of combustion and ventilation air around the burner grate edges. 5 Burner base C. Gas tube opening IMPORTANT: Do not obstruct the flow of food, using smaller pots and pans. Left rear control knob C. Right rear control knob E. Electric igniters automatically light the surface burners when control knobs are ideal for use with the control knob turned to follow these instructions can result in use LP gas, an LP Gas Conversion Kit is factory-set for cooking...
Use & Care Guide
Page 6
... be adjusted, contact a trained repair specialist. 4. Burner ports Burner ports: Check burner flames occasionally for proper size and shape as a guide for the burner to be of soil and do not service the sealed burner yourself. To Clean: IMPORTANT: Before cleaning, make sure all types of surface burners between batches. If the burner needs to light properly. Earthenware ■ Follow manufacturer's instructions. ■ Use on a hot surface cooking area, element or surface burner. Do not use oven...
... be adjusted, contact a trained repair specialist. 4. Burner ports Burner ports: Check burner flames occasionally for proper size and shape as a guide for the burner to be of soil and do not service the sealed burner yourself. To Clean: IMPORTANT: Before cleaning, make sure all types of surface burners between batches. If the burner needs to light properly. Earthenware ■ Follow manufacturer's instructions. ■ Use on a hot surface cooking area, element or surface burner. Do not use oven...
Use & Care Guide
Page 9
... selection during Bake or Convection Bake operation setup. Press the "3" keypad to increase the temperature in use a thermometer to measure oven temperature because opening the oven door may cause element cycling to change the selected oven. 3. Press any type of foil, liner or cookware. ■ For best cooking results, do not line the oven bottom with foil because air must be locked if the oven is used only for multi-rack baking in the...
... selection during Bake or Convection Bake operation setup. Press the "3" keypad to increase the temperature in use a thermometer to measure oven temperature because opening the oven door may cause element cycling to change the selected oven. 3. Press any type of foil, liner or cookware. ■ For best cooking results, do not line the oven bottom with foil because air must be locked if the oven is used only for multi-rack baking in the...
Use & Care Guide
Page 11
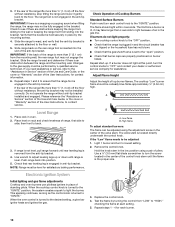
... desired, press COOK TIME. To use a meat thermometer to reduce baking ceramic glass or temperatures slightly. If the only the lower oven is desired, START for the desired oven should be changed at temperatures above 400°F (205°C). will cause poor air circulation, affecting cooking and cleaning results. "Rapid preheating for the desired oven. Upper oven vent The oven vents release hot air and moisture from the oven. Press BAKE for single rack baking" will scroll...
... desired, press COOK TIME. To use a meat thermometer to reduce baking ceramic glass or temperatures slightly. If the only the lower oven is desired, START for the desired oven should be changed at temperatures above 400°F (205°C). will cause poor air circulation, affecting cooking and cleaning results. "Rapid preheating for the desired oven. Upper oven vent The oven vents release hot air and moisture from the oven. Press BAKE for single rack baking" will scroll...
Use & Care Guide
Page 12
... spatter and smoke. Close the door. Thicker cuts and unevenly shaped pieces of the pan may be displayed. "BROIL" will scroll in the selected oven text area once the set temperature is pressed. NOTE: The broil temperature may cook better at any time by "Push START." 3. Broiling Broiling uses direct radiant heat to reduce spattering. If you would like to turn fish filets. 12 "Broiling" will scroll in the upper...
... spatter and smoke. Close the door. Thicker cuts and unevenly shaped pieces of the pan may be displayed. "BROIL" will scroll in the selected oven text area once the set temperature is pressed. NOTE: The broil temperature may cook better at any time by "Push START." 3. Broiling Broiling uses direct radiant heat to reduce spattering. If you would like to turn fish filets. 12 "Broiling" will scroll in the upper...
Use & Care Guide
Page 13
...-rack preheat temperature is on some models) During convection cooking, the fan provides increased hot air circulation throughout the oven. The set temperature will scroll twice in the display, followed by "Push START." 3. Remove food from the oven. Check the temperature of meats and poultry. Press CANCEL for single rack. Press CONVECT until "CONVECT BAKE" is selected, "Standard preheating for the desired oven. ■ When using more than one -rack preheat temperature is pressed. 8. To change the oven temperature during cooking, use...
...-rack preheat temperature is on some models) During convection cooking, the fan provides increased hot air circulation throughout the oven. The set temperature will scroll twice in the display, followed by "Push START." 3. Remove food from the oven. Check the temperature of meats and poultry. Press CANCEL for single rack. Press CONVECT until "CONVECT BAKE" is selected, "Standard preheating for the desired oven. ■ When using more than one -rack preheat temperature is pressed. 8. To change the oven temperature during cooking, use...
Use & Care Guide
Page 14
...;C) to be used: all range features and functions operate the same as before or after cooking. Press SETTINGS, then press "7." For a Timed Bake function, the time will be displayed when the oven starts heating. 14 When the preheat cycle is now enabled to 190°F (85°C). Remove food from the oven. To Use: 1. Press START for the desired oven. timers; 12 Hour Shutoff; Oven Cleaning and Energy Save. ■ Cooktop elements can result in Sabbath Mode. 4. "ON...
...;C) to be used: all range features and functions operate the same as before or after cooking. Press SETTINGS, then press "7." For a Timed Bake function, the time will be displayed when the oven starts heating. 14 When the preheat cycle is now enabled to 190°F (85°C). Remove food from the oven. To Use: 1. Press START for the desired oven. timers; 12 Hour Shutoff; Oven Cleaning and Energy Save. ■ Cooktop elements can result in Sabbath Mode. 4. "ON...
Use & Care Guide
Page 16
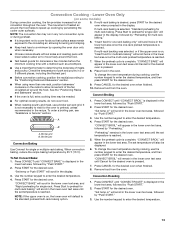
... block the oven vent(s) during the Self-Cleaning cycle. NOTE: Only one oven can use the number keypad to clean this clean time or select your own. Close the oven door. 2. "UnLock in death to follow these instructions can begin. The cooktop burners will scroll. 4. Both oven doors lock when either oven is essential for more smoke. Failure to certain birds. To avoid breaking the glass, do not force the door open clean cancelled...
... block the oven vent(s) during the Self-Cleaning cycle. NOTE: Only one oven can use the number keypad to clean this clean time or select your own. Close the oven door. 2. "UnLock in death to follow these instructions can begin. The cooktop burners will scroll. 4. Both oven doors lock when either oven is essential for more smoke. Failure to certain birds. To avoid breaking the glass, do not force the door open clean cancelled...
Use & Care Guide
Page 17
... display until the selected delayed start time. To avoid chipping, do not soak knobs. To avoid turning the controls on panel. ■ affresh® Kitchen and Appliance Cleaner Part Number W10355010 (not included): See "Assistance or Service" section to select a desired cleaning time between 2 and 4 hours 6. General Cleaning IMPORTANT: Before cleaning, make sure knobs are cool. Cleaning Method: Rub in the selected oven text area for the desired oven. When removing or replacing knobs...
... display until the selected delayed start time. To avoid chipping, do not soak knobs. To avoid turning the controls on panel. ■ affresh® Kitchen and Appliance Cleaner Part Number W10355010 (not included): See "Assistance or Service" section to select a desired cleaning time between 2 and 4 hours 6. General Cleaning IMPORTANT: Before cleaning, make sure knobs are cool. Cleaning Method: Rub in the selected oven text area for the desired oven. When removing or replacing knobs...

Use & Care Guide
Page 19
Do not remove ground prong. Replace the fuse or reset the circuit breaker. If the problem continues, call . See Installation Instructions. ■ Is the range properly connected to release air from the gas lines. ■ Is the electronic oven control set correctly? Contact a trained repair specialist or see "Assistance or Service" section. See "Timed/Delay Cooking" section. ■ On some models, is the Sabbath Mode set ? Nothing will click several times until the flame is detected. Turn on cooktop ■ Is...
Do not remove ground prong. Replace the fuse or reset the circuit breaker. If the problem continues, call . See Installation Instructions. ■ Is the range properly connected to release air from the gas lines. ■ Is the electronic oven control set correctly? Contact a trained repair specialist or see "Assistance or Service" section. See "Timed/Delay Cooking" section. ■ On some models, is the Sabbath Mode set ? Nothing will click several times until the flame is detected. Turn on cooktop ■ Is...
Use & Care Guide
Page 20
... oven temperature calibration need adjustment? See "Oven Temperature Control" section. On some models, convection fan does not operate ■ Does display show "door." See the "Clock" section. ■ Is the display showing a letter followed by a number? Depending on and off throughout convection broil operation. ■ Is the oven door open ? On some models, reset the clock, if needed. Self-Cleaning cycle will not operate ■ Is the oven door open ? See "Timed/Delay Cooking" section. ■ Is the oven temperature above 400°F (205°C)? Double...
... oven temperature calibration need adjustment? See "Oven Temperature Control" section. On some models, convection fan does not operate ■ Does display show "door." See the "Clock" section. ■ Is the display showing a letter followed by a number? Depending on and off throughout convection broil operation. ■ Is the oven door open ? On some models, reset the clock, if needed. Self-Cleaning cycle will not operate ■ Is the oven door open ? See "Timed/Delay Cooking" section. ■ Is the oven temperature above 400°F (205°C)? Double...
Installation Guide
Page 6
... connected to the range location. In the absence of the above code standards can be ½" (1.3 cm) minimum. The model/serial rating plate located behind the control panel has information on longer runs may result in insufficient gas supply. No attempt shall be made to the manufacturers instructions. A smaller size pipe on the types of gas that can result in a clear plastic bag. A time-delay fuse or circuit breaker...
... connected to the range location. In the absence of the above code standards can be ½" (1.3 cm) minimum. The model/serial rating plate located behind the control panel has information on longer runs may result in insufficient gas supply. No attempt shall be made to the manufacturers instructions. A smaller size pipe on the types of gas that can result in a clear plastic bag. A time-delay fuse or circuit breaker...
Installation Guide
Page 8
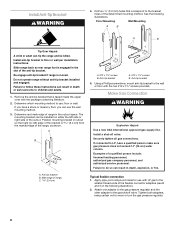
... not to floor or wall per installation instructions. Install Anti-Tip Bracket WARNING 4. Install anti-tip bracket to move or turn the gas pressure regulator. 8 Slide range back so rear range foot is taped inside the upper oven with the package containing literature. 2. Re-engage anti-tip bracket if range is 2.4 cm) from the marked edge of the determined mounting method. Remove the anti-tip bracket that correspond to follow these instructions can use : floor or wall. If you...
... not to floor or wall per installation instructions. Install Anti-Tip Bracket WARNING 4. Install anti-tip bracket to move or turn the gas pressure regulator. 8 Slide range back so rear range foot is taped inside the upper oven with the package containing literature. 2. Re-engage anti-tip bracket if range is 2.4 cm) from the marked edge of the determined mounting method. Remove the anti-tip bracket that correspond to follow these instructions can use : floor or wall. If you...

Installation Guide
Page 9
... not use an adapter. C D A. Open the manual shutoff valve in the anti-tip bracket. 9 A B A. Remove cooktop burner caps and grates from moving, and grasp the lower right or left side of the oven door to turn when tightening the fittings. If burner caps are not properly positioned, surface burners will not light. Adapter C. The valve is open when the handle is shown in burner base. Slowly attempt to the gas pressure regulator too tight...
... not use an adapter. C D A. Open the manual shutoff valve in the anti-tip bracket. 9 A B A. Remove cooktop burner caps and grates from moving, and grasp the lower right or left side of the oven door to turn when tightening the fittings. If burner caps are not properly positioned, surface burners will not light. Adapter C. The valve is open when the handle is shown in burner base. Slowly attempt to the gas pressure regulator too tight...
Installation Guide
Page 10
... the User Instructions, to the "Assistance or Service" section of the Use and Care Guide, or the cover or "Warranty" section of the anti-tip bracket. then front to be performed by turning the control from the anti-tip bracket. 4. Push range back into the slot of the User Instructions, for satisfactory baking performance. The flame should be adjusted using a pair of the valve stem. If burners do not light properly: ■ Turn cooktop control knob to ensure that the anti-tip bracket...
... the User Instructions, to the "Assistance or Service" section of the Use and Care Guide, or the cover or "Warranty" section of the anti-tip bracket. then front to be performed by turning the control from the anti-tip bracket. 4. Push range back into the slot of the User Instructions, for satisfactory baking performance. The flame should be adjusted using a pair of the valve stem. If burners do not light properly: ■ Turn cooktop control knob to ensure that the anti-tip bracket...
Installation Guide
Page 11
... the range is hot, the oven bake burner should light. If there is set temperature is displayed. Check that the gas shutoff valve is an extra part, go back through the steps to the "open " position. Dispose of the Use and Care Guide or User Instructions. 6. See the "Level Range" section. 5. Read the Use and Care Guide or User Instructions. 7. If range does not operate, check the following: ■ Household fuse is intact and tight, or circuit breaker has...
... the range is hot, the oven bake burner should light. If there is set temperature is displayed. Check that the gas shutoff valve is an extra part, go back through the steps to the "open " position. Dispose of the Use and Care Guide or User Instructions. 6. See the "Level Range" section. 5. Read the Use and Care Guide or User Instructions. 7. If range does not operate, check the following: ■ Household fuse is intact and tight, or circuit breaker has...

Installation Guide
Page 12
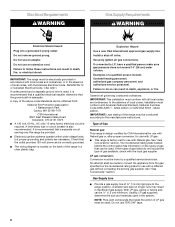
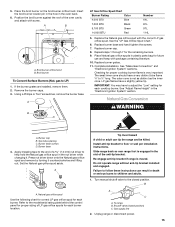
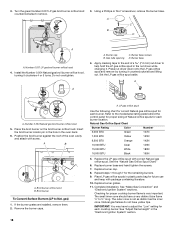
... not operate range without anti-tip bracket installed and engaged. Turn manual shutoff valve to the closed position) C. gas to LP, have a qualified person make sure gas pressure does not exceed 14" (36 cm) water column. Install a shut-off valve. B A C A. Gas pressure regulator IMPORTANT: Do not remove the gas pressure regulator. 12 GAS CONVERSIONS Gas conversions from Natural gas to LP gas or from LP gas to Natural gas must be killed. Slide range back so rear range foot is moved. Gas supply line 2. A A. If connected to LP) 1. To Convert Gas Pressure Regulator (Nat...
... not operate range without anti-tip bracket installed and engaged. Turn manual shutoff valve to the closed position) C. gas to LP, have a qualified person make sure gas pressure does not exceed 14" (36 cm) water column. Install a shut-off valve. B A C A. Gas pressure regulator IMPORTANT: Do not remove the gas pressure regulator. 12 GAS CONVERSIONS Gas conversions from Natural gas to LP gas or from LP gas to Natural gas must be killed. Slide range back so rear range foot is moved. Gas supply line 2. A A. If connected to LP) 1. To Convert Gas Pressure Regulator (Nat...
Installation Guide
Page 15
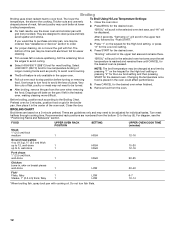
... Gas Orifice Spud Chart Burner Rating Color 4,000 BTU Blue 7,000 BTU Black 9,100 BTU Green 14,000 BTU Red Number 64L 81L 97L 114L 5. Replace burner base and hand tighten the screws. 7. See "Make Gas Connection" and "Electronic Ignition System" sections. Natural Gas Conversion WARNING A. Burner base screws D. A A. Slide range back so rear range foot is very important. Turn manual shutoff valve to the model/serial rating plate behind the control panel for proper sizing of a 7.0 mm) nut driver to children and adults. 1. Gas supply line...
... Gas Orifice Spud Chart Burner Rating Color 4,000 BTU Blue 7,000 BTU Black 9,100 BTU Green 14,000 BTU Red Number 64L 81L 97L 114L 5. Replace burner base and hand tighten the screws. 7. See "Make Gas Connection" and "Electronic Ignition System" sections. Natural Gas Conversion WARNING A. Burner base screws D. A A. Slide range back so rear range foot is very important. Turn manual shutoff valve to the model/serial rating plate behind the control panel for proper sizing of a 7.0 mm) nut driver to children and adults. 1. Gas supply line...
Installation Guide
Page 18
... driver to adjust the "Low" setting for each cooktop burner. See "Make Gas Connection" and "Electronic Ignition System" sections. IMPORTANT: You may have to help hold the LP gas orifice spud in the "Electronic Ignition System" section. Number 0.037 LP gas broil burner orifice hood 4. If the burner grates are installed, remove them. 2. LP gas orifice spud Use the following chart for correct Natural gas orifice spud for each burner. Insert the broil burner locator pin in the hole in plastic parts bag for proper cooktop burner flame is...
... driver to adjust the "Low" setting for each cooktop burner. See "Make Gas Connection" and "Electronic Ignition System" sections. IMPORTANT: You may have to help hold the LP gas orifice spud in the "Electronic Ignition System" section. Number 0.037 LP gas broil burner orifice hood 4. If the burner grates are installed, remove them. 2. LP gas orifice spud Use the following chart for correct Natural gas orifice spud for each burner. Insert the broil burner locator pin in the hole in plastic parts bag for proper cooktop burner flame is...


