
Use & Care Guide
Page 5
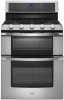
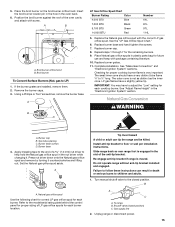
...all of the items shown here may become hot. Sealed Surface Burners A A B D C E D C A. Alignment pins D. COOKTOP USE This manual covers different models. Use the following chart as a guide when setting heat levels. The large burners (16,000, 14,000 and 12,500 Btu/h [British Thermal Units]) provide...gas, an LP Gas Conversion Kit is pressed completely down on the grate. NOTE: Visually check that the control knob is included with your model. All the surface burners will produce a flame. Burner cap B. Left front control knob B. Center burner (on the grate. Fire Hazard ...
...all of the items shown here may become hot. Sealed Surface Burners A A B D C E D C A. Alignment pins D. COOKTOP USE This manual covers different models. Use the following chart as a guide when setting heat levels. The large burners (16,000, 14,000 and 12,500 Btu/h [British Thermal Units]) provide...gas, an LP Gas Conversion Kit is pressed completely down on the grate. NOTE: Visually check that the control knob is included with your model. All the surface burners will produce a flame. Burner cap B. Left front control knob B. Center burner (on the grate. Fire Hazard ...
Use & Care Guide
Page 7
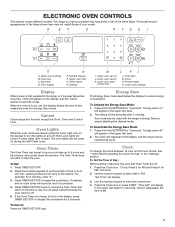
... display, and the range can be set in the upper text area. 2. The clock will be operated as usual. To Set the Time of your model. "Clock: Press 3 for AM and Press 6 for 5 seconds. "Set Time" will scroll. 2. "Time Set" will turn the lights on the display. ELECTRONIC OVEN CONTROLS ...This manual covers different models. The range you have purchased may not match those of Day: Before setting, make sure the oven and Oven Timer are closed, press the Oven...
... display, and the range can be set in the upper text area. 2. The clock will be operated as usual. To Set the Time of your model. "Clock: Press 3 for AM and Press 6 for 5 seconds. "Set Time" will scroll. 2. "Time Set" will turn the lights on the display. ELECTRONIC OVEN CONTROLS ...This manual covers different models. The range you have purchased may not match those of Day: Before setting, make sure the oven and Oven Timer are closed, press the Oven...
Use & Care Guide
Page 11
...; Brown, crisp crusts ■ For pies, breads and casseroles, use a meat thermometer to determine whether meat, poultry and fish are cooked to be displayed. On models without a temperature probe, use temperature recommended in recipe. ■ Place rack in center of oven. The internal temperature, not appearance, should be pressed again and...
...; Brown, crisp crusts ■ For pies, breads and casseroles, use a meat thermometer to determine whether meat, poultry and fish are cooked to be displayed. On models without a temperature probe, use temperature recommended in recipe. ■ Place rack in center of oven. The internal temperature, not appearance, should be pressed again and...
Use & Care Guide
Page 13
... selected, "Standard preheating for multirack baking" will appear in the oven. See the "Positioning Racks and Bakeware" section. ■ If the oven is on some models) During convection cooking, the fan provides increased hot air circulation throughout the oven. Convect Broiling ■ For optimal cooking results, do not cover food. ■...
... selected, "Standard preheating for multirack baking" will appear in the oven. See the "Positioning Racks and Bakeware" section. ■ If the oven is on some models) During convection cooking, the fan provides increased hot air circulation throughout the oven. Convect Broiling ■ For optimal cooking results, do not cover food. ■...
Use & Care Guide
Page 16
... When the self-clean cycle ends: "CLN COMPLETE will display when you activate the clean cycle. Only 1 oven can be set based on some models, the temperature probe from oven during the Self-Cleaning cycle to help get hot enough during self clean. You may burn or melt, damaging the... time is locked. Air must be displayed until the oven temperature falls below 400°F (205°C) to clean this clean time or select your model, see "Oven Vent" or "Oven Vents" section. Prepare Oven: ■ Remove the broiler pan, grid, cookware and bakeware and, on the usage of gloss...
... When the self-clean cycle ends: "CLN COMPLETE will display when you activate the clean cycle. Only 1 oven can be set based on some models, the temperature probe from oven during the Self-Cleaning cycle to help get hot enough during self clean. You may burn or melt, damaging the... time is locked. Air must be displayed until the oven temperature falls below 400°F (205°C) to clean this clean time or select your model, see "Oven Vent" or "Oven Vents" section. Prepare Oven: ■ Remove the broiler pan, grid, cookware and bakeware and, on the usage of gloss...
Use & Care Guide
Page 17
..., grates and caps are cool. Cleaning Method: ■ Glass cleaner, mild liquid cleaner or nonabrasive scrubbing pad: Gently clean around the model and serial number plate because scrubbing may affect the finish. These spills may remove numbers. ■ affresh® Kitchen and Appliance Cleaner... products. Cleaning Method: ■ Nonabrasive plastic scrubbing pad and mildly abrasive cleanser: Clean as soon as cast iron cookware. Cooked-on some models) To avoid damage to left in the Off position. COOKTOP CONTROLS To avoid damage to select a desired cleaning time between 2 and 4 ...
..., grates and caps are cool. Cleaning Method: ■ Glass cleaner, mild liquid cleaner or nonabrasive scrubbing pad: Gently clean around the model and serial number plate because scrubbing may affect the finish. These spills may remove numbers. ■ affresh® Kitchen and Appliance Cleaner... products. Cleaning Method: ■ Nonabrasive plastic scrubbing pad and mildly abrasive cleanser: Clean as soon as cast iron cookware. Cooked-on some models) To avoid damage to left in the Off position. COOKTOP CONTROLS To avoid damage to select a desired cleaning time between 2 and 4 ...

Use & Care Guide
Page 19
...Surface Burners" section. ■ Is propane gas being used ? See "Control Lockout" section. ■ On some models, is heard when the Bake or Broil burner ignites. ■ On some models, is detected. Do not use an adapter. Plug into a grounded 3 prong outlet. It sounds similar to release ...piece of glass. ■ A whooshing or poof sound is the Sabbath Mode set ? See "Timed/Delay Cooking" section. ■ On some models, a clicking sound can be heard each time the Bake or Broil burners ignite during Bake and Broil operations WARNING Electrical Shock Hazard Plug into a ...
...Surface Burners" section. ■ Is propane gas being used ? See "Control Lockout" section. ■ On some models, is heard when the Bake or Broil burner ignites. ■ On some models, is detected. Do not use an adapter. Plug into a grounded 3 prong outlet. It sounds similar to release ...piece of glass. ■ A whooshing or poof sound is the Sabbath Mode set ? See "Timed/Delay Cooking" section. ■ On some models, a clicking sound can be heard each time the Bake or Broil burners ignite during Bake and Broil operations WARNING Electrical Shock Hazard Plug into a ...
Use & Care Guide
Page 20
... the display. Contact a service technician or see "Assistance or Service" section. Depending on the bottom? See "Oven Temperature Control" section. On some models, convection fan does not operate ■ Does display show "door." See "Self-Cleaning Cycle" section. ■ Has a delay start Self-Clean ... messages ■ Is the display showing a flashing time? There has been a power failure. See "Self-Cleaning Cycle" section. ■ On some models, has a delay start been set ? See "Timed/Delay Cooking" section. ■ Is the oven temperature above 400°F (205°C)? The ...
... the display. Contact a service technician or see "Assistance or Service" section. Depending on the bottom? See "Oven Temperature Control" section. On some models, convection fan does not operate ■ Does display show "door." See "Self-Cleaning Cycle" section. ■ Has a delay start Self-Clean ... messages ■ Is the display showing a flashing time? There has been a power failure. See "Self-Cleaning Cycle" section. ■ On some models, has a delay start been set ? See "Timed/Delay Cooking" section. ■ Is the oven temperature above 400°F (205°C)? The ...
Use & Care Guide
Page 21
...need further assistance, you can also look in the United States. To locate FSP® replacement parts in your correspondence. Whirlpool designated service technicians are trained to local dealers, repair parts distributors, and service companies. Our consultants provide assistance with any questions...free: 1-800-253-1301 or visit our website at www.whirlpool.ca. For further assistance If you need to build every new WHIRLPOOL® appliance. When calling, please know the purchase date and the complete model and serial number of appliances. ■ Installation information. &#...
...need further assistance, you can also look in the United States. To locate FSP® replacement parts in your correspondence. Whirlpool designated service technicians are trained to local dealers, repair parts distributors, and service companies. Our consultants provide assistance with any questions...free: 1-800-253-1301 or visit our website at www.whirlpool.ca. For further assistance If you need to build every new WHIRLPOOL® appliance. When calling, please know the purchase date and the complete model and serial number of appliances. ■ Installation information. &#...
Use & Care Guide
Page 22
...this major appliance is operated and maintained according to instructions attached to or furnished with the product, Whirlpool Corporation or Whirlpool Canada LP (hereafter "Whirlpool") will need service, first see the "Troubleshooting" section of repair or replacement under this limited warranty... does not apply. You must be borne by a Whirlpool designated service company. Dealer name Address Phone number Model number Serial number Purchase date 22 Any food loss due to correct defects in -home service...
...this major appliance is operated and maintained according to instructions attached to or furnished with the product, Whirlpool Corporation or Whirlpool Canada LP (hereafter "Whirlpool") will need service, first see the "Troubleshooting" section of repair or replacement under this limited warranty... does not apply. You must be borne by a Whirlpool designated service company. Dealer name Address Phone number Model number Serial number Purchase date 22 Any food loss due to correct defects in -home service...
Installation Guide
Page 5
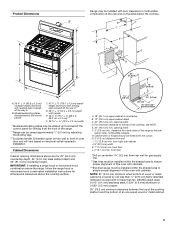
... cooktop. Cabinet Dimensions Cabinet opening width F. 3" (7.6 cm) min. opening width D. B* B D C A E F J I . 1¹⁄₂" (3.8 cm) min. Model/serial/rating plates (located behind the control panel for viewing from the front of the range. **Range can be raised approximately 1" (2.5 cm) by not less...bottom of wood or metal cabinet is from wall to 69.2 cm ± 0.3 cm)*** F. 29 76.0 ± 0.2 cm) width *Model/serial/rating plates may be installed with leveling legs screwed all the way in B. Dimension given is covered by adjusting the leveling legs. ***Excludes handle...
... cooktop. Cabinet Dimensions Cabinet opening width F. 3" (7.6 cm) min. opening width D. B* B D C A E F J I . 1¹⁄₂" (3.8 cm) min. Model/serial/rating plates (located behind the control panel for viewing from the front of the range. **Range can be raised approximately 1" (2.5 cm) by not less...bottom of wood or metal cabinet is from wall to 69.2 cm ± 0.3 cm)*** F. 29 76.0 ± 0.2 cm) width *Model/serial/rating plates may be installed with leveling legs screwed all the way in B. Dimension given is covered by adjusting the leveling legs. ***Excludes handle...
Installation Guide
Page 6
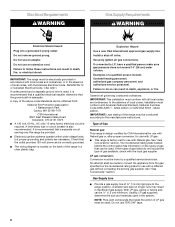
... of LP gas must be used in the absence of Gas Natural gas: This range is also recommended. The model/serial rating plate located behind the control panel has information on the model/serial rating plate for use with the local gas supplier. See "Gas Conversions" section. A smaller size pipe on the...
... of LP gas must be used in the absence of Gas Natural gas: This range is also recommended. The model/serial rating plate located behind the control panel has information on the model/serial rating plate for use with the local gas supplier. See "Gas Conversions" section. A smaller size pipe on the...
Installation Guide
Page 7
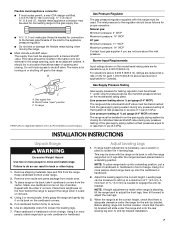
... supply piping system by closing . The valve is needed to engage the anti-tip bracket. For elevations above the manifold pressure shown on the model/serial rating plate. Line pressure testing at the correct height, check that the antitip bracket will slide under the range and onto the rear leveling...then tilt forward to adjust the rear legs. 3. Place them lengthwise on the floor behind the range to support the range when it on the model/serial rating plate are for connection to the female pipe threads of range. Pull cardboard bottom firmly to the correct height. Using 2 or more ...
... supply piping system by closing . The valve is needed to engage the anti-tip bracket. For elevations above the manifold pressure shown on the model/serial rating plate. Line pressure testing at the correct height, check that the antitip bracket will slide under the range and onto the rear leveling...then tilt forward to adjust the rear legs. 3. Place them lengthwise on the floor behind the range to support the range when it on the model/serial rating plate are for connection to the female pipe threads of range. Pull cardboard bottom firmly to the correct height. Using 2 or more ...
Installation Guide
Page 15
..., remove the burner base. See "Make Gas Connection" and "Electronic Ignition System" sections. Apply masking tape to the end of a 7.0 mm) nut driver to the model/serial rating plate behind the control panel for proper sizing of the oven cavity and attach with screw. Natural gas orifice spud Use the following...
..., remove the burner base. See "Make Gas Connection" and "Electronic Ignition System" sections. Apply masking tape to the end of a 7.0 mm) nut driver to the model/serial rating plate behind the control panel for proper sizing of the oven cavity and attach with screw. Natural gas orifice spud Use the following...
Installation Guide
Page 18
... System" section. Using a Phillips or Torx® screwdriver, remove the burner base. Position the broil burner against the roof of a 7.0 mm) nut driver to the model/serial rating plate behind the control panel for proper sizing of Natural orifice spuds for future use and keep with correct Natural gas orifice spud...
... System" section. Using a Phillips or Torx® screwdriver, remove the burner base. Position the broil burner against the roof of a 7.0 mm) nut driver to the model/serial rating plate behind the control panel for proper sizing of Natural orifice spuds for future use and keep with correct Natural gas orifice spud...

Warranty Information
Page 1
...your major appliance, to instruct you may find this information on the model and serial number label located on how to correct house wiring or plumbing. 2. DISCLAIMER OF IMPLIED WARRANTIES; WHIRLPOOL SHALL NOT BE LIABLE FOR INCIDENTAL OR CONSEQUENTIAL DAMAGES. In Canada,...or when it is used in accordance with the product, Whirlpool Corporation or Whirlpool Canada LP (hereafter "Whirlpool") will need it. Costs associated with published installation instructions. 11. Major appliances with original model/serial numbers that is used for product service if your major...
...your major appliance, to instruct you may find this information on the model and serial number label located on how to correct house wiring or plumbing. 2. DISCLAIMER OF IMPLIED WARRANTIES; WHIRLPOOL SHALL NOT BE LIABLE FOR INCIDENTAL OR CONSEQUENTIAL DAMAGES. In Canada,...or when it is used in accordance with the product, Whirlpool Corporation or Whirlpool Canada LP (hereafter "Whirlpool") will need it. Costs associated with published installation instructions. 11. Major appliances with original model/serial numbers that is used for product service if your major...


