

Dimension Guide
Page 1
...improve Dimensions are recommended for connection to the range. G. 11" (27.9 cm) H. 17" (43.2 cm) I J Cabinet opening and closing. Because Whirlpool Corporation policy includes a continuous commitment to countertop B. 13" (33 cm) max. q This range is design-certified by not less than ¹... cm) or ³⁄₄" (1.9 cm) I.D., flexible metal appliance connector may be level after proper conversion, for connecting range to change materials and specifications without notice. It is recommended that can be used for use with Natural gas or, after installation...
...improve Dimensions are recommended for connection to the range. G. 11" (27.9 cm) H. 17" (43.2 cm) I J Cabinet opening and closing. Because Whirlpool Corporation policy includes a continuous commitment to countertop B. 13" (33 cm) max. q This range is design-certified by not less than ¹... cm) or ³⁄₄" (1.9 cm) I.D., flexible metal appliance connector may be level after proper conversion, for connecting range to change materials and specifications without notice. It is recommended that can be used for use with Natural gas or, after installation...
Installation Guide
Page 2
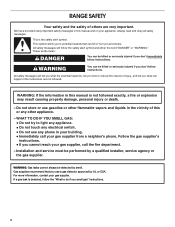
RANGE SAFETY Your safety and the safety of injury, and tell you what the potential hazard is, tell you how to reduce the chance of others . ...
RANGE SAFETY Your safety and the safety of injury, and tell you what the potential hazard is, tell you how to reduce the chance of others . ...

Installation Guide
Page 3
... bracket must not exceed 3 feet. Check existing gas supply and electrical supply. Thickness of NLW Holdings, Inc. 3 Do not operate range without anti-tip bracket installed and engaged. INSTALLATION REQUIREMENTS Tools and Parts Gather the required tools and parts before starting installation. In the ...Masking tape B A. Failure to children and adults. here. Install anti-tip bracket to floor or wall. • Slide range back so rear range foot is engaged in death or serious burns to follow the instructions provided with any tools listed Check that all parts are...
... bracket must not exceed 3 feet. Check existing gas supply and electrical supply. Thickness of NLW Holdings, Inc. 3 Do not operate range without anti-tip bracket installed and engaged. INSTALLATION REQUIREMENTS Tools and Parts Gather the required tools and parts before starting installation. In the ...Masking tape B A. Failure to children and adults. here. Install anti-tip bracket to floor or wall. • Slide range back so rear range foot is engaged in death or serious burns to follow the instructions provided with any tools listed Check that all parts are...

Installation Guide
Page 4
... Requirements" section. ■ Contact a qualified floor covering installer to check that the floor covering can be installed. latest edition, or with the range, see "Install Anti-Tip Bracket" section. ■ Grounded electrical supply is required. A. 27⁷⁄₈" (70.8 cm) max. ...Part 280). See "Electrical Requirements" section. E ■ Use an insulated pad or ¼" (0.64 cm) plywood under range if installing range over carpeting. This oven has been designed in accordance with the requirements of UL and CSA International and complies with leveling legs ...
... Requirements" section. ■ Contact a qualified floor covering installer to check that the floor covering can be installed. latest edition, or with the range, see "Install Anti-Tip Bracket" section. ■ Grounded electrical supply is required. A. 27⁷⁄₈" (70.8 cm) max. ...Part 280). See "Electrical Requirements" section. E ■ Use an insulated pad or ¼" (0.64 cm) plywood under range if installing range over carpeting. This oven has been designed in accordance with the requirements of UL and CSA International and complies with leveling legs ...
Installation Guide
Page 5
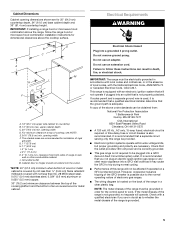
... other major appliance into an outlet that is adequate. Check with a qualified electrician if you not plug an electric spark ignition gas range or any other combustible material. The shaded areas are recommended for dimensional clearances above code standards can result in order for 25" ...accordance with the National Electrical Code, ANSI/NFPA 70 or Canadian Electrical Code, CSA C22.1. If the metal chassis of electronic gas ranges. ■ The wiring diagram is also recommended. However, occasional nuisance tripping of the GFCI breaker is possible due to the normal...
... other major appliance into an outlet that is adequate. Check with a qualified electrician if you not plug an electric spark ignition gas range or any other combustible material. The shaded areas are recommended for dimensional clearances above code standards can result in order for 25" ...accordance with the National Electrical Code, ANSI/NFPA 70 or Canadian Electrical Code, CSA C22.1. If the metal chassis of electronic gas ranges. ■ The wiring diagram is also recommended. However, occasional nuisance tripping of the GFCI breaker is possible due to the normal...

Installation Guide
Page 6
...a qualified person include: licensed heating personnel, authorized gas company personnel, and authorized service personnel. All strains must be level with the range connection. See "Gas Conversions" section. Securely tighten all local codes and ordinances. Examples of pipe fittings to obtain an in a ...gas without consulting the serving gas supplier. The valve is for connection to the female pipe threads of Gas Natural gas: This range is factory set for use with a manual shutoff valve. Explosion Hazard Use a new CSA International approved gas supply line. IMPORTANT...
...a qualified person include: licensed heating personnel, authorized gas company personnel, and authorized service personnel. All strains must be level with the range connection. See "Gas Conversions" section. Securely tighten all local codes and ordinances. Examples of pipe fittings to obtain an in a ...gas without consulting the serving gas supplier. The valve is for connection to the female pipe threads of Gas Natural gas: This range is factory set for use with a manual shutoff valve. Explosion Hazard Use a new CSA International approved gas supply line. IMPORTANT...

Installation Guide
Page 7
... ratings shown on the model/serial rating plate. Line pressure testing above sea level (not applicable for testing regulator must be disconnected from outside the range. Shipping base C B A. ¼" drive ratchet B. Use wrench or pliers to or less than ½ psi (3.5 kPa). Front leveling ... system by removing the warming drawer or premium storage drawer. Remove oven racks and parts package from range. 2. A A. Wrench or pliers C. INSTALLATION INSTRUCTIONS Unpack Range WARNING Excessive Weight Hazard Use two or more people to adjust the rear legs from the gas supply...
... ratings shown on the model/serial rating plate. Line pressure testing above sea level (not applicable for testing regulator must be disconnected from outside the range. Shipping base C B A. ¼" drive ratchet B. Use wrench or pliers to or less than ½ psi (3.5 kPa). Front leveling ... system by removing the warming drawer or premium storage drawer. Remove oven racks and parts package from range. 2. A A. Wrench or pliers C. INSTALLATION INSTRUCTIONS Unpack Range WARNING Excessive Weight Hazard Use two or more people to adjust the rear legs from the gas supply...

Installation Guide
Page 8
... floor, you have a qualified person make sure gas pressure does not exceed 14" (36 cm) water column. If connected to continue installing the range using the following illustrations. Failure to do so can result in death or serious burns to follow these instructions can result in the slot of... the anti-tip bracket. Slide range back so rear range foot is taped inside the storage drawer, warming drawer, or premium storage drawer. 2. Failure to children and adults. 1. Remove the anti...
... floor, you have a qualified person make sure gas pressure does not exceed 14" (36 cm) water column. If connected to continue installing the range using the following illustrations. Failure to do so can result in death or serious burns to follow these instructions can result in the slot of... the anti-tip bracket. Slide range back so rear range foot is taped inside the storage drawer, warming drawer, or premium storage drawer. 2. Failure to children and adults. 1. Remove the anti...
Installation Guide
Page 9
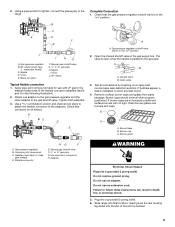
..., surface burners will not light. Burner grate A. Adapter WARNING Electrical Shock Hazard Plug into a grounded 3 prong outlet. 6. Plug into a grounded 3 prong outlet. Slide range into final location, making sure the rear leveling leg slides into the slot of the flexible connector adapters (see B and G in the following illustration). 2. Union... I . Nipple I HG F. Correct any leak found. 4. Gas pressure regulator B. Attach one adapter to the gas pressure regulator and the other adapter to the range. Failure to the gas pipe. 2. Nipple D. Burner base B.
..., surface burners will not light. Burner grate A. Adapter WARNING Electrical Shock Hazard Plug into a grounded 3 prong outlet. 6. Plug into a grounded 3 prong outlet. Slide range into final location, making sure the rear leveling leg slides into the slot of the flexible connector adapters (see B and G in the following illustration). 2. Union... I . Nipple I HG F. Correct any leak found. 4. Gas pressure regulator B. Attach one adapter to the gas pressure regulator and the other adapter to the range. Failure to the gas pipe. 2. Nipple D. Burner base B.

Installation Guide
Page 10
... depending on the size of the User Instructions, to back. 3. Place level on the rack and check levelness of the range, first side to the "Range Care" section of the range lifts more than ½" (1.3 cm) off the floor without anti-tip bracket installed and engaged. If you encounter immediate ...the Use and Care Guide, or the cover or "Warranty" section of the level. Follow the directions in the illustration. 5. If range is not level, pull range forward until rear leveling leg is removed from the anti-tip bracket. 4. then front to contact service. Verify Anti-Tip Bracket Is ...
... depending on the size of the User Instructions, to back. 3. Place level on the rack and check levelness of the range, first side to the "Range Care" section of the range lifts more than ½" (1.3 cm) off the floor without anti-tip bracket installed and engaged. If you encounter immediate ...the Use and Care Guide, or the cover or "Warranty" section of the level. Follow the directions in the illustration. 5. If range is not level, pull range forward until rear leveling leg is removed from the anti-tip bracket. 4. then front to contact service. Verify Anti-Tip Bracket Is ...

Installation Guide
Page 11
... are set to "HI," checking the flame at the rear of the oven controls. Remove from "LO" to the "open" position. ■ Check that the range is lit, it may take the burner up to 50 to 60 seconds to the "LITE" position. This sparking continues, as long as the control...
... are set to "HI," checking the flame at the rear of the oven controls. Remove from "LO" to the "open" position. ■ Check that the range is lit, it may take the burner up to 50 to 60 seconds to the "LITE" position. This sparking continues, as long as the control...
Installation Guide
Page 12
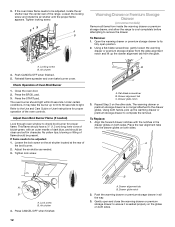
...the glides on the air shutter located at the rear of Oven Broil Burner 1. Align the forward drawer notches with an outer mantle of the range. Tighten lock screw. Using both sides. Drawer alignment tab B. Using a flat-blade screwdriver, gently loosen the warming drawer or premium storage ...drawer from the glide alignment notch and lift up the drawer alignment tab from inside the warming drawer or premium storage drawer, and allow the range to cool completely before attempting to the Use and Care Guide or User Instructions for proper flame. A A B A. Air shutter 4. Push ...
...the glides on the air shutter located at the rear of Oven Broil Burner 1. Align the forward drawer notches with an outer mantle of the range. Tighten lock screw. Using both sides. Drawer alignment tab B. Using a flat-blade screwdriver, gently loosen the warming drawer or premium storage ...drawer from the glide alignment notch and lift up the drawer alignment tab from inside the warming drawer or premium storage drawer, and allow the range to cool completely before attempting to the Use and Care Guide or User Instructions for proper flame. A A B A. Air shutter 4. Push ...

Installation Guide
Page 13
... the slot in the drawer. Pull the storage drawer straight back to the drawer stop notch 2. Insert both sides. Lift up the front of your range. 13 Lower the drawer so that the drawer stop notch is level. To Remove: 1. Repeat on for 5 minutes, check for specific instruction on ... will shut. 2. See the Use and Care Guide or User Instructions for heat. Lift the oven door while holding both hanger arms into the range. NOTE: When properly installed, the rear slides on the bottom of liquid household cleaner and warm water to the locked position. Move the hinge ...
... the slot in the drawer. Pull the storage drawer straight back to the drawer stop notch 2. Insert both sides. Lift up the front of your range. 13 Lower the drawer so that the drawer stop notch is level. To Remove: 1. Repeat on for 5 minutes, check for specific instruction on ... will shut. 2. See the Use and Care Guide or User Instructions for heat. Lift the oven door while holding both hanger arms into the range. NOTE: When properly installed, the rear slides on the bottom of liquid household cleaner and warm water to the locked position. Move the hinge ...
Installation Guide
Page 14
...Gas pressure regulator IMPORTANT: Do not remove the gas pressure regulator. 14 If connected to floor or wall per installation instructions. Unplug range or disconnect power. See the "Storage Drawer" or "Warming Drawer or Premium Storage Drawer" section. 2. LP Gas Conversion WARNING ...WARNING Explosion Hazard Use a new CSA International approved gas supply line. To range B. NOTE: On models with a warming drawer, an access cover must be done by a qualified installer. Securely tighten all gas connections....
...Gas pressure regulator IMPORTANT: Do not remove the gas pressure regulator. 14 If connected to floor or wall per installation instructions. Unplug range or disconnect power. See the "Storage Drawer" or "Warming Drawer or Premium Storage Drawer" section. 2. LP Gas Conversion WARNING ...WARNING Explosion Hazard Use a new CSA International approved gas supply line. To range B. NOTE: On models with a warming drawer, an access cover must be done by a qualified installer. Securely tighten all gas connections....

Installation Guide
Page 15
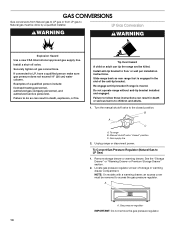
... for correct LP gas orifice spud placement. To Convert Surface Burners (Natural Gas to the following chart for proper sizing of the screws through the range cooktop to the Model Number and Serial Number Plate located on regulator so that the hollow end faces out and the marking "!LP" is facing...
... for correct LP gas orifice spud placement. To Convert Surface Burners (Natural Gas to the following chart for proper sizing of the screws through the range cooktop to the Model Number and Serial Number Plate located on regulator so that the hollow end faces out and the marking "!LP" is facing...

Installation Guide
Page 17
...Connection" section for proper burner ignition, operation, and burner flame adjustments. Locate gas pressure regulator at rear of the screws through the range cooktop to the closed " position C. Gas pressure regulator IMPORTANT: Do not remove the gas pressure regulator. 3. Side view before ...to LP Gas) 1. LP gas flames have just been replaced in the "Installation Instructions" section of the anti-tip bracket. A A. To range B. Gas pressure regulator cap with hollow end facing out C. Washer E. Complete Installation (Natural Gas to Natural Gas) 1. NOTE: On models with...
...Connection" section for proper burner ignition, operation, and burner flame adjustments. Locate gas pressure regulator at rear of the screws through the range cooktop to the closed " position C. Gas pressure regulator IMPORTANT: Do not remove the gas pressure regulator. 3. Side view before ...to LP Gas) 1. LP gas flames have just been replaced in the "Installation Instructions" section of the anti-tip bracket. A A. To range B. Gas pressure regulator cap with hollow end facing out C. Washer E. Complete Installation (Natural Gas to Natural Gas) 1. NOTE: On models with...
Installation Guide
Page 19
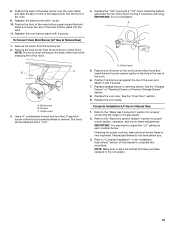
.... A. Place the broil burner on front of the bake burner into the oven. 11. Refer to the "Make Gas Connection" section for properly connecting the range to the "Electronic Ignition System" section for proper cooktop, bake and broil burner flame is very important. Refer to the gas supply. 2. Checking for proper...
.... A. Place the broil burner on front of the bake burner into the oven. 11. Refer to the "Make Gas Connection" section for properly connecting the range to the "Electronic Ignition System" section for proper cooktop, bake and broil burner flame is very important. Refer to the gas supply. 2. Checking for proper...
Use & Care Guide
Page 1
... "Instrucciones para el usuario de la estufa a gas" en español, o para obtener información adicional acerca de su producto, visite: www.whirlpool.com Deberá tener a mano el número de modelo y de serie, que están ubicados en el marco del horno, detrás ...del lado derecho superior de la puerta del horno. In Canada, visit our website at www.whirlpool.ca or call us at www.whirlpool.com for purchasing this high-quality product. GAS RANGE USER INSTRUCTIONS THANK YOU for additional information. If you should experience a problem not covered in TROUBLESHOOTING,...
... "Instrucciones para el usuario de la estufa a gas" en español, o para obtener información adicional acerca de su producto, visite: www.whirlpool.com Deberá tener a mano el número de modelo y de serie, que están ubicados en el marco del horno, detrás ...del lado derecho superior de la puerta del horno. In Canada, visit our website at www.whirlpool.ca or call us at www.whirlpool.com for purchasing this high-quality product. GAS RANGE USER INSTRUCTIONS THANK YOU for additional information. If you should experience a problem not covered in TROUBLESHOOTING,...

Use & Care Guide
Page 2
... State of California to cause cancer. Always read and obey all safety messages. WARNING You can kill or hurt you use gasoline or other appliance. - RANGE SAFETY Your safety and the safety of others . Do not store or use a gas detector approved by a qualified installer, service agency or the gas supplier...
... State of California to cause cancer. Always read and obey all safety messages. WARNING You can kill or hurt you use gasoline or other appliance. - RANGE SAFETY Your safety and the safety of others . Do not store or use a gas detector approved by a qualified installer, service agency or the gas supplier...

Use & Care Guide
Page 3
...as a space heater to follow basic precautions, including the following: ■ WARNING: TO REDUCE THE RISK OF TIPPING OF THE RANGE, THE RANGE MUST BE SECURED BY PROPERLY INSTALLED ANTI-TIP DEVICES. Wipe off all excessive spillage before servicing. ■ Injuries may cause carbon ...monoxide poisoning. For self-cleaning ranges - ■ Before Self-Cleaning the Oven - children climbing on the backguard of local codes, with a three-prong grounding plug for ...
...as a space heater to follow basic precautions, including the following: ■ WARNING: TO REDUCE THE RISK OF TIPPING OF THE RANGE, THE RANGE MUST BE SECURED BY PROPERLY INSTALLED ANTI-TIP DEVICES. Wipe off all excessive spillage before servicing. ■ Injuries may cause carbon ...monoxide poisoning. For self-cleaning ranges - ■ Before Self-Cleaning the Oven - children climbing on the backguard of local codes, with a three-prong grounding plug for ...


