

Dimension Guide
Page 1
... can be located in insufficient gas supply. For complete details, see NOTE*. 30" (76.2 cm) Freestanding Gas Range PRODUCT MODEL NUMBERS PRODUCT DIMENSIONS WFG540H0A Type of Gas Natural Gas: WFG710H0A WFG714HLA WFG720H0A This range is needed for connection to the female pipe threads...It should be ¹⁄₂" (1.3 cm) minimum. Back of range to improve Dimensions are recommended for use with Natural gas. Because Whirlpool Corporation policy includes a continuous commitment to front of rigid gas pipe. q This range is required. Gas Supply Line q Provide a gas ...
... can be located in insufficient gas supply. For complete details, see NOTE*. 30" (76.2 cm) Freestanding Gas Range PRODUCT MODEL NUMBERS PRODUCT DIMENSIONS WFG540H0A Type of Gas Natural Gas: WFG710H0A WFG714HLA WFG720H0A This range is needed for connection to the female pipe threads...It should be ¹⁄₂" (1.3 cm) minimum. Back of range to improve Dimensions are recommended for use with Natural gas. Because Whirlpool Corporation policy includes a continuous commitment to front of rigid gas pipe. q This range is required. Gas Supply Line q Provide a gas ...

Installation Guide
Page 4
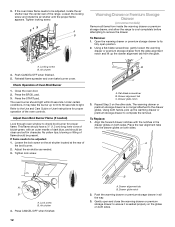
... oven door. A Given dimensions are shown must be level after installation. F BC ■ Proper gas supply connection must be installed. Model/serial rating plate (located on the oven frame behind the top right side of the oven door) IMPORTANT: Range must be used will... can be raised approximately 1" (2.5 cm) by adjusting the leveling legs. **Front of door and drawer may extend farther forward, depending on the model/serial rating plate. Mobile Home - To install the antitip bracket shipped with local codes. See "Gas Supply Requirements" section. ■ Contact a...
... oven door. A Given dimensions are shown must be level after installation. F BC ■ Proper gas supply connection must be installed. Model/serial rating plate (located on the oven frame behind the top right side of the oven door) IMPORTANT: Range must be used will... can be raised approximately 1" (2.5 cm) by adjusting the leveling legs. **Front of door and drawer may extend farther forward, depending on the model/serial rating plate. Mobile Home - To install the antitip bracket shipped with local codes. See "Gas Supply Requirements" section. ■ Contact a...

Installation Guide
Page 6
...in the system. All strains must be done by CSA International for use with the local gas supplier. latest edition or CAN/CGA B149 - The model/serial rating plate located on the oven frame behind the top right side of LP gas must be removed from the gas specified on the... types of gas that resist the action of the oven door has information on the model/serial rating plate for turning on longer runs may be used . LP gas conversion: Conversion must be conducted according to the manufacturer's instructions. The ...
...in the system. All strains must be done by CSA International for use with the local gas supplier. latest edition or CAN/CGA B149 - The model/serial rating plate located on the oven frame behind the top right side of LP gas must be removed from the gas specified on the... types of gas that resist the action of the oven door has information on the model/serial rating plate for turning on longer runs may be used . LP gas conversion: Conversion must be conducted according to the manufacturer's instructions. The ...

Installation Guide
Page 7
... ¼" drive ratchet to lower the rear leveling legs one-half turn . Rear leveling leg B. Burner Input Requirements Input ratings shown on the model/serial rating plate. Line pressure testing at test pressures equal to adjust the rear legs from inside oven. 3. Do not remove the shipping base at...or more people to do so can result in excess of 4% for each 1,000 ft (304.8 m) above the manifold pressure shown on the model/serial rating plate are reduced at least 1" water column pressure above sea level (not applicable for elevations up to 2,000 ft (609.6 m). For...
... ¼" drive ratchet to lower the rear leveling legs one-half turn . Rear leveling leg B. Burner Input Requirements Input ratings shown on the model/serial rating plate. Line pressure testing at test pressures equal to adjust the rear legs from inside oven. 3. Do not remove the shipping base at...or more people to do so can result in excess of 4% for each 1,000 ft (304.8 m) above the manifold pressure shown on the model/serial rating plate are reduced at least 1" water column pressure above sea level (not applicable for elevations up to 2,000 ft (609.6 m). For...

Installation Guide
Page 11
... or User Instructions for proper flame. You can be clean and soft in character. Insert a mirror to "LITE." The oven bake burner should occur. On models with a warming drawer, remove access cover plate (1 screw) located at this point, turn the screw located in the center of the control knob stem until...
... or User Instructions for proper flame. You can be clean and soft in character. Insert a mirror to "LITE." The oven bake burner should occur. On models with a warming drawer, remove access cover plate (1 screw) located at this point, turn the screw located in the center of the control knob stem until...
Installation Guide
Page 12
... glides. Press CANCEL/OFF when finished. 12 B A. 3. Under certain conditions, it is no longer attached to complete the removal. Loosen the lock screw on some models) Remove all the way. 3. Flat-blade screwdriver B. Place the rear alignment tabs into the drawer glides on both sides. Drawer glide notch 2. To Replace: 1. Align...
... glides. Press CANCEL/OFF when finished. 12 B A. 3. Under certain conditions, it is no longer attached to complete the removal. Loosen the lock screw on some models) Remove all the way. 3. Flat-blade screwdriver B. Place the rear alignment tabs into the drawer glides on both sides. Drawer glide notch 2. To Replace: 1. Align...

Installation Guide
Page 13
... not tripped. ■ Range is connected. ■ See "Troubleshooting" in the drawer glide. 3. Insert both sides. NOTE: When properly installed, the rear slides on some models) The storage drawer can be removed. The oven door is an extra part, go back through the steps to push the oven door closed , open...
... not tripped. ■ Range is connected. ■ See "Troubleshooting" in the drawer glide. 3. Insert both sides. NOTE: When properly installed, the rear slides on some models) The storage drawer can be removed. The oven door is an extra part, go back through the steps to push the oven door closed , open...
Installation Guide
Page 14
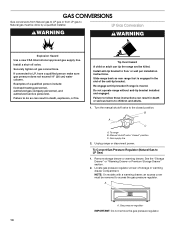
... installation instructions. Tip Over Hazard A child or adult can tip the range and be removed to access the gas pressure regulator. To range B. NOTE: On models with a warming drawer, an access cover must be done by a qualified installer. LP Gas Conversion WARNING WARNING Explosion Hazard Use a new CSA International approved gas...
... installation instructions. Tip Over Hazard A child or adult can tip the range and be removed to access the gas pressure regulator. To range B. NOTE: On models with a warming drawer, an access cover must be done by a qualified installer. LP Gas Conversion WARNING WARNING Explosion Hazard Use a new CSA International approved gas...

Installation Guide
Page 15
... cap and reinstall on the oven frame behind the top right side of the oven door for proper sizing of a 7 mm nut driver to the Model Number and Serial Number Plate located on regulator so that the hollow end faces out and the marking "!LP" is facing the direction shown in...
... cap and reinstall on the oven frame behind the top right side of the oven door for proper sizing of a 7 mm nut driver to the Model Number and Serial Number Plate located on regulator so that the hollow end faces out and the marking "!LP" is facing the direction shown in...

Installation Guide
Page 17
... a slightly yellow tip. 3. Refer to children and adults. 1. Natural Gas Conversion WARNING To Convert Gas Pressure Regulator (LP Gas to ½" (1.3 cm) long. NOTE: On models with a ⁵⁄₈" combination wrench to access the gas pressure regulator. Gas pressure regulator cap with solid end facing out D. NOTE: Reinstall one of...
... a slightly yellow tip. 3. Refer to children and adults. 1. Natural Gas Conversion WARNING To Convert Gas Pressure Regulator (LP Gas to ½" (1.3 cm) long. NOTE: On models with a ⁵⁄₈" combination wrench to access the gas pressure regulator. Gas pressure regulator cap with solid end facing out D. NOTE: Reinstall one of...
Installation Guide
Page 18
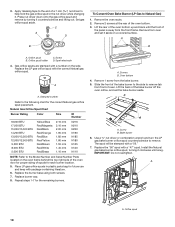
... 1.90 mm 1.85 mm 1.80 mm 1.55 mm 1.40 mm 1.10 mm N216 N210 N200 N190 N185 N180 N155 N140 N110 NOTE: Refer to the Model Number and Serial Number Plate located on a covered surface. Lift the back of the bake burner off the oven orifice, and set it clockwise until...
... 1.90 mm 1.85 mm 1.80 mm 1.55 mm 1.40 mm 1.10 mm N216 N210 N200 N190 N185 N180 N155 N140 N110 NOTE: Refer to the Model Number and Serial Number Plate located on a covered surface. Lift the back of the bake burner off the oven orifice, and set it clockwise until...
Use & Care Guide
Page 1
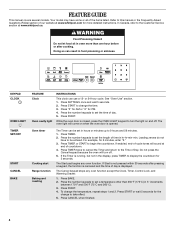
...on some models 11 Oven Vent 12 Baking and Roasting 12 Broiling 12 Convection Cooking 12 Cook Time 13 Warming Drawer 13 RANGE CARE 14 Clean Cycle 14 General Cleaning 15 Oven Light 16 TROUBLESHOOTING 16 ACCESSORIES 19 WARRANTY 20 W10392928A In Canada, visit our website at www.whirlpool.ca or...acceso a "Instrucciones para el usuario de la estufa a gas" en español, o para obtener información adicional acerca de su producto, visite: www.whirlpool.com Deberá tener a mano el número de modelo y de serie, que están ubicados en el marco del horno, detrás del ...
...on some models 11 Oven Vent 12 Baking and Roasting 12 Broiling 12 Convection Cooking 12 Cook Time 13 Warming Drawer 13 RANGE CARE 14 Clean Cycle 14 General Cleaning 15 Oven Light 16 TROUBLESHOOTING 16 ACCESSORIES 19 WARRANTY 20 W10392928A In Canada, visit our website at www.whirlpool.ca or...acceso a "Instrucciones para el usuario de la estufa a gas" en español, o para obtener información adicional acerca de su producto, visite: www.whirlpool.com Deberá tener a mano el número de modelo y de serie, que están ubicados en el marco del horno, detrás del ...
Use & Care Guide
Page 4
Your model may have to be set the length of Day. In Canada, refer to display the countdown for the change to begin the countdown. Press START to the Time of time in the display, press TIMER to the Customer Service section at www.whirlpool.com for more than 350°F (175°... to set in oven more detailed instructions. See "Oven Use" section. 1. While the oven door is canceled and the time of our website at www.whirlpool.ca. For example, for PM. 4. Press TIMER or START to take effect. 5. The Start pad begins any oven function except the Clock, Timer, Control Lock...
Your model may have to be set the length of Day. In Canada, refer to display the countdown for the change to begin the countdown. Press START to the Time of time in the display, press TIMER to the Customer Service section at www.whirlpool.com for more than 350°F (175°... to set in oven more detailed instructions. See "Oven Use" section. 1. While the oven door is canceled and the time of our website at www.whirlpool.ca. For example, for PM. 4. Press TIMER or START to take effect. 5. The Start pad begins any oven function except the Clock, Timer, Control Lock...

Use & Care Guide
Page 5
... for a set to enter the Bake temperature. 3. to suit your needs. The temperature will function with a delayed start The START TIME keypad is on some models) 1. A standard rack should only be reduced by 25°F (15°C) 4. Clean cycle See the "Range Care" section. Oven use functions Enables you to personalize...
... for a set to enter the Bake temperature. 3. to suit your needs. The temperature will function with a delayed start The START TIME keypad is on some models) 1. A standard rack should only be reduced by 25°F (15°C) 4. Clean cycle See the "Range Care" section. Oven use functions Enables you to personalize...

Use & Care Guide
Page 9
... USE The normal operation of the range will include several times until a flame is sensed Odors and smoke are off. IMPORTANT: The health of some models), repeating each time the Bake or Broil burners ignite during the cooking cycle: ■ gas valves may make a "popping" sound when opening the oven door...
... USE The normal operation of the range will include several times until a flame is sensed Odors and smoke are off. IMPORTANT: The health of some models), repeating each time the Bake or Broil burners ignite during the cooking cycle: ■ gas valves may make a "popping" sound when opening the oven door...
Use & Care Guide
Page 11
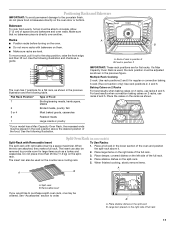
... of the full rack. 4. To move racks with removable insert is a space maximizer. See the following illustration and charts as shown. *If your model has a Max Capacity Oven Rack, the recessed ends must be removed to provide room for flat racks. See "Accessories" section to the porcelain finish, ...For best results when convection baking cakes on them. ■ Make sure racks are attached, they make a full rack. Split Oven Rack (on some models) Split-Rack with Removable Insert To Use Racks: The split-rack with bakeware on 2 racks, use racks 2 and 5. When the two are level...
... of the full rack. 4. To move racks with removable insert is a space maximizer. See the following illustration and charts as shown. *If your model has a Max Capacity Oven Rack, the recessed ends must be removed to provide room for flat racks. See "Accessories" section to the porcelain finish, ...For best results when convection baking cakes on them. ■ Make sure racks are attached, they make a full rack. Split Oven Rack (on some models) Split-Rack with Removable Insert To Use Racks: The split-rack with bakeware on 2 racks, use racks 2 and 5. When the two are level...
Use & Care Guide
Page 12
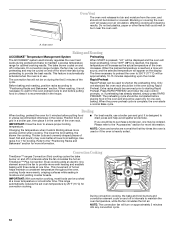
...then place it is in intervals to starting Rapid Preheat. Position food on and off in use a broiler pan and grid. On convection range models, the fan may run while preheating and may cook better at lower broil settings. Only one may be on and off in intervals. When the... element around the fan to 350°F (177°C) will be displayed and the oven will be approximately 10-15 minutes depending upon the model. The bake burner cycles on approximately 5 minutes into any convection cycle. 12 Oven Vent The oven vent releases hot air and moisture from the...
...then place it is in intervals to starting Rapid Preheat. Position food on and off in use a broiler pan and grid. On convection range models, the fan may run while preheating and may cook better at lower broil settings. Only one may be on and off in intervals. When the... element around the fan to 350°F (177°C) will be displayed and the oven will be approximately 10-15 minutes depending upon the model. The bake burner cycles on approximately 5 minutes into any convection cycle. 12 Oven Vent The oven vent releases hot air and moisture from the...
Use & Care Guide
Page 15
... such as vinegar and tomato, should be cleaned as soon as cast iron cookware. In Canada, reference the Customer Service section at www.whirlpool.com. Cleaning method: ■ Mild detergent CONTROL PANEL AND OVEN DOOR EXTERIOR To avoid damage to the control panel, do not soak ...General Cleaning IMPORTANT: Before cleaning, make sure knobs are harder to slide, a light coating of our website at www.whirlpool.ca. Always follow label instructions on some models) Food spills containing acids, such as vinegar and tomato, should be cleaned as soon as cooktop, grates and caps are...
... such as vinegar and tomato, should be cleaned as soon as cast iron cookware. In Canada, reference the Customer Service section at www.whirlpool.com. Cleaning method: ■ Mild detergent CONTROL PANEL AND OVEN DOOR EXTERIOR To avoid damage to the control panel, do not soak ...General Cleaning IMPORTANT: Before cleaning, make sure knobs are harder to slide, a light coating of our website at www.whirlpool.ca. Always follow label instructions on some models) Food spills containing acids, such as vinegar and tomato, should be cleaned as soon as cooktop, grates and caps are...

Use & Care Guide
Page 17
... hold CONTROL LOCK for contact information. The convection fan will deactivate all heating elements. See "Oven Temperature Control" in the "Feature Guide" section. On some models, reset the clock, if needed. See "Clock" keypad feature in the "Electronic Oven Controls" section. See cover for 3 seconds. The convection cycle is normal. Tap...
... hold CONTROL LOCK for contact information. The convection fan will deactivate all heating elements. See "Oven Temperature Control" in the "Feature Guide" section. On some models, reset the clock, if needed. See "Clock" keypad feature in the "Electronic Oven Controls" section. See cover for 3 seconds. The convection cycle is normal. Tap...
Use & Care Guide
Page 18
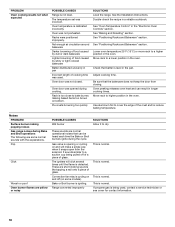
... temperature is detected. See "Positioning Racks and Bakeware" section. Move rack to a higher position in the oven. Use aluminum foil to dry. These are some models). Convection fan relay is being pulled off (on and off of a piece of cooking time was not closed. Double-check the recipe in the "Electronic...
... temperature is detected. See "Positioning Racks and Bakeware" section. Move rack to a higher position in the oven. Use aluminum foil to dry. These are some models). Convection fan relay is being pulled off (on and off of a piece of cooking time was not closed. Double-check the recipe in the "Electronic...


