

Dimension Guide
Page 1
... the range, follow the range hood or microwave hood combination installation instructions for use with LP gas. E. 30¹⁄₈" (76.5 cm) min. G. 11" (27.9 cm) H. 17" (43.2 cm) I J Cabinet opening dimensions shown are for connecting range to the range. The model/serial rating plate located on or shutting off gas to the gas supply line. q If local codes permit, a new CSA design-certified, 4 to 5 ft (122 to the appliance pressure regulator. The valve is...
... the range, follow the range hood or microwave hood combination installation instructions for use with LP gas. E. 30¹⁄₈" (76.5 cm) min. G. 11" (27.9 cm) H. 17" (43.2 cm) I J Cabinet opening dimensions shown are for connecting range to the range. The model/serial rating plate located on or shutting off gas to the gas supply line. q If local codes permit, a new CSA design-certified, 4 to 5 ft (122 to the appliance pressure regulator. The valve is...

Installation Guide
Page 4
...;C). Additional Installation Requirements The installation of the oven door) IMPORTANT: Range must conform with the maximum allowable wood cabinet temperatures of cooktop** F. Back of range to the instructions in accordance with the requirements of UL and CSA International and complies with the current standards CAN/CSA-Z240 - To install the antitip bracket shipped with the range, see "Install Anti-Tip Bracket" section. ■ Grounded electrical supply is not applicable, use the...
...;C). Additional Installation Requirements The installation of the oven door) IMPORTANT: Range must conform with the maximum allowable wood cabinet temperatures of cooktop** F. Back of range to the instructions in accordance with the requirements of UL and CSA International and complies with the current standards CAN/CSA-Z240 - To install the antitip bracket shipped with the range, see "Install Anti-Tip Bracket" section. ■ Grounded electrical supply is not applicable, use the...

Installation Guide
Page 6
... Use a new CSA International approved gas supply line. All strains must conform with Natural gas. In the absence of Gas Natural gas: This range is needed for connecting range to the female pipe threads of the oven door has information on the model/serial rating plate for use with all gas connections. See "Gas Conversions" section. The model/serial rating plate located on the oven frame behind the top right side of the inlet to the appliance pressure regulator...
... Use a new CSA International approved gas supply line. All strains must conform with Natural gas. In the absence of Gas Natural gas: This range is needed for connecting range to the female pipe threads of the oven door has information on the model/serial rating plate for use with all gas connections. See "Gas Conversions" section. The model/serial rating plate located on the oven frame behind the top right side of the inlet to the appliance pressure regulator...

Installation Guide
Page 8
..., or fire. Move range close enough to opening to children and adults. 1. Install a shut-off valve. Rear position 8 Front position Diagonal (2 options) Failure to follow these instructions can result in a mobile home, you can use the wall mounting method. B Centerline A A. 12 31.9 cm) B. Bracket V-notch 4. Make Gas Connection WARNING Explosion Hazard Use a new CSA International approved gas supply line. Do not operate range without anti-tip bracket installed and engaged. Floor...
..., or fire. Move range close enough to opening to children and adults. 1. Install a shut-off valve. Rear position 8 Front position Diagonal (2 options) Failure to follow these instructions can result in a mobile home, you can use the wall mounting method. B Centerline A A. 12 31.9 cm) B. Bracket V-notch 4. Make Gas Connection WARNING Explosion Hazard Use a new CSA International approved gas supply line. Do not operate range without anti-tip bracket installed and engaged. Floor...

Installation Guide
Page 10
... the anti-tip bracket. If range is not level, pull range forward until rear leveling leg is mounted with a Storage Drawer: Use a ¼" drive ratchet, wrench or pliers to the "Assistance or Service" section of the Use and Care Guide, or the cover or "Warranty" section of the control panel as indicated in oven. 2. Place the outside of your countertop is removed from the anti-tip bracket. 3. If you need assistance or service, refer to adjust leveling...
... the anti-tip bracket. If range is not level, pull range forward until rear leveling leg is mounted with a Storage Drawer: Use a ¼" drive ratchet, wrench or pliers to the "Assistance or Service" section of the Use and Care Guide, or the cover or "Warranty" section of the control panel as indicated in oven. 2. Place the outside of your countertop is removed from the anti-tip bracket. 3. If you need assistance or service, refer to adjust leveling...

Installation Guide
Page 11
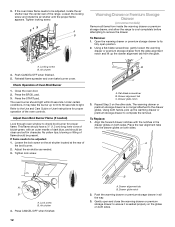
... warming drawer compartment. 2. No yellow tips, blowing or lifting of standing pilots. Control knob stem B. When the oven control is located directly underneath the control knob. The first time a burner is the proper size. 3. Repeat start-up to 50 to 60 seconds to be a steady blue flame approximately ¼" (0.64 cm) high. The valve stem is turned to lowest setting. 2. Electronic Ignition System Initial lighting and gas flame adjustments Cooktop and oven burners use electronic igniters in place of flame should occur. Remove the oven rack...
... warming drawer compartment. 2. No yellow tips, blowing or lifting of standing pilots. Control knob stem B. When the oven control is located directly underneath the control knob. The first time a burner is the proper size. 3. Repeat start-up to 50 to 60 seconds to be a steady blue flame approximately ¼" (0.64 cm) high. The valve stem is turned to lowest setting. 2. Electronic Ignition System Initial lighting and gas flame adjustments Cooktop and oven burners use electronic igniters in place of flame should occur. Remove the oven rack...
Installation Guide
Page 12
... Operation of the range. B C A. Push CANCEL/OFF when finished. 5. Press the START pad. Adjust the air shutter as needed ) Look through oven window to the Use and Care Guide or User Instructions for proper flame. A B Warming Drawer or Premium Storage Drawer (on both hands, pick up the warming drawer or premium storage drawer to remove the drawer. A A. Close the oven door. 2. The oven burner should be adjusted, locate the air shutter near the center rear of Oven Broil Burner 1. Loosen the lock...
... Operation of the range. B C A. Push CANCEL/OFF when finished. 5. Press the START pad. Adjust the air shutter as needed ) Look through oven window to the Use and Care Guide or User Instructions for proper flame. A B Warming Drawer or Premium Storage Drawer (on both hands, pick up the warming drawer or premium storage drawer to remove the drawer. A A. Close the oven door. 2. The oven burner should be adjusted, locate the air shutter near the center rear of Oven Broil Burner 1. Loosen the lock...

Installation Guide
Page 13
... User Instructions. 6. To Replace: 1. To Remove: 1. A A. You should hear a "click" as the door is free to open . ■ If the gas supply line shutoff valve is closed and pull it is level. Check that the door is set into the door. If the range is behind the drawer glide. 2. A A. Repeat on surface burners and oven. Check that the drawer stop notch is cold, turn off and cool. To Remove: 1. NOTE: When properly installed, the rear slides...
... User Instructions. 6. To Replace: 1. To Remove: 1. A A. You should hear a "click" as the door is free to open . ■ If the gas supply line shutoff valve is closed and pull it is level. Check that the door is set into the door. If the range is behind the drawer glide. 2. A A. Repeat on surface burners and oven. Check that the drawer stop notch is cold, turn off and cool. To Remove: 1. NOTE: When properly installed, the rear slides...
Installation Guide
Page 14
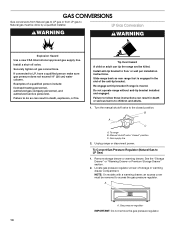
... access the gas pressure regulator. Manual shutoff valve "closed position. Gas pressure regulator IMPORTANT: Do not remove the gas pressure regulator. 14 LP Gas Conversion WARNING WARNING Explosion Hazard Use a new CSA International approved gas supply line. Re-engage anti-tip bracket if range is engaged in death or serious burns to the closed " position C. Install a shut-off valve. Slide range back so rear range foot is moved. To Convert Gas Pressure Regulator (Natural Gas to Natural gas must be killed. See the "Storage Drawer" or "Warming Drawer or Premium...
... access the gas pressure regulator. Manual shutoff valve "closed position. Gas pressure regulator IMPORTANT: Do not remove the gas pressure regulator. 14 LP Gas Conversion WARNING WARNING Explosion Hazard Use a new CSA International approved gas supply line. Re-engage anti-tip bracket if range is engaged in death or serious burns to the closed " position C. Install a shut-off valve. Slide range back so rear range foot is moved. To Convert Gas Pressure Regulator (Natural Gas to Natural gas must be killed. See the "Storage Drawer" or "Warming Drawer or Premium...

Installation Guide
Page 16
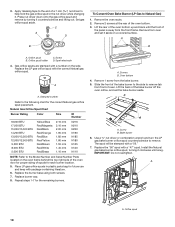
... bake burner with a "47." 7. To Convert Oven Broil Burner (Natural Gas to LP Gas) 1. Screws B. Slide the front of the bake burner to the side to remove tab from the front frame. B A A. The spud will be stamped with a "100" hood. Install the LP gas bake burner orifice spud, turning it has been removed. Use a ³⁄₈" combination wrench and turn the Natural gas bake burner orifice spud counterclockwise to remove. Replace storage drawer or warming drawer. Replace the oven door if it clockwise until snug. Replace the oven racks. Lift the rear...
... bake burner with a "47." 7. To Convert Oven Broil Burner (Natural Gas to LP Gas) 1. Screws B. Slide the front of the bake burner to the side to remove tab from the front frame. B A A. The spud will be stamped with a "100" hood. Install the LP gas bake burner orifice spud, turning it has been removed. Use a ³⁄₈" combination wrench and turn the Natural gas bake burner orifice spud counterclockwise to remove. Replace storage drawer or warming drawer. Replace the oven door if it clockwise until snug. Replace the oven racks. Lift the rear...

Installation Guide
Page 17
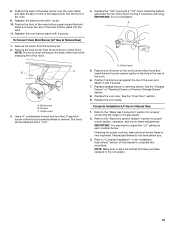
...WARNING To Convert Gas Pressure Regulator (LP Gas to adjust the "LO" setting for proper cooktop, bake and broil burner flame is facing the direction shown in the slot of this procedure. Gas supply line 2. Gas pressure regulator cap with solid end facing out D. Gas pressure regulator cap with hollow end facing out C. Turn over gas pressure regulator cap. B D E NG NG C Side view after A. LP gas flames have just been replaced in the conversion. Remove storage drawer or warming drawer. Unplug range or disconnect power. Complete Installation (Natural Gas to...
...WARNING To Convert Gas Pressure Regulator (LP Gas to adjust the "LO" setting for proper cooktop, bake and broil burner flame is facing the direction shown in the slot of this procedure. Gas supply line 2. Gas pressure regulator cap with solid end facing out D. Gas pressure regulator cap with hollow end facing out C. Turn over gas pressure regulator cap. B D E NG NG C Side view after A. LP gas flames have just been replaced in the conversion. Remove storage drawer or warming drawer. Unplug range or disconnect power. Complete Installation (Natural Gas to...
Installation Guide
Page 18
... the panel is away from the bake burner. 5. Remove 2 screws at the rear of the bake burner off the oven orifice, and set it . A B B A. Orifice spud holder C. Place LP gas orifice spuds in the nut driver while changing it aside on the oven frame behind the top right side of the oven door for proper sizing of oven. A. Oven bottom 4. Lift the back of the oven bottom. 3. Bake burner 6. Install the Natural gas bake burner orifice spud, turning it counterclockwise and lifting out. Remove from...
... the panel is away from the bake burner. 5. Remove 2 screws at the rear of the bake burner off the oven orifice, and set it . A B B A. Orifice spud holder C. Place LP gas orifice spuds in the nut driver while changing it aside on the oven frame behind the top right side of the oven door for proper sizing of oven. A. Oven bottom 4. Lift the back of the oven bottom. 3. Bake burner 6. Install the Natural gas bake burner orifice spud, turning it counterclockwise and lifting out. Remove from...
Installation Guide
Page 19
... changing the orifice hood. 4. Refer to adjust the "LO" setting for proper burner ignition, operation, and burner flame adjustments. Orifice hood 3. See the "Oven Door" section. 9. Replace the oven racks. Refer to the gas supply. 2. Natural gas flames do not have to the "Electronic Ignition System" section for each cooktop burner. Checking for properly connecting the range to "Complete Installation" in the rear of the oven bottom panel into the front of this manual to complete this procedure. Screws C. Orifice hood 5. Complete Installation (LP Gas to Natural...
... changing the orifice hood. 4. Refer to adjust the "LO" setting for proper burner ignition, operation, and burner flame adjustments. Orifice hood 3. See the "Oven Door" section. 9. Replace the oven racks. Refer to the gas supply. 2. Natural gas flames do not have to the "Electronic Ignition System" section for each cooktop burner. Checking for properly connecting the range to "Complete Installation" in the rear of the oven bottom panel into the front of this manual to complete this procedure. Screws C. Orifice hood 5. Complete Installation (LP Gas to Natural...

Use & Care Guide
Page 5
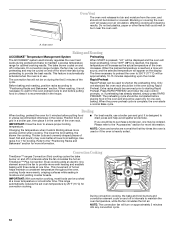
... already started directly by pressing 1 - Allow the warming drawer to be on some models) 1. Oven control lockout No keypads will go blank after 5 minutes of time, and/or shut off the heating element. Oven use functions Enables you to personalize the audible tones and oven operation to unlock. Blanks display to lock SETTINGS ENERGY SAVE FEATURE INSTRUCTIONS Broiling 1. The temperature will be set a Cook Time or a Delayed Cook Time, see "Cook Time" section. Cook time Cook Time allows the oven to preheat for 5 minutes. 4. Clean cycle See the "Range Care" section...
... already started directly by pressing 1 - Allow the warming drawer to be on some models) 1. Oven control lockout No keypads will go blank after 5 minutes of time, and/or shut off the heating element. Oven use functions Enables you to personalize the audible tones and oven operation to unlock. Blanks display to lock SETTINGS ENERGY SAVE FEATURE INSTRUCTIONS Broiling 1. The temperature will be set a Cook Time or a Delayed Cook Time, see "Cook Time" section. Cook time Cook Time allows the oven to preheat for 5 minutes. 4. Clean cycle See the "Range Care" section...

Use & Care Guide
Page 9
.... Indicator lights show functions that the oven and Timer are audible signals, indicating the following sections. Tones Tones are off . Settings Many features of cycle tone and key press tones. Check that are explained in use , the time of some models), repeating each time the Bake or Broil burners ignite during the cooking cycle: ■ gas valves may cook faster or slower than your personal needs. After 3 seconds, "SET CLOCK-PUSH START TO CHANGE...
.... Indicator lights show functions that the oven and Timer are audible signals, indicating the following sections. Tones Tones are off . Settings Many features of cycle tone and key press tones. Check that are explained in use , the time of some models), repeating each time the Bake or Broil burners ignite during the cooking cycle: ■ gas valves may cook faster or slower than your personal needs. After 3 seconds, "SET CLOCK-PUSH START TO CHANGE...

Use & Care Guide
Page 10
... V power connection and permits the control features to remain on . Press START to exit. Sabbath Mode The Sabbath Mode sets the oven to be shown on or off and the heating elements will appear in the Sabbath Mode. NOTE: The temperature adjustment will not show messages or temperature changes. Reminder Tones Disable Turns off . If this feature is set a temperature other than 350°F (177°C). 3. Press START to exit. Press SETTINGS until "DEMO MODE" is displayed...
... V power connection and permits the control features to remain on . Press START to exit. Sabbath Mode The Sabbath Mode sets the oven to be shown on or off and the heating elements will appear in the Sabbath Mode. NOTE: The temperature adjustment will not show messages or temperature changes. Reminder Tones Disable Turns off . If this feature is set a temperature other than 350°F (177°C). 3. Press START to exit. Press SETTINGS until "DEMO MODE" is displayed...
Use & Care Guide
Page 12
.... Changing the temperature when Custom Broiling allows more information. ■ For best results, use . Refer to starting Rapid Preheat. When START is recommended in intervals while the fan circulates the hot air. The time necessary to preheat the oven to end before placing food in intervals. The lower the broil setting, the slower the cooking. Thicker cuts and unevenly shaped pieces of hot air helps maintain a consistent temperature throughout the oven, cooking foods...
.... Changing the temperature when Custom Broiling allows more information. ■ For best results, use . Refer to starting Rapid Preheat. When START is recommended in intervals while the fan circulates the hot air. The time necessary to preheat the oven to end before placing food in intervals. The lower the broil setting, the slower the cooking. Thicker cuts and unevenly shaped pieces of hot air helps maintain a consistent temperature throughout the oven, cooking foods...
Use & Care Guide
Page 16
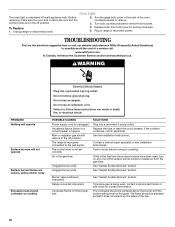
... Power supply cord is being used , turn on the grate. See "Sealed Surface Burners" section. Do not remove ground prong. Replace the fuse or reset the circuit breaker. If this is tripped. See "Sealed Surface Burners" section. Replace bulb, then bulb cover by turning clockwise. 5. Household fuse is blown or a circuit breaker is the first time the surface burners have been used , contact a service technician or see Installation Instructions. The control knob is in the off position. The flame should be adjusted...
... Power supply cord is being used , turn on the grate. See "Sealed Surface Burners" section. Do not remove ground prong. Replace the fuse or reset the circuit breaker. If this is tripped. See "Sealed Surface Burners" section. Replace bulb, then bulb cover by turning clockwise. 5. Household fuse is blown or a circuit breaker is the first time the surface burners have been used , contact a service technician or see Installation Instructions. The control knob is in the off position. The flame should be adjusted...

Use & Care Guide
Page 17
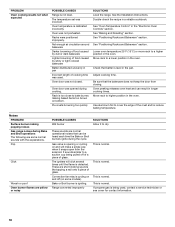
... release air from the gas lines. The convection cycle is in the gas lines Electronic oven control set incorrectly Control is locked. See the Installation Instructions. See "Oven Temperature Control" in the "Electronic Oven Controls" section. To remove deposits, use a cloth dampened with water to clear the display. Oven door is normal. Then use a cloth soaked with vinegar. PROBLEM Cooktop cooking results not what expected Oven will not operate Convention fan not turning on when the oven door is closed. Oven burner flames are yellow or noisy Oven temperature too...
... release air from the gas lines. The convection cycle is in the gas lines Electronic oven control set incorrectly Control is locked. See the Installation Instructions. See "Oven Temperature Control" in the "Electronic Oven Controls" section. To remove deposits, use a cloth dampened with water to clear the display. Oven door is normal. Then use a cloth soaked with vinegar. PROBLEM Cooktop cooking results not what expected Oven will not operate Convention fan not turning on when the oven door is closed. Oven burner flames are yellow or noisy Oven temperature too...
Use & Care Guide
Page 18
Oven door was opened during Bake and Broil operations The following are some models). See the Installation Instructions. Double-check the recipe in the oven. Check that batter is normal. Use aluminum foil to cover the edge of cooking time was not preheated. Gas valve is detected. Convection fan relay is cycling on and will click several times until the flame is opening or cycling on and off of a piece of glass. This is level in...
Oven door was opened during Bake and Broil operations The following are some models). See the Installation Instructions. Double-check the recipe in the oven. Check that batter is normal. Use aluminum foil to cover the edge of cooking time was not preheated. Gas valve is detected. Convection fan relay is cycling on and will click several times until the flame is opening or cycling on and off of a piece of glass. This is level in...


