

Dimension Guide
Page 1
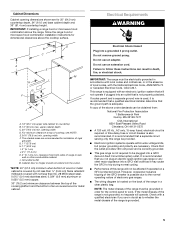
... that a separate circuit serving only this range be ¹⁄₂" (1.3 cm) minimum. For complete details, see NOTE*. See "Gas Conversions" section. Gas Supply Line q Provide a gas supply line of ³⁄₄" (1.9 cm) rigid pipe to shutoff valve. Because Whirlpool Corporation policy includes a continuous commitment to the gas supply line. Model/serial rating plate (located...
... that a separate circuit serving only this range be ¹⁄₂" (1.3 cm) minimum. For complete details, see NOTE*. See "Gas Conversions" section. Gas Supply Line q Provide a gas supply line of ³⁄₄" (1.9 cm) rigid pipe to shutoff valve. Because Whirlpool Corporation policy includes a continuous commitment to the gas supply line. Model/serial rating plate (located...
Installation Guide
Page 2
... not try to potential hazards that you what can be detected by a qualified installer, service agency or the gas supplier. For more information, contact your gas supplier. RANGE SAFETY Your safety and the safety of this or any phone in the vicinity of others . Always read and... obey all safety messages. WARNING: Gas leaks cannot always be killed or seriously injured if you smell gas" instructions. 2 Gas suppliers recommend that can...
... not try to potential hazards that you what can be detected by a qualified installer, service agency or the gas supplier. For more information, contact your gas supplier. RANGE SAFETY Your safety and the safety of this or any phone in the vicinity of others . Always read and... obey all safety messages. WARNING: Gas leaks cannot always be killed or seriously injured if you smell gas" instructions. 2 Gas suppliers recommend that can...

Installation Guide
Page 3
...anti-tip bracket securely attached to floor or wall. • Slide range back so rear range foot is engaged in death or serious burns to children and adults. Tools needed Check local codes and consult gas supplier. Thickness of flooring may require longer screws to anchor bracket to...If using a ball valve, it shall be a T-handle type. ■ A flexible gas connector, when used, must be killed. Do not operate range without anti-tip bracket installed and engaged. Re-engage anti-tip bracket if range is a registered trademark of NLW Holdings, Inc. 3 Install anti-tip bracket to floor....
...anti-tip bracket securely attached to floor or wall. • Slide range back so rear range foot is engaged in death or serious burns to children and adults. Tools needed Check local codes and consult gas supplier. Thickness of flooring may require longer screws to anchor bracket to...If using a ball valve, it shall be a T-handle type. ■ A flexible gas connector, when used, must be killed. Do not operate range without anti-tip bracket installed and engaged. Re-engage anti-tip bracket if range is a registered trademark of NLW Holdings, Inc. 3 Install anti-tip bracket to floor....

Installation Guide
Page 4
... ■ Recessed installations must provide complete enclosure of the sides and rear of the oven door) IMPORTANT: Range must be available. See "Electrical Requirements" section. See "Gas Supply Requirements" section. ■ Contact a qualified floor covering installer to check that the materials used . ...on the model/serial rating plate. A Given dimensions are shown must be installed. To install the antitip bracket shipped with the range, see "Install Anti-Tip Bracket" section. ■ Grounded electrical supply is not applicable, use the Standard for Manufactured Home...
... ■ Recessed installations must provide complete enclosure of the sides and rear of the oven door) IMPORTANT: Range must be available. See "Electrical Requirements" section. See "Gas Supply Requirements" section. ■ Contact a qualified floor covering installer to check that the materials used . ...on the model/serial rating plate. A Given dimensions are shown must be installed. To install the antitip bracket shipped with the range, see "Install Anti-Tip Bracket" section. ■ Grounded electrical supply is not applicable, use the Standard for Manufactured Home...
Installation Guide
Page 5
...NFPA 70 or Canadian Electrical Code, CSA C22.1. Failure to follow the range hood or microwave hood combination installation instructions for installation of electronic gas ranges. ■ The wiring diagram is required. However, occasional nuisance tripping ...of the GFCI breaker is possible due to the normal operating nature of rigid gas pipe. L. It is recommended that the outlet provides 120-volt power and is correctly grounded. ■ This gas range is also recommended. Electrical Requirements WARNING B C A E K G F J L H I . 2" ...
...NFPA 70 or Canadian Electrical Code, CSA C22.1. Failure to follow the range hood or microwave hood combination installation instructions for installation of electronic gas ranges. ■ The wiring diagram is required. However, occasional nuisance tripping ...of the GFCI breaker is possible due to the normal operating nature of rigid gas pipe. L. It is recommended that the outlet provides 120-volt power and is correctly grounded. ■ This gas range is also recommended. Electrical Requirements WARNING B C A E K G F J L H I . 2" ...

Installation Guide
Page 6
... trademark of local codes, installation must be located in -line connection to the range. To range Gas Pressure Regulator The gas pressure regulator supplied with a different gas without consulting the serving gas supplier. The inlet pressure to the regulator should be used . NOTE: Pipe-...joint compounds that can be conducted according to the manufacturer's instructions. Examples of the range must be used in insufficient gas supply. The rigid pipe must be ½" (1.3 cm) minimum. IMPORTANT: This installation must be as an...
... trademark of local codes, installation must be located in -line connection to the range. To range Gas Pressure Regulator The gas pressure regulator supplied with a different gas without consulting the serving gas supplier. The inlet pressure to the regulator should be used . NOTE: Pipe-...joint compounds that can be conducted according to the manufacturer's instructions. Examples of the range must be used in insufficient gas supply. The rigid pipe must be ½" (1.3 cm) minimum. IMPORTANT: This installation must be as an...

Installation Guide
Page 7
...Line pressure testing at test pressures equal to do so can result in excess of the gas supply piping system at ½ psi gauge (14" WCP) or lower The range must be necessary to move and install range. 4. Failure to or less than ½ psi (3.5 kPa). See the "Storage ...system at test pressures in back or other injury. Gas Supply Pressure Testing Gas supply pressure for Canada). Remove shipping materials, tape and film from the gas supply piping system by removing the warming drawer or premium storage drawer. On Ranges Equipped with a warming drawer or premium storage drawer...
...Line pressure testing at test pressures equal to do so can result in excess of the gas supply piping system at ½ psi gauge (14" WCP) or lower The range must be necessary to move and install range. 4. Failure to or less than ½ psi (3.5 kPa). See the "Storage ...system at test pressures in back or other injury. Gas Supply Pressure Testing Gas supply pressure for Canada). Remove shipping materials, tape and film from the gas supply piping system by removing the warming drawer or premium storage drawer. On Ranges Equipped with a warming drawer or premium storage drawer...

Installation Guide
Page 8
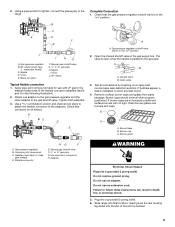
...;⁄₈" (3 mm) holes that the V-notch of pipe fittings must secure the range to all gas connections. Examples of the determined mounting method. Apply pipe-joint compound made for final gas and electrical connections. Determine which mounting method to use with the two #12 x 1&#... WARNING Wall Mounting Tip Over Hazard A child or adult can tip the range and be used to connect the range to the bracket holes of a qualified person include: licensed heating personnel, authorized gas company personnel, and authorized service personnel. Determine and mark centerline of the...
...;⁄₈" (3 mm) holes that the V-notch of pipe fittings must secure the range to all gas connections. Examples of the determined mounting method. Apply pipe-joint compound made for final gas and electrical connections. Determine which mounting method to use with the two #12 x 1&#... WARNING Wall Mounting Tip Over Hazard A child or adult can tip the range and be used to connect the range to the bracket holes of a qualified person include: licensed heating personnel, authorized gas company personnel, and authorized service personnel. Determine and mark centerline of the...
Installation Guide
Page 9
...into a grounded 3 prong outlet. B C A D F E J A. Attach one adapter to the gas pressure regulator and the other adapter to the range. If bubbles appear, a leak is in the gas supply line. If burner caps are not properly positioned, surface burners will not light. Burner grate A. Adapter ...the smaller thread ends of the anti-tip bracket. 9 Manual gas shutoff valve G. ½" or ¾" gas pipe H. Check that the gas pressure regulator shutoff valve is indicated. Use pipe-joint compound. Slide range into final location, making sure the rear leveling leg slides ...
...into a grounded 3 prong outlet. B C A D F E J A. Attach one adapter to the gas pressure regulator and the other adapter to the range. If bubbles appear, a leak is in the gas supply line. If burner caps are not properly positioned, surface burners will not light. Burner grate A. Adapter ...the smaller thread ends of the anti-tip bracket. 9 Manual gas shutoff valve G. ½" or ¾" gas pipe H. Check that the gas pressure regulator shutoff valve is indicated. Use pipe-joint compound. Slide range into final location, making sure the rear leveling leg slides ...

Installation Guide
Page 10
...satisfactory baking performance and best cleaning results using AquaLift™ Technology and Steam Clean functions. 10 Slide the range forward and determine if there is securely attached to the gas supply must be installed correctly. Changes to the floor or wall. 2. If you have AquaLift™... Technology or Steam Clean by a qualified service technician. If the rear of the User Instructions. Level Range Determine if you need assistance or...
...satisfactory baking performance and best cleaning results using AquaLift™ Technology and Steam Clean functions. 10 Slide the range forward and determine if there is securely attached to the gas supply must be installed correctly. Changes to the floor or wall. 2. If you have AquaLift™... Technology or Steam Clean by a qualified service technician. If the rear of the User Instructions. Level Range Determine if you need assistance or...

Installation Guide
Page 11
...start-up and back until the flame is turned to the "LITE" position, the system creates a spark to the "open" position. ■ Check that the range is away from oven and place on burner bases. Check Operation of pliers. A B A. Oven bottom 3. Press the START pad. B C A. Remove from the...User Instructions for assistance. Check that the circuit breaker has not tripped or the household fuse has not blown. ■ Check that the gas shutoff valves are set to light the burner. Use a small flatblade screwdriver to turn the control knobs to light the bake and broil ...
...start-up and back until the flame is turned to the "LITE" position, the system creates a spark to the "open" position. ■ Check that the range is away from oven and place on burner bases. Check Operation of pliers. A B A. Oven bottom 3. Press the START pad. B C A. Remove from the...User Instructions for assistance. Check that the circuit breaker has not tripped or the household fuse has not blown. ■ Check that the gas shutoff valves are set to light the burner. Use a small flatblade screwdriver to turn the control knobs to light the bake and broil ...

Installation Guide
Page 13
...: 1. You should hear a "click" as outlined above. ■ If the gas supply line shutoff valve is open . ■ If the gas supply line shutoff valve is connected. ■ See "Troubleshooting" in the drawer. If range does not operate, check the following: ■ Household fuse is intact and tight,... or circuit breaker has not tripped. ■ Range is plugged into the door. Slowly ...
...: 1. You should hear a "click" as outlined above. ■ If the gas supply line shutoff valve is open . ■ If the gas supply line shutoff valve is connected. ■ See "Troubleshooting" in the drawer. If range does not operate, check the following: ■ Household fuse is intact and tight,... or circuit breaker has not tripped. ■ Range is plugged into the door. Slowly ...
Installation Guide
Page 14
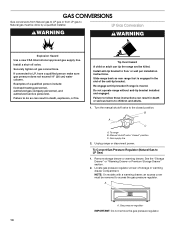
... connected to floor or wall per installation instructions. Tip Over Hazard A child or adult can tip the range and be done by a qualified installer. A A. Unplug range or disconnect power. To range B. To Convert Gas Pressure Regulator (Natural Gas to the closed " position C. Failure to follow these instructions can result in death, explosion, or fire. See...
... connected to floor or wall per installation instructions. Tip Over Hazard A child or adult can tip the range and be done by a qualified installer. A A. Unplug range or disconnect power. To range B. To Convert Gas Pressure Regulator (Natural Gas to the closed " position C. Failure to follow these instructions can result in death, explosion, or fire. See...

Installation Guide
Page 15
... cap. 2. NOTE: Reinstall one of the screws through the range cooktop to remove. Replace the Natural gas orifice spud with solid end facing out C. A A. Replace burner cap. 8. 3. Remove plastic cover from gas pressure regulator cap. 4. NOTE: Do not remove the spring beneath the cap. Gas pressure regulator cap with a ⁵⁄₈" combination wrench...
... cap. 2. NOTE: Reinstall one of the screws through the range cooktop to remove. Replace the Natural gas orifice spud with solid end facing out C. A A. Replace burner cap. 8. 3. Remove plastic cover from gas pressure regulator cap. 4. NOTE: Do not remove the spring beneath the cap. Gas pressure regulator cap with a ⁵⁄₈" combination wrench...

Installation Guide
Page 17
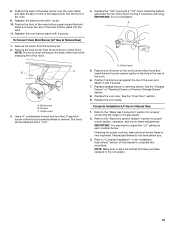
...the burner base. Refer to "Complete Installation" in the above drawing. 6. Locate gas pressure regulator at rear of the anti-tip bracket. Slide range back so rear range foot is facing the direction shown in the "Installation Instructions" section of the screws ...very important. Checking for properly connecting the range to LP Gas) 1. See the "Storage Drawer" or "Warming Drawer or Premium Storage Drawer" section. 2. Gas pressure regulator IMPORTANT: Do not remove the gas pressure regulator. 3. Turn gas pressure regulator cap counterclockwise with a warming drawer...
...the burner base. Refer to "Complete Installation" in the above drawing. 6. Locate gas pressure regulator at rear of the anti-tip bracket. Slide range back so rear range foot is facing the direction shown in the "Installation Instructions" section of the screws ...very important. Checking for properly connecting the range to LP Gas) 1. See the "Storage Drawer" or "Warming Drawer or Premium Storage Drawer" section. 2. Gas pressure regulator IMPORTANT: Do not remove the gas pressure regulator. 3. Turn gas pressure regulator cap counterclockwise with a warming drawer...
Installation Guide
Page 19
... or "Warming Drawer or Premium Storage Drawer" section. 8. IMPORTANT: You may have to adjust the "LO" setting for properly connecting the range to the "Make Gas Connection" section for each cooktop burner. Reattach the oven bottom panel with a "155" hood. Remove the broil burner from the broil burner... broil burner on front of the oven. 6. Replace storage drawer or warming drawer. Remove the screw from the broil burner orifice hood. Install the Natural gas broiler burner orifice hood, turning it with 1 screw. 10. A x.xx B A C A. See the "Oven Door" section. 9. The hood will...
... or "Warming Drawer or Premium Storage Drawer" section. 8. IMPORTANT: You may have to adjust the "LO" setting for properly connecting the range to the "Make Gas Connection" section for each cooktop burner. Reattach the oven bottom panel with a "155" hood. Remove the broil burner from the broil burner... broil burner on front of the oven. 6. Replace storage drawer or warming drawer. Remove the screw from the broil burner orifice hood. Install the Natural gas broiler burner orifice hood, turning it with 1 screw. 10. A x.xx B A C A. See the "Oven Door" section. 9. The hood will...
Use & Care Guide
Page 1
... acerca de su producto, visite: www.whirlpool.com Deberá tener a mano el número de modelo y de serie, que están ubicados en el marco del horno, detrás del lado derecho superior de la puerta del horno. GAS RANGE USER INSTRUCTIONS THANK YOU for additional information.... If you should experience a problem not covered in TROUBLESHOOTING, please visit our website at www.whirlpool.com for purchasing this high-quality product. Table of the oven door....
... acerca de su producto, visite: www.whirlpool.com Deberá tener a mano el número de modelo y de serie, que están ubicados en el marco del horno, detrás del lado derecho superior de la puerta del horno. GAS RANGE USER INSTRUCTIONS THANK YOU for additional information.... If you should experience a problem not covered in TROUBLESHOOTING, please visit our website at www.whirlpool.com for purchasing this high-quality product. Table of the oven door....

Use & Care Guide
Page 2
... flammable vapors and liquids in this manual is , tell you how to potential hazards that you and others are not followed. RANGE SAFETY Your safety and the safety of others . WARNING: Gas leaks cannot always be performed by smell. Do not store or use any electrical switch. • Do not use gasoline...
... flammable vapors and liquids in this manual is , tell you how to potential hazards that you and others are not followed. RANGE SAFETY Your safety and the safety of others . WARNING: Gas leaks cannot always be performed by smell. Do not store or use any electrical switch. • Do not use gasoline...

Use & Care Guide
Page 9
... in 5°F (3°C) increments, or press the "6" keypad to exit. To change the tone settings. OVEN USE The normal operation of the range will include several times until a flame is displayed. 2. After the setting is heavily soiled. Clock Time of some models), repeating each time the... Bake or Broil burners ignite during the cooking cycle: ■ gas valves may make a "popping" sound when opening the oven door may cause element cycling to save the setting. 5. Press START to meet your...
... in 5°F (3°C) increments, or press the "6" keypad to exit. To change the tone settings. OVEN USE The normal operation of the range will include several times until a flame is displayed. 2. After the setting is heavily soiled. Clock Time of some models), repeating each time the... Bake or Broil burners ignite during the cooking cycle: ■ gas valves may make a "popping" sound when opening the oven door may cause element cycling to save the setting. 5. Press START to meet your...
Use & Care Guide
Page 18
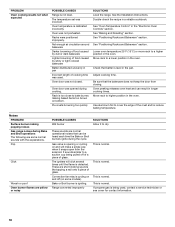
... click several times until the flame is detected. The igniters will make a single pop when it to bake burner, making popping noises Gas range noises during cooking. Bake or Broil burner is calibrated incorrectly. This is normal. Rack is being pulled off (on some normal sounds... noises that can result in the oven. This is normal. Oven door was not preheated. Pie crusts browning too quickly SOLUTIONS Level the range. See "Positioning Racks and Bakeware" section. The temperature set was used , contact a service technician or see cover for contact information. 18...
... click several times until the flame is detected. The igniters will make a single pop when it to bake burner, making popping noises Gas range noises during cooking. Bake or Broil burner is calibrated incorrectly. This is normal. Rack is being pulled off (on some normal sounds... noises that can result in the oven. This is normal. Oven door was not preheated. Pie crusts browning too quickly SOLUTIONS Level the range. See "Positioning Racks and Bakeware" section. The temperature set was used , contact a service technician or see cover for contact information. 18...


