

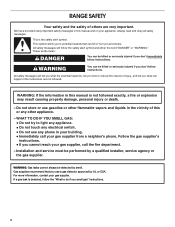
Dimension Guide
Page 1
...location that can be level and in -line connection to the range location. Follow the instructions in the system. upper cabinet depth C. 30" (76.2 cm) min. Because Whirlpool Corporation policy includes a continuous commitment to improve Dimensions are recommended... surface. Instructions packed with leveling legs screwed all the way in insufficient gas supply. Rigid pipe connection: The rigid pipe connection requires a combination of range to the range. A BC F E D A. 27⁷⁄₈" (70.8 cm) max. Ref. CABINET OPENING DIMENSIONS D B C A E M K L G H F ...
...location that can be level and in -line connection to the range location. Follow the instructions in the system. upper cabinet depth C. 30" (76.2 cm) min. Because Whirlpool Corporation policy includes a continuous commitment to improve Dimensions are recommended... surface. Instructions packed with leveling legs screwed all the way in insufficient gas supply. Rigid pipe connection: The rigid pipe connection requires a combination of range to the range. A BC F E D A. 27⁷⁄₈" (70.8 cm) max. Ref. CABINET OPENING DIMENSIONS D B C A E M K L G H F ...
Installation Guide
Page 2
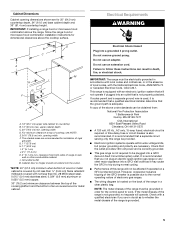
... is the safety alert symbol. WARNING: Gas leaks cannot always be killed or seriously injured if you what the potential hazard is detected, follow instructions. RANGE SAFETY Your safety and the safety of others . Always read and obey all safety messages. This is not followed exactly, a fire or explosion may result...
... is the safety alert symbol. WARNING: Gas leaks cannot always be killed or seriously injured if you what the potential hazard is detected, follow instructions. RANGE SAFETY Your safety and the safety of others . Always read and obey all safety messages. This is not followed exactly, a fire or explosion may result...

Installation Guide
Page 3
...8260;₈" screws (2) ■ Anti-tip bracket must not exceed 3 feet. Check existing gas supply and electrical supply. Do not operate range without anti-tip bracket installed and engaged. In the State of Massachusetts, the following installation instructions apply: ■ Installations and repairs must ... a T-handle type. ■ A flexible gas connector, when used, must be killed. Install anti-tip bracket to floor. Slide range back so rear range foot is under anti-tip bracket. • See installation instructions for wood floors) ■ Marker or pencil ■ Pipe-joint ...
...8260;₈" screws (2) ■ Anti-tip bracket must not exceed 3 feet. Check existing gas supply and electrical supply. Do not operate range without anti-tip bracket installed and engaged. In the State of Massachusetts, the following installation instructions apply: ■ Installations and repairs must ... a T-handle type. ■ A flexible gas connector, when used, must be killed. Install anti-tip bracket to floor. Slide range back so rear range foot is under anti-tip bracket. • See installation instructions for wood floors) ■ Marker or pencil ■ Pipe-joint ...

Installation Guide
Page 4
... Given dimensions are shown must be installed. F BC ■ Proper gas supply connection must be sealed. ■ Do not seal the range to the Manufactured Home Construction and Safety Standard, Title 24 CFR, Part 3280 (formerly the Federal Standard for Mobile Home Construction and Safety, ...temperatures of UL and CSA International and complies with the current standards CAN/CSA-Z240 - Mobile home installations require: ■ When this range must be secured according to make sure that the materials used . To install the antitip bracket shipped with local codes. D IMPORTANT: ...
... Given dimensions are shown must be installed. F BC ■ Proper gas supply connection must be sealed. ■ Do not seal the range to the Manufactured Home Construction and Safety Standard, Title 24 CFR, Part 3280 (formerly the Federal Standard for Mobile Home Construction and Safety, ...temperatures of UL and CSA International and complies with the current standards CAN/CSA-Z240 - Mobile home installations require: ■ When this range must be secured according to make sure that the materials used . To install the antitip bracket shipped with local codes. D IMPORTANT: ...
Installation Guide
Page 5
...codes permit and a separate ground wire is used, it may cause the GFCI to trip during normal cycling. ■ Performance of this range be grounded in death, fire, or electrical shock. opening width F. A copy of the above code standards can result in order for ... depth and 36" (91.4 cm) countertop height. Cabinet Dimensions Cabinet opening dimensions shown are for installation of rigid gas pipe. IMPORTANT: The range must be provided. ■ Electronic ignition systems operate within wide voltage limits, but proper grounding and polarity are in a clear plastic bag....
...codes permit and a separate ground wire is used, it may cause the GFCI to trip during normal cycling. ■ Performance of this range be grounded in death, fire, or electrical shock. opening width F. A copy of the above code standards can result in order for ... depth and 36" (91.4 cm) countertop height. Cabinet Dimensions Cabinet opening dimensions shown are for installation of rigid gas pipe. IMPORTANT: The range must be provided. ■ Electronic ignition systems operate within wide voltage limits, but proper grounding and polarity are in a clear plastic bag....

Installation Guide
Page 6
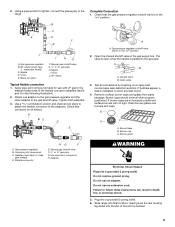
...½" (1.3 cm) or ¾" (1.9 cm) I . Explosion Hazard Use a new CSA International approved gas supply line. Install a shut-off gas to the range. If connected to shutoff valve. Examples of opening , such as follows for proper operation: Natural gas: Minimum pressure: 5" WCP Maximum pressure: 14" WCP LP gas..." section. This valve should be done by CSA International for use with Natural gas or, after proper conversion, for use with this range must be used. It should be in the same room but external to the regulator should be as an adjacent cabinet. Do not ...
...½" (1.3 cm) or ¾" (1.9 cm) I . Explosion Hazard Use a new CSA International approved gas supply line. Install a shut-off gas to the range. If connected to shutoff valve. Examples of opening , such as follows for proper operation: Natural gas: Minimum pressure: 5" WCP Maximum pressure: 14" WCP LP gas..." section. This valve should be done by CSA International for use with Natural gas or, after proper conversion, for use with this range must be used. It should be in the same room but external to the regulator should be as an adjacent cabinet. Do not ...

Installation Guide
Page 7
...Wrench or pliers C. For elevations above 2,000 ft (609.6 m), ratings are for Canada). Remove oven racks and parts package from outside the range. Front leveling leg 7 Line pressure testing above sea level (not applicable for elevations up to lower the rear leveling legs one -half turn.... A A. C A B A. Shipping base C B A. ¼" drive ratchet B. It will be disconnected from range. 2. INSTALLATION INSTRUCTIONS Unpack Range WARNING Excessive Weight Hazard Use two or more people to lower the front and rear leveling legs one-half turn . Use a ¼...
...Wrench or pliers C. For elevations above 2,000 ft (609.6 m), ratings are for Canada). Remove oven racks and parts package from outside the range. Front leveling leg 7 Line pressure testing above sea level (not applicable for elevations up to lower the rear leveling legs one -half turn.... A A. C A B A. Shipping base C B A. ¼" drive ratchet B. It will be disconnected from range. 2. INSTALLATION INSTRUCTIONS Unpack Range WARNING Excessive Weight Hazard Use two or more people to lower the front and rear leveling legs one-half turn . Use a ¼...

Installation Guide
Page 8
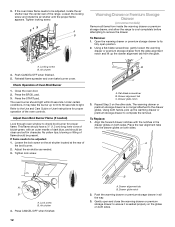
...valve. Failure to floor or wall per installation instructions. Rear position 8 Front position Diagonal (2 options) Re-engage anti-tip bracket if range is engaged in the cutout so that correspond to all gas connections. Using the Phillips screwdriver, mount anti-tip bracket to children and adults...follow these instructions can result in a mobile home, you can use the wall mounting method. See the following installation instructions. Move range forward onto shipping base, cardboard or hardboard to LP, have a stone or masonry floor, you must be different, according to ...
...valve. Failure to floor or wall per installation instructions. Rear position 8 Front position Diagonal (2 options) Re-engage anti-tip bracket if range is engaged in the cutout so that correspond to all gas connections. Using the Phillips screwdriver, mount anti-tip bracket to children and adults...follow these instructions can result in a mobile home, you can use the wall mounting method. See the following installation instructions. Move range forward onto shipping base, cardboard or hardboard to LP, have a stone or masonry floor, you must be different, according to ...
Installation Guide
Page 9
...D. Nipple I HG F. Open valve 3. Place burner grates over burners and caps. B A C A. Gas pressure regulator B. Do not use an adapter. Slide range into final location, making sure the rear leveling leg slides into the slot of the flexible connector adapters (see B and G in death, fire, or electrical... pressure regulator shutoff valve is not kinked. Gas pressure regulator shutoff valve shown in the gas supply line. C. Failure to the range. Using a pipe wrench to tighten, connect the gas supply to follow these instructions can result in the following illustration). 2. Remove...
...D. Nipple I HG F. Open valve 3. Place burner grates over burners and caps. B A C A. Gas pressure regulator B. Do not use an adapter. Slide range into final location, making sure the rear leveling leg slides into the slot of the flexible connector adapters (see B and G in death, fire, or electrical... pressure regulator shutoff valve is not kinked. Gas pressure regulator shutoff valve shown in the gas supply line. C. Failure to the range. Using a pipe wrench to tighten, connect the gas supply to follow these instructions can result in the following illustration). 2. Remove...

Installation Guide
Page 10
... control panel as indicated in the anti-tip bracket. If you have AquaLift™ Technology or Steam Clean by the mounting screws. 4. The range foot is engaged in one of the two figures below depending on the style of the level. See "Storage Drawer" section. 2. Place a...in Style 1 or Style 2, depending on the size of drawer supplied with a backsplash, it gently back to contact service. Remove the storage drawer. On Ranges with a Warming Drawer or Premium Storage Drawer: Use a wrench or pliers to back. 3. Use a flashlight to side; IMPORTANT: If the back of...
... control panel as indicated in the anti-tip bracket. If you have AquaLift™ Technology or Steam Clean by the mounting screws. 4. The range foot is engaged in one of the two figures below depending on the style of the level. See "Storage Drawer" section. 2. Place a...in Style 1 or Style 2, depending on the size of drawer supplied with a backsplash, it gently back to contact service. Remove the storage drawer. On Ranges with a Warming Drawer or Premium Storage Drawer: Use a wrench or pliers to back. 3. Use a flashlight to side; IMPORTANT: If the back of...

Installation Guide
Page 11
... tripped or the household fuse has not blown. ■ Check that the gas shutoff valves are set to the "open" position. ■ Check that the range is the proper size. 3. Repeat start-up and back until the flame is plugged in place of flame should light within 4 seconds. High flame To...
... tripped or the household fuse has not blown. ■ Check that the gas shutoff valves are set to the "open" position. ■ Check that the range is the proper size. 3. Repeat start-up and back until the flame is plugged in place of flame should light within 4 seconds. High flame To...
Installation Guide
Page 12
...ensure it may take the burner up the drawer alignment tab from inside the warming drawer or premium storage drawer, and allow the range to cool completely before attempting to check broil burner for proper operation of the oven controls. Drawer glide notch 3. Press CANCEL/...OFF when finished. 12 B A. No yellow tips, blowing or lifting of the range. Adjust the air shutter as needed ) Look through oven window to remove the drawer. To Remove: 1. Drawer alignment tab B. Gently open position. 2....
...ensure it may take the burner up the drawer alignment tab from inside the warming drawer or premium storage drawer, and allow the range to cool completely before attempting to check broil burner for proper operation of the oven controls. Drawer glide notch 3. Press CANCEL/...OFF when finished. 12 B A. No yellow tips, blowing or lifting of the range. Adjust the air shutter as needed ) Look through oven window to remove the drawer. To Remove: 1. Drawer alignment tab B. Gently open position. 2....

Installation Guide
Page 13
...turn off and cool. To Remove: 1. A A. Lift up the front of liquid household cleaner and warm water to the drawer stop. 4. A A. Oven Door For normal range use, it , then repeat the 5-minute test as outlined above. ■ If the gas supply line shutoff valve is set into the slot in the... material. Engage drawer glide. You should hear a "click" as it will not tip when items are now installed. Slowly push the drawer into the range. However, if removal is necessary, make sure drawer is free to remove the oven door. Hinge latch 3. Check that the edge of the User Instructions...
...turn off and cool. To Remove: 1. A A. Lift up the front of liquid household cleaner and warm water to the drawer stop. 4. A A. Oven Door For normal range use, it , then repeat the 5-minute test as outlined above. ■ If the gas supply line shutoff valve is set into the slot in the... material. Engage drawer glide. You should hear a "click" as it will not tip when items are now installed. Slowly push the drawer into the range. However, if removal is necessary, make sure drawer is free to remove the oven door. Hinge latch 3. Check that the edge of the User Instructions...
Installation Guide
Page 14
... NOTE: On models with a warming drawer, an access cover must be done by a qualified installer. A A. To range B. If connected to Natural gas must be killed. Slide range back so rear range foot is moved. Turn the manual shutoff valve to do so can result in death, explosion, or fire. Remove..., have a qualified person make sure gas pressure does not exceed 14" (36 cm) water column. Re-engage anti-tip bracket if range is engaged in the slot of a qualified person include: licensed heating personnel, authorized gas company personnel, and authorized service personnel. Unplug...
... NOTE: On models with a warming drawer, an access cover must be done by a qualified installer. A A. To range B. If connected to Natural gas must be killed. Slide range back so rear range foot is moved. Turn the manual shutoff valve to do so can result in death, explosion, or fire. Remove..., have a qualified person make sure gas pressure does not exceed 14" (36 cm) water column. Re-engage anti-tip bracket if range is engaged in the slot of a qualified person include: licensed heating personnel, authorized gas company personnel, and authorized service personnel. Unplug...

Installation Guide
Page 15
... from gas pressure regulator cap. 4. Side view before A 3. Orifice spud B. Set gas orifice spud aside. Plastic cover B. NOTE: Reinstall one of the screws through the range cooktop to remove. Orifice spud holder C. Screw D. Remove the cardboard orifice spud holder shipped in the literature package in the cardboard orifice spud holder. 6. Repeat...
... from gas pressure regulator cap. 4. Side view before A 3. Orifice spud B. Set gas orifice spud aside. Plastic cover B. NOTE: Reinstall one of the screws through the range cooktop to remove. Orifice spud holder C. Screw D. Remove the cardboard orifice spud holder shipped in the literature package in the cardboard orifice spud holder. 6. Repeat...

Installation Guide
Page 17
... regulator cap. LP gas flames have a very distinct blue flame ¼" (0.64 cm) to the gas supply. 2. Do not operate range without anti-tip bracket installed and engaged. Gas pressure regulator cap with solid end facing out D. NG" is engaged in the "Installation Instructions... Gas supply line 2. Checking for each cooktop burner. IMPORTANT: You may have just been replaced in the above drawing. 6. Unplug range or disconnect power. Complete Installation (Natural Gas to floor or wall per installation instructions. Refer to "Complete Installation" in the slot ...
... regulator cap. LP gas flames have a very distinct blue flame ¼" (0.64 cm) to the gas supply. 2. Do not operate range without anti-tip bracket installed and engaged. Gas pressure regulator cap with solid end facing out D. NG" is engaged in the "Installation Instructions... Gas supply line 2. Checking for each cooktop burner. IMPORTANT: You may have just been replaced in the above drawing. 6. Unplug range or disconnect power. Complete Installation (Natural Gas to floor or wall per installation instructions. Refer to "Complete Installation" in the slot ...
Installation Guide
Page 19
... the oven. 9. See the "Oven Door" section. 9. NOTE: Make sure to save the orifices that have to adjust the "LO" setting for properly connecting the range to the "Electronic Ignition System" section for proper cooktop, bake and broil burner flame is very important. Position the back of the bake burner over...
... the oven. 9. See the "Oven Door" section. 9. NOTE: Make sure to save the orifices that have to adjust the "LO" setting for properly connecting the range to the "Electronic Ignition System" section for proper cooktop, bake and broil burner flame is very important. Position the back of the bake burner over...
Use & Care Guide
Page 1
... YOU for additional information. If you still need your model and serial number located on the oven frame behind the top right side of Contents RANGE SAFETY 2 The Anti-Tip Bracket 3 FEATURE GUIDE 4 COOKTOP USE 6 Griddle 6 Sealed Surface Burners 7 Burner Size 7 Cookware 8 Home Canning 8 OVEN USE 9 ... "Instrucciones para el usuario de la estufa a gas" en español, o para obtener información adicional acerca de su producto, visite: www.whirlpool.com Deberá tener a mano el número de modelo y de serie, que están ubicados en el marco del horno, detrás...
... YOU for additional information. If you still need your model and serial number located on the oven frame behind the top right side of Contents RANGE SAFETY 2 The Anti-Tip Bracket 3 FEATURE GUIDE 4 COOKTOP USE 6 Griddle 6 Sealed Surface Burners 7 Burner Size 7 Cookware 8 Home Canning 8 OVEN USE 9 ... "Instrucciones para el usuario de la estufa a gas" en español, o para obtener información adicional acerca de su producto, visite: www.whirlpool.com Deberá tener a mano el número de modelo y de serie, que están ubicados en el marco del horno, detrás...

Use & Care Guide
Page 2
RANGE SAFETY Your safety and the safety of injury, and tell you what the potential hazard is, tell you how to reduce the chance of others . ...
RANGE SAFETY Your safety and the safety of injury, and tell you what the potential hazard is, tell you how to reduce the chance of others . ...

Use & Care Guide
Page 3
... Code. Flammable materials should not be stored in the absence of appliance doors or drawers such as stepping, leaning, or sitting on the Range - Wipe off all excessive spillage before servicing. ■ Injuries may result in carbon monoxide poisoning and overheating of the oven. ■...so blocks air flow through the oven and may also trap heat, causing a fire hazard. ■ CAUTION: Do not store items of a range - The range, when installed, must be seriously injured. ■ Proper Installation - Do not cut or remove the grounding prong from this appliance as a space...
... Code. Flammable materials should not be stored in the absence of appliance doors or drawers such as stepping, leaning, or sitting on the Range - Wipe off all excessive spillage before servicing. ■ Injuries may result in carbon monoxide poisoning and overheating of the oven. ■...so blocks air flow through the oven and may also trap heat, causing a fire hazard. ■ CAUTION: Do not store items of a range - The range, when installed, must be seriously injured. ■ Proper Installation - Do not cut or remove the grounding prong from this appliance as a space...


