

Installation Guide
Page 3
... screws (2) ■ Anti-tip bracket must not exceed 3 feet. Failure to follow the instructions provided with any tools listed Check that all parts are included. Thickness of NLW Holdings, Inc. 3 Re-engage anti-tip bracket if range is under anti-tip bracket. • See installation ... floor or wall. • Slide range back so rear range foot is moved. Do not operate range without anti-tip bracket installed and engaged. Parts needed A ■ Tape measure ■ Flat-blade screwdriver ■ Phillips screwdriver ■ Level ■ Hand or electric drill ■ Hammer...
... screws (2) ■ Anti-tip bracket must not exceed 3 feet. Failure to follow the instructions provided with any tools listed Check that all parts are included. Thickness of NLW Holdings, Inc. 3 Re-engage anti-tip bracket if range is under anti-tip bracket. • See installation ... floor or wall. • Slide range back so rear range foot is moved. Do not operate range without anti-tip bracket installed and engaged. Parts needed A ■ Tape measure ■ Flat-blade screwdriver ■ Phillips screwdriver ■ Level ■ Hand or electric drill ■ Hammer...

Installation Guide
Page 4
... ■ Recessed installations must be secured according to the Manufactured Home Construction and Safety Standard, Title 24 CFR, Part 3280 (formerly the Federal Standard for Mobile Home Construction and Safety, Title 24, HUD Part 280). F BC ■ Proper gas supply connection must provide complete enclosure of the sides and rear of the...
... ■ Recessed installations must be secured according to the Manufactured Home Construction and Safety Standard, Title 24 CFR, Part 3280 (formerly the Federal Standard for Mobile Home Construction and Safety, Title 24, HUD Part 280). F BC ■ Proper gas supply connection must provide complete enclosure of the sides and rear of the...

Installation Guide
Page 7
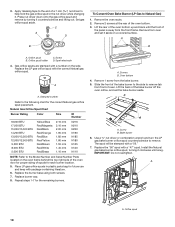
... in back or other injury. Rear leveling leg C. Use a wrench or pliers to adjust the rear legs from outside the range. Remove oven racks and parts package from range. 2. Gas Supply Pressure Testing Gas supply pressure for testing regulator must be isolated from the gas supply piping system during any pressure...
... in back or other injury. Rear leveling leg C. Use a wrench or pliers to adjust the rear legs from outside the range. Remove oven racks and parts package from range. 2. Gas Supply Pressure Testing Gas supply pressure for testing regulator must be isolated from the gas supply piping system during any pressure...
Installation Guide
Page 9
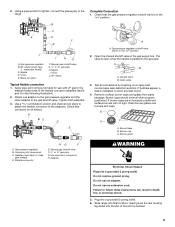
... electrical shock. 5. Use pipe-joint compound. Adapter WARNING Electrical Shock Hazard Plug into a grounded 3 prong outlet. 6. Complete Connection 1. Remove cooktop burner caps and grates from parts package. Burner cap C. B C A D F E J A. If burner caps are not properly positioned, surface burners will not light. Plug into a grounded 3 prong outlet. Union E. Manual gas shutoff valve...
... electrical shock. 5. Use pipe-joint compound. Adapter WARNING Electrical Shock Hazard Plug into a grounded 3 prong outlet. 6. Complete Connection 1. Remove cooktop burner caps and grates from parts package. Burner cap C. B C A D F E J A. If burner caps are not properly positioned, surface burners will not light. Plug into a grounded 3 prong outlet. Union E. Manual gas shutoff valve...

Installation Guide
Page 13
...drawer can be removed. Close the oven door as far as the door is set into a grounded 3 prong outlet. ■ Electrical supply is an extra part, go back through the steps to the drawer stop. 4. If there is connected. ■ See "Troubleshooting" in the Use and Care Guide or User ... drawer out. Insert both sides. Lift up the front of the Use and Care Guide or User Instructions. 6. To Remove: 1. Open oven door all parts are placed in the drawer glide. 3. Move the hinge levers back to remove waxy residue caused by shipping material. Check that the door is cold...
...drawer can be removed. Close the oven door as far as the door is set into a grounded 3 prong outlet. ■ Electrical supply is an extra part, go back through the steps to the drawer stop. 4. If there is connected. ■ See "Troubleshooting" in the Use and Care Guide or User ... drawer out. Insert both sides. Lift up the front of the Use and Care Guide or User Instructions. 6. To Remove: 1. Open oven door all parts are placed in the drawer glide. 3. Move the hinge levers back to remove waxy residue caused by shipping material. Check that the door is cold...
Installation Guide
Page 18
...: Refer to the Model Number and Serial Number Plate located on a covered surface. A A. Apply masking tape to help hold the gas orifice spud in plastic parts bag for the remaining burners. Slide the front of the bake burner to the side to remove. Bake burner 6. Lift the rear of the oven...
...: Refer to the Model Number and Serial Number Plate located on a covered surface. A A. Apply masking tape to help hold the gas orifice spud in plastic parts bag for the remaining burners. Slide the front of the bake burner to the side to remove. Bake burner 6. Lift the rear of the oven...
Use & Care Guide
Page 14
... from the oven in the oven after the Clean cycle is completed. Press CLEAN and then START on the oven bottom is covered by ordering Part Number W10423113RP. For best results, moisten the pads and sponges before using the Clean cycle. Refer to the porcelain surface of the oven cavity is...
... from the oven in the oven after the Clean cycle is completed. Press CLEAN and then START on the oven bottom is covered by ordering Part Number W10423113RP. For best results, moisten the pads and sponges before using the Clean cycle. Refer to the porcelain surface of the oven cavity is...
Use & Care Guide
Page 15
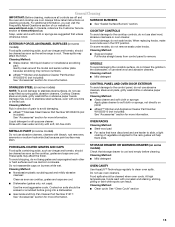
... pad: Gently clean around the model and serial number plate because scrubbing may remove numbers. ■ affresh™ Kitchen and Appliance Cleaner Part Number W10355010 (not included): See "Accessories" section for more information. Cleaning Method: GRIDDLE To avoid damaging the nonstick surface, do not...is cool. OVEN RACKS Cleaning Method: METALLIC PAINT (on some models, do not clean the griddle in direction of our website at www.whirlpool.ca. At high temperatures, foods react with soft, lint-free cloth. Cleaning Method: ■ Glass cleaner and soft cloth or sponge:...
... pad: Gently clean around the model and serial number plate because scrubbing may remove numbers. ■ affresh™ Kitchen and Appliance Cleaner Part Number W10355010 (not included): See "Accessories" section for more information. Cleaning Method: GRIDDLE To avoid damaging the nonstick surface, do not...is cool. OVEN RACKS Cleaning Method: METALLIC PAINT (on some models, do not clean the griddle in direction of our website at www.whirlpool.ca. At high temperatures, foods react with soft, lint-free cloth. Cleaning Method: ■ Glass cleaner and soft cloth or sponge:...
Use & Care Guide
Page 19
... and Drip Pan Cleaner Order Part Number 31617 Standard Flat Oven Rack Order Part Number W10179196 Split Oven Rack Order Part Number W10205524 Max Capacity Rack Oven Rack Order Part Number W10289145 Porcelain Broiler Pan and Grid Order Part Number 4396923 Premium Broiler Pan and Roasting Rack Order Part Number W10123240 www.whirlpool.com/broilerpan 19 ACCESSORIES...
... and Drip Pan Cleaner Order Part Number 31617 Standard Flat Oven Rack Order Part Number W10179196 Split Oven Rack Order Part Number W10205524 Max Capacity Rack Oven Rack Order Part Number W10289145 Porcelain Broiler Pan and Grid Order Part Number 4396923 Premium Broiler Pan and Roasting Rack Order Part Number W10123240 www.whirlpool.com/broilerpan 19 ACCESSORIES...

Use & Care Guide
Page 20
... misuse, abuse, fire, flood, acts of God, improper installation, installation not in accordance with the product, Whirlpool Corporation or Whirlpool Canada LP (hereafter "Whirlpool") will pay for future reference. 20 DISCLAIMER OF IMPLIED WARRANTIES; SOME STATES AND PROVINCES DO NOT ALLOW THE ... United States and Canada, this User Instructions and model number information for Factory Specified Parts and repair labor to correct defects in the U.S.A., call 1-800-807-6777. WHIRLPOOL SHALL NOT BE LIABLE FOR INCIDENTAL OR CONSEQUENTIAL DAMAGES. For assistance or service in materials...
... misuse, abuse, fire, flood, acts of God, improper installation, installation not in accordance with the product, Whirlpool Corporation or Whirlpool Canada LP (hereafter "Whirlpool") will pay for future reference. 20 DISCLAIMER OF IMPLIED WARRANTIES; SOME STATES AND PROVINCES DO NOT ALLOW THE ... United States and Canada, this User Instructions and model number information for Factory Specified Parts and repair labor to correct defects in the U.S.A., call 1-800-807-6777. WHIRLPOOL SHALL NOT BE LIABLE FOR INCIDENTAL OR CONSEQUENTIAL DAMAGES. For assistance or service in materials...

Warranty Information
Page 1
...location or is not installed in materials or workmanship and is reported to the appliance. 9. Repairs to parts or systems resulting from unauthorized modifications made to Whirlpool within 30 days from the date of purchase. 6. This warranty is void if the factory applied ... major appliance is operated and maintained according to instructions attached to or furnished with the product, Whirlpool Corporation or Whirlpool Canada LP (hereafter "Whirlpool") will pay for Factory Specified Parts and repair labor to repair or replace appliance light bulbs, air filters or water filters. Service...
...location or is not installed in materials or workmanship and is reported to the appliance. 9. Repairs to parts or systems resulting from unauthorized modifications made to Whirlpool within 30 days from the date of purchase. 6. This warranty is void if the factory applied ... major appliance is operated and maintained according to instructions attached to or furnished with the product, Whirlpool Corporation or Whirlpool Canada LP (hereafter "Whirlpool") will pay for Factory Specified Parts and repair labor to repair or replace appliance light bulbs, air filters or water filters. Service...


