Whirlpool KDRP407HSS Support and Manuals
Get Help and Manuals for this Whirlpool item
View All Support Options Below
Free Whirlpool KDRP407HSS manuals!
Problems with Whirlpool KDRP407HSS?
Ask a Question
Free Whirlpool KDRP407HSS manuals!
Problems with Whirlpool KDRP407HSS?
Ask a Question
Popular Whirlpool KDRP407HSS Manual Pages
Use and Care Guide - Page 1

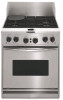
... d'instructions avec l'appareil. PROFESSIONAL COOKING SERIES DUAL FUEL RANGE
Use & Care Guide
For questions about features, operation/performance, parts accessories or service, call: 1-800-422-1230 In Canada, call : 1-800-807-6777 or visit our website at...
www.KitchenAid.ca
Table of Contents/Table des matières 2
To the installer: Please leave this book for installation and service...
Use and Care Guide - Page 5

... (not shown; The range you have purchased may not match those of unit) 6. Grille, Griddle, Center Burners or Filler Grate 12. Oven Rack
5 Surface Burner Grate 3. Electronic Oven Control Display 13. Control Panel 4. Range
9
10
1
11
2 12
3
4
13
5
14
6
15
7 8
1. for consumer use - PARTS AND FEATURES
This manual covers several different models. Oven Vent 5.
Use and Care Guide - Page 7
... chart as a guide when setting heat levels. s...repair specialist. Only the burner with Simmer Plate)
s Keep food warm. HI
s Start food cooking. s Stew or steam foods. If you wish to setting.
7 Check that the burner has lit.
NOTE: Visually check that the control knob is included with Natural Gas. REMEMBER: When range is wired with the L.P. See the instructions...
Use and Care Guide - Page 8

... setting. A clean burner cap will help prevent poor ignition and uneven flames. Do not use oven ...repair specialist.
1
4. See "Assistance or Service" section to the "General Cleaning" section.
Clean the gas tube opening for the burner to enter the gas tube opening. Replace... a wooden toothpick. If the burner needs to low range on the burner. Alignment pins 4.
For best results,...
Use and Care Guide - Page 18

... food sit in oven more smoke.
RANGE CARE
Self-Cleaning Cycle
WARNING
Timed Cooking allows the oven to be used for more information. Delay start should not be set length of heat... instructions can result. To Use the Keep Warm Function: After completing the Cook Time and Browning Function setting steps above , the browning light will glow (if selected).
Keep children away from oven ...
Use and Care Guide - Page 19
...NOTE: When replacing knobs after cleaning either the surface burner controls or the grille module control, make...models, do not bang grates and caps against each other or hard surfaces such as the cooktop, grates and caps are in the OFF position. Wash, rinse and dry with a damp cloth. Turn the SET knob to avoid damaging. The oven light will remain locked.
How the Cycle Works...
Use and Care Guide - Page 21

.... Open the oven door.
Switch cap with caps, are the burner caps positioned properly? To Replace: 1. Insert both sides.
Ensure that the door is not suggested here first in the "Auto" position. TROUBLESHOOTING
Try the solutions suggested to a setting. Replace the fuse or reset the circuit.
Contact a trained repair specialist. To Remove: 1.
On sealed burner models, see...
Use and Care Guide - Page 22

...models, has a delay start been set ?
See "Timed Cooking" section. s Was the oven preheated? s Is there proper air circulation around cookware on the bottom?
Discontinue use to cool the electronic control, and may run for oven to 45 minutes after oven has been turned off. See the Installation Instructions...surface burner and contact a service technician.
Increase or decrease ...
Use and Care Guide - Page 23

... at :
KitchenAid Brand Home Appliances Customer Interaction Center 553 Benson Road Benton Harbor, MI 49022-2692
Please include a daytime phone number in your appliance.
Our consultants provide assistance with : s Features and specifications on our full line of a service call. s Referrals to local dealers, repair parts distributors, and service companies. In the U.S.A. s Installation...
Use and Care Guide - Page 24
... DOOR
On ranges and built-in ovens only, in the sixth through due to determine if another warranty applies. KitchenAid will need service, first see the "Troubleshooting" section of purchase or installation date for the ceramic glass cooktop.
Outside the 50 United States and Canada, this book and your authorized KitchenAid dealer to defects in the "Parts and...
Installation Instructions - Page 5

....
Given dimensions are included. To install the antitip bracket shipped with natural gas. IMPORTANT: Some cabinet and building materials are shown must be made by the oven for use with the range, see the gas conversion instructions provided in the wall or floor where range is located on the model/serial rating plate. Read and follow the...
Installation Instructions - Page 8

... not kink or damage the flexible metal tubing when moving the range. The rigid pipe must conform with a manual shutoff valve. All strains must be removed from the gas specified on the types of local codes, installation must be level and in insufficient gas supply.
LP Gas conversion:
Conversion must be done by the...
Installation Instructions - Page 9
...609.6 m), ratings are reduced at test pressures equal to or less than ½ psi (3.5 kPa). Keep shipping pallet under range. Slide the vent down . A
A
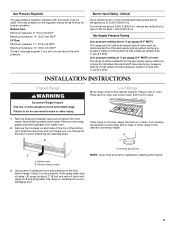
A. For elevations above ½ psi gauge (14" WCP) The range and its individual manual shutoff valve during any pressure testing of cardboard from range. INSTALLATION INSTRUCTIONS
Unpack Range
WARNING
Excessive Weight Hazard Use...
Installation Instructions - Page 13

... Height
Adjust the height of the valve stem. A
A
A.
Turn oven selector to BROIL. Press ENTER. If oven does not operate: s Check that burner caps are set to light the burner.
Electronic Ignition System
Initial lighting and gas flame adjustments
Cooktop and oven burners use .
13 This sparking continues, as long as the control knob is turned...
Installation Instructions - Page 15

... BK
GND GN
N L2 WR
VALVE SWITCHES SPARK MODULE
YEL OR BRN (4) PLCS
IGNITER ELECTRODES
Oven Schematic
*Blower remains off until oven reaches 190°F (88°C) and may continue running up to disconnection when servicing controls. NOTE: Circuit is equipped with a 3 prong grounding plug which mates with oven door closed.
15 WIRING DIAGRAMS
CAUTION: Label...
Whirlpool KDRP407HSS Reviews
We have not received any reviews for Whirlpool yet.