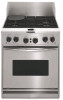

Use and Care Guide
Page 1
...ca CUISINIÈRE À DOUBLE COMBUSTIBLE, SÉRIE PROFESSIONNELLE Guide d'utilisation et d'entretien Au Canada, pour assistance composez le 1-800-461-5681, pour installation ou service composez le 1-800-807-6777 ou visitez notre site web à... Pour l'installateur : laisser ce manuel d'instructions avec l'appareil. Models/Modè..., call : 1-800-807-6777 or visit our website at... www.KitchenAid.ca Table of Contents/Table des matières 2 To the installer: Please leave this book for installation and service, call for assistance 1-800-461-5681, for future reference.
...ca CUISINIÈRE À DOUBLE COMBUSTIBLE, SÉRIE PROFESSIONNELLE Guide d'utilisation et d'entretien Au Canada, pour assistance composez le 1-800-461-5681, pour installation ou service composez le 1-800-807-6777 ou visitez notre site web à... Pour l'installateur : laisser ce manuel d'instructions avec l'appareil. Models/Modè..., call : 1-800-807-6777 or visit our website at... www.KitchenAid.ca Table of Contents/Table des matières 2 To the installer: Please leave this book for installation and service, call for assistance 1-800-461-5681, for future reference.
Use and Care Guide
Page 3
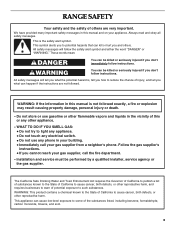
... birth defects, or other reproductive harm, and requires businesses to warn of potential exposure to potential hazards that can be performed by a qualified installer, service agency or the gas supplier. WHAT TO DO IF YOU SMELL GAS: • Do not try to cause cancer, birth defects,... of the substances listed, including benzene, formaldehyde, carbon monoxide, toluene, and soot. 3 Do not store or use any other reproductive harm. Installation and service must be killed or seriously injured if you don't follow the safety alert symbol and either the word "DANGER" or "WARNING." ...
... birth defects, or other reproductive harm, and requires businesses to warn of potential exposure to potential hazards that can be performed by a qualified installer, service agency or the gas supplier. WHAT TO DO IF YOU SMELL GAS: • Do not try to cause cancer, birth defects,... of the substances listed, including benzene, formaldehyde, carbon monoxide, toluene, and soot. 3 Do not store or use any other reproductive harm. Installation and service must be killed or seriously injured if you don't follow the safety alert symbol and either the word "DANGER" or "WARNING." ...
Use and Care Guide
Page 4
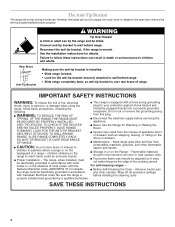
...the anti-tip bracket is moved. Slide range completely back, so anti-tip bracket is before servicing the BE SECURED BY PROPERLY INSTALLED appliance. TIPPING OF THE RANGE,THE RANGE MUST s Disconnect the electrical supply before initiating the cleaning cycle. ANTI-TIP DEVICES. LOOK... RANGE. SLIDE RANGE COMPLETELY BACK, SO ANTI-TIP BRACKET IS OVER REAR BRACE OF RANGE. children climbing on the Range - s Proper Installation - s Maintenance - Keep range area clear and free from this plug. Flammable materials should be electrically grounded in death or serious burns ...
...the anti-tip bracket is moved. Slide range completely back, so anti-tip bracket is before servicing the BE SECURED BY PROPERLY INSTALLED appliance. TIPPING OF THE RANGE,THE RANGE MUST s Disconnect the electrical supply before initiating the cleaning cycle. ANTI-TIP DEVICES. LOOK... RANGE. SLIDE RANGE COMPLETELY BACK, SO ANTI-TIP BRACKET IS OVER REAR BRACE OF RANGE. children climbing on the Range - s Proper Installation - s Maintenance - Keep range area clear and free from this plug. Flammable materials should be electrically grounded in death or serious burns ...
Use and Care Guide
Page 9
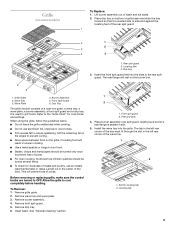
... aside. 2. s Do not leave the grille unattended while cooking. s Allow space between food on some models) To Replace: 1. This will rest on the burner box. 5 6 1. Install the wave tray into the slots in the rear spill guard. The tab in the left rear corner of the rear spill guard. 1 2 1 2 3 4 3 1. Rear spill...
... aside. 2. s Do not leave the grille unattended while cooking. s Allow space between food on some models) To Replace: 1. This will rest on the burner box. 5 6 1. Install the wave tray into the slots in the rear spill guard. The tab in the left rear corner of the rear spill guard. 1 2 1 2 3 4 3 1. Rear spill...

Use and Care Guide
Page 21
... reconnect power. Insert both sides. Flip up the hinge latch on any cook mode while the manual light switch is not, repeat the removal and installation procedures. Oven Lights The oven lights are uneven, yellow and/or noisy s Are the burner ports clogged? They will shut. 4.
... reconnect power. Insert both sides. Flip up the hinge latch on any cook mode while the manual light switch is not, repeat the removal and installation procedures. Oven Lights The oven lights are uneven, yellow and/or noisy s Are the burner ports clogged? They will shut. 4.

Use and Care Guide
Page 22
...not what expected s Is the appliance level? Oven cooking results not what expected s Was the grille or griddle preheated? See the Installation Instructions. s Are the racks positioned properly? s Is the batter evenly distributed in longer cooking times. s Are pie crust edges ...heat level? s Is there proper air circulation between foods? See "Timed Cooking" section. s Is the control knob set ? See the Installation Instructions. Thoroughly defrost foods. See "Electronic Oven Control" section. If it dry. Preheat grille or griddle. s Are foods taking too long...
...not what expected s Is the appliance level? Oven cooking results not what expected s Was the grille or griddle preheated? See the Installation Instructions. s Are the racks positioned properly? s Is the batter evenly distributed in longer cooking times. s Are pie crust edges ...heat level? s Is there proper air circulation between foods? See "Timed Cooking" section. s Is the control knob set ? See the Installation Instructions. Thoroughly defrost foods. See "Electronic Oven Control" section. If it dry. Preheat grille or griddle. s Are foods taking too long...

Use and Care Guide
Page 23
... calling, please know the purchase date and the complete model and serial number of a service call our Customer Interaction Center telephone number or your correspondence. s Installation information. For further assistance If you need further assistance, you can write to fulfill the product warranty and provide after-warranty service, anywhere in your...
... calling, please know the purchase date and the complete model and serial number of a service call our Customer Interaction Center telephone number or your correspondence. s Installation information. For further assistance If you need further assistance, you can write to fulfill the product warranty and provide after-warranty service, anywhere in your...
Use and Care Guide
Page 24
...number Serial number Purchase date 24 Repairs to parts or systems resulting from accident, alteration, misuse, abuse, fire, flood, improper installation, acts of God or use your authorized KitchenAid dealer to correct defects in materials or workmanship. Repairs when your complete model ... ever need to know your appliance is operated and maintained according to instructions attached to province. Service calls to correct the installation of purchase, when this appliance is used in combination ovens to replace owner-accessible light bulbs. 2. KitchenAid warrants that the...
...number Serial number Purchase date 24 Repairs to parts or systems resulting from accident, alteration, misuse, abuse, fire, flood, improper installation, acts of God or use your authorized KitchenAid dealer to correct defects in materials or workmanship. Repairs when your complete model ... ever need to know your appliance is operated and maintained according to instructions attached to province. Service calls to correct the installation of purchase, when this appliance is used in combination ovens to replace owner-accessible light bulbs. 2. KitchenAid warrants that the...
Installation Instructions
Page 3
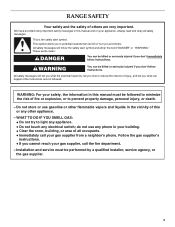
WHAT TO DO IF YOU SMELL GAS: • Do not try to prevent property damage, personal injury, or death. - Installation and service must be killed or seriously injured if you how to reduce the chance of fire or explosion, or to light any appliance. •... not followed. These words mean: DANGER You can be followed to potential hazards that can kill or hurt you what can be performed by a qualified installer, service agency, or the gas supplier. 3 All safety messages will follow instructions. do not use gasoline or other appliance. - WARNING: For your gas supplier, ...
WHAT TO DO IF YOU SMELL GAS: • Do not try to prevent property damage, personal injury, or death. - Installation and service must be killed or seriously injured if you how to reduce the chance of fire or explosion, or to light any appliance. •... not followed. These words mean: DANGER You can be followed to potential hazards that can kill or hurt you what can be performed by a qualified installer, service agency, or the gas supplier. 3 All safety messages will follow instructions. do not use gasoline or other appliance. - WARNING: For your gas supplier, ...
Installation Instructions
Page 4
..., or gasfitter qualified or licensed by the State of Massachusetts. s If using a ball valve, it shall be killed. In the State of Massachusetts, the following installation instructions apply: s Installations and repairs must not exceed 3 feet.
..., or gasfitter qualified or licensed by the State of Massachusetts. s If using a ball valve, it shall be killed. In the State of Massachusetts, the following installation instructions apply: s Installations and repairs must not exceed 3 feet.

Installation Instructions
Page 5
...Noncorrosive leak-detection solution s Stud finder Parts needed s Island trim and attachment screws (3). Given dimensions are shown must be used if installed with 1" (2.5 cm) clearance from a combustible rear wall. To convert to comply with the range, see the gas conversion instructions...drill s Channel lock pliers s Pipe wrench s combination wrench s Marker or pencil s Masking tape s Pipe-joint compound resistant to be installed must be sealed. Thickness of the range. s Proper gas supply connection must provide complete enclosure of the sides and rear of finished ...
...Noncorrosive leak-detection solution s Stud finder Parts needed s Island trim and attachment screws (3). Given dimensions are shown must be used if installed with 1" (2.5 cm) clearance from a combustible rear wall. To convert to comply with the range, see the gas conversion instructions...drill s Channel lock pliers s Pipe wrench s combination wrench s Marker or pencil s Masking tape s Pipe-joint compound resistant to be installed must be sealed. Thickness of the range. s Proper gas supply connection must provide complete enclosure of the sides and rear of finished ...
Installation Instructions
Page 6
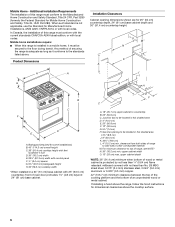
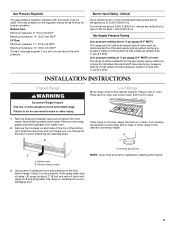
... to top of an unprotected wood or metal cabinet. front of range to the floor during transit. Gas line opening dimensions shown are for some installations) B. 45" (114.3 cm) overall height C. 36" (91.4 cm) cooktop height with feet loosened ¾ turn D. 30" (76.2 cm) width E. 26½" ... wood or metal cabinet is not applicable, use the Standard for Mobile Home Construction and Safety, Title 24, HUD Part 280). Product Dimensions Installation Clearances Cabinet opening to the standards listed above the cooktop surface. 6 Junction box to be located in a mobile home, it conforms to...
... to top of an unprotected wood or metal cabinet. front of range to the floor during transit. Gas line opening dimensions shown are for some installations) B. 45" (114.3 cm) overall height C. 36" (91.4 cm) cooktop height with feet loosened ¾ turn D. 30" (76.2 cm) width E. 26½" ... wood or metal cabinet is not applicable, use the Standard for Mobile Home Construction and Safety, Title 24, HUD Part 280). Product Dimensions Installation Clearances Cabinet opening to the standards listed above the cooktop surface. 6 Junction box to be located in a mobile home, it conforms to...
Installation Instructions
Page 7
... Electrical Requirements - Be sure that the electrical connection and wire size are not sure the range is recommended that a qualified electrical installer determine that the range can result in accordance with local codes. s A time-delay fuse or circuit breaker is recommended. b) Aluminum... , it is adequate. U.S.A. If codes permit and a separate ground wire is used , it is recommended that a qualified electrical installer determine that the ground path is recommended that a qualified electrician determine that the ground path and wire gauge are adequate and in accordance...
... Electrical Requirements - Be sure that the electrical connection and wire size are not sure the range is recommended that a qualified electrical installer determine that the range can result in accordance with local codes. s A time-delay fuse or circuit breaker is recommended. b) Aluminum... , it is adequate. U.S.A. If codes permit and a separate ground wire is used , it is recommended that a qualified electrical installer determine that the ground path is recommended that a qualified electrician determine that the ground path and wire gauge are adequate and in accordance...

Installation Instructions
Page 8
...package supplied with the local gas supplier. Do not block access to LP gas, use with your range. Examples of local codes, installation must be level with a different gas without consulting the serving gas supplier. In the absence of a qualified person include: licensed heating... gas supply line. latest edition or CAN/CGA B149 - Flexible metal appliance connector: s If local codes permit, a new A.G.A./C.S.A. IMPORTANT: This installation must be used for use TEFLON®† tape. s Must include a manual shutoff valve: The supply line must be in the system. ...
...package supplied with the local gas supplier. Do not block access to LP gas, use with your range. Examples of local codes, installation must be level with a different gas without consulting the serving gas supplier. In the absence of a qualified person include: licensed heating... gas supply line. latest edition or CAN/CGA B149 - Flexible metal appliance connector: s If local codes permit, a new A.G.A./C.S.A. IMPORTANT: This installation must be used for use TEFLON®† tape. s Must include a manual shutoff valve: The supply line must be in the system. ...
Installation Instructions
Page 9
... system by closing its individual manual shutoff valve during any pressure testing of that system at a rate of cardboard from inside oven. 2. INSTALLATION INSTRUCTIONS Unpack Range WARNING Excessive Weight Hazard Use two or more people, firmly grasp each side of the top of range. Turn leveling leg...you . Burner Input Rating - Altitude Input ratings shown on the model/serial rating plate are not sure about 3" (8 cm) and move and install range. Failure to do so can result in oven. Place level on each side of the bottom vent. Leveling leg sleeves NOTE: Oven must ...
... system by closing its individual manual shutoff valve during any pressure testing of that system at a rate of cardboard from inside oven. 2. INSTALLATION INSTRUCTIONS Unpack Range WARNING Excessive Weight Hazard Use two or more people, firmly grasp each side of the top of range. Turn leveling leg...you . Burner Input Rating - Altitude Input ratings shown on the model/serial rating plate are not sure about 3" (8 cm) and move and install range. Failure to do so can result in oven. Place level on each side of the bottom vent. Leveling leg sleeves NOTE: Oven must ...
Installation Instructions
Page 10
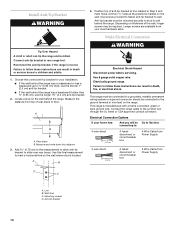
... and mark holes. Reconnect the anti-tip bracket, if the range is located. Locate a stud on the wall where stud is moved. Install Anti-Tip Bracket WARNING 4. Connect anti-tip bracket to wall. This range is manufactured with a frame connected, green or bare ground wire. ...4-Wire Cable from Power Supply 3-wire direct 3¹ ₂" (8.9 cm) A fused disconnect or circuit breaker box 3-Wire Cable from your installation. This range must be mounted securely to the junction box through the UL listed or CSA approved conduit connector. Drill two ¹⁄₈"...
... and mark holes. Reconnect the anti-tip bracket, if the range is located. Locate a stud on the wall where stud is moved. Install Anti-Tip Bracket WARNING 4. Connect anti-tip bracket to wall. This range is manufactured with a frame connected, green or bare ground wire. ...4-Wire Cable from Power Supply 3-wire direct 3¹ ₂" (8.9 cm) A fused disconnect or circuit breaker box 3-Wire Cable from your installation. This range must be mounted securely to the junction box through the UL listed or CSA approved conduit connector. Drill two ¹⁄₈"...

Installation Instructions
Page 11
...the flexible armored cable from under range. Attach Backguard or Island Trim WARNING Excessive Weight Hazard Use two or more people, move and install range. Red wires B. Tighten screws on conduit connector if present. 5. Connect the two black wires together using the UL listed ...two white wires together using UL listed wire nuts. 7. White wire (from the range to the neutral (white) junction box wire (not used for your installation. Connect the flexible armored cable from power supply) D. A D E F B G C H A. UL listed or CSA approved conduit connector 1. Reconnect...
...the flexible armored cable from under range. Attach Backguard or Island Trim WARNING Excessive Weight Hazard Use two or more people, move and install range. Red wires B. Tighten screws on conduit connector if present. 5. Connect the two black wires together using the UL listed ...two white wires together using UL listed wire nuts. 7. White wire (from the range to the neutral (white) junction box wire (not used for your installation. Connect the flexible armored cable from power supply) D. A D E F B G C H A. UL listed or CSA approved conduit connector 1. Reconnect...

Installation Instructions
Page 13
... this point, contact your dealer or authorized service company for heat. The flame can be radiating out of air in place of the valve stem. A A A. Install Burner Grates Place burner grates over burner caps. The valve stem is turned on , open " position. If a burner does not light at this point, contact...
... this point, contact your dealer or authorized service company for heat. The flame can be radiating out of air in place of the valve stem. A A A. Install Burner Grates Place burner grates over burner caps. The valve stem is turned on , open " position. If a burner does not light at this point, contact...
Installation Instructions
Page 14
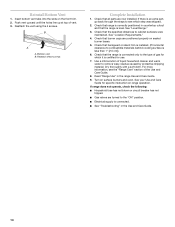
Insert bottom vent tabs into the slots on surface burners and oven. Bottom vent B. Reattach these screws Complete Installation 1. See "Level Range." 3. Check that burner caps are now installed. Dry thoroughly with a soft cloth. See your Use and Care Guide for use. 7. Check that the ...gas for which step was skipped. 2. s Gas valves are turned to remove waxy residue caused by protective shipping material. s Electrical supply is installed. (If horizontal clearance to the type of liquid household cleaner and warm water to the "ON" position. Turn on the front trim. ...
Insert bottom vent tabs into the slots on surface burners and oven. Bottom vent B. Reattach these screws Complete Installation 1. See "Level Range." 3. Check that burner caps are now installed. Dry thoroughly with a soft cloth. See your Use and Care Guide for use. 7. Check that the ...gas for which step was skipped. 2. s Gas valves are turned to remove waxy residue caused by protective shipping material. s Electrical supply is installed. (If horizontal clearance to the type of liquid household cleaner and warm water to the "ON" position. Turn on the front trim. ...


