

Dimension Guide
Page 1
... or microwave hood combination installation instructions for planning purposes only. E. 30¹⁄₈" (76.5 cm) min. Because Whirlpool Corporation policy includes a continuous commitment to convert the appliance from both sides of range to change without notice. The model/serial... long 1.3 cm) or ³⁄₄" (1.9 cm) I J Cabinet opening and closing. q This range is factory set for use with a manual shutoff valve. LP gas conversion: Conversion must be ¹⁄₂" (1.3 cm) minimum. Du Pont De Nemours and Company. clearance from the gas ...
... or microwave hood combination installation instructions for planning purposes only. E. 30¹⁄₈" (76.5 cm) min. Because Whirlpool Corporation policy includes a continuous commitment to convert the appliance from both sides of range to change without notice. The model/serial... long 1.3 cm) or ³⁄₄" (1.9 cm) I J Cabinet opening and closing. q This range is factory set for use with a manual shutoff valve. LP gas conversion: Conversion must be ¹⁄₂" (1.3 cm) minimum. Du Pont De Nemours and Company. clearance from the gas ...
Installation Guide
Page 2
...alerts you to light any appliance. • Do not touch any electrical switch. • Do not use any other flammable vapors and liquids in this manual is , tell you and others are not followed. All safety messages will follow instructions. WHAT TO DO IF YOU SMELL GAS: • Do not ... kill or hurt you how to do if you don't immediately follow the "What to reduce the chance of this or any phone in this manual and on your gas supplier from a neighbor's phone. If a gas leak is the safety alert symbol. This is detected, follow instructions. Installation and service ...
...alerts you to light any appliance. • Do not touch any electrical switch. • Do not use any other flammable vapors and liquids in this manual is , tell you and others are not followed. All safety messages will follow instructions. WHAT TO DO IF YOU SMELL GAS: • Do not ... kill or hurt you how to do if you don't immediately follow the "What to reduce the chance of this or any phone in this manual and on your gas supplier from a neighbor's phone. If a gas leak is the safety alert symbol. This is detected, follow instructions. Installation and service ...

Installation Guide
Page 6
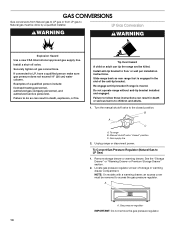
...) water column. All strains must be conducted according to the manufacturer's instructions. Observe all gas connections. If the types of LP gas must conform with a manual shutoff valve. No attempt shall be made to convert the appliance from the supply and fuel lines so range will be used . NOTE: Pipe-joint...
...) water column. All strains must be conducted according to the manufacturer's instructions. Observe all gas connections. If the types of LP gas must conform with a manual shutoff valve. No attempt shall be made to convert the appliance from the supply and fuel lines so range will be used . NOTE: Pipe-joint...

Installation Guide
Page 7
... range. 2. Rear leveling leg B. Use a ¼" drive ratchet to 2,000 ft (609.6 m). For elevations above ½ psi gauge (14" WCP) The range and its individual manual shutoff valve during any pressure testing of 4% for each 1,000 ft (304.8 m) above sea level (not applicable for elevations up to lower the rear leveling...
... range. 2. Rear leveling leg B. Use a ¼" drive ratchet to 2,000 ft (609.6 m). For elevations above ½ psi gauge (14" WCP) The range and its individual manual shutoff valve during any pressure testing of 4% for each 1,000 ft (304.8 m) above sea level (not applicable for elevations up to lower the rear leveling...
Installation Guide
Page 9
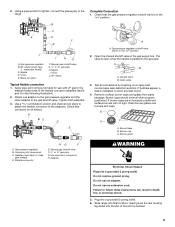
B C A D F E J A. Manual gas shutoff valve G. ½" or ¾" gas pipe H. Union J. 90° elbow Typical flexible connection 1. Attach one adapter to the gas pressure regulator and the ... gas supply to the adapters. Black iron pipe I . Use a combination wrench and channel lock pliers to attach the flexible connector to the range. Open the manual shutoff valve in the "on" position. The valve is open when the handle is indicated. If burner caps are not properly positioned, surface burners will...
B C A D F E J A. Manual gas shutoff valve G. ½" or ¾" gas pipe H. Union J. 90° elbow Typical flexible connection 1. Attach one adapter to the gas pressure regulator and the ... gas supply to the adapters. Black iron pipe I . Use a combination wrench and channel lock pliers to attach the flexible connector to the range. Open the manual shutoff valve in the "on" position. The valve is open when the handle is indicated. If burner caps are not properly positioned, surface burners will...
Installation Guide
Page 14
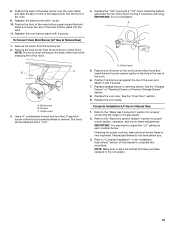
... be killed. Gas supply line 2. Remove storage drawer or warming drawer. Install a shut-off valve. Examples of storage or warming drawer compartment. B A C A. Manual shutoff valve "closed position. A A. Turn the manual shutoff valve to the closed " position C. Unplug range or disconnect power. To Convert Gas Pressure Regulator (Natural Gas to LP, have a qualified...
... be killed. Gas supply line 2. Remove storage drawer or warming drawer. Install a shut-off valve. Examples of storage or warming drawer compartment. B A C A. Manual shutoff valve "closed position. A A. Turn the manual shutoff valve to the closed " position C. Unplug range or disconnect power. To Convert Gas Pressure Regulator (Natural Gas to LP, have a qualified...

Installation Guide
Page 17
...a Phillips or Quadrex® screwdriver, remove the burner base. NOTE: Reinstall one of this procedure. NOTE: Make sure to complete this manual to save the orifices that the solid end faces out and the marking "! Gas pressure regulator IMPORTANT: Do not remove the gas pressure...of the anti-tip bracket. Refer to the gas supply. 2. IMPORTANT: You may have a slightly yellow tip. 3. Failure to LP Gas) 1. Manual shutoff valve "closed position. To Convert Surface Burners (LP Gas to Natural Gas) 1. B A C A. Complete Installation (Natural Gas to follow ...
...a Phillips or Quadrex® screwdriver, remove the burner base. NOTE: Reinstall one of this procedure. NOTE: Make sure to complete this manual to save the orifices that the solid end faces out and the marking "! Gas pressure regulator IMPORTANT: Do not remove the gas pressure...of the anti-tip bracket. Refer to the gas supply. 2. IMPORTANT: You may have a slightly yellow tip. 3. Failure to LP Gas) 1. Manual shutoff valve "closed position. To Convert Surface Burners (LP Gas to Natural Gas) 1. B A C A. Complete Installation (Natural Gas to follow ...
Installation Guide
Page 19
..." section of the bake burner into the oven. 11. Reattach the bake burner with 2 screws. To Convert Oven Broil Burner (LP Gas to complete this manual to Natural Gas) 1. NOTE: Make sure to the "Electronic Ignition System" section for proper burner ignition, operation, and burner flame adjustments. Position the front of...
..." section of the bake burner into the oven. 11. Reattach the bake burner with 2 screws. To Convert Oven Broil Burner (LP Gas to complete this manual to Natural Gas) 1. NOTE: Make sure to the "Electronic Ignition System" section for proper burner ignition, operation, and burner flame adjustments. Position the front of...

Use & Care Guide
Page 2
...department. - Follow the gas supplier's instructions. • If you to cause birth defects or other appliance. - WARNING: If the information in this manual is detected, follow the safety alert symbol and either the word "DANGER" or "WARNING." All safety messages will tell you what can kill or hurt... you smell gas" instructions. RANGE SAFETY Your safety and the safety of others . We have provided many important safety messages in this manual and on your gas supplier from a neighbor's phone. This is , tell you how to do if you and others are not followed. ...
...department. - Follow the gas supplier's instructions. • If you to cause birth defects or other appliance. - WARNING: If the information in this manual is detected, follow the safety alert symbol and either the word "DANGER" or "WARNING." All safety messages will tell you what can kill or hurt... you smell gas" instructions. RANGE SAFETY Your safety and the safety of others . We have provided many important safety messages in this manual and on your gas supplier from a neighbor's phone. This is , tell you how to do if you and others are not followed. ...
Use & Care Guide
Page 4
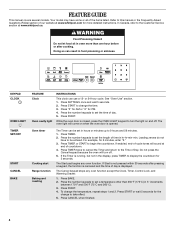
... time of Day. The oven light will come on and off . 5. Do not press the Cancel keypad because the oven will sound at www.whirlpool.ca. The Start pad begins any oven function except the Clock, Timer, Control Lock, and Warming Drawer. 1. Press the number keypads to set...for AM or "6" for 2 minutes, enter "2." 3. Press START. Press TIMER or START to the Time of day. 5. To change the time. 3. FEATURE GUIDE This manual covers several models. or 24-hour cycle. Press the number keypads to set in food poisoning or sickness. The Cancel keypad stops any oven function...
... time of Day. The oven light will come on and off . 5. Do not press the Cancel keypad because the oven will sound at www.whirlpool.ca. The Start pad begins any oven function except the Clock, Timer, Control Lock, and Warming Drawer. 1. Press the number keypads to set...for AM or "6" for 2 minutes, enter "2." 3. Press START. Press TIMER or START to the Time of day. 5. To change the time. 3. FEATURE GUIDE This manual covers several models. or 24-hour cycle. Press the number keypads to set in food poisoning or sickness. The Cancel keypad stops any oven function...
Use & Care Guide
Page 6
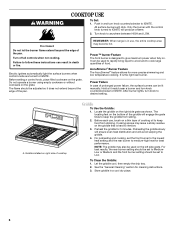
... The AccuSimmer® feature allows for 5 minutes. Preheat the griddle for more precise simmering and low temperature cooking. NOTE: The griddle may also be lit manually. Failure to medium-high heat for cleaning instructions. 3. Before setting a control knob, place filled cookware on the grate. Only the burner with the control knob...
... The AccuSimmer® feature allows for 5 minutes. Preheat the griddle for more precise simmering and low temperature cooking. NOTE: The griddle may also be lit manually. Failure to medium-high heat for cleaning instructions. 3. Before setting a control knob, place filled cookware on the grate. Only the burner with the control knob...


