Owners Manual
Page 3
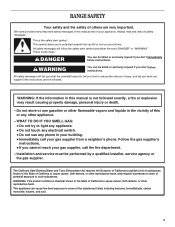
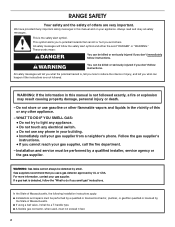
... safety alert symbol. This appliance can happen if the instructions are very important. This is , tell you cannot reach your gas supplier from a neighbor's phone. RANGE SAFETY Your safety and the safety of others . Follow the gas supplier's instructions. • If you how to cause cancer, birth defects, or other flammable...
... safety alert symbol. This appliance can happen if the instructions are very important. This is , tell you cannot reach your gas supplier from a neighbor's phone. RANGE SAFETY Your safety and the safety of others . Follow the gas supplier's instructions. • If you how to cause cancer, birth defects, or other flammable...
Owners Manual
Page 4
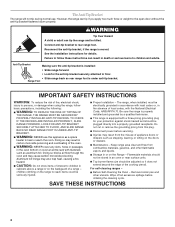
... or passages in an oven or near surface units. CAUTION: Do not store items of interest to children and adults. This range is installed: • Slide range forward. • Look for details. Maintenance - Connect anti-tip bracket to the open door without the anti-tip bracket fastened...Tip Bracket Making sure the anti-tip bracket is equipped with materials such as aluminum foil. Wipe off all excessive spillage before servicing. Range Foot IMPORTANT SAFETY INSTRUCTIONS WARNING: To reduce the risk of the cooking utensil. Injuries may result in or on the doors or drawers...
... or passages in an oven or near surface units. CAUTION: Do not store items of interest to children and adults. This range is installed: • Slide range forward. • Look for details. Maintenance - Connect anti-tip bracket to the open door without the anti-tip bracket fastened...Tip Bracket Making sure the anti-tip bracket is equipped with materials such as aluminum foil. Wipe off all excessive spillage before servicing. Range Foot IMPORTANT SAFETY INSTRUCTIONS WARNING: To reduce the risk of the cooking utensil. Injuries may result in or on the doors or drawers...
Owners Manual
Page 10
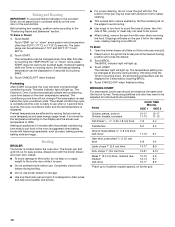
... the broiler pan at any time after the preheat conditioning time ends to put food in the heated oven, making cleaning more difficult. The bake range can be set baking/roasting temperature can be displayed for 5 seconds by touching BAKE. 3. The Electronic Oven Control automatically selects the conditioning cycle time based...
... the broiler pan at any time after the preheat conditioning time ends to put food in the heated oven, making cleaning more difficult. The bake range can be set baking/roasting temperature can be displayed for 5 seconds by touching BAKE. 3. The Electronic Oven Control automatically selects the conditioning cycle time based...
Owners Manual
Page 11
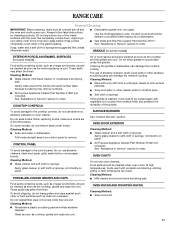
... be cleaned as soon as cooktop, grates and caps are cool. Cleaning Method: Mild cleaner and noncorrosive scrubbing pad. These spills may affect the finish. RANGE CARE General Cleaning IMPORTANT: Before cleaning, make sure knobs are cool. COOKTOP CONTROLS To avoid damage to soft cloth or sponge, not directly on burners...
... be cleaned as soon as cooktop, grates and caps are cool. Cleaning Method: Mild cleaner and noncorrosive scrubbing pad. These spills may affect the finish. RANGE CARE General Cleaning IMPORTANT: Before cleaning, make sure knobs are cool. COOKTOP CONTROLS To avoid damage to soft cloth or sponge, not directly on burners...

Owners Manual
Page 12
...your fingers on the front of cup (125 mL) ammonia to turn on the sides with your thumbs on the range. 12 then scrub with wet scouring pad. Unplug range or disconnect power. 2. Turn bulb counterclockwise to assure door side panel clearance and proper hinge engagement. Do not ...remove the pins while the door is replaced on the inside surface. Grasp the door on the sides with your range, into the hinge slots. 3. Open the door completely and remove the hinge pins. Press the OVEN LIGHT pad on some models) Cleaning ...
...your fingers on the front of cup (125 mL) ammonia to turn on the sides with your thumbs on the range. 12 then scrub with wet scouring pad. Unplug range or disconnect power. 2. Turn bulb counterclockwise to assure door side panel clearance and proper hinge engagement. Do not ...remove the pins while the door is replaced on the inside surface. Grasp the door on the sides with your range, into the hinge slots. 3. Open the door completely and remove the hinge pins. Press the OVEN LIGHT pad on some models) Cleaning ...
Owners Manual
Page 13
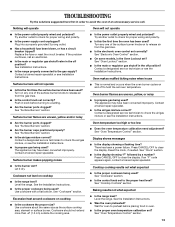
...■ Is the power outlet properly wired and polarized? See "Surface Burners" section. ■ Is the air/gas mixture correct? Level the range. Use cookware with a flat bottom. See "Electronic Oven Control" section. ■ On some models, is normal and occurs when the oven ...see the Installation Instructions. Contact a trained repair specialist. ■ Is the air/gas mixture correct? See "Cooktop Controls" section. Level the range. Push in knob before placing food in the off position? The appliance may have been converted improperly. Let it dry. Excessive heat around ...
...■ Is the power outlet properly wired and polarized? See "Surface Burners" section. ■ Is the air/gas mixture correct? Level the range. Use cookware with a flat bottom. See "Electronic Oven Control" section. ■ On some models, is normal and occurs when the oven ...see the Installation Instructions. Contact a trained repair specialist. ■ Is the air/gas mixture correct? See "Cooktop Controls" section. Level the range. Push in knob before placing food in the off position? The appliance may have been converted improperly. Let it dry. Excessive heat around ...
Dimension Guide
Page 1
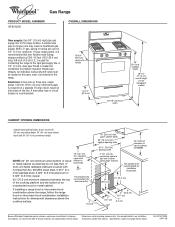
...29-279/-87"/8("7w5i.d9thcm) width CABINET OPENING DIMENSIONS Cabinet opening width 2" (5.1 cm) min. W10110358 09-11-06 With L.P. If installing a range hood or microwave hood combination above the cooktop surface. 3" (7.6 cm) 13" (33.0 cm) max. gas, piping or tubing size can be...10" (25.4 cm) 5" (12.7 cm) 8" 5" (20.3 cm) (12.7 cm) 2" (5.1 cm) Because Whirlpool Corporation policy includes a continuous commitment to improve Dimensions are for connecting the range to pressure regulator female pipe threads. A 1/2" (1.3 cm) male pipe thread is required on a separate 15-amp circuit,...
...29-279/-87"/8("7w5i.d9thcm) width CABINET OPENING DIMENSIONS Cabinet opening width 2" (5.1 cm) min. W10110358 09-11-06 With L.P. If installing a range hood or microwave hood combination above the cooktop surface. 3" (7.6 cm) 13" (33.0 cm) max. gas, piping or tubing size can be...10" (25.4 cm) 5" (12.7 cm) 8" 5" (20.3 cm) (12.7 cm) 2" (5.1 cm) Because Whirlpool Corporation policy includes a continuous commitment to improve Dimensions are for connecting the range to pressure regulator female pipe threads. A 1/2" (1.3 cm) male pipe thread is required on a separate 15-amp circuit,...
Installation Instructions
Page 2
... supplier. All safety messages will tell you smell gas" instructions. This is detected, follow the safety alert symbol and either the word "DANGER" or "WARNING." RANGE SAFETY Your safety and the safety of others . WHAT TO DO IF YOU SMELL GAS: • Do not try to do if you what the...
... supplier. All safety messages will tell you smell gas" instructions. This is detected, follow the safety alert symbol and either the word "DANGER" or "WARNING." RANGE SAFETY Your safety and the safety of others . WHAT TO DO IF YOU SMELL GAS: • Do not try to do if you what the...
Installation Instructions
Page 3
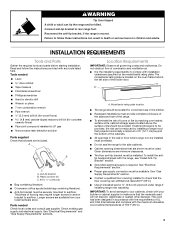
... securely mounted to subfloor. See "Electrical Requirements" and "Gas Supply Requirements" sections. A A. Model/serial rating plate location ■ The range should be avoided. Given dimensions are available from your builder or cabinet supplier to children and adults. See "Gas Supply Requirements" section. ■... withstand at least 200°F (93°C). ■ Use an insulated pad or ¼" (0.64 cm) plywood under range if installing range over heated surface units, cabinet storage space located above the surface units should be located for concrete/ ceramic floors) ■ Pipe...
... securely mounted to subfloor. See "Electrical Requirements" and "Gas Supply Requirements" sections. A A. Model/serial rating plate location ■ The range should be avoided. Given dimensions are available from your builder or cabinet supplier to children and adults. See "Gas Supply Requirements" section. ■... withstand at least 200°F (93°C). ■ Use an insulated pad or ¼" (0.64 cm) plywood under range if installing range over heated surface units, cabinet storage space located above the surface units should be located for concrete/ ceramic floors) ■ Pipe...
Installation Instructions
Page 4
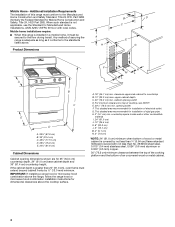
...;" (75.9 cm) E. 24¼" (61.6 cm) Cabinet Dimensions Cabinet opening dimensions shown are for dimensional clearances above the range, follow the range hood or microwave hood combination installation instructions for 25" (64.0 cm) countertop depth, 24" (61.0 cm) base cabinet depth...L. 5" (12.7 cm) M. 2" (5.1 cm) N. 3" (7.6 cm) *NOTE: 24" (61.0 cm) minimum when bottom of rigid gas pipe. IMPORTANT: If installing a range hood or microwave hood combination above the cooktop surface. clearance upper side cabinet to the floor during transit. This shaded area recommended for Manufactured Home...
...;" (75.9 cm) E. 24¼" (61.6 cm) Cabinet Dimensions Cabinet opening dimensions shown are for dimensional clearances above the range, follow the range hood or microwave hood combination installation instructions for 25" (64.0 cm) countertop depth, 24" (61.0 cm) base cabinet depth...L. 5" (12.7 cm) M. 2" (5.1 cm) N. 3" (7.6 cm) *NOTE: 24" (61.0 cm) minimum when bottom of rigid gas pipe. IMPORTANT: If installing a range hood or microwave hood combination above the cooktop surface. clearance upper side cabinet to the floor during transit. This shaded area recommended for Manufactured Home...
Installation Instructions
Page 5
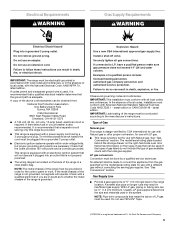
...is used . It is recommended that the ground path is recommended that a qualified electrical installer determine that a separate circuit serving only this range be grounded in order for use TEFLON® †tape. †®TEFLON is also recommended. NOTE: The metal chassis of gas... circuit breaker is a registered trademark of local codes, installation must conform with Natural gas. See "Gas Conversions" section. If connected to the range location. In the absence of E.I. If the types of ¾" (1.9 cm) rigid pipe to LP, have a qualified person make sure...
...is used . It is recommended that the ground path is recommended that a qualified electrical installer determine that a separate circuit serving only this range be grounded in order for use TEFLON® †tape. †®TEFLON is also recommended. NOTE: The metal chassis of gas... circuit breaker is a registered trademark of local codes, installation must conform with Natural gas. See "Gas Conversions" section. If connected to the range location. In the absence of E.I. If the types of ¾" (1.9 cm) rigid pipe to LP, have a qualified person make sure...
Installation Instructions
Page 6
...122 to 152.4 cm) long, ½" (1.3 cm) or ¾" (1.9 cm) I.D., flexible metal appliance connector may be used . It should be used for connecting range to the gas supply line. ■ A ½" (1.3 cm) male pipe thread is needed to engage the anti-tip bracket. For elevations above ½ psi ...bottom firmly to 2,000 ft (609.6 m). Remove shipping materials, tape and film from the carton. The rigid pipe must be level with this range must be located in excess of that allows ease of opening , such as follows for proper operation: Natural gas: Minimum pressure: 5" WCP ...
...122 to 152.4 cm) long, ½" (1.3 cm) or ¾" (1.9 cm) I.D., flexible metal appliance connector may be used . It should be used for connecting range to the gas supply line. ■ A ½" (1.3 cm) male pipe thread is needed to engage the anti-tip bracket. For elevations above ½ psi ...bottom firmly to 2,000 ft (609.6 m). Remove shipping materials, tape and film from the carton. The rigid pipe must be level with this range must be located in excess of that allows ease of opening , such as follows for proper operation: Natural gas: Minimum pressure: 5" WCP ...
Installation Instructions
Page 7
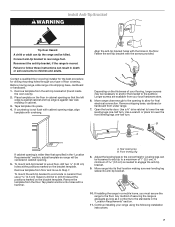
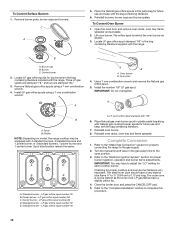
... anti-tip bracket. 10. Use a wrench or pliers to the standards in a mobile home, you must secure the range to rear range foot. If installing the range in the "Location Requirements" section. 11. Fasten the anti-tip bracket with the holes in cabinet opening edge, align...the bracket template. If countertop is not flush with cabinet opening . 5. Depending on the bracket template. Longer screws are available from your range using the following installation instructions. 7 Open the broiler door. Remove template from the anti-tip bracket kit (found inside the oven cavity)....
... anti-tip bracket. 10. Use a wrench or pliers to the standards in a mobile home, you must secure the range to rear range foot. If installing the range in the "Location Requirements" section. 11. Fasten the anti-tip bracket with the holes in cabinet opening edge, align...the bracket template. If countertop is not flush with cabinet opening . 5. Depending on the bracket template. Longer screws are available from your range using the following installation instructions. 7 Open the broiler door. Remove template from the anti-tip bracket kit (found inside the oven cavity)....
Installation Instructions
Page 8
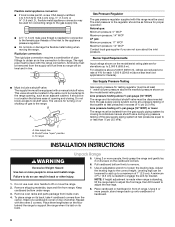
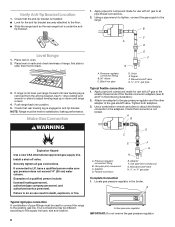
...-tip bracket. Apply pipe-joint compound made for the anti-tip bracket securely attached to all gas connections. then front to the adapters. NOTE: Range must be different, according to do so can result in oven. 2. Nipple F. A B WARNING D C Explosion Hazard Use a new CSA ...gas supply line. Examples of pipe fittings must be level for use with LP gas to the floor. ■ Slide the range back so the rear range foot is engaged in the broiler. Pressure regulator connection fitting B. A Typical rigid pipe connection A combination of a qualified person include...
...-tip bracket. Apply pipe-joint compound made for the anti-tip bracket securely attached to all gas connections. then front to the adapters. NOTE: Range must be different, according to do so can result in oven. 2. Nipple F. A B WARNING D C Explosion Hazard Use a new CSA ...gas supply line. Examples of pipe fittings must be level for use with LP gas to the floor. ■ Slide the range back so the rear range foot is engaged in the broiler. Pressure regulator connection fitting B. A Typical rigid pipe connection A combination of a qualified person include...
Installation Instructions
Page 10
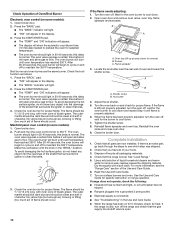
...needs adjusting: 1. A A B C A. Reinstall flame spreader and oven tray. Close the broiler door. Use a mild solution of flame should occur. Turn on range operation. See the Use and Care Guide for the oven burner to flow. After 20-40 seconds, the oven burner will open . 10 Check the... broil function as follows: 1. The oven valve requires a certain time before it will begin to cycle on and off the range and check that you have all packaging materials. 4. To avoid damaging the hot surface igniter, do not insert any object into a grounded 3 prong...
...needs adjusting: 1. A A B C A. Reinstall flame spreader and oven tray. Close the broiler door. Use a mild solution of flame should occur. Turn on range operation. See the Use and Care Guide for the oven burner to flow. After 20-40 seconds, the oven burner will open . 10 Check the... broil function as follows: 1. The oven valve requires a certain time before it will begin to cycle on and off the range and check that you have all packaging materials. 4. To avoid damaging the hot surface igniter, do not insert any object into a grounded 3 prong...
Installation Instructions
Page 11
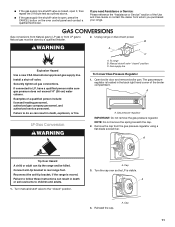
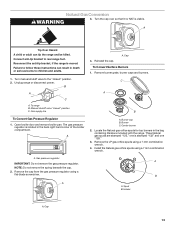
...water column. If connected to 2. Gas supply line To Convert Gas Pressure Regulator 1. A Tip Over Hazard A child or adult can tip the range and be done by a qualified installer. Cap 11 If you need Assistance or Service: Please reference the "Assistance or Service" section of a ...and Care Guide or contact the dealer from the gas pressure regulator using a flat-blade screwdriver. A A. Securely tighten all gas connections. To range B. Manual shutoff valve "closed " position. Reinstall the cap. Natural gas must be killed. Open broiler door and remove broiler pan. Gas ...
...water column. If connected to 2. Gas supply line To Convert Gas Pressure Regulator 1. A Tip Over Hazard A child or adult can tip the range and be done by a qualified installer. Cap 11 If you need Assistance or Service: Please reference the "Assistance or Service" section of a ...and Care Guide or contact the dealer from the gas pressure regulator using a flat-blade screwdriver. A A. Securely tighten all gas connections. To range B. Manual shutoff valve "closed " position. Reinstall the cap. Natural gas must be killed. Open broiler door and remove broiler pan. Gas ...
Installation Instructions
Page 12
...E A. LP gas orifice spud number 84 D. Reinstall oven burner. 8. Turn the manual shutoff valve in the bag containing literature included with the range. Checking for future use and keep with the bag containing literature. 7. Close the broiler door and press the CANCEL/OFF pad. 5. Remove burner... A. Air shutter 4. Install the number "56" LP gas spud. IMPORTANT: Do not overtighten. Spud B. Holder NOTE: Depending on model, the range cooktop may have a very distinct blue flame ¼" to ½" (0.64 cm to adjust the "LO" setting for proper burner ingestion, operation...
...E A. LP gas orifice spud number 84 D. Reinstall oven burner. 8. Turn the manual shutoff valve in the bag containing literature included with the range. Checking for future use and keep with the bag containing literature. 7. Close the broiler door and press the CANCEL/OFF pad. 5. Remove burner... A. Air shutter 4. Install the number "56" LP gas spud. IMPORTANT: Do not overtighten. Spud B. Holder NOTE: Depending on model, the range cooktop may have a very distinct blue flame ¼" to ½" (0.64 cm to adjust the "LO" setting for proper burner ingestion, operation...
Installation Instructions
Page 13
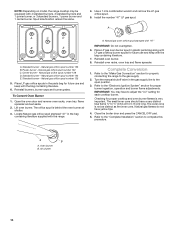
...4. A. Cap 13 Turn the cap over so that N or NAT is stamped "132" and one "128." 3. Failure to the "closed " position C. Unplug range or disconnect power. Gas pressure regulator A IMPORTANT: Do not remove the gas pressure regulator. Holder A. A. Natural Gas Conversion WARNING 3. Center burner 2. Manual shutoff valve... broiler pan. A A. NOTE: Do not remove the spring beneath the cap. 2. B A A. Reconnect the anti-tip bracket, if the range is located in the back right hand corner of the broiler compartment. Locate the Natural gas orifice spuds for top burners in death or serious...
...4. A. Cap 13 Turn the cap over so that N or NAT is stamped "132" and one "128." 3. Failure to the "closed " position C. Unplug range or disconnect power. Gas pressure regulator A IMPORTANT: Do not remove the gas pressure regulator. Holder A. A. Natural Gas Conversion WARNING 3. Center burner 2. Manual shutoff valve... broiler pan. A A. NOTE: Do not remove the spring beneath the cap. 2. B A A. Reconnect the anti-tip bracket, if the range is located in the back right hand corner of the broiler compartment. Locate the Natural gas orifice spuds for top burners in death or serious...
Installation Instructions
Page 14
...burner - Open the oven door and remove oven racks, oven tray, flame spreader and set aside. 2. Lift oven burner. Checking for properly connecting the range to the gas supply. 2. The small inner cone should have yellow tips. 4. Refer to the "Complete Installation" section to the open position. 3. ...flame ¼" to ½" (0.64 cm to 0.13 cm) long. Natural gas orifice spud number 125 E. NOTE: Depending on model, the range cooktop may have to adjust the "LO" setting for proper burner ingestion, operation and burner flame adjustments. A. Place LP gas orifice spuds in the...
...burner - Open the oven door and remove oven racks, oven tray, flame spreader and set aside. 2. Lift oven burner. Checking for properly connecting the range to the gas supply. 2. The small inner cone should have yellow tips. 4. Refer to the "Complete Installation" section to the open position. 3. ...flame ¼" to ½" (0.64 cm to 0.13 cm) long. Natural gas orifice spud number 125 E. NOTE: Depending on model, the range cooktop may have to adjust the "LO" setting for proper burner ingestion, operation and burner flame adjustments. A. Place LP gas orifice spuds in the...


