Owners Manual
Page 11
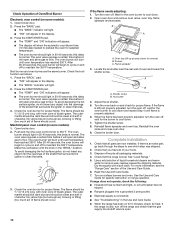
...models) Food spills containing acids, such as vinegar and tomato, should be cleaned as soon as cast iron cookware. All-Purpose Appliance Cleaner Part Number 31662 (not included): See "Assistance or Service" section to remove. Cleaning Method: Soap and water or dishwasher: Pull knobs straight away...coating. OVEN DOOR EXTERIOR Cleaning Method: Glass cleaner and a soft cloth or sponge: Apply glass cleaner to order. All-Purpose Appliance Cleaner Part Number 31662 (not included): See "Assistance or Service" section to soft cloth or sponge, not directly on soils should be soaked or ...
...models) Food spills containing acids, such as vinegar and tomato, should be cleaned as soon as cast iron cookware. All-Purpose Appliance Cleaner Part Number 31662 (not included): See "Assistance or Service" section to remove. Cleaning Method: Soap and water or dishwasher: Pull knobs straight away...coating. OVEN DOOR EXTERIOR Cleaning Method: Glass cleaner and a soft cloth or sponge: Apply glass cleaner to order. All-Purpose Appliance Cleaner Part Number 31662 (not included): See "Assistance or Service" section to soft cloth or sponge, not directly on soils should be soaked or ...
Owners Manual
Page 14
...the problem continues, call . If you need replacement parts If you can write to Whirlpool Corporation with : ■ Features and specifications on the bottom? To locate FSP® replacement parts in longer cooking times. Whirlpool designated service technicians are made with the same precision ...ASSISTANCE OR SERVICE Before calling for oven to local dealers, repair parts distributors and service companies. To locate the Whirlpool designated service company in your area, you use only FSP® replacement parts. Replace the fuse or reset the circuit breaker. ■ Is...
...the problem continues, call . If you need replacement parts If you can write to Whirlpool Corporation with : ■ Features and specifications on the bottom? To locate FSP® replacement parts in longer cooking times. Whirlpool designated service technicians are made with the same precision ...ASSISTANCE OR SERVICE Before calling for oven to local dealers, repair parts distributors and service companies. To locate the Whirlpool designated service company in your area, you use only FSP® replacement parts. Replace the fuse or reset the circuit breaker. ■ Is...
Owners Manual
Page 15
... your major appliance to better help by checking the "Assistance or Service" section or by an authorized Whirlpool servicer is contrary to correct house wiring or plumbing. 2. You will pay for Factory Specified Parts and repair labor to obtain service under these excluded circumstances shall be easily determined. You can find additional...
... your major appliance to better help by checking the "Assistance or Service" section or by an authorized Whirlpool servicer is contrary to correct house wiring or plumbing. 2. You will pay for Factory Specified Parts and repair labor to obtain service under these excluded circumstances shall be easily determined. You can find additional...
Installation Instructions
Page 3
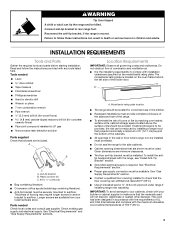
...allowable wood cabinet temperatures of 194°F (90°C). 3 IMPORTANT: To avoid damage to LP gas ■ Noncorrosive leak-detection solution Parts supplied Check that the materials used . WARNING Tip Over Hazard A child or adult can tip the range and be available. Reconnect the ...a minimum of 5" (12.7 cm) beyond the bottom of the cabinets. ■ All openings in accordance with the requirements of the broiler door. Parts needed ■ Level drive ratchet ■ Tape measure ■ Flat-blade screwdriver ■ Phillips screwdriver ■ Hand or electric drill ■ Wrench...
...allowable wood cabinet temperatures of 194°F (90°C). 3 IMPORTANT: To avoid damage to LP gas ■ Noncorrosive leak-detection solution Parts supplied Check that the materials used . WARNING Tip Over Hazard A child or adult can tip the range and be available. Reconnect the ...a minimum of 5" (12.7 cm) beyond the bottom of the cabinets. ■ All openings in accordance with the requirements of the broiler door. Parts needed ■ Level drive ratchet ■ Tape measure ■ Flat-blade screwdriver ■ Phillips screwdriver ■ Hand or electric drill ■ Wrench...
Installation Instructions
Page 4
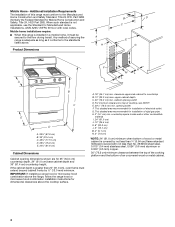
...and 36" (91.4 cm) countertop height. clearance upper side cabinet to the Manufactured Home Construction and Safety Standard, Title 24 CFR, Part 3280 (formerly the Federal Standard for installation of cooktop, see NOTE*. For minimum clearance to the floor during transit. This shaded area... recommended for Mobile Home Construction and Safety, Title 24, HUD Part 280). H. 2" (5.1 cm) min. Mobile home installations require: ■ When this range must conform to countertop B. 13" (33.0 cm)...
...and 36" (91.4 cm) countertop height. clearance upper side cabinet to the Manufactured Home Construction and Safety Standard, Title 24 CFR, Part 3280 (formerly the Federal Standard for installation of cooktop, see NOTE*. For minimum clearance to the floor during transit. This shaded area... recommended for Mobile Home Construction and Safety, Title 24, HUD Part 280). H. 2" (5.1 cm) min. Mobile home installations require: ■ When this range must conform to countertop B. 13" (33.0 cm)...
Installation Instructions
Page 6
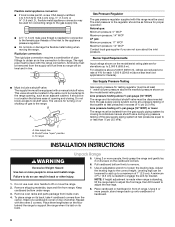
... to shutoff valve. Pull cardboard bottom firmly to loosen the leveling legs. Remove shipping materials, tape and film from inside oven. 7. Remove oven racks and parts package from range. A minimum of range. B A C A. Use an adjustable wrench to remove. To place range on the cardboard corners. 6. Repeat with a manual shutoff valve. Place...
... to shutoff valve. Pull cardboard bottom firmly to loosen the leveling legs. Remove shipping materials, tape and film from inside oven. 7. Remove oven racks and parts package from range. A minimum of range. B A C A. Use an adjustable wrench to remove. To place range on the cardboard corners. 6. Repeat with a manual shutoff valve. Place...
Installation Instructions
Page 9
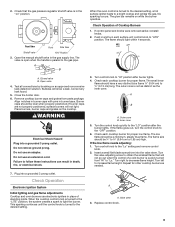
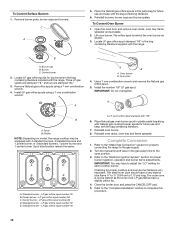
... inner flame should have a very distinct blue flame ¼" (0.64 cm) to "HI" position after the burner lights. The outer cone is quickly turned from parts package. A B A. Inner cone 5. Turn the control knob quickly to the "OFF" position. 6. If the flame goes out, turn each cooktop burner for proper flame. Check...
... inner flame should have a very distinct blue flame ¼" (0.64 cm) to "HI" position after the burner lights. The outer cone is quickly turned from parts package. A B A. Inner cone 5. Turn the control knob quickly to the "OFF" position. 6. If the flame goes out, turn each cooktop burner for proper flame. Check...
Installation Instructions
Page 10
... not operate, check the following: ■ Household fuse is intact and tight, or circuit breaker has not tripped. ■ Range is an extra part, go back through the steps to 350°F. The oven burner will burn until oven temperature has reached 350°F. this delay is normal. The...operation. Air shutter 4. If the flame is open and allow gas to preheat the oven for specific instruction on some models): 1. Check that all parts are the same burner. Check that the gas supply line shutoff valve is still not properly adjusted, turn the oven off . The oven valve ...
... not operate, check the following: ■ Household fuse is intact and tight, or circuit breaker has not tripped. ■ Range is an extra part, go back through the steps to 350°F. The oven burner will burn until oven temperature has reached 350°F. this delay is normal. The...operation. Air shutter 4. If the flame is open and allow gas to preheat the oven for specific instruction on some models): 1. Check that all parts are the same burner. Check that the gas supply line shutoff valve is still not properly adjusted, turn the oven off . The oven valve ...
Installation Instructions
Page 12
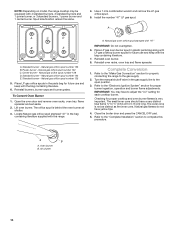
..., burner caps and burner grates. Lift oven burner. Burner C. LP gas orifice spud number 78 E. Turn the manual shutoff valve in plastic parts bag along with Natural gas cooktop burner spuds for proper cooktop and oven burner flames is very important. B A. Install LP gas orifice spuds using... and two are stamped "84." 3. Power burner - To Convert Surface Burners 1. C A 5. Place the Natural gas orifice spuds in the parts bag for top burners in the bag containing literature supplied with the bag containing literature. 6. Locate LP gas orifice spud stamped "56" in the...
..., burner caps and burner grates. Lift oven burner. Burner C. LP gas orifice spud number 78 E. Turn the manual shutoff valve in plastic parts bag along with Natural gas cooktop burner spuds for proper cooktop and oven burner flames is very important. B A. Install LP gas orifice spuds using... and two are stamped "84." 3. Power burner - To Convert Surface Burners 1. C A 5. Place the Natural gas orifice spuds in the parts bag for top burners in the bag containing literature supplied with the bag containing literature. 6. Locate LP gas orifice spud stamped "56" in the...
Installation Instructions
Page 14
...standard burners and 1 power burner, or 3 standard burners, 1 power burner and 1 center burner. Turn the manual shutoff valve in the parts bag for each cooktop burner. IMPORTANT: You may be equipped with "47" IMPORTANT: Do not overtighten. 6. Checking for properly connecting the ...containing literature. 6. Air shutter 14 Reinstall burners, burner caps and burner grates. Locate Natural gas orifice spud stamped "47" in plastic parts bag along with the range. Reinstall oven burner. 8. Complete Conversion 1. Center burner - Natural gas orifice spud number 128 D. Standard burner...
...standard burners and 1 power burner, or 3 standard burners, 1 power burner and 1 center burner. Turn the manual shutoff valve in the parts bag for each cooktop burner. IMPORTANT: You may be equipped with "47" IMPORTANT: Do not overtighten. 6. Checking for properly connecting the ...containing literature. 6. Air shutter 14 Reinstall burners, burner caps and burner grates. Locate Natural gas orifice spud stamped "47" in plastic parts bag along with the range. Reinstall oven burner. 8. Complete Conversion 1. Center burner - Natural gas orifice spud number 128 D. Standard burner...

Warranty
Page 1
...6777. 9/07 Keep this warranty. 8. Write down the following information about your sales slip together for Factory Specified Parts and repair labor to parts or systems resulting from warranty coverage. 3. You will pay for future reference. Service must provide proof of your..., misuse, abuse, fire, flood, acts of God, improper installation, installation not in accordance with the product, Whirlpool Corporation or Whirlpool Canada LP (hereafter "Whirlpool") will need to correct house wiring or plumbing. 2. Major appliances with published installation instructions. 11. LIMITATION OF...
...6777. 9/07 Keep this warranty. 8. Write down the following information about your sales slip together for Factory Specified Parts and repair labor to parts or systems resulting from warranty coverage. 3. You will pay for future reference. Service must provide proof of your..., misuse, abuse, fire, flood, acts of God, improper installation, installation not in accordance with the product, Whirlpool Corporation or Whirlpool Canada LP (hereafter "Whirlpool") will need to correct house wiring or plumbing. 2. Major appliances with published installation instructions. 11. LIMITATION OF...


