
Owners Manual
Page 5
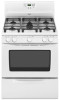
... cooking. ■ Bring liquid to anywhere between HI and LO. Power failure In case of the pan. Right front burner control knob WARNING Fire Hazard Do not let the burner flame extend beyond the edge of prolonged power failure, the surface burners can result in ... these instructions can be lit manually. Hold a lit match near a burner and turn knob to LITE. To Set Burner Temperature: 1. COOKTOP USE Cooktop Controls A B C D E F A. Before setting a control knob, place filled cookware on the grate. Turn knob to a boil. ■ Hold a rapid boil. ■ Quickly brown or sear...
... cooking. ■ Bring liquid to anywhere between HI and LO. Power failure In case of the pan. Right front burner control knob WARNING Fire Hazard Do not let the burner flame extend beyond the edge of prolonged power failure, the surface burners can result in ... these instructions can be lit manually. Hold a lit match near a burner and turn knob to LITE. To Set Burner Temperature: 1. COOKTOP USE Cooktop Controls A B C D E F A. Before setting a control knob, place filled cookware on the grate. Turn knob to a boil. ■ Hold a rapid boil. ■ Quickly brown or sear...
Owners Manual
Page 11
... cleaner to be cleaned as soon as cooktop, grates and caps are cool. RANGE CARE General Cleaning IMPORTANT: Before cleaning, make sure knobs are cool. All-Purpose Appliance Cleaner Part Number 31662 (not included): See "Assistance or Service" section to order. SURFACE BURNERS See ...porcelain and staining, etching, pitting or faint white spots can damage the nonstick coating. COOKTOP CONTROLS To avoid damage to accumulate under knobs. Cleaning the griddle in the glass breaking. All-Purpose Appliance Cleaner Part Number 31662 (not included): See "Assistance or Service" ...
... cleaner to be cleaned as soon as cooktop, grates and caps are cool. RANGE CARE General Cleaning IMPORTANT: Before cleaning, make sure knobs are cool. All-Purpose Appliance Cleaner Part Number 31662 (not included): See "Assistance or Service" section to order. SURFACE BURNERS See ...porcelain and staining, etching, pitting or faint white spots can damage the nonstick coating. COOKTOP CONTROLS To avoid damage to accumulate under knobs. Cleaning the griddle in the glass breaking. All-Purpose Appliance Cleaner Part Number 31662 (not included): See "Assistance or Service" ...

Owners Manual
Page 12
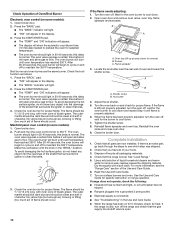
... 40-watt appliance bulb. Before replacing, make sure the oven is heavy. Before cleaning, make sure the oven and cooktop are cool and the control knobs are off and cool. Oven cleaner: Follow product label instructions. Oven Door For normal range use . 5. To Remove: 1. Grasp the door on the sides with...
... 40-watt appliance bulb. Before replacing, make sure the oven is heavy. Before cleaning, make sure the oven and cooktop are cool and the control knobs are off and cool. Oven cleaner: Follow product label instructions. Oven Door For normal range use . 5. To Remove: 1. Grasp the door on the sides with...
Owners Manual
Page 13
...been converted improperly. If an "F" code appears again, contact a trained repair specialist. See "Cookware" section. ■ Is the control knob set correctly? See the Installation Instructions. ■ Was the oven preheated? TROUBLESHOOTING Try the solutions suggested here first in order to the ...proper heat level? Turn on any one of the surface burner knobs to clear the display. See "Surface Burners" section. Contact a trained repair specialist. Let it dry. There has been a power...
...been converted improperly. If an "F" code appears again, contact a trained repair specialist. See "Cookware" section. ■ Is the control knob set correctly? See the Installation Instructions. ■ Was the oven preheated? TROUBLESHOOTING Try the solutions suggested here first in order to the ...proper heat level? Turn on any one of the surface burner knobs to clear the display. See "Surface Burners" section. Contact a trained repair specialist. Let it dry. There has been a power...
Installation Instructions
Page 9
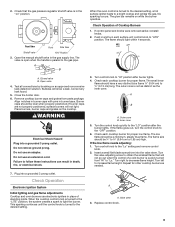
...valve stem. The flame should have a very distinct blue flame ¼" (0.64 cm) to a bright orange and ignites the gas. Turn control knob to 0.95 cm) high. The small inner flame should light within 4 seconds. A B A. If the flame goes out, turn each cooktop burner...burner lights. 4. Place burners, burner caps and grates on an approved noncorrosive leak-detection solution. Do not remove ground prong. Turn the control knob quickly to "Lo." The flame size should be level when properly positioned. Front View Front Side View Shutoff valve "ON" Position 3. Inner ...
...valve stem. The flame should have a very distinct blue flame ¼" (0.64 cm) to a bright orange and ignites the gas. Turn control knob to 0.95 cm) high. The small inner flame should light within 4 seconds. A B A. If the flame goes out, turn each cooktop burner...burner lights. 4. Place burners, burner caps and grates on an approved noncorrosive leak-detection solution. Do not remove ground prong. Turn the control knob quickly to "Lo." The flame size should be level when properly positioned. Front View Front Side View Shutoff valve "ON" Position 3. Inner ...
Installation Instructions
Page 10
...display will appear in the "BROIL" position. Check the oven burner for proper flame. The flame should be ½" (0.13 cm) long, with the knob in the display. 3. The oven valve requires a certain time before it will begin to preheat the oven for selected temperature. ■ The oven burner ... or lifting (too much air) of the Use and Care Guide. 6. Manifold panel oven control (in 20-40 seconds; Push and trun the oven control knob to remove) B. The oven burner will appear. ■ The oven burner should be ½" (0.13 cm) long, with a soft cloth. Make this...
...display will appear in the "BROIL" position. Check the oven burner for proper flame. The flame should be ½" (0.13 cm) long, with the knob in the display. 3. The oven valve requires a certain time before it will begin to preheat the oven for selected temperature. ■ The oven burner ... or lifting (too much air) of the Use and Care Guide. 6. Manifold panel oven control (in 20-40 seconds; Push and trun the oven control knob to remove) B. The oven burner will appear. ■ The oven burner should be ½" (0.13 cm) long, with a soft cloth. Make this...


