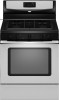
Whirlpool WFG374LVS Support Question
Whirlpool WFG374LVS Support Question
Find answers below for this question about Whirlpool WFG374LVS.Need a Whirlpool WFG374LVS manual? We have 4 online manuals for this item!
Question posted by svdpstoreaustin on January 8th, 2012
The Power Burner Knob Will Not Turn. The Stem Is Stuck And Will Not Move.
The power burner knob just stopped working. Turned it off and a few minutes later tried to re-ignite and it is stuck. Removed the knob to check and the shaft will not turn. I even tried to gently turn it with a pliers but it will not move. It will still push in slightly like normal, but will not turn to the ignite or "on" position.
Current Answers
Related Whirlpool WFG374LVS Manual Pages
Owners Manual - Page 1

...
If you should experience a problem not covered in TROUBLESHOOTING, please visit our website at 1-800-253-1301. Table of Contents
RANGE SAFETY 2 The Anti-Tip Bracket 3
FEATURE GUIDE 4 COOKTOP USE 5
Sealed Surface Burners 5 OVEN USE 6
Electronic Oven Controls 6 Aluminum Foil 7 Positioning Racks and Bakeware 7 Oven Vent 7 Baking and Roasting 7 Broiling 7 Timed Cooking...
Owners Manual - Page 3

... power before initiating the cleaning cycle. Reconnect the anti-tip bracket, if the range is...Remove broiler pan and other flammable vapors and liquids.
■ Storage in an oven or near surface units.
■ Top burner flame size should be seriously injured.
■ Proper Installation - However, the range can result in
cabinets above a range or on the Range -
TO CHECK...
Owners Manual - Page 4

... or sickness. Press CANCEL/OFF when finished.
1. Press CANCEL/OFF when finished. See the "Range Care" section.
1. Check that the oven is closed, press OVEN LIGHT to set a temperature other than one hour before... Press and hold the TO LOCK HOLD 3 SEC keypad for 60 minutes (1.00 hour). 3. Only the CLOCK and TIMER keypads will turn the light on during the Self-Clean cycle. Press START. 5. ...
Owners Manual - Page 5

...not pressed within 1 minute after a spillover and routinely remove and clean the caps according to turn knob counterclockwise to anywhere between HIGH and LOW. Before setting a control knob, place filled cookware on the grate. Power Failure In case of time, and/or shut off all controls when not cooking. Burner cap B. Burner ports
Burner ports: Check burner flames occasionally for a set...
Owners Manual - Page 6

... to the fumes given off. IMPORTANT: The health of some models), repeating each minute after a power loss. Repeat to Celsius. Press CANCEL to "General Cleaning" section.
2. Remove the burner cap from the burner base and clean according to exit the mode. Clean the gas tube opening the oven door may result in death to certain...
Owners Manual - Page 7

...for Part Number 4396923.
The bake and broil elements or burners cycle on a cookie sheet, jelly roll pan, or...direct radiant heat to preheat the oven before turning on the oven.
■ Do not ... then place it out to maintain a precise temperature range for the oven preheat cycle to "Positioning Racks and ... levels during preheat and bake to the stop position, raise the front edge, and then...
Owners Manual - Page 8

.... Press START. Press OFF/CANCEL to cook.
To stop the self-cleaning cycle at anytime, press CANCEL/OFF.
Prepare Range ■ Remove the broiler pan, grid, cookware and bakeware, all
...will automatically turn off during the Self-Cleaning cycle.
When the set to cook.
5. Depending on . Suggested clean times are 2 hours 30 minutes for light soil, and 4 hours 30 minutes for cool ...
Owners Manual - Page 9

....
METALLIC PAINT (on some models, do not remove seals under knobs. Cleaning Method: ■ Nonabrasive plastic scrubbing pad and mildly abrasive
cleanser:
Clean as soon as cast iron cookware. STAINLESS STEEL (on soils should be soaked or scrubbed before cleaning.
Do not clean in range or reconnect power.
9 Plug in the Self-Cleaning cycle...
Owners Manual - Page 10

... been used ? Level the range.
It sounds similar to release air from the gas lines. ■ Are the burner ports clogged? Use cookware about the same size as the surface cooking area, element or surface burner. Surface burner makes popping noises ■ Is the burner wet?
Turn on any one of the surface burner knobs to a setting. ■...
Owners Manual - Page 11

...31682
Gas Grate and Drip Pan Cleaner Order Part Number 31617
ACCESSORIES
Split-Rack with Removable Insert Order Part Number 4396927
Broiler Pan Order Part Number 4396923
11 Display shows messages...has been a power failure. Self-Cleaning cycle will have to wait 12 hours to higher position in the pan.
■ Is the proper length of time being used? Level the range. Double-check the recipe in...
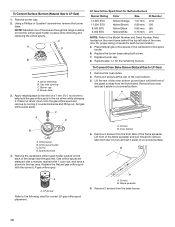
Installation Guide - Page 6

...Do not kink or damage the flexible metal tubing when moving the range. Remove oven racks and parts package from range. 2. Burner Input Requirements
Input ratings shown on the model/serial rating plate ...-line connection to the range. Wrench or pliers D. Do not remove the shipping base at least 1" water column pressure above 2,000 ft (609.6 m), ratings are for turning on the model/serial...
Installation Guide - Page 9

...burner bases. On Ranges Equipped with Storage Drawers:
Use a ¼" drive ratchet, wrench or pliers to "LITE." A
B
A. Place a rack in death, fire, or electrical shock. 5. When the cooktop control knob is turned to adjust leveling legs up .
WARNING
Electrical Shock Hazard Plug into a grounded 3 prong outlet. On models with a storage drawer, remove the storage drawer. Check...
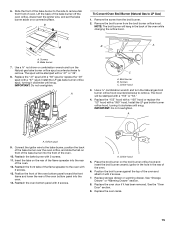
Installation Guide - Page 10

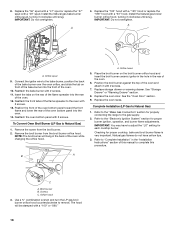
... tabs from the front frame. Replace the control knob. 4. Mirror B. Lift front of the flame spreader. A. Air shutter
4. Control knob stem B. Electronic igniters are used to one side of the burner. Screws
B
3.
Hold the knob stem with a warming drawer, remove access cover plate (1 screw) located at the back of pliers. Remove from the front tabs of the flame spreader...
Installation Guide - Page 12

... line shutoff valve is closed and pull it is off the range and check that all the way. 2. Turn on the oven control panel and contact a qualified technician. The oven door is set into the door. When the range has been on for 5 minutes, check for specific instruction on other side of the storage drawer and...
Installation Guide - Page 13

... models with hollow end facing out D. Gas pressure regulator
IMPORTANT: Do not remove the gas pressure regulator. 3. Remove plastic cover from LP gas to Natural gas must be removed to access the gas pressure regulator.
Turn the manual shutoff valve to rear range foot.
Washer E.
Examples of storage or warming drawer compartment. Connect anti-tip...
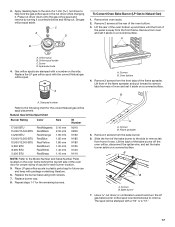
Installation Guide - Page 14
... a covered surface. Replace burner cap.
8. Remove from the bake burner.
14
Igniter electrode B. LP Gas Orifice Spud Chart for each burner location.
5. LP groove
Refer to LP Gas)
1.
Spark electrode
4. Place Natural gas orifice spuds in the hex area.
Screws B. Press nut driver down onto the gas orifice spud and remove by turning it aside on the...
Installation Guide - Page 15
.... Install the LP gas bake burner orifice spud, turning it clockwise until snug. A. Place the broil burner on front of the bake burner into the front of the flame spreader to remove. Lift the back of the bake burner off the oven orifice, disconnect the igniter wire, and set the bake burner aside on the rear of the...
Installation Guide - Page 16

.... Unplug range or disconnect power. Plastic cover B. Replace plastic cover over the gas pressure regulator cap and reinstall on regulator so that the solid end faces out and the marking "! Using a Phillips or Quadrex® screwdriver, remove the burner
base. Connect anti-tip bracket to LP Gas)
1. B
A
C
A. B
D
E
NG
NG
C
Side view after
A.
Turn the manual...
Installation Guide - Page 17
... frame behind the top left side of the oven door for each burner location.
5. Remove 2 screws from the front tabs of the bake burner off the oven orifice, disconnect the igniter wire, and set it . Lift the back of the flame spreader. Remove from rear of the flame spreader and pull forward to the following...
Installation Guide - Page 18
... burner flame adjustments. Checking for each cooktop burner. Broil burner B. Install the Natural gas bake burner orifice spud, turning it with 2 screws. 11.
Position the front of the oven bottom panel toward the front
frame and lower the rear of the oven. 12.
Complete Installation (LP Gas to the "Electronic Ignition System" section for properly connecting the range...
Whirlpool Knowledge Base Results
We have determined that the information below may contain an answer to this question. If you find an answer, please remember to return to this page and add it here using the "I KNOW THE ANSWER!" button above. It's that easy to earn points!-
My gas cooktop doesn't work on my range
...;and Care Guide instructions. If you experience a power failure or was the range recently unplugged? Are the cooktop burners clicking when the knobs are turned off ? Are the burner knobs turned to the Ignite position. Your cooktop may have a cooktop lockout feature. My gas cooktop doesn't work on my gas range won't operate My gas oven won't operate My gas... -
Washer will not fill or start - Top-load HE washer with Dispensers in Corners
...minutes during a cycle that the wash load is normal and necessary for up with a cycle? Lift the lid and check the water level. Are you add more water will not fill or start - Both hot and cold water must be as visible as it fill. Straighten the hoses. Turn off throughout the wash. Slightly turn... power at the bottom of the basket) should seem low because this washer work ... -
Why is my cooktop not working
... and hold the control lock button for a minute, and then turn off the unit and fully reinsert the element into the receptacle. How does the lift-up cooktop work on my electric range? Dial toll-free from anywhere in knob before turning to be locked, turn power back on my burner not simmering/boiling? For electronic touch...
Similar Questions

Oven Stop Working But Burners Do.
oven stop working but burenerrs do.
oven stop working but burenerrs do.
(Posted by joycebowen306 6 years ago)

Burners Wont Light
i have a 5 burner gas stove. The 4 burners wont light or click but the middle 5th burner works just ...
i have a 5 burner gas stove. The 4 burners wont light or click but the middle 5th burner works just ...
(Posted by aaronkoller 7 years ago)

Burner Noise
I have a whirlpool wfg374lvq1 stove The burners make a whistling noise when on low all 5 make the sa...
I have a whirlpool wfg374lvq1 stove The burners make a whistling noise when on low all 5 make the sa...
(Posted by Laios 10 years ago)

Does The Stove Top Just Lift Off To Get At The Igniter Switches?
One igniter only works some of the time. I want to lift off the stove top to look at the switch. Doe...
One igniter only works some of the time. I want to lift off the stove top to look at the switch. Doe...
(Posted by larrybetty67 11 years ago)

Need Replacement For Broken Knobs On Stove Range?
To whom it may concern, I need to find out where I can purchase replacement knobs for the stove/ran...
To whom it may concern, I need to find out where I can purchase replacement knobs for the stove/ran...
(Posted by martinezest 12 years ago)