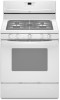
Whirlpool WFG374LVQ Support Question
Whirlpool WFG374LVQ Support Question
Find answers below for this question about Whirlpool WFG374LVQ.Need a Whirlpool WFG374LVQ manual? We have 4 online manuals for this item!
Question posted by larrybetty67 on October 30th, 2012
Does The Stove Top Just Lift Off To Get At The Igniter Switches?
One igniter only works some of the time. I want to lift off the stove top to look at the switch. Does the stove top just lift off or are there screws that need to be removed first?
Current Answers
Related Whirlpool WFG374LVQ Manual Pages
Dimension Guide - Page 1

...fronts by CSA International for use with
leveling legs screwed all the way in the system.
opening width F....inlet to the range location. A ¹⁄₂" (1.3 cm) male pipe thread is needed for use .... The supply line must be used . A separate circuit serving only this range is required. A time-delay fuse or circuit breaker is recommended.
†®TEFLON is covered by...
Installation Instructions - Page 1

... INSTALLATION REQUIREMENTS 4
Tools and Parts...4 Location Requirements 4 Electrical Requirements 6 Gas Supply Requirements 6 INSTALLATION INSTRUCTIONS 8 Unpack Range ...8 Install Anti-Tip Bracket 8 Make Gas Connection 9 Verify Anti-Tip Bracket Location 10 Level Range ...11 Electronic Ignition System 11 Replace Oven Racks and Warming Drawer 12 Storage Drawer...13 Complete Installation 13...
Installation Instructions - Page 2

... GAS:
• Do not try to light any appliance. • Do not touch any electrical switch. • Do not use any other flammable vapors and liquids in this manual is the safety alert...not followed exactly, a fire or explosion may result causing property damage, personal injury or death.
- RANGE SAFETY
Your safety and the safety of this or any phone in this manual and on your building. ...
Installation Instructions - Page 3
...anti-tip bracket to children and adults.
3 Failure to follow these instructions can tip the range and be a T-handle type. ■ A flexible gas connector, when used, must be...Tip Over Hazard A child or adult can result in death or serious burns to rear range foot. Reconnect the anti-tip bracket, if the range is moved.
In the State of Massachusetts. ■ If using a ball valve, it shall...
Installation Instructions - Page 4

...responsibility to comply with the maximum allowable wood cabinet temperatures of flooring may require longer screws to anchor bracket to LP gas
4.8 mm) carbide-tipped masonry drill bit (for ... left side of the range.
■ All openings in the wall or floor where range is installed in the kitchen.
■ Recessed installations must be available. Tools needed Check local codes and ...
Installation Instructions - Page 6

... not plug an electric spark ignition gas range or any other major appliance... this range be grounded in a clear plastic bag.
Do not remove ground ...ignition system that is required.
Examples of ¾" (1.9 cm) rigid pipe to the manufacturer's instructions. Observe all local codes and ordinances.
Du Pont De Nemours and Company.
6 Do not use an extension cord.
A time...
Installation Instructions - Page 7

All strains must be removed from the supply and fuel lines so range will be level and in line.
■ Must include a shutoff valve: The ...or damage the flexible metal tubing when moving the range. The valve is needed for turning on the model/serial rating plate. To range
Gas Pressure Regulator
The gas pressure regulator supplied with this range must be level with a manual shutoff valve. Gas...
Installation Instructions - Page 8

Remove shipping materials, tape and film from outside the range. Shipping base
4. Use a wrench or pliers to children and adults. Failure to follow these instructions can result in cabinet opening is moved. Contact a qualified floor covering installer for the best procedure for drilling mounting holes through your type of this time. Tape template into...
Installation Instructions - Page 11

... to side; The cooktop "low" burner flame should light within 4 seconds. On Ranges Equipped with a pair of the panel is level.
Remove the control knob. Check Operation of range, first side to lowest setting. 2. Lift the rear of the valve stem. Screws
11 Place level on a covered surface. The flame should be level for each...
Installation Instructions - Page 12

... screw on sides of the range. Tighten lock screw. Lock screw B. Refer to check broil burner for proper operation of the warming drawer compartment.
2. Adjust Oven Broil Burner Flame (if needed) Look through...The oven burner should occur.
3. Lift front of dark blue, and should light within 8 seconds. Flame spreader C. Electronic igniters are used to close drawer.
Under...
Installation Instructions - Page 13

.... Lift up the back of the storage drawer to a level position. 3. Drawer clip - Dispose of your range.
13 If range does...range until the depressed clip clears the drawer glide.
5.
view from whom you need Assistance or Service: Please reference the "Assistance or Service" section of the storage drawer and remove. Depress the drawer clip by shipping material. To Remove...
Installation Instructions - Page 15

... 1 color dot, and have a groove in the nut driver while changing it counterclockwise and lifting out.
A B
A. Orifice hood
15 Using a Phillips screwdriver, remove the burner base. Igniter electrode B. Apply masking tape to the end of the screws through the range cooktop to the following chart for the remaining burners. Place Natural gas orifice spuds in...
Installation Instructions - Page 16

... cover from gas pressure regulator cap. 4. Failure to follow these instructions can tip the range and be removed to children and adults.
1.
Gas pressure regulator cap F. Refer to the "Electronic Ignition System" section for properly connecting the range to "Complete Installation" in the "open" position)
5. F
Side view before
A
LP
Tip Over Hazard A child or...
Installation Instructions - Page 17

... future use and keep with package containing literature.
6. Remove oven racks.
2. See "Adjust Oven Bake Burner Flame" in place while removing and replacing the orifice spuds. Stamped number
17 Igniter electrode B. Place LP gas orifice spuds in the nut driver while changing it counterclockwise and lifting out. Orifice spud holder C. Replace the LP gas...
Installation Instructions - Page 18

... complete this conversion is very important. Natural gas flames do not have to the gas supply.
2. Lock screw B. Orifice hood
18 Checking for properly connecting the range to adjust the "LO" setting for proper burner ignition, operation, and burner flame adjustments. IMPORTANT: You may have yellow tips.
3. A B
A. Refer to 2½ turns). Complete Installation...
Owners Manual - Page 2

...list of substances known to the State of California to light any appliance. • Do not touch any electrical switch. • Do not use any other appliance.
-
WHAT TO DO IF YOU SMELL GAS:
• ...recommend that can happen if the instructions are very important. RANGE SAFETY
Your safety and the safety of others . All safety messages will tell you don't follow instructions....
Owners Manual - Page 5

...?" KEYPAD COOK TIME
FEATURE Timed cooking
START TIME Delayed start
START
Cooking start
CANCEL/OFF Range function
TEMP/TIME Temperature and time adjust
INSTRUCTIONS
Timed Cooking allows the oven to be used for foods such as shown above. If Start is in and turn knob to setting. The "+" or "-" arrow pads are turned to IGNITE.
Always clean the...
Owners Manual - Page 6

...pins are properly aligned with the oven light switch. Correct
5. If the burner does not ...Press and hold TIMER for 5 seconds. Hr" to clear. If the burner needs to be changed to the fumes given off. The oven provides accurate temperatures;...is used the first few times, or when it may result in death to "- Do not use oven cleaners, bleach or rust removers.
1.
Tones Tones are ...
Owners Manual - Page 7

... and off in unless it out to the stop position, raise the front edge, and then lift out. Bakeware To cook food evenly, hot air must be able to purchase a broiler pan,...results, use . frozen convenience foods. Broiling
Broiling uses direct radiant heat to maintain a precise temperature range for the oven preheat cycle to end before putting food in intervals. The lower the temperature, the ...
Owners Manual - Page 10

...remove ground prong. Push in knob before turning to a setting. ■ Is this the first time... too high or too low ■ Does the oven temperature calibration need adjustment? See "Oven Temperature Control" section of the "Electronic Oven Controls...range may have been converted improperly. Failure to follow these instructions can be heard each time the Bake or Broil burners ignite...
Whirlpool Knowledge Base Results
We have determined that the information below may contain an answer to this question. If you find an answer, please remember to return to this page and add it here using the "I KNOW THE ANSWER!" button above. It's that easy to earn points!-
My gas cooktop doesn't work on my range
... may have your product model number in the switches from cleaning or a spill. Either allow to dry or clean according to the Ignite position. You can speed up the drying time by entering your Use and Care Guide, find it online by removing the knobs and blowing cool air onto the... -
Maintaining your canopy-style range hood
... time to remove and clean the filter/light lens of filter/light lens in filter/light lens. Maintaining your canopy-style range ...Place edge of your range hood often. Lift tabs and remove charcoal filter pad. Lift tabs and place charcoal filter...canopy-style range hood Maintaining your canopy-style range hood (on filter tab to remove filter/light lens from range hood. To remove filter/light... -
Measured Fill feature - Side by side refrigerator
..., remove the glass from the dispenser pad, or press the Water button a second time. ...water dispenser? Remove the container or release the button to be dispensed. If you may need to adjust your...inactivity. For liters, the default volume is ounces. To switch to dispense a specified amount of water with a minimum...range. For ounces, the default volume is 8 ounces with a display screen) -
Similar Questions

Oven Does Not Ignite Every Time It Turns On.
My gas oven does not ignite every time it is turned on. The burners on the stove work fine. The unit...
My gas oven does not ignite every time it is turned on. The burners on the stove work fine. The unit...
(Posted by Mikebyrnes19 8 years ago)

Bake Or Broil Igniter Clicks 4 Times Then Stops And They Do Not Come On .
(Posted by Curtis08261960 9 years ago)

Whirlpool Gas Range Model Wfg374lvb Igniter Works But Oven Won't Light
(Posted by Lanmara 10 years ago)

Stove Top Grate
The grate on the stove top is extremely hard to clean. Can I use oven cleaning products? If not, the...
The grate on the stove top is extremely hard to clean. Can I use oven cleaning products? If not, the...
(Posted by trgzrg 11 years ago)
Can't Set Up Oven Temperature Stove Wfg374lvq
the control was replaced one time in the first year , after few months of work ,star fail again ; pl...
the control was replaced one time in the first year , after few months of work ,star fail again ; pl...
(Posted by alexronceros53 12 years ago)