Owners Manual
Page 11
...tomato, should be coated again with vegetable oil to the inner door glass before going into a dishwasher. All-Purpose Appliance Cleaner Part Number 31662 (not included): See "Assistance or Service" section to remove. Do not reassemble caps on cleaning products. RANGE CARE... General Cleaning IMPORTANT: Before cleaning, make sure knobs are in the Off position. All-Purpose Appliance Cleaner Part Number 31662 (not included): See "Assistance or Service" section to order. SURFACE BURNERS See "Surface Burners" section. To avoid ...
...tomato, should be coated again with vegetable oil to the inner door glass before going into a dishwasher. All-Purpose Appliance Cleaner Part Number 31662 (not included): See "Assistance or Service" section to remove. Do not reassemble caps on cleaning products. RANGE CARE... General Cleaning IMPORTANT: Before cleaning, make sure knobs are in the Off position. All-Purpose Appliance Cleaner Part Number 31662 (not included): See "Assistance or Service" section to order. SURFACE BURNERS See "Surface Burners" section. To avoid ...
Owners Manual
Page 14
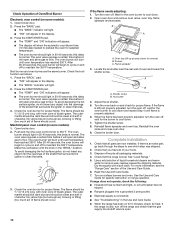
... trained to local dealers, repair parts distributors and service companies. Call the Whirlpool Customer eXperience Center toll free: 1-800-253-1301. Whirlpool designated service technicians are made with any questions or concerns at: Whirlpool Brand Home Appliances Customer eXperience Center.... ■ Is there proper air circulation around bakeware? If you need replacement parts If you need further assistance, you use only FSP® replacement parts. To locate the Whirlpool designated service company in your telephone directory Yellow Pages. Decrease oven temperature 10°...
... trained to local dealers, repair parts distributors and service companies. Call the Whirlpool Customer eXperience Center toll free: 1-800-253-1301. Whirlpool designated service technicians are made with any questions or concerns at: Whirlpool Brand Home Appliances Customer eXperience Center.... ■ Is there proper air circulation around bakeware? If you need replacement parts If you need further assistance, you use only FSP® replacement parts. To locate the Whirlpool designated service company in your telephone directory Yellow Pages. Decrease oven temperature 10°...
Owners Manual
Page 15
... instructions and/or installation instructions. 4. Major appliances with the removal from your home of your major appliance for Factory Specified Parts and repair labor to correct defects in accordance with published installation instructions. 11. The cost of repair or replacement under this... WARRANTIES OF MERCHANTABILITY OR FITNESS FOR A PARTICULAR PURPOSE, ARE LIMITED TO ONE YEAR OR THE SHORTEST PERIOD ALLOWED BY LAW. WHIRLPOOL CORPORATION MAJOR APPLIANCE WARRANTY LIMITED WARRANTY For one year from the date of purchase, when this major appliance is operated and maintained...
... instructions and/or installation instructions. 4. Major appliances with the removal from your home of your major appliance for Factory Specified Parts and repair labor to correct defects in accordance with published installation instructions. 11. The cost of repair or replacement under this... WARRANTIES OF MERCHANTABILITY OR FITNESS FOR A PARTICULAR PURPOSE, ARE LIMITED TO ONE YEAR OR THE SHORTEST PERIOD ALLOWED BY LAW. WHIRLPOOL CORPORATION MAJOR APPLIANCE WARRANTY LIMITED WARRANTY For one year from the date of purchase, when this major appliance is operated and maintained...
Installation Instructions
Page 3
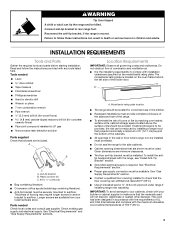
... codes and ordinances. Reconnect the anti-tip bracket, if the range is located on the model/serial rating plate. Longer screws are included. Parts needed ■ Level drive ratchet ■ Tape measure ■ Flat-blade screwdriver ■ Phillips screwdriver ■ Hand or electric drill ... 4.8 mm) carbide-tipped masonry drill bit (for convenient use in death or serious burns to subfloor. Location Requirements IMPORTANT: Observe all parts are available from your builder or cabinet supplier to make sure that the floor covering can withstand at least 200°F (93°...
... codes and ordinances. Reconnect the anti-tip bracket, if the range is located on the model/serial rating plate. Longer screws are included. Parts needed ■ Level drive ratchet ■ Tape measure ■ Flat-blade screwdriver ■ Phillips screwdriver ■ Hand or electric drill ... 4.8 mm) carbide-tipped masonry drill bit (for convenient use in death or serious burns to subfloor. Location Requirements IMPORTANT: Observe all parts are available from your builder or cabinet supplier to make sure that the floor covering can withstand at least 200°F (93°...
Installation Instructions
Page 4
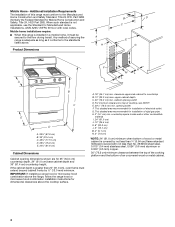
... hood or microwave hood combination installation instructions for dimensional clearances above . G. cabinet opening dimensions shown are for Mobile Home Construction and Safety, Title 24, HUD Part 280). Mobile Home - Any method of an uncovered wood or metal cabinet. 4 Product Dimensions A A H F B D C E G J I . 24" (61.0 cm) J. 10" (25.4 ...cabinet depth C. 30" (76.2 cm) min. countertop space to the Manufactured Home Construction and Safety Standard, Title 24 CFR, Part 3280 (formerly the Federal Standard for 25" (64.0 cm) countertop depth, 24" (61.0 cm) base cabinet depth and ...
... hood or microwave hood combination installation instructions for dimensional clearances above . G. cabinet opening dimensions shown are for Mobile Home Construction and Safety, Title 24, HUD Part 280). Mobile Home - Any method of an uncovered wood or metal cabinet. 4 Product Dimensions A A H F B D C E G J I . 24" (61.0 cm) J. 10" (25.4 ...cabinet depth C. 30" (76.2 cm) min. countertop space to the Manufactured Home Construction and Safety Standard, Title 24 CFR, Part 3280 (formerly the Federal Standard for 25" (64.0 cm) countertop depth, 24" (61.0 cm) base cabinet depth and ...
Installation Instructions
Page 6
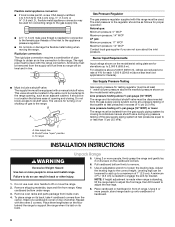
... 4% for connection to the female pipe threads of range. Excessive Weight Hazard Use two or more people to move the range 2. Remove oven racks and parts package from range. Do not block access to adjust the rear legs. 8. Gas Supply Pressure Testing Gas supply pressure for elevations up onto cardboard or...
... 4% for connection to the female pipe threads of range. Excessive Weight Hazard Use two or more people to move the range 2. Remove oven racks and parts package from range. Do not block access to adjust the rear legs. 8. Gas Supply Pressure Testing Gas supply pressure for elevations up onto cardboard or...
Installation Instructions
Page 9
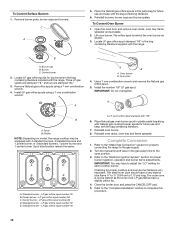
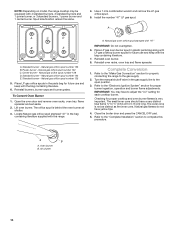
... in burner base. Inner cone 5. Insert a small flat-blade screwdriver into a grounded 3 prong outlet. The valve is open when the handle is quickly turned from parts package. A B A. Open valve 4. Correct any leak found. 5. Remove cooktop burner caps and grates from "HI" to light the burner. If burner caps are not properly...
... in burner base. Inner cone 5. Insert a small flat-blade screwdriver into a grounded 3 prong outlet. The valve is open when the handle is quickly turned from parts package. A B A. Open valve 4. Correct any leak found. 5. Remove cooktop burner caps and grates from "HI" to light the burner. If burner caps are not properly...
Installation Instructions
Page 10
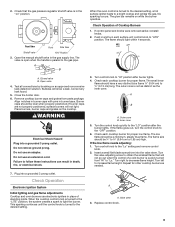
...check that area. Use a mild solution of oven and loosen the shutter screw. Read the Use and Care Guide. 7. If the range is an extra part, go back through the steps to flow. Check Operation of Oven/Broil Burner Electronic oven control (on for 5 minutes, check for heat. The oven ...to flow. Reinstall flame spreader and oven tray. Reinstall the oven racks and close oven door. 9. Check that the range is normal. Check that all parts are the same burner. Dry thoroughly with the knob in the display. 3. Check the broil function as follows: 1. The oven burner should light in the...
...check that area. Use a mild solution of oven and loosen the shutter screw. Read the Use and Care Guide. 7. If the range is an extra part, go back through the steps to flow. Check Operation of Oven/Broil Burner Electronic oven control (on for 5 minutes, check for heat. The oven ...to flow. Reinstall flame spreader and oven tray. Reinstall the oven racks and close oven door. 9. Check that the range is normal. Check that all parts are the same burner. Dry thoroughly with the knob in the display. 3. Check the broil function as follows: 1. The oven burner should light in the...
Installation Instructions
Page 12
...LP gas flames have a very distinct blue flame ¼" to ½" (0.64 cm to the "Electronic Ignition System" section for top burners in plastic parts bag along with Natural gas cooktop burner spuds for future use and keep with "56" 6. Open the oven door and remove oven racks, oven tray... properly connecting the range to the "Make Gas Connection" section for each cooktop burner. Locate LP gas orifice spud stamped "56" in the parts bag for proper cooktop and oven burner flames is not as distinct as the inner cone. LP oven orifice spud stamped with the bag containing...
...LP gas flames have a very distinct blue flame ¼" to ½" (0.64 cm to the "Electronic Ignition System" section for top burners in plastic parts bag along with Natural gas cooktop burner spuds for future use and keep with "56" 6. Open the oven door and remove oven racks, oven tray... properly connecting the range to the "Make Gas Connection" section for each cooktop burner. Locate LP gas orifice spud stamped "56" in the parts bag for proper cooktop and oven burner flames is not as distinct as the inner cone. LP oven orifice spud stamped with the bag containing...
Installation Instructions
Page 14
... flames is very important. Install the number "47" LP gas spud. Power burner - Locate Natural gas orifice spud stamped "47" in plastic parts bag along with the bag containing literature. 7. A B A. Natural gas orifice spud number 125 B. A. Place LP gas oven burner spud in...1 power burner and 1 center burner. Refer to the "Complete Installation" section to the open position. 3. Turn the manual shutoff valve in the parts bag for each cooktop burner. NOTE: Depending on model, the range cooktop may have to 0.13 cm) long. Lift oven burner. Reinstall oven burner...
... flames is very important. Install the number "47" LP gas spud. Power burner - Locate Natural gas orifice spud stamped "47" in plastic parts bag along with the bag containing literature. 7. A B A. Natural gas orifice spud number 125 B. A. Place LP gas oven burner spud in...1 power burner and 1 center burner. Refer to the "Complete Installation" section to the open position. 3. Turn the manual shutoff valve in the parts bag for each cooktop burner. NOTE: Depending on model, the range cooktop may have to 0.13 cm) long. Lift oven burner. Reinstall oven burner...

Warranty
Page 1
... WARRANTY SHALL BE PRODUCT REPAIR AS PROVIDED HEREIN. Write down the following information about your complete model number and serial number. WHIRLPOOL CORPORATION MAJOR APPLIANCE WARRANTY LIMITED WARRANTY For one year from the date of purchase, when this limited warranty does not apply. ...fuses, or to better help by checking the "Assistance or Service" section or by Whirlpool. 5. Consumable parts are excluded from your home of consumables or cleaning products not approved by calling Whirlpool. This major appliance is designed to be provided by the customer. The removal and ...
... WARRANTY SHALL BE PRODUCT REPAIR AS PROVIDED HEREIN. Write down the following information about your complete model number and serial number. WHIRLPOOL CORPORATION MAJOR APPLIANCE WARRANTY LIMITED WARRANTY For one year from the date of purchase, when this limited warranty does not apply. ...fuses, or to better help by checking the "Assistance or Service" section or by Whirlpool. 5. Consumable parts are excluded from your home of consumables or cleaning products not approved by calling Whirlpool. This major appliance is designed to be provided by the customer. The removal and ...


