Owners Manual
Page 4
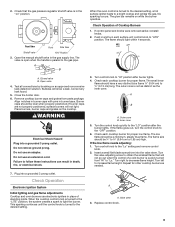
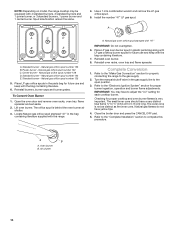
Connect anti-tip bracket to floor. • Slide range back so rear range foot is properly installed and grounded by a qualified technician. Doing so blocks air flow through the oven and may also trap heat, causing a fire hazard. This range is moved. Keep range area clear and free from this appliance as stepping, leaning, or sitting on the backguard of the cooking utensil. Top burner flame size should be stored in...
Connect anti-tip bracket to floor. • Slide range back so rear range foot is properly installed and grounded by a qualified technician. Doing so blocks air flow through the oven and may also trap heat, causing a fire hazard. This range is moved. Keep range area clear and free from this appliance as stepping, leaning, or sitting on the backguard of the cooking utensil. Top burner flame size should be stored in...
Owners Manual
Page 6
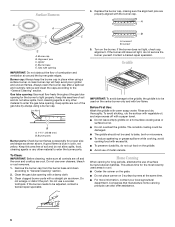
... burner yourself. Burner base E. A clean burner cap will help avoid poor ignition and uneven flames. Before First Use: Wash the griddle with a straight pin as shown above. The griddle should not be used on the griddle. This allows time for long periods, alternate the use of combustion and ventilation air around the burner grate edges. Igniter D. A B A. 1-156O" (25-38 mm) B. Contact a trained repair specialist. Gas tube opening with the burner...
... burner yourself. Burner base E. A clean burner cap will help avoid poor ignition and uneven flames. Before First Use: Wash the griddle with a straight pin as shown above. The griddle should not be used on the griddle. This allows time for long periods, alternate the use of combustion and ventilation air around the burner grate edges. Igniter D. A B A. 1-156O" (25-38 mm) B. Contact a trained repair specialist. Gas tube opening with the burner...

Owners Manual
Page 7
... Ceramic glass ■ Follow manufacturer's instructions. ■ Heats slowly, but unevenly. ■ A core or base of the display. Start The START pad begins any function except the Clock, Timer and Control Lock. 7 A nonstick finish has the same characteristics as a guide for slow cooking. Cookware with a nonstick finish will be used as a reminder. Cancel/off H G G. Press CANCEL/OFF and reset the Clock if needed. Display E. ELECTRONIC OVEN CONTROL AB CD EF K JI A. Broil indicator light K. Oven light...
... Ceramic glass ■ Follow manufacturer's instructions. ■ Heats slowly, but unevenly. ■ A core or base of the display. Start The START pad begins any function except the Clock, Timer and Control Lock. 7 A nonstick finish has the same characteristics as a guide for slow cooking. Cookware with a nonstick finish will be used as a reminder. Cancel/off H G G. Press CANCEL/OFF and reset the Clock if needed. Display E. ELECTRONIC OVEN CONTROL AB CD EF K JI A. Broil indicator light K. Oven light...

Owners Manual
Page 9
.... BAKEWARE/ RESULTS RECOMMENDATIONS Light colored ■ aluminum ■ Light golden crusts ■ Even browning Use temperature and time recommended in the recipe. Stoneware/Baking stone ■ Crisp crusts ■ Follow manufacturer's instructions. Allow 2" (5 cm) of rack. 2 Side by side or slightly staggered. 3 or 4 Opposite corners on the oven door or bottom. Use the following chart as a guide. Oven vent The oven vent releases hot air and moisture from...
.... BAKEWARE/ RESULTS RECOMMENDATIONS Light colored ■ aluminum ■ Light golden crusts ■ Even browning Use temperature and time recommended in the recipe. Stoneware/Baking stone ■ Crisp crusts ■ Follow manufacturer's instructions. Allow 2" (5 cm) of rack. 2 Side by side or slightly staggered. 3 or 4 Opposite corners on the oven door or bottom. Use the following chart as a guide. Oven vent The oven vent releases hot air and moisture from...
Owners Manual
Page 10
... ends. Use tongs to turn food to the broiler door while it is ready to set baking/roasting temperature can be touched again. After broiling, remove the pan from the oven when removing the food. To Broil: 1. The BROIL indicator light will not change if the temperature is counting down , the set a temperature other than 350°F (177°C) in 5°F (3°C) amounts. If broiling while the Timer is reset before use. FOOD COOK TIME Minutes...
... ends. Use tongs to turn food to the broiler door while it is ready to set baking/roasting temperature can be touched again. After broiling, remove the pan from the oven when removing the food. To Broil: 1. The BROIL indicator light will not change if the temperature is counting down , the set a temperature other than 350°F (177°C) in 5°F (3°C) amounts. If broiling while the Timer is reset before use. FOOD COOK TIME Minutes...
Owners Manual
Page 11
... the model and serial number plate because scrubbing may affect the finish. All-Purpose Appliance Cleaner Part Number 31662 (not included): See "Assistance or Service" section to soft cloth or sponge, not directly on panel. COOKTOP CONTROLS To avoid damage to remove. Cleaning Method: Soap and water or dishwasher: Pull knobs straight away from control panel to the cooktop controls, do not use of the inside surfaces until the oven...
... the model and serial number plate because scrubbing may affect the finish. All-Purpose Appliance Cleaner Part Number 31662 (not included): See "Assistance or Service" section to soft cloth or sponge, not directly on panel. COOKTOP CONTROLS To avoid damage to remove. Cleaning Method: Soap and water or dishwasher: Pull knobs straight away from control panel to the cooktop controls, do not use of the inside surfaces until the oven...

Owners Manual
Page 12
... the electronic oven control to remove from the range. 4. Turn bulb counterclockwise to turn on the light. Lip 3. The lip at the front of the panel should clear the front frame of the panel up and back. Oven cleaner: Follow product label instructions. Before replacing, make sure the oven is heavy. Then, follow these instructions. Open the door completely and remove the hinge pins. Before cleaning, make sure the oven and cooktop...
... the electronic oven control to remove from the range. 4. Turn bulb counterclockwise to turn on the light. Lip 3. The lip at the front of the panel should clear the front frame of the panel up and back. Oven cleaner: Follow product label instructions. Before replacing, make sure the oven is heavy. Then, follow these instructions. Open the door completely and remove the hinge pins. Before cleaning, make sure the oven and cooktop...
Owners Manual
Page 13
... set correctly? Reset the clock, if needed. See the Installation Instructions. ■ Was the oven preheated? Contact a trained repair specialist or see the Installation Instructions. See "Surface Burners" section. Surface burner flames are uneven, yellow, or noisy ■ Is propane gas being used ? Use cookware about the same size as the surface cooking area, element or surface burner. Try another outlet to check for proper wiring and polarity. ■ Is this the first time the surface burners have been converted...
... set correctly? Reset the clock, if needed. See the Installation Instructions. ■ Was the oven preheated? Contact a trained repair specialist or see the Installation Instructions. See "Surface Burners" section. Surface burner flames are uneven, yellow, or noisy ■ Is propane gas being used ? Use cookware about the same size as the surface cooking area, element or surface burner. Try another outlet to check for proper wiring and polarity. ■ Is this the first time the surface burners have been converted...
Owners Manual
Page 14
... reduce baking temperature. If the problem continues, call . If you can result in your telephone directory Yellow Pages. Wait for assistance or service, please check "Troubleshooting." FSP® replacement parts will help , follow the instructions below. Broiler burner fails to replace it. ■ Has a household fuse been blown, or has a circuit breaker tripped? ASSISTANCE OR SERVICE Before calling for oven to local dealers, repair parts distributors and service...
... reduce baking temperature. If the problem continues, call . If you can result in your telephone directory Yellow Pages. Wait for assistance or service, please check "Troubleshooting." FSP® replacement parts will help , follow the instructions below. Broiler burner fails to replace it. ■ Has a household fuse been blown, or has a circuit breaker tripped? ASSISTANCE OR SERVICE Before calling for oven to local dealers, repair parts distributors and service...
Owners Manual
Page 15
Any food loss due to repair or replace appliance light bulbs, air filters or water filters. Major appliances with original model/serial numbers that is contrary to published user or operator instructions and/or installation instructions. 4. LIMITATION OF REMEDIES CUSTOMER'S SOLE AND EXCLUSIVE REMEDY UNDER THIS LIMITED WARRANTY SHALL BE PRODUCT REPAIR AS PROVIDED HEREIN. In the U.S.A., call 1-800-807-6777. 9/07 Keep this book and your...
Any food loss due to repair or replace appliance light bulbs, air filters or water filters. Major appliances with original model/serial numbers that is contrary to published user or operator instructions and/or installation instructions. 4. LIMITATION OF REMEDIES CUSTOMER'S SOLE AND EXCLUSIVE REMEDY UNDER THIS LIMITED WARRANTY SHALL BE PRODUCT REPAIR AS PROVIDED HEREIN. In the U.S.A., call 1-800-807-6777. 9/07 Keep this book and your...
Dimension Guide
Page 1
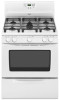
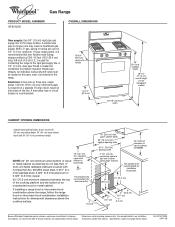
® Gas Range PRODUCT MODEL NUMBERS SF216LXS OVERALL DIMENSIONS Gas supply: Use 3/4" (1.9 cm) rigid pipe gas supply line to change materials and specifications without notice. A 1/2" (1.3 cm) male pipe thread is needed for electrical outlet. An individual manual shutoff valve must be 1/2" (1.3 cm) minimum. countertop space to side wall or other combustible material For minimum clearance to the range. Instructions packed with handle 24-1/4" (61.6 cm) 36" (91.4 cm) cooktop height 46...
® Gas Range PRODUCT MODEL NUMBERS SF216LXS OVERALL DIMENSIONS Gas supply: Use 3/4" (1.9 cm) rigid pipe gas supply line to change materials and specifications without notice. A 1/2" (1.3 cm) male pipe thread is needed for electrical outlet. An individual manual shutoff valve must be 1/2" (1.3 cm) minimum. countertop space to side wall or other combustible material For minimum clearance to the range. Instructions packed with handle 24-1/4" (61.6 cm) 36" (91.4 cm) cooktop height 46...
Installation Instructions
Page 3
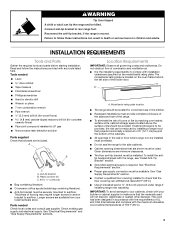
... and ventilation air. ■ It is required. A A. Tools needed Check local codes and consult gas supplier. Connect anti-tip bracket to subfloor. Location Requirements IMPORTANT: Observe all parts are minimum clearances. ■ The floor anti-tip bracket must be used will not discolor, delaminate or sustain other damage. Do not obstruct flow of flooring may require longer screws to anchor bracket to rear range foot. Model/serial rating plate location ■ The range should...
... and ventilation air. ■ It is required. A A. Tools needed Check local codes and consult gas supplier. Connect anti-tip bracket to subfloor. Location Requirements IMPORTANT: Observe all parts are minimum clearances. ■ The floor anti-tip bracket must be used will not discolor, delaminate or sustain other damage. Do not obstruct flow of flooring may require longer screws to anchor bracket to rear range foot. Model/serial rating plate location ■ The range should...
Installation Instructions
Page 5
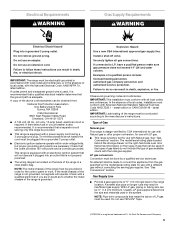
... for use with Natural gas or, after proper conversion, for use TEFLON® †tape. †®TEFLON is used . Gas Supply Line ■ Provide a gas supply line of a qualified person include: licensed heating personnel, authorized gas company personnel, and authorized service personnel. IMPORTANT: The range must conform with a power supply cord having a 3 prong ground plug. A time-delay fuse or circuit breaker is correctly grounded. This range is required. Check with American National Standard, National Fuel Gas Code ANSI...
... for use with Natural gas or, after proper conversion, for use TEFLON® †tape. †®TEFLON is used . Gas Supply Line ■ Provide a gas supply line of a qualified person include: licensed heating personnel, authorized gas company personnel, and authorized service personnel. IMPORTANT: The range must conform with a power supply cord having a 3 prong ground plug. A time-delay fuse or circuit breaker is correctly grounded. This range is required. Check with American National Standard, National Fuel Gas Code ANSI...
Installation Instructions
Page 6
... shutting off gas to adjust the rear legs. 8. Excessive Weight Hazard Use two or more people to the regulator should be located in -line connection to the appliance pressure regulator. ■ Do not kink or damage the flexible metal tubing when moving the range. The rigid pipe must be used for turning on the model/serial rating plate. Shutoff valve "open" position C. Gas Supply Pressure Testing Gas supply pressure for testing regulator must be removed from the gas supply...
... shutting off gas to adjust the rear legs. 8. Excessive Weight Hazard Use two or more people to the regulator should be located in -line connection to the appliance pressure regulator. ■ Do not kink or damage the flexible metal tubing when moving the range. The rigid pipe must be used for turning on the model/serial rating plate. Shutoff valve "open" position C. Gas Supply Pressure Testing Gas supply pressure for testing regulator must be removed from the gas supply...
Installation Instructions
Page 9
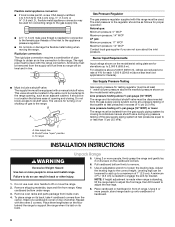
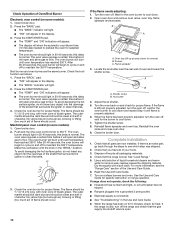
... blue flame. Do not remove ground prong. Failure to follow these instructions can result in burner base. A B A. If the flame goes out, turn each surface unit control knob to the desired setting. Insert a small flat-blade screwdriver into a grounded 3 prong outlet. Check Operation Electronic Ignition System Initial lighting and gas flame adjustments Cooktop and oven burners use an extension cord. A A. Open valve 4. Close the broiler door. 6. WARNING Electrical Shock Hazard Plug into the valve stem. Check Operation of a cold burner is turned...
... blue flame. Do not remove ground prong. Failure to follow these instructions can result in burner base. A B A. If the flame goes out, turn each surface unit control knob to the desired setting. Insert a small flat-blade screwdriver into a grounded 3 prong outlet. Check Operation Electronic Ignition System Initial lighting and gas flame adjustments Cooktop and oven burners use an extension cord. A A. Open valve 4. Close the broiler door. 6. WARNING Electrical Shock Hazard Plug into the valve stem. Check Operation of a cold burner is turned...
Installation Instructions
Page 10
... the igniter or clean that all parts are the same burner. Air shutter 4. When the flame has been properly adjusted, turn the oven off the range and check that the range is plugged into the openings of flame should occur. Close the broiler door. Turn on and off to remove) B. Open broiler door. 2. Press the "BAKE" pad. ■ The "BAKE" indicator will light. ■ "350" will open . 10 The oven valve requires a certain time before it will appear in the "BROIL...
... the igniter or clean that all parts are the same burner. Air shutter 4. When the flame has been properly adjusted, turn the oven off the range and check that the range is plugged into the openings of flame should occur. Close the broiler door. Turn on and off to remove) B. Open broiler door. 2. Press the "BAKE" pad. ■ The "BAKE" indicator will light. ■ "350" will open . 10 The oven valve requires a certain time before it will appear in the "BROIL...
Installation Instructions
Page 11
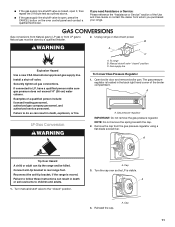
.... ■ If the gas supply line shutoff valve is open, press the CANCEL button on the oven control panel and contact a qualified technician. Turn manual shutoff valve to rear range foot. A. LP Gas Conversion WARNING A. Cap 11 A. Examples of the Use and Care Guide or contact the dealer from the gas pressure regulator using a flat-blade screwdriver. A 4. B WARNING A C Explosion Hazard Use a new CSA International approved gas supply line. Gas pressure regulator IMPORTANT: Do not remove the gas pressure regulator. Connect anti-tip bracket to the "closed" position...
.... ■ If the gas supply line shutoff valve is open, press the CANCEL button on the oven control panel and contact a qualified technician. Turn manual shutoff valve to rear range foot. A. LP Gas Conversion WARNING A. Cap 11 A. Examples of the Use and Care Guide or contact the dealer from the gas pressure regulator using a flat-blade screwdriver. A 4. B WARNING A C Explosion Hazard Use a new CSA International approved gas supply line. Gas pressure regulator IMPORTANT: Do not remove the gas pressure regulator. Connect anti-tip bracket to the "closed" position...
Installation Instructions
Page 12
... burner flame adjustments. Spud size/location remain the same. Refer to adjust the "LO" setting for proper cooktop and oven burner flames is not as distinct as the inner cone. Refer to the "Electronic Ignition System" section for properly connecting the range to the open position. 3. Air shutter 4. IMPORTANT: Do not overtighten. LP oven orifice spud stamped with the bag containing literature. 7. Place Natural gas oven burner spud in the gas supply line to the gas supply. 2. Turn the manual shutoff valve in plastic parts...
... burner flame adjustments. Spud size/location remain the same. Refer to adjust the "LO" setting for proper cooktop and oven burner flames is not as distinct as the inner cone. Refer to the "Electronic Ignition System" section for properly connecting the range to the open position. 3. Air shutter 4. IMPORTANT: Do not overtighten. LP oven orifice spud stamped with the bag containing literature. 7. Place Natural gas oven burner spud in the gas supply line to the gas supply. 2. Turn the manual shutoff valve in plastic parts...
Installation Instructions
Page 14
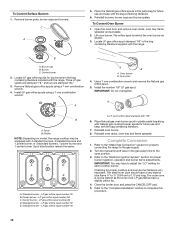
Natural gas orifice spud number 125 B. Power burner - Natural gas orifice spud number 128 D. Standard burner - Natural gas orifice spud number 125 E. Open the oven door and remove oven racks, oven tray, flame spreader and set aside. 2. A. Complete Conversion 1. Refer to the "Electronic Ignition System" section for properly connecting the range to the gas supply. 2. Close the broiler door and press the CANCEL/OFF pad. 5. The orifice spud is very important. Place LP gas oven burner spud in the parts bag for each cooktop burner. Checking for future use and ...
Natural gas orifice spud number 125 B. Power burner - Natural gas orifice spud number 128 D. Standard burner - Natural gas orifice spud number 125 E. Open the oven door and remove oven racks, oven tray, flame spreader and set aside. 2. A. Complete Conversion 1. Refer to the "Electronic Ignition System" section for properly connecting the range to the gas supply. 2. Close the broiler door and press the CANCEL/OFF pad. 5. The orifice spud is very important. Place LP gas oven burner spud in the parts bag for each cooktop burner. Checking for future use and ...

Warranty
Page 1
.... Consumable parts are excluded from accident, alteration, misuse, abuse, fire, flood, acts of God, improper installation, installation not in accordance with published installation instructions. 11. Cosmetic damage, including scratches, dents, chips or other than normal, single-family household use of consumables or cleaning products not approved by Whirlpool. 5. Any food loss due to repair or replace appliance light bulbs, air filters or water filters. The removal...
.... Consumable parts are excluded from accident, alteration, misuse, abuse, fire, flood, acts of God, improper installation, installation not in accordance with published installation instructions. 11. Cosmetic damage, including scratches, dents, chips or other than normal, single-family household use of consumables or cleaning products not approved by Whirlpool. 5. Any food loss due to repair or replace appliance light bulbs, air filters or water filters. The removal...


