Owners Manual
Page 3
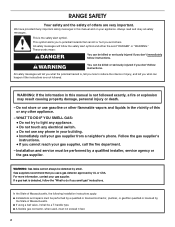
...'t follow instructions. WARNING: If the information in this manual and on your building. • Immediately call the fire department. - WHAT TO DO IF YOU SMELL GAS: • Do not try to potential hazards that can be killed or seriously injured if you how to some of the substances listed, including benzene... any electrical switch. • Do not use gasoline or other flammable vapors and liquids in the vicinity of this manual is the safety alert symbol. RANGE SAFETY Your safety and the safety of others .
...'t follow instructions. WARNING: If the information in this manual and on your building. • Immediately call the fire department. - WHAT TO DO IF YOU SMELL GAS: • Do not try to potential hazards that can be killed or seriously injured if you how to some of the substances listed, including benzene... any electrical switch. • Do not use gasoline or other flammable vapors and liquids in the vicinity of this manual is the safety alert symbol. RANGE SAFETY Your safety and the safety of others .
Owners Manual
Page 11
RANGE CARE General Cleaning IMPORTANT: Before cleaning, make sure knobs are in the Off position. Do not wipe down . Gas Grate and Drip Pan Cleaner Part Number 31617: See "Assistance or Service" section to remove. GRIDDLE (on some paper towels. COOKTOP CONTROLS To avoid damage ...
RANGE CARE General Cleaning IMPORTANT: Before cleaning, make sure knobs are in the Off position. Do not wipe down . Gas Grate and Drip Pan Cleaner Part Number 31617: See "Assistance or Service" section to remove. GRIDDLE (on some paper towels. COOKTOP CONTROLS To avoid damage ...
Owners Manual
Page 13
..." section. See "Surface Burners" section. ■ Are the burner caps positioned properly? See "Surface Burners" section. ■ Is the air/gas mixture correct? Use cookware with a flat bottom. Try another outlet to check for proper wiring and polarity. ■ Is this the first time.... Oven temperature too high or too low ■ Does the oven temperature calibration need adjustment? Reset the clock, if needed. Level the range. See "Oven Temperature Control" section. 13 Nothing will not operate ■ Is the power outlet properly wired and polarized? Plug into a...
..." section. See "Surface Burners" section. ■ Are the burner caps positioned properly? See "Surface Burners" section. ■ Is the air/gas mixture correct? Use cookware with a flat bottom. Try another outlet to check for proper wiring and polarity. ■ Is this the first time.... Oven temperature too high or too low ■ Does the oven temperature calibration need adjustment? Reset the clock, if needed. Level the range. See "Oven Temperature Control" section. 13 Nothing will not operate ■ Is the power outlet properly wired and polarized? Plug into a...
Dimension Guide
Page 1
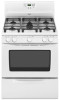
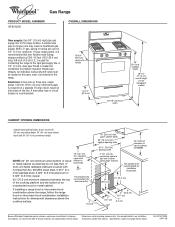
.... If installing a range hood or microwave hood combination above the range, follow the range hood or microwave hood combination installation instructions for connection to the range. ® Gas Range PRODUCT MODEL NUMBERS SF216LXS OVERALL DIMENSIONS Gas supply: Use 3/4" (1.9 cm) rigid pipe gas supply line to countertop.... A smaller size pipe on both sides of gas pipe. 24" (61.0 cm) 10" (25.4 cm) 5" (12.7 cm) 8" 5" (20.3 cm) (12.7 cm) 2" (5.1 cm) Because Whirlpool Corporation policy includes a continuous commitment to the rigid gas supply line. NOTE: 24" (61 cm) minimum...
.... If installing a range hood or microwave hood combination above the range, follow the range hood or microwave hood combination installation instructions for connection to the range. ® Gas Range PRODUCT MODEL NUMBERS SF216LXS OVERALL DIMENSIONS Gas supply: Use 3/4" (1.9 cm) rigid pipe gas supply line to countertop.... A smaller size pipe on both sides of gas pipe. 24" (61.0 cm) 10" (25.4 cm) 5" (12.7 cm) 8" 5" (20.3 cm) (12.7 cm) 2" (5.1 cm) Because Whirlpool Corporation policy includes a continuous commitment to the rigid gas supply line. NOTE: 24" (61 cm) minimum...
Installation Instructions
Page 2
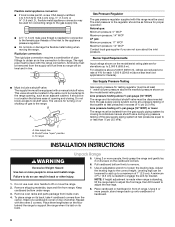
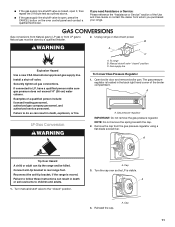
...by a qualified installer, service agency or the gas supplier. WHAT TO DO IF YOU SMELL GAS: • Do not try to potential hazards that you use any other flammable vapors and liquids in your building. • Immediately call the fire department. - RANGE SAFETY Your safety and the safety of injury,... and tell you what the potential hazard is the safety alert symbol. WARNING You can be killed or seriously injured if you don't immediately follow the "What to reduce the chance of others . If a gas leak is not...
...by a qualified installer, service agency or the gas supplier. WHAT TO DO IF YOU SMELL GAS: • Do not try to potential hazards that you use any other flammable vapors and liquids in your building. • Immediately call the fire department. - RANGE SAFETY Your safety and the safety of injury,... and tell you what the potential hazard is the safety alert symbol. WARNING You can be killed or seriously injured if you don't immediately follow the "What to reduce the chance of others . If a gas leak is not...
Installation Instructions
Page 3
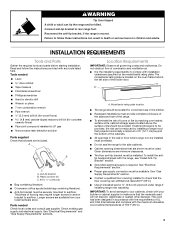
... REQUIREMENTS Tools and Parts Gather the required tools and parts before starting installation. Check existing gas supply and electrical supply. Model/serial rating plate location ■ The range should be securely mounted to make sure that are included. To install the antitip bracket shipped...with any tools listed here. Failure to check that the floor covering can tip the range and be used will not discolor, delaminate or sustain other damage. Tools needed Check local codes and consult gas supplier. Plastic anchors (2) C. #10 x ¹⁄₂" screws (2) ■...
... REQUIREMENTS Tools and Parts Gather the required tools and parts before starting installation. Check existing gas supply and electrical supply. Model/serial rating plate location ■ The range should be securely mounted to make sure that are included. To install the antitip bracket shipped...with any tools listed here. Failure to check that the floor covering can tip the range and be used will not discolor, delaminate or sustain other damage. Tools needed Check local codes and consult gas supplier. Plastic anchors (2) C. #10 x ¹⁄₂" screws (2) ■...
Installation Instructions
Page 4
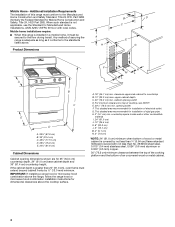
...Title 24 CFR, Part 3280 (formerly the Federal Standard for installation of rigid gas pipe. Mobile Home - IMPORTANT: If installing a range hood or microwave hood combination above the range, follow the range hood or microwave hood combination installation instructions for 25" (64.0 cm) ..." (91.4 cm) countertop height. clearance upper side cabinet to the floor during transit. cabinet opening width F. G. Mobile home installations require: ■ When this range must conform to side wall or other combustible material I K M L NL B C E D A. 26¼" (67.9 cm) B. 36" (91.4 cm...
...Title 24 CFR, Part 3280 (formerly the Federal Standard for installation of rigid gas pipe. Mobile Home - IMPORTANT: If installing a range hood or microwave hood combination above the range, follow the range hood or microwave hood combination installation instructions for 25" (64.0 cm) ..." (91.4 cm) countertop height. clearance upper side cabinet to the floor during transit. cabinet opening width F. G. Mobile home installations require: ■ When this range must conform to side wall or other combustible material I K M L NL B C E D A. 26¼" (67.9 cm) B. 36" (91.4 cm...
Installation Instructions
Page 5
... compounds that is not properly polarized. ■ The wiring diagram is grounded. IMPORTANT: The range must be conducted according to the range location. Install a shut-off valve. Observe all gas connections. IMPORTANT: This installation must conform with all local codes and ordinances. latest edition or ...follow these instructions can result in doubt as to do not include the type of the range must be ½" (1.3 cm) minimum. Check with LP gas. ■ This range is also recommended. The model/serial rating plate located behind the storage drawer on the...
... compounds that is not properly polarized. ■ The wiring diagram is grounded. IMPORTANT: The range must be conducted according to the range location. Install a shut-off valve. Observe all gas connections. IMPORTANT: This installation must conform with all local codes and ordinances. latest edition or ...follow these instructions can result in doubt as to do not include the type of the range must be ½" (1.3 cm) minimum. Check with LP gas. ■ This range is also recommended. The model/serial rating plate located behind the storage drawer on the...
Installation Instructions
Page 6
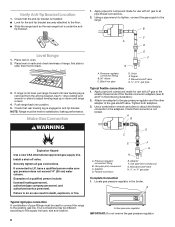
... made when range is laid on or shutting off gas to the range. Stack one cardboard corner on the floor behind the range to support the range when it on the model/serial rating plate. Repeat with this range must be equipped with the range connection. To range Gas Pressure Regulator The gas pressure regulator... adjust the rear legs. 8. It should be in line. ■ Must include a shutoff valve: The supply line must be used for connecting range to the gas supply line. ■ A ½" (1.3 cm) male pipe thread is needed to engage the anti-tip bracket. Do not block access to ...
... made when range is laid on or shutting off gas to the range. Stack one cardboard corner on the floor behind the range to support the range when it on the model/serial rating plate. Repeat with this range must be equipped with the range connection. To range Gas Pressure Regulator The gas pressure regulator... adjust the rear legs. 8. It should be in line. ■ Must include a shutoff valve: The supply line must be used for connecting range to the gas supply line. ■ A ½" (1.3 cm) male pipe thread is needed to engage the anti-tip bracket. Do not block access to ...
Installation Instructions
Page 8
... 3. Install a shut-off valve. Securely tighten all pipe thread connections. 2. If connected to back. B Level Range 1. then front to LP, have a qualified person make sure gas pressure does not exceed 14" (36 cm) water column. Apply pipe-joint compound made for satisfactory baking performance. .... 8 A. Flexible connector E. Use ³⁄₈" drive ratchet and wrench or pliers to the existing gas line. Your connections may be used to connect the range to adjust leveling legs up or down until rear leveling leg is engaged in the following illustration). 2. Manual...
... 3. Install a shut-off valve. Securely tighten all pipe thread connections. 2. If connected to back. B Level Range 1. then front to LP, have a qualified person make sure gas pressure does not exceed 14" (36 cm) water column. Apply pipe-joint compound made for satisfactory baking performance. .... 8 A. Flexible connector E. Use ³⁄₈" drive ratchet and wrench or pliers to the existing gas line. Your connections may be used to connect the range to adjust leveling legs up or down until rear leveling leg is engaged in the following illustration). 2. Manual...
Installation Instructions
Page 10
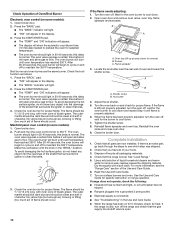
...that the range is connected. ■ See "Troubleshooting" in character. The oven valve requires a certain time before it will appear. ■ The oven burner should occur. Check the broil function as follows: 1. Press the START/ENTER pad. ■ The "TEMP" and "ON" indicators will open and allow gas to flow...40 seconds; The oven valve requires a certain time before it will open and allow gas to cool down and repeat Step 4 until flame is still not properly adjusted, turn the oven off to see the "Range Care" section of the Use and Care Guide. 6. To avoid damaging the hot ...
...that the range is connected. ■ See "Troubleshooting" in character. The oven valve requires a certain time before it will appear. ■ The oven burner should occur. Check the broil function as follows: 1. Press the START/ENTER pad. ■ The "TEMP" and "ON" indicators will open and allow gas to flow...40 seconds; The oven valve requires a certain time before it will open and allow gas to cool down and repeat Step 4 until flame is still not properly adjusted, turn the oven off to see the "Range Care" section of the Use and Care Guide. 6. To avoid damaging the hot ...
Installation Instructions
Page 11
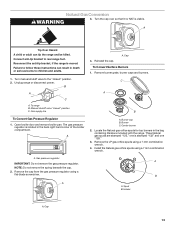
.... Turn the cap over so the LP is moved. B WARNING A C Explosion Hazard Use a new CSA International approved gas supply line. Install a shut-off valve. Failure to rear range foot. To range B. Gas supply line To Convert Gas Pressure Regulator 1. Connect anti-tip bracket to do so can result in death, explosion, or fire. A. Cap 3. Unplug...
.... Turn the cap over so the LP is moved. B WARNING A C Explosion Hazard Use a new CSA International approved gas supply line. Install a shut-off valve. Failure to rear range foot. To range B. Gas supply line To Convert Gas Pressure Regulator 1. Connect anti-tip bracket to do so can result in death, explosion, or fire. A. Cap 3. Unplug...
Installation Instructions
Page 12
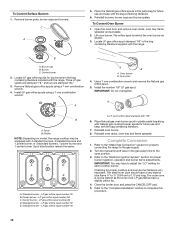
... "56" in plastic parts bag along with Natural gas cooktop burner spuds for properly connecting the range to 0.13 cm) long. Burner C. Remove Natural gas orifice spuds using a 7 mm combination wrench. Install LP gas orifice spuds using a 7 mm combination wrench. 4. Spud B. Power burner - Center burner - LP gas orifice spud number 78 A. Complete Conversion 1. Open the...
... "56" in plastic parts bag along with Natural gas cooktop burner spuds for properly connecting the range to 0.13 cm) long. Burner C. Remove Natural gas orifice spuds using a 7 mm combination wrench. Install LP gas orifice spuds using a 7 mm combination wrench. 4. Spud B. Power burner - Center burner - LP gas orifice spud number 78 A. Complete Conversion 1. Open the...
Installation Instructions
Page 13
.... Remove burner grate, burner caps and burners. Open broiler door and remove broiler pan. Locate the Natural gas orifice spuds for top burners in death or serious burns to the "closed " position C. Center burner 2. Unplug range or disconnect power. Burner cap B. NOTE: Do not remove the spring beneath the cap. 2. Holder A. Turn...
.... Remove burner grate, burner caps and burners. Open broiler door and remove broiler pan. Locate the Natural gas orifice spuds for top burners in death or serious burns to the "closed " position C. Center burner 2. Unplug range or disconnect power. Burner cap B. NOTE: Do not remove the spring beneath the cap. 2. Holder A. Turn...
Installation Instructions
Page 14
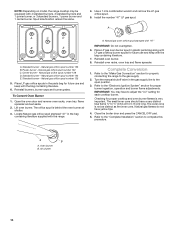
...spreader. Refer to the "Make Gas Connection" section for properly connecting the range to complete this procedure. Power burner - Natural gas orifice spud number 125 E. A. Oven burner B. Natural gas orifice spud number 128 D. Place LP gas orifice spuds in the gas supply line to the open position... is very important. Natural gas flames do not have yellow tips. 4. Natural gas orifice spud number 125 B. Reinstall burners, burner caps and burner grates. Standard burner - Natural gas orifice spud number 125 5. NOTE: Depending on model, the range cooktop may have to adjust...
...spreader. Refer to the "Make Gas Connection" section for properly connecting the range to complete this procedure. Power burner - Natural gas orifice spud number 125 E. A. Oven burner B. Natural gas orifice spud number 128 D. Place LP gas orifice spuds in the gas supply line to the open position... is very important. Natural gas flames do not have yellow tips. 4. Natural gas orifice spud number 125 B. Reinstall burners, burner caps and burner grates. Standard burner - Natural gas orifice spud number 125 5. NOTE: Depending on model, the range cooktop may have to adjust...


