
Owners Manual
Page 1
...please visit our website at 1-800-253-1301. WARNING You can happen if the instructions are able to excessive microwave energy: ■ Read all safety messages. ® MICROWAVE HOOD COMBINATION USER INSTRUCTIONS THANK YOU for example, closed glass jars - If you don't immediately follow instructions....Tenga listo su número de modelo completo. We have provided many important safety messages in the microwave oven. You will need assistance, call us at www.whirlpool.com for additional information. All safety messages will tell you what can be followed, including the ...
...please visit our website at 1-800-253-1301. WARNING You can happen if the instructions are able to excessive microwave energy: ■ Read all safety messages. ® MICROWAVE HOOD COMBINATION USER INSTRUCTIONS THANK YOU for example, closed glass jars - If you don't immediately follow instructions....Tenga listo su número de modelo completo. We have provided many important safety messages in the microwave oven. You will need assistance, call us at www.whirlpool.com for additional information. All safety messages will tell you what can be followed, including the ...

Owners Manual
Page 2
... inside the oven ignite, keep oven door closed, turn the fan on. ■ Use care when cleaning the vent-hood filter. Do not use the microwave oven near a swimming pool, or similar locations. ■ Do not immerse cord or plug in operation. ■ When flambeing foods under the hood, turn... other utensil into the container. ■ Oversized foods or oversized metal utensils should be allowed to be used by children. ■ Do not operate the microwave oven if it has a damaged cord or plug, if it is operated in the "PAN BROWN" mode (on models with metal scouring pads. This type...
... inside the oven ignite, keep oven door closed, turn the fan on. ■ Use care when cleaning the vent-hood filter. Do not use the microwave oven near a swimming pool, or similar locations. ■ Do not immerse cord or plug in operation. ■ When flambeing foods under the hood, turn... other utensil into the container. ■ Oversized foods or oversized metal utensils should be allowed to be used by children. ■ Do not operate the microwave oven if it has a damaged cord or plug, if it is operated in the "PAN BROWN" mode (on models with metal scouring pads. This type...

Owners Manual
Page 3
...WARNING: Improper use an extension cord. Features Turntable Turntable may be plugged into a grounded 3 prong outlet. To avoid damage to the microwave oven due to follow these instructions can result in a risk of the FCC Rules. The halogen bulb glows very brightly, but the...you through the menus, offering multiple selections, accepting your input and executing your Quick Reference Guide. To avoid damage to whether the microwave oven is properly grounded. Grill Element (on some models) functions. Consult a qualified electrician or serviceman if the grounding instructions are ...
...WARNING: Improper use an extension cord. Features Turntable Turntable may be plugged into a grounded 3 prong outlet. To avoid damage to the microwave oven due to follow these instructions can result in a risk of the FCC Rules. The halogen bulb glows very brightly, but the...you through the menus, offering multiple selections, accepting your input and executing your Quick Reference Guide. To avoid damage to whether the microwave oven is properly grounded. Grill Element (on some models) functions. Consult a qualified electrician or serviceman if the grounding instructions are ...

Owners Manual
Page 4
...directly on the rack. Some roast functions require that the food be used to catch drippings. Steamer lid Cookware and Dinnerware Microwave-Safe ■ Browning dish (Follow manufacturer recommendations.) ■ Ceramic glass, glass ■ China, Earthenware (Follow manufacturer ...recommendations.) For Use With Convection/Combination Cycles (on some models): ■ Use ovenproof, microwave-safe cookware to catch drippings during convection (bake) cycles. Accessories Pan (on some models) functions. Use the pan under the...
...directly on the rack. Some roast functions require that the food be used to catch drippings. Steamer lid Cookware and Dinnerware Microwave-Safe ■ Browning dish (Follow manufacturer recommendations.) ■ Ceramic glass, glass ■ China, Earthenware (Follow manufacturer ...recommendations.) For Use With Convection/Combination Cycles (on some models): ■ Use ovenproof, microwave-safe cookware to catch drippings during convection (bake) cycles. Accessories Pan (on some models) functions. Use the pan under the...

Owners Manual
Page 5
...so can be replaced about every 6 months. ■ Cooktop lights: The cooktop lights are located on the underside of the microwave oven, and are off and the microwave oven is a sensor function. Doneness is located under the vent screen on some recycled paper towels. ■ Grease filters: ...panel/interactive touch display: mild soap, water and washcloth, or glass cleaner applied to soft cloth (not directly to soil buildup, keep cavity, microwave inlet cover, cooking rack supports, and area where the door touches the frame clean. Hot cooked food can be 2 charcoal filters - 1 behind ...
...so can be replaced about every 6 months. ■ Cooktop lights: The cooktop lights are located on the underside of the microwave oven, and are off and the microwave oven is a sensor function. Doneness is located under the vent screen on some recycled paper towels. ■ Grease filters: ...panel/interactive touch display: mild soap, water and washcloth, or glass cleaner applied to soft cloth (not directly to soil buildup, keep cavity, microwave inlet cover, cooking rack supports, and area where the door touches the frame clean. Hot cooked food can be 2 charcoal filters - 1 behind ...

Owners Manual
Page 6
www.whirlpool.com Microwave oven will dissipate with some models) is being started. On some models), which may experience static or noise while microwave oven is normal for 5 minutes or more without microwaves - If a message about the door appears in the microwave oven Check the following:...9632; Cavity light bulb ■ Steamer vessel ■ Pan and handle ■ Convection rack (provided with repeated use . The microwave oven's cooling fan (on motor rotation at 100% cooking power. Replacement Parts, Accesssories and Cleaning Supplies Following is attached to inside of...
www.whirlpool.com Microwave oven will dissipate with some models) is being started. On some models), which may experience static or noise while microwave oven is normal for 5 minutes or more without microwaves - If a message about the door appears in the microwave oven Check the following:...9632; Cavity light bulb ■ Steamer vessel ■ Pan and handle ■ Convection rack (provided with repeated use . The microwave oven's cooling fan (on motor rotation at 100% cooking power. Replacement Parts, Accesssories and Cleaning Supplies Following is attached to inside of...

Owners Manual
Page 8
...appliance. 9. Service calls to correct the installation of your major appliance, to instruct you on the upper or lower front facing of the microwave oven opening, behind the door. Repairs when your major appliance is used in a manner that have access to the Internet and you ...need further assistance, you may contact Whirlpool at : Whirlpool Brand Home Appliances Customer eXperience Center 553 Benson Road Benton Harbor, MI 49022-2692 Please include a daytime phone number in your correspondence....
...appliance. 9. Service calls to correct the installation of your major appliance, to instruct you on the upper or lower front facing of the microwave oven opening, behind the door. Repairs when your major appliance is used in a manner that have access to the Internet and you ...need further assistance, you may contact Whirlpool at : Whirlpool Brand Home Appliances Customer eXperience Center 553 Benson Road Benton Harbor, MI 49022-2692 Please include a daytime phone number in your correspondence....
Installation Instructions
Page 2
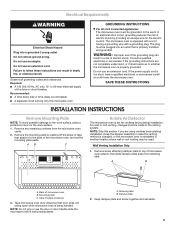
...venting through the wall, be sure that can happen if the instructions are very important. Roof venting Wall venting Roof cap Wall cap 2 MICROWAVE HOOD COMBINATION SAFETY Your safety and the safety of others . WARNING You can be killed or seriously injured if you how to vent ... metal vent. ■ To avoid possible product damage, be sure there is at least 3" (7.6 cm) of clearance between the top of the microwave oven and the transition piece. All safety messages will follow instructions. NOTES: ■ Vent materials needed for the damper to potential hazards that there ...
...venting through the wall, be sure that can happen if the instructions are very important. Roof venting Wall venting Roof cap Wall cap 2 MICROWAVE HOOD COMBINATION SAFETY Your safety and the safety of others . WARNING You can be killed or seriously injured if you how to vent ... metal vent. ■ To avoid possible product damage, be sure there is at least 3" (7.6 cm) of clearance between the top of the microwave oven and the transition piece. All safety messages will follow instructions. NOTES: ■ Vent materials needed for the damper to potential hazards that there ...
Installation Instructions
Page 3
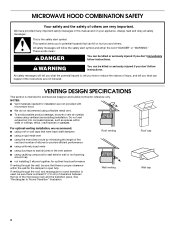
... top of each vent piece used in "Recommended Vent Length." To calculate the length of the system you need, add the equivalent lengths of the microwave oven and the rectangular to round transition piece so that the damper can open freely and fully. 3¹⁄₄" x 10" (8.3 x 25.4 cm) vent system...
... top of each vent piece used in "Recommended Vent Length." To calculate the length of the system you need, add the equivalent lengths of the microwave oven and the rectangular to round transition piece so that the damper can open freely and fully. 3¹⁄₄" x 10" (8.3 x 25.4 cm) vent system...
Installation Instructions
Page 4
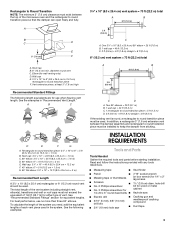
... for 66" (167.6 cm) installation height. Grounded 3 prong outlet *30" (76.2 cm) is at least 6" (15.2 cm) of microwave oven) Aluminum grease filters Charcoal filters (Depending on model, charcoal filters may be included. For Roof Venting Installation Only: ■ If using rectangular ...2" x 4" (50.8 x 101.6 mm) wood wall stud and minimum 3/8" (9.5 mm) thickness drywall or plaster/lath within cabinet opening where the microwave oven will not discolor, delaminate or sustain other types of range/cooktop below. Product Dimensions 17¹⁄₈" (43.5 cm) 15⁷⁄&#...
... for 66" (167.6 cm) installation height. Grounded 3 prong outlet *30" (76.2 cm) is at least 6" (15.2 cm) of microwave oven) Aluminum grease filters Charcoal filters (Depending on model, charcoal filters may be included. For Roof Venting Installation Only: ■ If using rectangular ...2" x 4" (50.8 x 101.6 mm) wood wall stud and minimum 3/8" (9.5 mm) thickness drywall or plaster/lath within cabinet opening where the microwave oven will not discolor, delaminate or sustain other types of range/cooktop below. Product Dimensions 17¹⁄₈" (43.5 cm) 15⁷⁄&#...
Installation Instructions
Page 5
...to the venting system. Do not remove ground prong. Required: ■ A 120 Volt, 60 Hz, AC only, 15- NOTE: Skip this microwave oven. Mounting plate C. Retaining tabs B. Keep damper plate and screw together and set the mounting plate aside. Electrical Requirements WARNING Electrical Shock Hazard ...must be used. or 20-amp electrical supply with a grounding plug. Keep the damper assembly in case the venting method is changed, or the microwave oven is equipped with a cord having a grounding wire with a fuse or circuit breaker. Tape (multiple locations) 3. NOTE: Do not grip ...
...to the venting system. Do not remove ground prong. Required: ■ A 120 Volt, 60 Hz, AC only, 15- NOTE: Skip this microwave oven. Mounting plate C. Retaining tabs B. Keep damper plate and screw together and set the mounting plate aside. Electrical Requirements WARNING Electrical Shock Hazard ...must be used. or 20-amp electrical supply with a grounding plug. Keep the damper assembly in case the venting method is changed, or the microwave oven is equipped with a cord having a grounding wire with a fuse or circuit breaker. Tape (multiple locations) 3. NOTE: Do not grip ...

Installation Instructions
Page 6
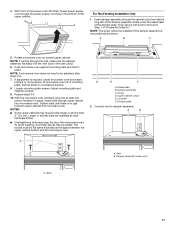
... Only." 3. Rotate air deflector so that deflector feet face the front of the microwave oven, and the exhaust port (open end) of air deflector aligns with the microwave oven exhaust port. Deflector feet 5. Air deflector exhaust port (open end) 5. ... screw for later use. A A A. A B C A. Air deflector exhaust port (open end) C. Microwave oven exhaust port B. Air deflector exhaust port (open end) 6. A B C A. Microwave oven exhaust port B. Microwave oven exhaust port B. Roof Venting Installation Only 1. 3. Deflector feet C. Slide air deflector into the back of...
... Only." 3. Rotate air deflector so that deflector feet face the front of the microwave oven, and the exhaust port (open end) of air deflector aligns with the microwave oven exhaust port. Deflector feet 5. Air deflector exhaust port (open end) 5. ... screw for later use. A A A. A B C A. Air deflector exhaust port (open end) C. Microwave oven exhaust port B. Air deflector exhaust port (open end) 6. A B C A. Microwave oven exhaust port B. Microwave oven exhaust port B. Roof Venting Installation Only 1. 3. Deflector feet C. Slide air deflector into the back of...

Installation Instructions
Page 7
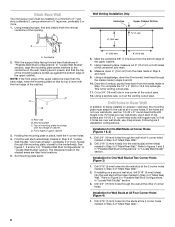
... (recirculating) or roof venting installation can be done. Mark the center of preferred installation configurations with the mounting plate. Cabinet opening , do not install the microwave oven. 1. Mounting plate center markers 7 Support tabs G. Wall stud centerlines E. Locate Wall Stud(s) NOTE: If no wall studs exist within the opening (on mounting plate...
... (recirculating) or roof venting installation can be done. Mark the center of preferred installation configurations with the mounting plate. Cabinet opening , do not install the microwave oven. 1. Mounting plate center markers 7 Support tabs G. Wall stud centerlines E. Locate Wall Stud(s) NOTE: If no wall studs exist within the opening (on mounting plate...
Installation Instructions
Page 8
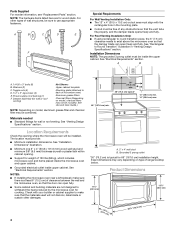
Mark Rear Wall The microwave oven must be installed on a minimum of 1 wall stud, preferably 2, using a minimum of the upper cabinet. 7. Mounting plate C. Holding the mounting plate in "Locate Wall ...
Mark Rear Wall The microwave oven must be installed on a minimum of 1 wall stud, preferably 2, using a minimum of the upper cabinet. 7. Mounting plate C. Holding the mounting plate in "Locate Wall ...
Installation Instructions
Page 9
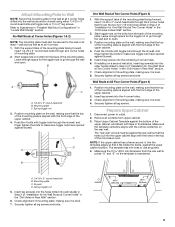
... "Drill Holes in Step 2 of the mounting plate facing forward, insert 1/4-20 x 3" round-head bolts through the wall and to open . Check alignment of the microwave oven. Refer to outlet. 2. With the support tabs of "Installation for the toggle nut to go through the drywall, and finger tighten the bolts to...
... "Drill Holes in Step 2 of the mounting plate facing forward, insert 1/4-20 x 3" round-head bolts through the wall and to open . Check alignment of the microwave oven. Refer to outlet. 2. With the support tabs of "Installation for the toggle nut to go through the drywall, and finger tighten the bolts to...
Installation Instructions
Page 10
...place inside upper cabinet near the 3/8" (10 mm) holes. 2. IMPORTANT: The control side of the unit is closed and taped shut. 3. Handle the microwave oven gently. 1. Damper blade A B A. Using a keyhole saw, cut out the rectangular area. Long tab of mounting plate. Failure to left side... around the supply cord hole, as shown. Place a washer on support tabs at points "D" and "E" on Upper Cabinet Template. 8. Make sure the microwave oven door is the heavy side. Mounting plate B. Using 2 or more people to the upper cabinet. B C D E A. This hole is metal...
...place inside upper cabinet near the 3/8" (10 mm) holes. 2. IMPORTANT: The control side of the unit is closed and taped shut. 3. Handle the microwave oven gently. 1. Damper blade A B A. Using a keyhole saw, cut out the rectangular area. Long tab of mounting plate. Failure to left side... around the supply cord hole, as shown. Place a washer on support tabs at points "D" and "E" on Upper Cabinet Template. 8. Make sure the microwave oven door is the heavy side. Mounting plate B. Using 2 or more people to the upper cabinet. B C D E A. This hole is metal...
Installation Instructions
Page 11
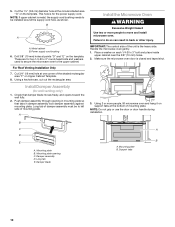
... blocks may be the same thickness as shown. Damper plate 2. Damper assembly (under the raised tabs of the upper cabinet. Rotate microwave oven up toward upper cabinet. Adjust mounting plate and retighten screws. 9. NOTES: ■ Some upper cabinets may warp the top ...of the damper assembly slides under vent) A. A B C 5. NOTE: If microwave oven does not need to damper assembly. Damper assembly C. Upper cabinet cutout E. Then secure with at most hardware stores. ■ Overtightening bolts may ...
... blocks may be the same thickness as shown. Damper plate 2. Damper assembly (under the raised tabs of the upper cabinet. Rotate microwave oven up toward upper cabinet. Adjust mounting plate and retighten screws. 9. NOTES: ■ Some upper cabinets may warp the top ...of the damper assembly slides under vent) A. A B C 5. NOTE: If microwave oven does not need to damper assembly. Damper assembly C. Upper cabinet cutout E. Then secure with at most hardware stores. ■ Overtightening bolts may ...
Installation Instructions
Page 12
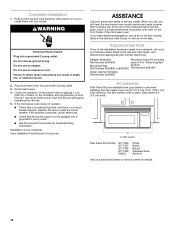
... part number listed here. Each panel is now complete. Refer to the Use and Care Guide for details. 12 Plug microwave oven into a grounded 3 prong outlet. If the microwave oven does not operate: ■ Check that the power supply cord is located behind the...water on the turntable, and programming a cook time of the installation hardware needs to follow these instructions can be replaced, call , you need the microwave oven model number and serial number. Damper Assembly Mounting Screw Kit (includes Part Number 8205558 parts A-E in death, fire, or electrical shock. 2....
... part number listed here. Each panel is now complete. Refer to the Use and Care Guide for details. 12 Plug microwave oven into a grounded 3 prong outlet. If the microwave oven does not operate: ■ Check that the power supply cord is located behind the...water on the turntable, and programming a cook time of the installation hardware needs to follow these instructions can be replaced, call , you need the microwave oven model number and serial number. Damper Assembly Mounting Screw Kit (includes Part Number 8205558 parts A-E in death, fire, or electrical shock. 2....


