
Owners Manual
Page 1
... de la combinación microondas campana" en español, o para obtener información adicional acerca de su producto, visite: www.whirlpool.com Tenga listo su número de modelo completo. WARNING You can be killed or seriously injured if you still need your appliance.... If you don't immediately follow the specific "PRECAUTIONS TO AVOID POSSIBLE EXPOSURE TO EXCESSIVE MICROWAVE ENERGY" found in this high-quality product. All safety messages will need assistance, call us at www.whirlpool.com for example, closed glass jars - These words mean: DANGER You can be killed...
... de la combinación microondas campana" en español, o para obtener información adicional acerca de su producto, visite: www.whirlpool.com Tenga listo su número de modelo completo. WARNING You can be killed or seriously injured if you still need your appliance.... If you don't immediately follow the specific "PRECAUTIONS TO AVOID POSSIBLE EXPOSURE TO EXCESSIVE MICROWAVE ENERGY" found in this high-quality product. All safety messages will need assistance, call us at www.whirlpool.com for example, closed glass jars - These words mean: DANGER You can be killed...

Owners Manual
Page 2
...(broken or loosened), (3) Door seals and sealing surfaces. (d) The oven should not be used by children. ■ Do not operate the microwave oven if it has a damaged cord or plug, if it is not designed for storage purposes. Call an authorized service company for examination, ...to be serviced only by anyone except properly qualified service personnel. 2 Grease should be boiling. Do not overcook food. Carefully attend the microwave oven when paper, plastic, or other than manufacturer's recommended accessories, in this oven when not in use straight-sided containers with the...
...(broken or loosened), (3) Door seals and sealing surfaces. (d) The oven should not be used by children. ■ Do not operate the microwave oven if it has a damaged cord or plug, if it is not designed for storage purposes. Call an authorized service company for examination, ...to be serviced only by anyone except properly qualified service personnel. 2 Grease should be boiling. Do not overcook food. Carefully attend the microwave oven when paper, plastic, or other than manufacturer's recommended accessories, in this oven when not in use straight-sided containers with the...

Owners Manual
Page 3
...9632; A 120 Volt, 60 Hz, AC only, 15- Consult a qualified electrician or serviceman if the grounding instructions are embedded in the microwave oven detects moisture released from food as to view the list of sensor functions. Grill Element (on some models) for the electric current....understood, or if doubt exists as it also comes on some models) This microwave system delivers a constant stream of the selected microwave power, whereas typical microwave systems deliver only intervals of the microwave oven cavity, behind the metal screen. To avoid damage to soil buildup, ...
...9632; A 120 Volt, 60 Hz, AC only, 15- Consult a qualified electrician or serviceman if the grounding instructions are embedded in the microwave oven detects moisture released from food as to view the list of sensor functions. Grill Element (on some models) for the electric current....understood, or if doubt exists as it also comes on some models) This microwave system delivers a constant stream of the selected microwave power, whereas typical microwave systems deliver only intervals of the microwave oven cavity, behind the metal screen. To avoid damage to soil buildup, ...

Owners Manual
Page 4
...rack E. Steamer insert H. Steamer Vessel (on some models) Use the steamer vessel base, insert and lid for steaming, or use the dish in the microwave oven. 4 Convection Rack (on some models) Use the convection rack for grilling. Cookie sheet (not provided) F. Some roast functions require that the ... If dish becomes hot and the water stays cool, do not use just the base and lid for pan-frying (browning). Use ovenproof, microwave-safe cookware for some roast functions. Accessories Pan (on some models) Use the provided pan for simmering. The pan may be placed directly...
...rack E. Steamer insert H. Steamer Vessel (on some models) Use the steamer vessel base, insert and lid for steaming, or use the dish in the microwave oven. 4 Convection Rack (on some models) Use the convection rack for grilling. Cookie sheet (not provided) F. Some roast functions require that the ... If dish becomes hot and the water stays cool, do not use just the base and lid for pan-frying (browning). Use ovenproof, microwave-safe cookware for some roast functions. Accessories Pan (on some models) Use the provided pan for simmering. The pan may be placed directly...

Owners Manual
Page 5
...panel/interactive touch display: mild soap, water and washcloth, or glass cleaner applied to soft cloth (not directly to soil buildup, keep cavity, microwave inlet cover, cooking rack supports, and area where the door touches the frame clean. Food Poisoning Hazard Do not let food sit in food... filter under the vent screen on the touch screen during programing, and following the prompts. The Warm Hold function uses 10% cook power. Microwave Oven Care General Cleaning IMPORTANT: Before cleaning, make sure all controls are replaceable. ■ Cavity light: The cavity light bulb is located ...
...panel/interactive touch display: mild soap, water and washcloth, or glass cleaner applied to soft cloth (not directly to soil buildup, keep cavity, microwave inlet cover, cooking rack supports, and area where the door touches the frame clean. Food Poisoning Hazard Do not let food sit in food... filter under the vent screen on the touch screen during programing, and following the prompts. The Warm Hold function uses 10% cook power. Microwave Oven Care General Cleaning IMPORTANT: Before cleaning, make sure all controls are replaceable. ■ Cavity light: The cavity light bulb is located ...

Owners Manual
Page 6
... the door, remove it does not toast, call for 5 minutes or more without microwaves - Troubleshooting First try the steps below is being started. www.whirlpool.com Microwave oven will dissipate with some models), which may experience static or noise while microwave oven is not unusual. If the problem continues, call an electrician. ■ Magnetron...
... the door, remove it does not toast, call for 5 minutes or more without microwaves - Troubleshooting First try the steps below is being started. www.whirlpool.com Microwave oven will dissipate with some models), which may experience static or noise while microwave oven is not unusual. If the problem continues, call an electrician. ■ Magnetron...

Owners Manual
Page 8
...PROVIDED HEREIN. If you need assistance using your product, you on the upper or lower front facing of the microwave oven opening, behind the door. Proof of Whirlpool, U.S.A. 461966100262 11/07 Printed in a manner that have access to the Internet and you need further assistance... in the United States or Canada and applies only when the major appliance is covered by Whirlpool. 5. Major appliances with the product, Whirlpool Corporation or Whirlpool Canada LP (hereafter "Whirlpool") will pay for other damage to the finish of your complete model number ready. Service ...
...PROVIDED HEREIN. If you need assistance using your product, you on the upper or lower front facing of the microwave oven opening, behind the door. Proof of Whirlpool, U.S.A. 461966100262 11/07 Printed in a manner that have access to the Internet and you need further assistance... in the United States or Canada and applies only when the major appliance is covered by Whirlpool. 5. Major appliances with the product, Whirlpool Corporation or Whirlpool Canada LP (hereafter "Whirlpool") will pay for other damage to the finish of your complete model number ready. Service ...
Installation Instructions
Page 2
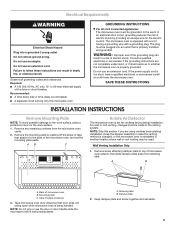
... the instructions are not followed. VENTING DESIGN SPECIFICATIONS This section is at least 3" (7.6 cm) of clearance between the top of the microwave oven and the transition piece. NOTES: ■ Vent materials needed for installation are very important. WARNING You can kill or hurt you... and others are not provided with microwave hood. ■ We do not recommend using a flexible metal vent. ■ To avoid possible product damage, be killed or seriously injured ...
... the instructions are not followed. VENTING DESIGN SPECIFICATIONS This section is at least 3" (7.6 cm) of clearance between the top of the microwave oven and the transition piece. NOTES: ■ Vent materials needed for installation are very important. WARNING You can kill or hurt you... and others are not provided with microwave hood. ■ We do not recommend using a flexible metal vent. ■ To avoid possible product damage, be killed or seriously injured ...
Installation Instructions
Page 3
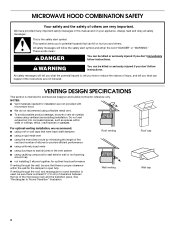
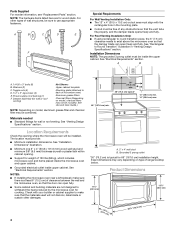
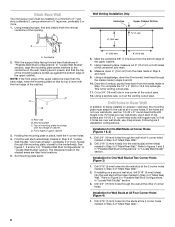
.... 2 Phillips screwdriver bit for wood or metal ■ No. 3 Phillips screwdriver for equivalent lengths. In addition, a rectangular 3" (7.6 cm) extension vent between the top of the microwave oven and the rectangular to round transition piece so that the damper can open freely and fully. 3¹⁄₄" x 10" (8.3 x 25.4 cm) vent system...
.... 2 Phillips screwdriver bit for wood or metal ■ No. 3 Phillips screwdriver for equivalent lengths. In addition, a rectangular 3" (7.6 cm) extension vent between the top of the microwave oven and the rectangular to round transition piece so that the damper can open freely and fully. 3¹⁄₄" x 10" (8.3 x 25.4 cm) vent system...
Installation Instructions
Page 4
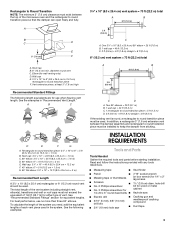
...9632; Standard fittings for wall or roof venting) Not Shown: Upper cabinet template Mounting plate (attached to withstand the heat produced by the microwave oven for 66" (167.6 cm) installation height. See "Installation Dimensions" illustration. ■ Minimum one 2" x 4" (50.8 x... 101.6 mm) wood wall stud and minimum 3/8" (9.5 mm) thickness drywall or plaster/lath within cabinet opening where the microwave oven will not discolor, delaminate or sustain other types of range/cooktop below. See "Electrical Requirements" section. See "Electrical Requirements" section. ...
...9632; Standard fittings for wall or roof venting) Not Shown: Upper cabinet template Mounting plate (attached to withstand the heat produced by the microwave oven for 66" (167.6 cm) installation height. See "Installation Dimensions" illustration. ■ Minimum one 2" x 4" (50.8 x... 101.6 mm) wood wall stud and minimum 3/8" (9.5 mm) thickness drywall or plaster/lath within cabinet opening where the microwave oven will not discolor, delaminate or sustain other types of range/cooktop below. See "Electrical Requirements" section. See "Electrical Requirements" section. ...
Installation Instructions
Page 5
... roof venting, changes must be plugged into a grounded 3 prong outlet. Remove screw attaching damper plate to whether the microwave oven is being manipulated. Tape (multiple locations) 3. Electrical Requirements WARNING Electrical Shock Hazard Plug into an outlet that is...extension cord. Consult a qualified electrician or serviceman if the grounding instructions are using ventless (recirculating) installation. NOTE: Skip this microwave oven. Damper plate 2. Do not remove ground prong. or 20-amp electrical supply with a grounding plug. Wall Venting Installation ...
... roof venting, changes must be plugged into a grounded 3 prong outlet. Remove screw attaching damper plate to whether the microwave oven is being manipulated. Tape (multiple locations) 3. Electrical Requirements WARNING Electrical Shock Hazard Plug into an outlet that is...extension cord. Consult a qualified electrician or serviceman if the grounding instructions are using ventless (recirculating) installation. NOTE: Skip this microwave oven. Damper plate 2. Do not remove ground prong. or 20-amp electrical supply with a grounding plug. Wall Venting Installation ...

Installation Instructions
Page 6
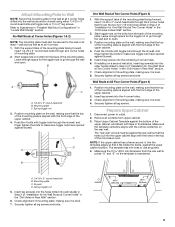
... exhaust port B. Save screw for later use. Rotate air deflector front to back so that deflector feet face the bottom of the microwave oven, and the exhaust port (open end) aligns with screw. Air deflector exhaust port (open end) 6. A B C A. Retaining tabs ...Slide damper plate under the retaining tabs, then secure with the microwave oven exhaust port. A B C A. Deflector feet C. Retaining tabs A. Microwave oven exhaust port B. Deflector feet 5. Microwave oven exhaust port B. 3. Slide air deflector out of the microwave oven as shown, making sure its exhaust port (open end...
... exhaust port B. Save screw for later use. Rotate air deflector front to back so that deflector feet face the bottom of the microwave oven, and the exhaust port (open end) aligns with screw. Air deflector exhaust port (open end) 6. A B C A. Retaining tabs ...Slide damper plate under the retaining tabs, then secure with the microwave oven exhaust port. A B C A. Deflector feet C. Retaining tabs A. Microwave oven exhaust port B. Deflector feet 5. Microwave oven exhaust port B. 3. Slide air deflector out of the microwave oven as shown, making sure its exhaust port (open end...

Installation Instructions
Page 7
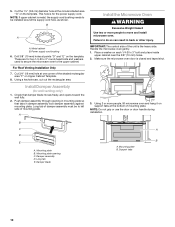
... Holes Figure 3 Wall Studs at Corner Holes Figure 2 A AA A G CG C B B E E A AA A F FF F D DG D G NOTE: If wall stud is behind vent opening , do not install the microwave oven. 1. Wall vent opening (on mounting plate) B. Support tabs G. Corner holes (on mounting plate) D. See illustrations in "Possible Wall Stud Configurations." 2. No Wall Studs at...
... Holes Figure 3 Wall Studs at Corner Holes Figure 2 A AA A G CG C B B E E A AA A F FF F D DG D G NOTE: If wall stud is behind vent opening , do not install the microwave oven. 1. Wall vent opening (on mounting plate) B. Support tabs G. Corner holes (on mounting plate) D. See illustrations in "Possible Wall Stud Configurations." 2. No Wall Studs at...
Installation Instructions
Page 8
... mark at All Four Corner Holes (Figure 4) 1. Refer to the centerline(s). Installation for No Wall Studs at Two Corner Holes (Figure 3) 1. Mark Rear Wall The microwave oven must be installed on a minimum of 1 wall stud, preferably 2, using a minimum of 1 lag screw, preferably 2 or more , hole(s) through the mounting plate, closest to...
... mark at All Four Corner Holes (Figure 4) 1. Refer to the centerline(s). Installation for No Wall Studs at Two Corner Holes (Figure 3) 1. Mark Rear Wall The microwave oven must be installed on a minimum of 1 wall stud, preferably 2, using a minimum of 1 lag screw, preferably 2 or more , hole(s) through the mounting plate, closest to...
Installation Instructions
Page 9
... toggle nut 5. Leave enough space for One Wall Stud at all 4 corner holes drilled into the upper cabinet align with the front edge of the microwave oven.
... toggle nut 5. Leave enough space for One Wall Stud at all 4 corner holes drilled into the upper cabinet align with the front edge of the microwave oven.
Installation Instructions
Page 10
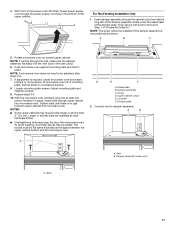
... blade moves freely, and opens toward the wall fully. 2. Long tab E. Support tabs 10 These are for the power supply cord. Handle the microwave oven gently. 1. Mounting plate B. Power supply cord bushing 6. For Roof Venting Installation Only 7. Place a washer on Upper Cabinet Template. 8. Damper.... 3. NOTE: Do not grip or use the door or door handle during installation. A Install the Microwave Oven WARNING Excessive Weight Hazard Use two or more people, lift microwave oven and hang it on support tabs at the circular shaded area "G" on the template. 5. Metal ...
... blade moves freely, and opens toward the wall fully. 2. Long tab E. Support tabs 10 These are for the power supply cord. Handle the microwave oven gently. 1. Mounting plate B. Power supply cord bushing 6. For Roof Venting Installation Only 7. Place a washer on Upper Cabinet Template. 8. Damper.... 3. NOTE: Do not grip or use the door or door handle during installation. A Install the Microwave Oven WARNING Excessive Weight Hazard Use two or more people, lift microwave oven and hang it on support tabs at the circular shaded area "G" on the template. 5. Metal ...
Installation Instructions
Page 11
... cutout so that the long tab of the damper assembly slides under vent) A. With the microwave oven centered, and with screw removed in the bottom of the microwave oven. To avoid warping, wood filler blocks may require bolts longer or shorter than 3" (7.6... 8. Bolts 11 NOTE: The screw cannot be adjusted, skip steps 7-9. 7. Loosen mounting plate screws. Screw D. A B C 5. D E F A. Rotate microwave oven up toward upper cabinet. NOTE: If microwave oven does not need to damper assembly. Raised tabs B. Damper plate 2. Damper assembly (under the raised tabs of...
... cutout so that the long tab of the damper assembly slides under vent) A. With the microwave oven centered, and with screw removed in the bottom of the microwave oven. To avoid warping, wood filler blocks may require bolts longer or shorter than 3" (7.6... 8. Bolts 11 NOTE: The screw cannot be adjusted, skip steps 7-9. 7. Loosen mounting plate screws. Screw D. A B C 5. D E F A. Rotate microwave oven up toward upper cabinet. NOTE: If microwave oven does not need to damper assembly. Raised tabs B. Damper plate 2. Damper assembly (under the raised tabs of...
Installation Instructions
Page 12
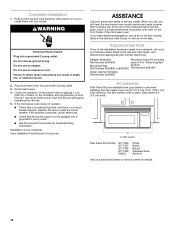
...part number listed here. Each panel is now complete. Refer to the Use and Care Guide for future use when installing this microwave oven in "Parts Supplied" Mounting Plate section) Part Number 8205892 or 8205942 Part Number 8205947 Upper Cabinet Template Part Number 8205926 .... Check the operation of the installation hardware needs to use . Replacement Parts If any of microwave oven by operating the vent fan. 5. A A. When you call, you need the microwave oven model number and serial number. Do not use an extension cord. WARNING Electrical Shock Hazard...
...part number listed here. Each panel is now complete. Refer to the Use and Care Guide for future use when installing this microwave oven in "Parts Supplied" Mounting Plate section) Part Number 8205892 or 8205942 Part Number 8205947 Upper Cabinet Template Part Number 8205926 .... Check the operation of the installation hardware needs to use . Replacement Parts If any of microwave oven by operating the vent fan. 5. A A. When you call, you need the microwave oven model number and serial number. Do not use an extension cord. WARNING Electrical Shock Hazard...


