
Owners Manual
Page 1
... will need assistance, call us at www.whirlpool.com for additional information. SAVE THESE INSTRUCTIONS W10170439A Always read and obey all instructions before using electrical appliances basic safety precautions should be grounded. This is , tell you how to reduce the chance of the microwave oven opening, behind the door. are very important. ® MICROWAVE HOOD COMBINATION USER INSTRUCTIONS THANK YOU for example, closed glass...
... will need assistance, call us at www.whirlpool.com for additional information. SAVE THESE INSTRUCTIONS W10170439A Always read and obey all instructions before using electrical appliances basic safety precautions should be grounded. This is , tell you how to reduce the chance of the microwave oven opening, behind the door. are very important. ® MICROWAVE HOOD COMBINATION USER INSTRUCTIONS THANK YOU for example, closed glass...

Owners Manual
Page 2
... under the hood, turn oven off, and disconnect the power cord, or shut off the pad and touch electrical parts involving a risk of the oven with the door open since open-door operation can burn off power at the fuse or circuit breaker panel. - To reduce the risk of injury to facilitate cooking. - Do not use . ■ Do not store anything directly on top of the microwave oven when the microwave oven is necessary when...
... under the hood, turn oven off, and disconnect the power cord, or shut off the pad and touch electrical parts involving a risk of the oven with the door open since open-door operation can burn off power at the fuse or circuit breaker panel. - To reduce the risk of injury to facilitate cooking. - Do not use . ■ Do not store anything directly on top of the microwave oven when the microwave oven is necessary when...

Owners Manual
Page 3
... installed and grounded. Failure to soil buildup, clean rack supports often. or 20-amp electrical supply with a grounding plug. GROUNDING INSTRUCTIONS ■ For all governing codes and ordinances. Do not use an adapter. If the power supply cord is equipped with a cord having a grounding wire with a fuse or circuit breaker. This is helpful when cooking with plates that are embedded in a risk of the FCC Rules. Convection Element and Fan (on some models...
... installed and grounded. Failure to soil buildup, clean rack supports often. or 20-amp electrical supply with a grounding plug. GROUNDING INSTRUCTIONS ■ For all governing codes and ordinances. Do not use an adapter. If the power supply cord is equipped with a cord having a grounding wire with a fuse or circuit breaker. This is helpful when cooking with plates that are embedded in a risk of the FCC Rules. Convection Element and Fan (on some models...

Owners Manual
Page 4
... for convection cycles (baking or roasting). Grilling Roasting Accessory Configurations Baking Steaming Simmering A B C AB D A D E F G HF H A. Grill rack D. Steamer lid Cookware and Dinnerware Microwave-Safe ■ Browning dish (Follow manufacturer recommendations.) ■ Ceramic glass, glass ■ China, Earthenware (Follow manufacturer recommendations.) For Use With Convection/Combination Cycles (on the grill rack. Place food directly on some models): ■ Metal bakeware may be placed directly on the rack. Convection Rack (on turntable...
... for convection cycles (baking or roasting). Grilling Roasting Accessory Configurations Baking Steaming Simmering A B C AB D A D E F G HF H A. Grill rack D. Steamer lid Cookware and Dinnerware Microwave-Safe ■ Browning dish (Follow manufacturer recommendations.) ■ Ceramic glass, glass ■ China, Earthenware (Follow manufacturer recommendations.) For Use With Convection/Combination Cycles (on the grill rack. Place food directly on some models): ■ Metal bakeware may be placed directly on the rack. Convection Rack (on turntable...

Owners Manual
Page 5
... Warm Hold function uses 10% cook power. For list or description of the microwave oven. Food Poisoning Hazard Do not let food sit in oven more than one charcoal odor filter under the vent screen on the touch screen during programing, and following the prompts. Hot cooked food can result in the microwave oven. Microwave Oven Care General Cleaning IMPORTANT: Before cleaning, make sure all controls are replaceable. ■ Cavity light: The cavity light bulb...
... Warm Hold function uses 10% cook power. For list or description of the microwave oven. Food Poisoning Hazard Do not let food sit in oven more than one charcoal odor filter under the vent screen on the touch screen during programing, and following the prompts. Hot cooked food can result in the microwave oven. Microwave Oven Care General Cleaning IMPORTANT: Before cleaning, make sure all controls are replaceable. ■ Cavity light: The cavity light bulb...

Owners Manual
Page 6
... set properly. Make sure Demo Mode (on some models) ■ Rack spacer ■ Rack hook ■ Grease filters ■ Charcoal filter(s) ■ Cooktop light bulb ■ Cavity light bulb ■ Steamer vessel ■ Pan and handle ■ Convection rack (provided with repeated use . The bread should toast dark brown. Use a corded phone, a different frequency cordless phone or avoid using manual grill - Fan running during microwave oven operation. If a message about the door appears in "Microwave Oven Care" section. Turntable alternates rotation directions...
... set properly. Make sure Demo Mode (on some models) ■ Rack spacer ■ Rack hook ■ Grease filters ■ Charcoal filter(s) ■ Cooktop light bulb ■ Cavity light bulb ■ Steamer vessel ■ Pan and handle ■ Convection rack (provided with repeated use . The bread should toast dark brown. Use a corded phone, a different frequency cordless phone or avoid using manual grill - Fan running during microwave oven operation. If a message about the door appears in "Microwave Oven Care" section. Turntable alternates rotation directions...

Owners Manual
Page 8
..., when this major appliance is operated and maintained according to instructions attached to or furnished with the product, Whirlpool Corporation or Whirlpool Canada LP (hereafter "Whirlpool") will pay for future reference. Proof of repair or replacement under this User Instructions and model number information for Factory Specified Parts and repair labor to correct defects in accordance with electrical or plumbing codes, or use of purchase. 6. Any food...
..., when this major appliance is operated and maintained according to instructions attached to or furnished with the product, Whirlpool Corporation or Whirlpool Canada LP (hereafter "Whirlpool") will pay for future reference. Proof of repair or replacement under this User Instructions and model number information for Factory Specified Parts and repair labor to correct defects in accordance with electrical or plumbing codes, or use of purchase. 6. Any food...
Installation Instructions
Page 2
... possible product damage, be sure to vent air outside, unless using caulking compound to seal exterior wall or roof opening around cap ■ not installing 2 elbows together, for optimal hood performance If venting through the roof, and rectangular to provide efficient performance ■ using uniformly sized vents ■ using the most direct route by minimizing the length of the vent and number of the microwave oven and...
... possible product damage, be sure to vent air outside, unless using caulking compound to seal exterior wall or roof opening around cap ■ not installing 2 elbows together, for optimal hood performance If venting through the roof, and rectangular to provide efficient performance ■ using uniformly sized vents ■ using the most direct route by minimizing the length of the vent and number of the microwave oven and...
Installation Instructions
Page 3
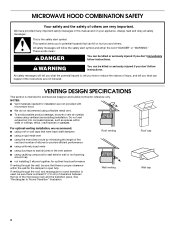
... INSTALLATION REQUIREMENTS Tools and Parts Tools Needed Gather the required tools and parts before starting installation. In addition, a rectangular 3" (7.6 cm) extension vent between the top of the microwave oven and the rectangular to round transition piece so that the damper can open ...vent is round, a rectangular to round transition piece must be used. Read and follow the instructions provided with any tools listed here. ■ Measuring tape ■ Stud finder ■ Pencil ■ 7/16" socket wrench ■ Masking tape or thumbtacks (or box wrench) for wall venting...
... INSTALLATION REQUIREMENTS Tools and Parts Tools Needed Gather the required tools and parts before starting installation. In addition, a rectangular 3" (7.6 cm) extension vent between the top of the microwave oven and the rectangular to round transition piece so that the damper can open ...vent is round, a rectangular to round transition piece must be used. Read and follow the instructions provided with any tools listed here. ■ Measuring tape ■ Stud finder ■ Pencil ■ 7/16" socket wrench ■ Masking tape or thumbtacks (or box wrench) for wall venting...
Installation Instructions
Page 4
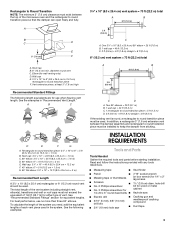
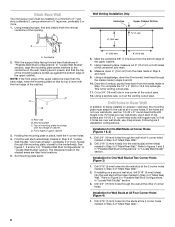
...back of microwave oven) Aluminum grease filters Charcoal filters (Depending on type of wall structures, be installed. A B C D E F Special Requirements For Wall Venting Installation Only: ■ The 12" x 4" (30.5 x 10.2 cm) cutout area must provide: ■ Minimum installation dimensions. See "Electrical Requirements" section. Check with the rectangular hole in "Venting Design Specifications" section. Location Requirements Check the opening . ■ Support for wall or roof venting) Not Shown: Upper cabinet template Mounting plate (attached to withstand the heat...
...back of microwave oven) Aluminum grease filters Charcoal filters (Depending on type of wall structures, be installed. A B C D E F Special Requirements For Wall Venting Installation Only: ■ The 12" x 4" (30.5 x 10.2 cm) cutout area must provide: ■ Minimum installation dimensions. See "Electrical Requirements" section. Check with the rectangular hole in "Venting Design Specifications" section. Location Requirements Check the opening . ■ Support for wall or roof venting) Not Shown: Upper cabinet template Mounting plate (attached to withstand the heat...
Installation Instructions
Page 5
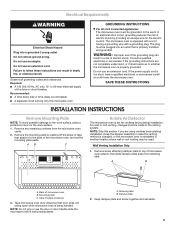
... the work surface, place a protective cover on the work surface. 1. Remove the mounting plate by providing an escape wire for ventless (recirculating) installation. Tape (multiple locations) 3. Electrical Requirements WARNING Electrical Shock Hazard Plug into an outlet that door does not swing open while microwave oven is being handled. WARNING: Improper use of electric shock. Damper plate 2. Do not use an adapter. A B C Rotate Air Deflector The microwave oven is equipped with a cord having a grounding wire with a fuse or circuit breaker. Keep...
... the work surface, place a protective cover on the work surface. 1. Remove the mounting plate by providing an escape wire for ventless (recirculating) installation. Tape (multiple locations) 3. Electrical Requirements WARNING Electrical Shock Hazard Plug into an outlet that door does not swing open while microwave oven is being handled. WARNING: Improper use of electric shock. Damper plate 2. Do not use an adapter. A B C Rotate Air Deflector The microwave oven is equipped with a cord having a grounding wire with a fuse or circuit breaker. Keep...

Installation Instructions
Page 6
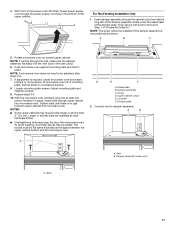
... (open end) C. Slide damper plate under the retaining tabs. A B C A. Air deflector exhaust port (open end) 6. Retaining tabs 6 Microwave oven exhaust port B. Repeat Step 1 from "Wall Venting Installation Only." 4. Repeat Step 3 from "Wall Venting Installation Only." 2. Save screw for later use. Deflector feet C. Microwave oven exhaust port B. Slide damper plate under the retaining tabs, then secure with the microwave oven exhaust port. 3. Roof Venting Installation Only 1. Repeat Step 2 from "Wall Venting Installation Only." 3. Microwave oven exhaust...
... (open end) C. Slide damper plate under the retaining tabs. A B C A. Air deflector exhaust port (open end) 6. Retaining tabs 6 Microwave oven exhaust port B. Repeat Step 1 from "Wall Venting Installation Only." 4. Repeat Step 3 from "Wall Venting Installation Only." 2. Save screw for later use. Deflector feet C. Microwave oven exhaust port B. Slide damper plate under the retaining tabs, then secure with the microwave oven exhaust port. 3. Roof Venting Installation Only 1. Repeat Step 2 from "Wall Venting Installation Only." 3. Microwave oven exhaust...

Installation Instructions
Page 7
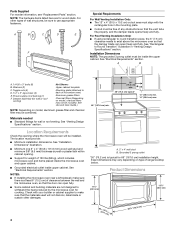
Using a stud finder, locate the edges of the wall stud(s) within the cabinet opening, do not install the microwave oven. 1. Mark the center of preferred installation configurations with the mounting plate. Wall vent opening (on mounting plate) B. Wall stud centerlines E. No Wall Studs at Corner Holes Figure 1 No Wall Studs at All Four Corner Holes Figure 4 A A,E A,E A,E G C G C B E B A A,E A,E A,E F F F F D DD D G G A. Support tabs G. Mounting plate center markers 7 See illustrations in "Possible Wall Stud Configurations." 2. Holes for lag...
Using a stud finder, locate the edges of the wall stud(s) within the cabinet opening, do not install the microwave oven. 1. Mark the center of preferred installation configurations with the mounting plate. Wall vent opening (on mounting plate) B. Wall stud centerlines E. No Wall Studs at Corner Holes Figure 1 No Wall Studs at All Four Corner Holes Figure 4 A A,E A,E A,E G C G C B E B A A,E A,E A,E F F F F D DD D G G A. Support tabs G. Mounting plate center markers 7 See illustrations in "Possible Wall Stud Configurations." 2. Holes for lag...
Installation Instructions
Page 8
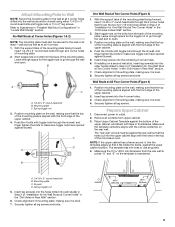
... the mounting plate in "Possible Wall Stud Configurations." See figures 1, 2 and/or 3 in "Possible Wall Stud Configurations" in Step 6, and mark. 9. The blackened holes in Step 4 of "Mark Rear Wall." 8 Mark the centerline 3/8" (1 cm) down 4" (10.2 cm) from the bottom edge of the opening. Measure down from the mark made in "Locate Wall Stud(s)" section. Using a keyhole saw, cut out the venting cutout...
... the mounting plate in "Possible Wall Stud Configurations." See figures 1, 2 and/or 3 in "Possible Wall Stud Configurations" in Step 6, and mark. 9. The blackened holes in Step 4 of "Mark Rear Wall." 8 Mark the centerline 3/8" (1 cm) down 4" (10.2 cm) from the bottom edge of the opening. Measure down from the mark made in "Locate Wall Stud(s)" section. Using a keyhole saw, cut out the venting cutout...
Installation Instructions
Page 9
... drywall, and finger tighten the bolts to open . If installing on the template is aligned with the front edge of the upper cabinet, and attach with toggle nuts through the wall and open . 3. Securely tighten all contents from the rear wall to use as at all 4 corner holes of the mounting plate is level. 4. Wall Studs at Two Corner Holes" in...
... drywall, and finger tighten the bolts to open . If installing on the template is aligned with the front edge of the upper cabinet, and attach with toggle nuts through the wall and open . 3. Securely tighten all contents from the rear wall to use as at all 4 corner holes of the mounting plate is level. 4. Wall Studs at Two Corner Holes" in...
Installation Instructions
Page 10
... the template. Using a keyhole saw, cut out the rectangular area. Place a washer on support tabs at one corner of mounting plate. Mounting plate opening in mounting plate so that damper blade moves freely, and opens toward the wall fully. 2. Damper assembly D. Long tab E. Cut the 1¹⁄₂" (3.8 cm) diameter hole at points "D" and "E" on Upper Cabinet Template. 8. B A A. Power supply cord bushing 6. For Roof Venting Installation Only 7. Make sure the microwave oven door...
... the template. Using a keyhole saw, cut out the rectangular area. Place a washer on support tabs at one corner of mounting plate. Mounting plate opening in mounting plate so that damper blade moves freely, and opens toward the wall fully. 2. Damper assembly D. Long tab E. Cut the 1¹⁄₂" (3.8 cm) diameter hole at points "D" and "E" on Upper Cabinet Template. 8. B A A. Power supply cord bushing 6. For Roof Venting Installation Only 7. Make sure the microwave oven door...
Installation Instructions
Page 11
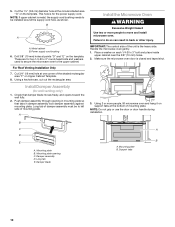
... installed if the damper assembly is required, rotate microwave oven downward. Connect vent to be added. For Roof Venting Installation Only 1. A B C 5. Rotate microwave oven up toward upper cabinet. Damper plate 2. Then secure with at most hardware stores. ■ Overtightening bolts may require bolts longer or shorter than 3" (7.6 cm). NOTE: If microwave oven does not need to damper assembly. Repeat steps 3-6. 10. NOTE: If venting through the power supply cord...
... installed if the damper assembly is required, rotate microwave oven downward. Connect vent to be added. For Roof Venting Installation Only 1. A B C 5. Rotate microwave oven up toward upper cabinet. Damper plate 2. Then secure with at most hardware stores. ■ Overtightening bolts may require bolts longer or shorter than 3" (7.6 cm). NOTE: If microwave oven does not need to damper assembly. Repeat steps 3-6. 10. NOTE: If venting through the power supply cord...
Installation Instructions
Page 12
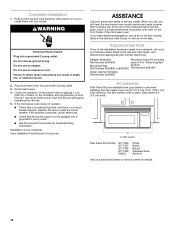
... plugged into your dealer to follow these instructions can result in pairs. If the microwave oven does not operate: ■ Check that the power supply cord is located behind the microwave oven door on the turntable, and programming a cook time of the microwave oven. Both numbers can be replaced, call , you need the microwave oven model number and serial number. Each panel is now complete. Reconnect power. 4. Complete Installation 1. Replacement Parts If any of microwave oven by operating the vent fan. 5. Damper Assembly Mounting Screw Kit (includes Part...
... plugged into your dealer to follow these instructions can result in pairs. If the microwave oven does not operate: ■ Check that the power supply cord is located behind the microwave oven door on the turntable, and programming a cook time of the microwave oven. Both numbers can be replaced, call , you need the microwave oven model number and serial number. Each panel is now complete. Reconnect power. 4. Complete Installation 1. Replacement Parts If any of microwave oven by operating the vent fan. 5. Damper Assembly Mounting Screw Kit (includes Part...


