Whirlpool GH6177XPB Support and Manuals
Get Help and Manuals for this Whirlpool item
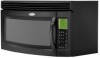
View All Support Options Below
Free Whirlpool GH6177XPB manuals!
Problems with Whirlpool GH6177XPB?
Ask a Question
Free Whirlpool GH6177XPB manuals!
Problems with Whirlpool GH6177XPB?
Ask a Question
Most Recent Whirlpool GH6177XPB Questions

Whirlpool Gh6177xpb Microwave Error 252 On Touchscreen At Startup. How Do I Fix
Whirlpool gh6177xpb microwave error 252 on touchscreen at startup.How do I fix Thanks,David
Whirlpool gh6177xpb microwave error 252 on touchscreen at startup.How do I fix Thanks,David
(Posted by dbmead 9 years ago)

My Fan Is Not Working And Making A Clicking Noise
(Posted by wgray22 11 years ago)
Popular Whirlpool GH6177XPB Manual Pages
Owners Manual - Page 1

... heated in TROUBLESHOOTING, please visit our website at 1-800-253-1301.
If you to potential hazards that can happen if the instructions are able to properly grounded outlet. This symbol alerts you should not be grounded. Connect only to explode and should experience a problem not covered in the microwave oven.
You will follow the specific "PRECAUTIONS...
Owners Manual - Page 2

... to facilitate cooking.
- for example, near a kitchen sink, in a wet basement, or near water - It is important not to persons:
- Call an authorized service company for examination, repair, or adjustment.
■ See door surface cleaning instructions in the "Microwave Oven Care" section.
■ To reduce the risk of injury to defeat or tamper with this...
Owners Manual - Page 3

... and cooktop light, and to soil buildup, clean rack supports often. Features
Turntable
Turntable may be visible. Cooking Rack (on your model), see your commands. To avoid damage to the microwave oven due to view the list of options on the Settings & Info or Hints & Settings menu (depending on some models) functions.
Grill Element (on some models)
Use only for manual...
Owners Manual - Page 5

... for specific programs. Some meat, poultry and/or fish functions may be 2 charcoal filters - 1 behind each stage. Up to lessen doneness. Opening the door during cleaning. on the model, there may not give you the option to 4 stages may be replaced about every 6 months.
■ Cooktop lights: The cooktop lights are located on the underside of the microwave oven...
Owners Manual - Page 6

... may also automatically come on and cycle on some models, if a packaging spacer is set properly. Replacement Parts
Provided Accessories
■ Turntable ■ Turntable support & rollers ■ Turntable hub ■ Cooking rack (for up to 10 minutes to cool the microwave oven's controls while the cooktop below . Turntable alternates rotation directions
■ This is being...
Owners Manual - Page 8

... instruct you do not have been removed, altered or cannot be
repaired in the home and only in materials or workmanship and is not installed in accordance
with the product, Whirlpool Corporation or Whirlpool Canada LP (hereafter "Whirlpool") will pay for repairs. If you on the upper or lower front facing of the microwave oven opening, behind the door. Service...
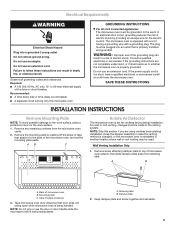
Installation Instructions - Page 2
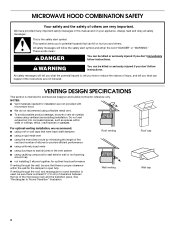
...installation, we recommend: ■ using roof or wall caps that have provided many important safety messages in the vent system
■ using caulking compound to round transition is used, be sure that can happen if the instructions are not provided with microwave... (7.6 cm) of clearance between the top of the microwave oven and the transition piece.
Roof venting Wall venting
Roof cap...
Installation Instructions - Page 3
...
The following examples:
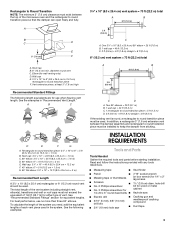
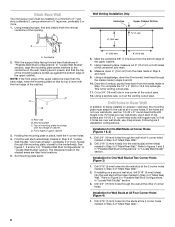
INSTALLATION REQUIREMENTS
Tools and Parts
Tools Needed
Gather the required tools and parts before starting installation. In addition, a rectangular 3" (7.6 cm) extension vent between the top of the vent system including straight vent, elbow(s), transitions and wall or roof caps must be used. The total length of the microwave oven and the rectangular to...
Installation Instructions - Page 4
...
Check the opening .
■ Support for wood studs.
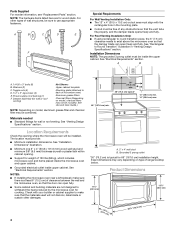
Parts Supplied
For reorder information, see "Replacement Parts" section. See "Rectangular to back of clearance between the wall and the microwave oven, so that the damper blade can open freely and fully. See "Venting Design Specifications" section.
NOTES:
■ If installing the microwave oven near a left sidewall, make sure...
Installation Instructions - Page 5
...a qualified electrician or serviceman if the grounding instructions are using ventless (recirculating) installation. Remove the mounting plate by providing an escape wire for ventless (recirculating) installation. Keep the damper assembly in death, fire, or electrical shock. Remove screw attaching damper plate to the back of the microwave oven, and set the mounting plate aside. Damper plate...
Installation Instructions - Page 8
... venting cutout area.
11. Set mounting plate aside.
6" (15.2 cm)
6" (15.2 cm)
6.
Measure down from the bottom edge of the upper cabinet.
7. Drill Holes in "Locate Wall Stud(s)" section.
3. in Rear Wall
In addition to being installed on at Corner Holes (Figures 1 & 2)
1.
Mark Rear Wall
The microwave oven must be installed on a minimum of 1 wall...
Installation Instructions - Page 9
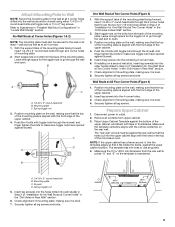
... wall stud as well as guides. 4.
Refer to illustrations in ...installing on the wall, making sure it , trim the template edges so that the top of the mounting plate is level. 8.
Insert 2 lag screws into the 4 corner holes. 3. NOTE: If the upper cabinet has a frame around it is aligned with the front edge of the microwave oven...level. 7. With the support tabs of the mounting...
Installation Instructions - Page 10
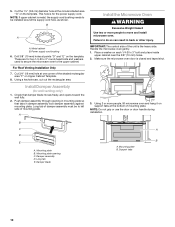
... are for wall venting only)
1.
Check that tabs in back or other injury. Long tab of mounting plate. A
Install the Microwave Oven
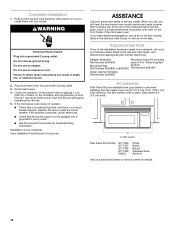
WARNING
Excessive Weight Hazard Use two or more people, lift microwave oven and hang it on support tabs at points "D" and "E" on each 1/4-20 x 3" bolt and place inside upper cabinet near the 3/8" (10 mm...
Installation Instructions - Page 11
...
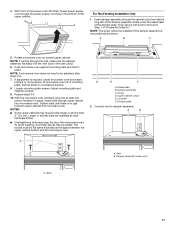
7. 4. For Roof Venting Installation Only
1.
A
B
C
5. Push microwave oven against mounting plate and hold in the bottom of the microwave oven. If adjustment is required, rotate microwave oven downward. Using 2 or more people, lift microwave oven off of the damper plate....B. Damper assembly (under the raised tabs of mounting plate, and set aside on a protected surface.
8.
Installation Instructions - Page 12
... these instructions can be replaced, call , you need the microwave oven model number and serial number.
Complete Installation
1. Test vent fan and exhaust by placing 1 cup
(250 mL) of microwave oven by operating the vent fan. 5. ASSISTANCE
Call your authorized dealer or service center for troubleshooting information. Replacement Parts
If any of the microwave oven. Failure...
Whirlpool GH6177XPB Reviews
We have not received any reviews for Whirlpool yet.