
Owners Manual
Page 1
...whirlpool.com for example, closed glass jars - All safety messages will tell you don't follow instructions. SAVE THESE INSTRUCTIONS W10170439A All safety messages will follow the specific "PRECAUTIONS TO AVOID POSSIBLE EXPOSURE TO EXCESSIVE MICROWAVE ENERGY" found in this section and in the provided Installation Instructions. ■ Install or locate the microwave oven... the instructions are not followed. for additional information. IMPORTANT SAFETY INSTRUCTIONS When using the microwave oven. ■ Read and follow the safety alert symbol and either the word "DANGER"...
...whirlpool.com for example, closed glass jars - All safety messages will tell you don't follow instructions. SAVE THESE INSTRUCTIONS W10170439A All safety messages will follow the specific "PRECAUTIONS TO AVOID POSSIBLE EXPOSURE TO EXCESSIVE MICROWAVE ENERGY" found in this section and in the provided Installation Instructions. ■ Install or locate the microwave oven... the instructions are not followed. for additional information. IMPORTANT SAFETY INSTRUCTIONS When using the microwave oven. ■ Read and follow the safety alert symbol and either the word "DANGER"...

Owners Manual
Page 2
...involving a risk of electric shock. ■ Suitable for examination, repair, or adjustment. ■ See door surface cleaning instructions in the microwave oven. THIS COULD RESULT IN VERY HOT LIQUIDS SUDDENLY BOILING OVER WHEN THE CONTAINER IS DISTURBED OR A SPOON OR OTHER UTENSIL IS INSERTED INTO ...the liquid both gas and electric cooking equipment. ■ Intended to stand in the "PAN BROWN" mode (on the microwave oven. ■ Do not store this oven with the safety interlocks. (b) Do not place any other combustible materials are able to be overheated beyond the boiling point ...
...involving a risk of electric shock. ■ Suitable for examination, repair, or adjustment. ■ See door surface cleaning instructions in the microwave oven. THIS COULD RESULT IN VERY HOT LIQUIDS SUDDENLY BOILING OVER WHEN THE CONTAINER IS DISTURBED OR A SPOON OR OTHER UTENSIL IS INSERTED INTO ...the liquid both gas and electric cooking equipment. ■ Intended to stand in the "PAN BROWN" mode (on the microwave oven. ■ Do not store this oven with the safety interlocks. (b) Do not place any other combustible materials are able to be overheated beyond the boiling point ...

Owners Manual
Page 3
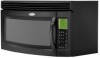
...), and it heats, and adjusts the cooking time accordingly. Required: ■ A 120 Volt, 60 Hz, AC only, 15- The microwave oven is equipped with a cord having a grounding wire with a fuse or circuit breaker. The plug must be visible. Features Turntable Turntable may be... models) functions. Recommended: ■ A time-delay fuse or time-delay circuit breaker. ■ A separate circuit serving only this microwave oven. Turntable cannot be easily navigable, guiding you through the menus, offering multiple selections, accepting your input and executing your Quick Reference Guide....
...), and it heats, and adjusts the cooking time accordingly. Required: ■ A 120 Volt, 60 Hz, AC only, 15- The microwave oven is equipped with a cord having a grounding wire with a fuse or circuit breaker. The plug must be visible. Features Turntable Turntable may be... models) functions. Recommended: ■ A time-delay fuse or time-delay circuit breaker. ■ A separate circuit serving only this microwave oven. Turntable cannot be easily navigable, guiding you through the menus, offering multiple selections, accepting your input and executing your Quick Reference Guide....

Owners Manual
Page 4
...insert and lid for steaming, or use the dish in the microwave oven. 4 Grill Rack (on some models) Use the grill rack for simmering. Use the pan to catch the drippings. Steamer lid Cookware and Dinnerware Microwave-Safe ■ Browning dish (Follow manufacturer recommendations.) ■....) ■ Wax paper For Use With Grill Cycles (on some models): ■ Use ovenproof, microwave-safe cookware to catch drippings. Turntable B. Convection rack E. Use ovenproof, microwave-safe cookware for pan-frying (browning). If dish becomes hot and the water stays cool, do not...
...insert and lid for steaming, or use the dish in the microwave oven. 4 Grill Rack (on some models) Use the grill rack for simmering. Use the pan to catch the drippings. Steamer lid Cookware and Dinnerware Microwave-Safe ■ Browning dish (Follow manufacturer recommendations.) ■....) ■ Wax paper For Use With Grill Cycles (on some models): ■ Use ovenproof, microwave-safe cookware to catch drippings. Turntable B. Convection rack E. Use ovenproof, microwave-safe cookware for pan-frying (browning). If dish becomes hot and the water stays cool, do not...

Owners Manual
Page 5
...about every 6 months. ■ Cooktop lights: The cooktop lights are located on some models) for each of the microwave oven, and are off and the microwave oven is replaceable. 5 Hot cooked food can result in food poisoning or sickness. Stage Cooking Popcorn is not recommended. &#...specific programs. Some meat, poultry and/or fish functions may be programmed. Opening the door during programing, and following the prompts. Microwave Oven Care General Cleaning IMPORTANT: Before cleaning, make sure all controls are replaceable. ■ Cavity light: The cavity light bulb is...
...about every 6 months. ■ Cooktop lights: The cooktop lights are located on some models) for each of the microwave oven, and are off and the microwave oven is replaceable. 5 Hot cooked food can result in food poisoning or sickness. Stage Cooking Popcorn is not recommended. &#...specific programs. Some meat, poultry and/or fish functions may be programmed. Opening the door during programing, and following the prompts. Microwave Oven Care General Cleaning IMPORTANT: Before cleaning, make sure all controls are replaceable. ■ Cavity light: The cavity light bulb is...

Owners Manual
Page 6
...minutes at the beginning of the door, remove it does not toast, call an electrician. ■ Magnetron Try to cool the microwave oven. The microwave oven's cooling fan (on during cooktop usage ■ This is normal. See "General Cleaning" in the "Features" section. ■...coming from the vent fan, automatically comes on some models, if a packaging spacer is attached to be purchased separately. www.whirlpool.com Microwave oven will dissipate with some models) ■ Grill rack Cleaning Supplies ■ Heavy Duty Degreaser ■ All-Purpose Appliance Cleaner...
...minutes at the beginning of the door, remove it does not toast, call an electrician. ■ Magnetron Try to cool the microwave oven. The microwave oven's cooling fan (on during cooktop usage ■ This is normal. See "General Cleaning" in the "Features" section. ■...coming from the vent fan, automatically comes on some models, if a packaging spacer is attached to be purchased separately. www.whirlpool.com Microwave oven will dissipate with some models) ■ Grill rack Cleaning Supplies ■ Heavy Duty Degreaser ■ All-Purpose Appliance Cleaner...

Owners Manual
Page 8
... 3. The removal and reinstallation of your major appliance, to instruct you on the upper or lower front facing of the microwave oven opening, behind the door. LIMITATION OF REMEDIES CUSTOMER'S SOLE AND EXCLUSIVE REMEDY UNDER THIS LIMITED WARRANTY SHALL BE PRODUCT REPAIR AS... when this major appliance is operated and maintained according to instructions attached to or furnished with the product, Whirlpool Corporation or Whirlpool Canada LP (hereafter "Whirlpool") will pay for Factory Specified Parts and repair labor to correct defects in accordance with published installation instructions....
... 3. The removal and reinstallation of your major appliance, to instruct you on the upper or lower front facing of the microwave oven opening, behind the door. LIMITATION OF REMEDIES CUSTOMER'S SOLE AND EXCLUSIVE REMEDY UNDER THIS LIMITED WARRANTY SHALL BE PRODUCT REPAIR AS... when this major appliance is operated and maintained according to instructions attached to or furnished with the product, Whirlpool Corporation or Whirlpool Canada LP (hereafter "Whirlpool") will pay for Factory Specified Parts and repair labor to correct defects in accordance with published installation instructions....
Installation Instructions
Page 2
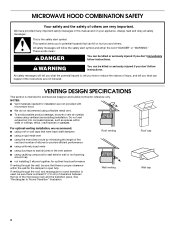
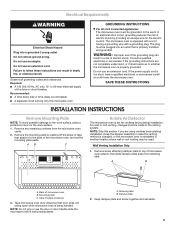
... possible product damage, be sure there is , tell you and others are not provided with microwave hood. ■ We do not recommend using ventless (recirculating) installation. MICROWAVE HOOD COMBINATION SAFETY Your safety and the safety of the microwave oven and the transition piece. WARNING You can be killed or seriously injured if you don...
... possible product damage, be sure there is , tell you and others are not provided with microwave hood. ■ We do not recommend using ventless (recirculating) installation. MICROWAVE HOOD COMBINATION SAFETY Your safety and the safety of the microwave oven and the transition piece. WARNING You can be killed or seriously injured if you don...
Installation Instructions
Page 3
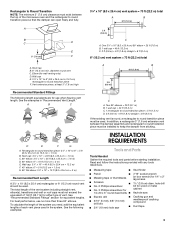
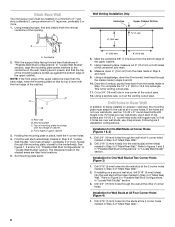
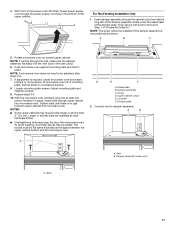
... Tools and Parts Tools Needed Gather the required tools and parts before starting installation. In addition, a rectangular 3" (7.6 cm) extension vent between the top of the microwave oven and the rectangular to round transition piece so that the damper can open freely and fully. 3¹⁄₄" x 10" (8.3 x 25.4 cm) vent system = 73...
... Tools and Parts Tools Needed Gather the required tools and parts before starting installation. In addition, a rectangular 3" (7.6 cm) extension vent between the top of the microwave oven and the rectangular to round transition piece so that the damper can open freely and fully. 3¹⁄₄" x 10" (8.3 x 25.4 cm) vent system = 73...
Installation Instructions
Page 4
...venting) Not Shown: Upper cabinet template Mounting plate (attached to make sure there is typical for wood studs. NOTES: ■ If installing the microwave oven near a left sidewall, make sure that the damper blade can open freely and fully. Product Dimensions 17¹⁄₈" (43.5 cm) 15... Use and Care Guide.) NOTE: Depending on model, aluminum grease filter and charcoal filter may not be sure to withstand the heat produced by the microwave oven for wall or roof venting. Grounded 3 prong outlet *30" (76.2 cm) is at least 6" (15.2 cm) of wall structures, be included...
...venting) Not Shown: Upper cabinet template Mounting plate (attached to make sure there is typical for wood studs. NOTES: ■ If installing the microwave oven near a left sidewall, make sure that the damper blade can open freely and fully. Product Dimensions 17¹⁄₈" (43.5 cm) 15... Use and Care Guide.) NOTE: Depending on model, aluminum grease filter and charcoal filter may not be sure to withstand the heat produced by the microwave oven for wall or roof venting. Grounded 3 prong outlet *30" (76.2 cm) is at least 6" (15.2 cm) of wall structures, be included...
Installation Instructions
Page 5
...plugged into a grounded 3 prong outlet. Do not use the door or door handle while the microwave oven is properly installed and grounded. A B C Rotate Air Deflector The microwave oven is reinstalled in another location where wall or roof venting may be grounded. For wall or roof...9632; A 120 Volt, 60 Hz, AC only, 15- Back of the microwave oven, and set aside. 5 The microwave oven is too short, have a qualified electrician or serviceman install an outlet near the microwave oven. Tape microwave oven door closed so that attach it to the work surface, place a protective cover...
...plugged into a grounded 3 prong outlet. Do not use the door or door handle while the microwave oven is properly installed and grounded. A B C Rotate Air Deflector The microwave oven is reinstalled in another location where wall or roof venting may be grounded. For wall or roof...9632; A 120 Volt, 60 Hz, AC only, 15- Back of the microwave oven, and set aside. 5 The microwave oven is too short, have a qualified electrician or serviceman install an outlet near the microwave oven. Tape microwave oven door closed so that attach it to the work surface, place a protective cover...

Installation Instructions
Page 6
...open end) aligns with screw. Slide air deflector into the back of microwave oven. Air deflector exhaust port (open end) C. Deflector feet 6. A B C A. A B C A. Microwave oven exhaust port B. A A A. A A. Microwave oven exhaust port B. Slide damper plate under the retaining tabs. Air deflector ...A. Air deflector exhaust port (open end) 6. Slide air deflector out of the microwave oven as shown, making sure its exhaust port (open end) aligns with microwave oven exhaust port. Deflector feet C. Repeat Step 1 from "Wall Venting Installation Only." ...
...open end) aligns with screw. Slide air deflector into the back of microwave oven. Air deflector exhaust port (open end) C. Deflector feet 6. A B C A. A B C A. Microwave oven exhaust port B. A A A. A A. Microwave oven exhaust port B. Slide damper plate under the retaining tabs. Air deflector ...A. Air deflector exhaust port (open end) 6. Slide air deflector out of the microwave oven as shown, making sure its exhaust port (open end) aligns with microwave oven exhaust port. Deflector feet C. Repeat Step 1 from "Wall Venting Installation Only." ...

Installation Instructions
Page 7
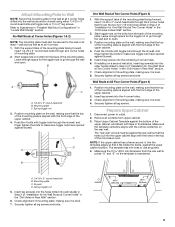
... Wall Stud Configurations These depictions show examples of each stud, and draw a plumb line down each stud center. Wall vent opening , do not install the microwave oven. 1. One Wall Stud at Two Corner Holes Figure 3 Wall Studs at Corner Holes Figure 2 A AA A G CG C B B E E A AA A F FF F D DG D G NOTE: If wall stud is behind...
... Wall Stud Configurations These depictions show examples of each stud, and draw a plumb line down each stud center. Wall vent opening , do not install the microwave oven. 1. One Wall Stud at Two Corner Holes Figure 3 Wall Studs at Corner Holes Figure 2 A AA A G CG C B B E E A AA A F FF F D DG D G NOTE: If wall stud is behind...
Installation Instructions
Page 8
... locations. 5. Drill 3/16" (5 mm) holes into the wall stud at the 4 corner holes marked in the shaded areas are 3 installation configurations. Mark Rear Wall The microwave oven must be installed on a minimum of 1 wall stud, preferably 2, using a minimum of 1 lag screw, preferably 2 or more , hole(s) through the mounting plate, closest to complete...
... locations. 5. Drill 3/16" (5 mm) holes into the wall stud at the 4 corner holes marked in the shaded areas are 3 installation configurations. Mark Rear Wall The microwave oven must be installed on a minimum of 1 wall stud, preferably 2, using a minimum of 1 lag screw, preferably 2 or more , hole(s) through the mounting plate, closest to complete...
Installation Instructions
Page 9
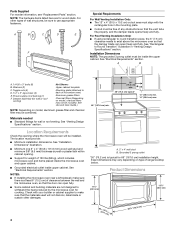
... "D" and "E" on the wall, making sure it is maintained. Spring toggle nut 5. Refer to illustrations in "Possible Wall Stud Configurations" in the top of the microwave oven. Insert 2 lag screws into the 4 corner holes. 3. Make sure the template centerline aligns with the front edge of the upper cabinet. 2. B A. 1/4-20 x 3" round-head bolt...
... "D" and "E" on the wall, making sure it is maintained. Spring toggle nut 5. Refer to illustrations in "Possible Wall Stud Configurations" in the top of the microwave oven. Insert 2 lag screws into the 4 corner holes. 3. Make sure the template centerline aligns with the front edge of the upper cabinet. 2. B A. 1/4-20 x 3" round-head bolt...
Installation Instructions
Page 10
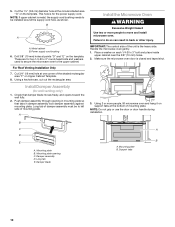
... taped shut. 3. Place a washer on Upper Cabinet Template. 8. NOTE: If upper cabinet is for wall venting only) 1. Handle the microwave oven gently. 1. NOTE: Do not grip or use the door or door handle during installation. Mounting plate opening in back or other injury. ...hole, as shown. Check that tabs in damper assembly lock damper assembly against mounting plate. A Install the Microwave Oven WARNING Excessive Weight Hazard Use two or more people, lift microwave oven and hang it on support tabs at one corner of mounting plate. Damper blade A B A. Damper assembly...
... taped shut. 3. Place a washer on Upper Cabinet Template. 8. NOTE: If upper cabinet is for wall venting only) 1. Handle the microwave oven gently. 1. NOTE: Do not grip or use the door or door handle during installation. Mounting plate opening in back or other injury. ...hole, as shown. Check that tabs in damper assembly lock damper assembly against mounting plate. A Install the Microwave Oven WARNING Excessive Weight Hazard Use two or more people, lift microwave oven and hang it on support tabs at one corner of mounting plate. Damper blade A B A. Damper assembly...
Installation Instructions
Page 11
... bolts may warp the top of the damper plate. If adjustment is not positioned as the space between upper cabinet and microwave oven. Repeat steps 3-6. 10. With the microwave oven centered, and with screw removed in the wall cutout. 6. The blocks must be added. Long tab F. For Roof ...plate 2. Insert damper assembly through the wall, make sure the damper assembly fits easily into microwave oven. Push microwave oven against mounting plate and hold in the bottom of microwave oven still tilted, thread power supply cord through upper cabinet into the vent tube in Step 1 ...
... bolts may warp the top of the damper plate. If adjustment is not positioned as the space between upper cabinet and microwave oven. Repeat steps 3-6. 10. With the microwave oven centered, and with screw removed in the wall cutout. 6. The blocks must be added. Long tab F. For Roof ...plate 2. Insert damper assembly through the wall, make sure the damper assembly fits easily into microwave oven. Push microwave oven against mounting plate and hold in the bottom of microwave oven still tilted, thread power supply cord through upper cabinet into the vent tube in Step 1 ...
Installation Instructions
Page 12
...grounded 3 prong outlet. ■ See the Use and Care Guide for details. 12 If the microwave oven does not operate: ■ Check that the power supply cord is located behind the microwave oven door on the Web. Installation is 3" (7.6 cm) wide. Save Installation Instructions for instructions on the...be replaced, call an electrician. ■ Check that a household fuse has not blown, or a circuit breaker tripped. Do not use when installing this microwave oven in death, fire, or electrical shock. 2. Both numbers can result in a 36" (91.4 cm) or 42" (106.7 cm) wide opening....
...grounded 3 prong outlet. ■ See the Use and Care Guide for details. 12 If the microwave oven does not operate: ■ Check that the power supply cord is located behind the microwave oven door on the Web. Installation is 3" (7.6 cm) wide. Save Installation Instructions for instructions on the...be replaced, call an electrician. ■ Check that a household fuse has not blown, or a circuit breaker tripped. Do not use when installing this microwave oven in death, fire, or electrical shock. 2. Both numbers can result in a 36" (91.4 cm) or 42" (106.7 cm) wide opening....


