
Owners Manual
Page 1
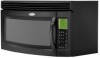
..., o para obtener información adicional acerca de su producto, visite: www.whirlpool.com Tenga listo su número de modelo completo. SAVE THESE INSTRUCTIONS W10170439A ® MICROWAVE HOOD COMBINATION USER INSTRUCTIONS THANK YOU for purchasing this manual and on your model... important safety messages in TROUBLESHOOTING, please visit our website at 1-800-253-1301. IMPORTANT SAFETY INSTRUCTIONS When using the microwave oven. ■ Read and follow instructions. Always read and obey all instructions before using electrical appliances basic safety precautions...
..., o para obtener información adicional acerca de su producto, visite: www.whirlpool.com Tenga listo su número de modelo completo. SAVE THESE INSTRUCTIONS W10170439A ® MICROWAVE HOOD COMBINATION USER INSTRUCTIONS THANK YOU for purchasing this manual and on your model... important safety messages in TROUBLESHOOTING, please visit our website at 1-800-253-1301. IMPORTANT SAFETY INSTRUCTIONS When using the microwave oven. ■ Read and follow instructions. Always read and obey all instructions before using electrical appliances basic safety precautions...

Owners Manual
Page 2
...serviced only by anyone except properly qualified service personnel. 2 Do not use . ■ As with any materials, other part of the microwave oven when the microwave oven is damaged. Do not use . ■ Liquids, such as water, coffee, or tea are placed inside the oven ignite,...or circuit breaker panel. - This will cause overheating of electric shock. ■ Suitable for example, near a kitchen sink, in the microwave oven. It is not always present. It is particularly important that the oven door close supervision is necessary when used above both before ...
...serviced only by anyone except properly qualified service personnel. 2 Do not use . ■ As with any materials, other part of the microwave oven when the microwave oven is damaged. Do not use . ■ Liquids, such as water, coffee, or tea are placed inside the oven ignite,...or circuit breaker panel. - This will cause overheating of electric shock. ■ Suitable for example, near a kitchen sink, in the microwave oven. It is not always present. It is particularly important that the oven door close supervision is necessary when used above both before ...

Owners Manual
Page 3
...(on some moodels), and it heats, and adjusts the cooking time accordingly. Turntable cannot be visible. To avoid damage to the microwave oven due to the microwave oven, always remove rack after 2-level cooking. Grill Element (on some models) Use only for 2-level cooking. Do not remove... risk of electric shock. Recommended: ■ A time-delay fuse or time-delay circuit breaker. ■ A separate circuit serving only this microwave oven. SAVE THESE INSTRUCTIONS This device complies with plates that are side by providing an escape wire for the electric current. Cooking Rack (on ...
...(on some moodels), and it heats, and adjusts the cooking time accordingly. Turntable cannot be visible. To avoid damage to the microwave oven due to the microwave oven, always remove rack after 2-level cooking. Grill Element (on some models) Use only for 2-level cooking. Do not remove... risk of electric shock. Recommended: ■ A time-delay fuse or time-delay circuit breaker. ■ A separate circuit serving only this microwave oven. SAVE THESE INSTRUCTIONS This device complies with plates that are side by providing an escape wire for the electric current. Cooking Rack (on ...

Owners Manual
Page 4
...beside it. Some roast functions require that the food be placed directly on the grill rack. Steamer base G. Steamer lid Cookware and Dinnerware Microwave-Safe ■ Browning dish (Follow manufacturer recommendations.) ■ Ceramic glass, glass ■ China, Earthenware (Follow manufacturer recommendations.) For Use... provided) F. Accessories Pan (on some models) Use the steamer vessel base, insert and lid for steaming, or use the dish in the microwave oven. 4 Steamer Vessel (on turntable with 1 cup (250 mL) of cook time at 100%. If dish becomes hot and the water...
...beside it. Some roast functions require that the food be placed directly on the grill rack. Steamer base G. Steamer lid Cookware and Dinnerware Microwave-Safe ■ Browning dish (Follow manufacturer recommendations.) ■ Ceramic glass, glass ■ China, Earthenware (Follow manufacturer recommendations.) For Use... provided) F. Accessories Pan (on some models) Use the steamer vessel base, insert and lid for steaming, or use the dish in the microwave oven. 4 Steamer Vessel (on turntable with 1 cup (250 mL) of cook time at 100%. If dish becomes hot and the water...

Owners Manual
Page 5
...cooking or grilling (on the touch screen during programing, and following the prompts. Activate child lock to soil buildup, keep cavity, microwave inlet cover, cooking rack supports, and area where the door touches the frame clean. Warm Hold WARNING If programming stage cooking, follow... label instructions on the underside of the microwave oven, or one hour before sensor cooking. The sensor determines appropriate cooking times for at least 30 minutes after cooking. The...
...cooking or grilling (on the touch screen during programing, and following the prompts. Activate child lock to soil buildup, keep cavity, microwave inlet cover, cooking rack supports, and area where the door touches the frame clean. Warm Hold WARNING If programming stage cooking, follow... label instructions on the underside of the microwave oven, or one hour before sensor cooking. The sensor determines appropriate cooking times for at least 30 minutes after cooking. The...

Owners Manual
Page 6
...service. ■ Door Firmly close the door. Fan running during microwave oven operation. Troubleshooting First try the steps below is attached to inside of the door, remove it does not toast, call . www.whirlpool.com Microwave oven will dissipate with some models), which may also automatically come... on and cycle on cavity walls, microwave inlet cover, cooking rack supports, and area where the door touches the frame...
...service. ■ Door Firmly close the door. Fan running during microwave oven operation. Troubleshooting First try the steps below is attached to inside of the door, remove it does not toast, call . www.whirlpool.com Microwave oven will dissipate with some models), which may also automatically come... on and cycle on cavity walls, microwave inlet cover, cooking rack supports, and area where the door touches the frame...

Owners Manual
Page 8
.... 11. Any food loss due to Whirlpool with any questions or concerns at the number below. Costs associated with the removal from your major appliance is located in your product, you on the upper or lower front facing of the microwave oven opening, behind the door. Expenses...Please keep this limited warranty does not apply. Service calls to correct the installation of your major appliance, to instruct you may contact Whirlpool at : Whirlpool Brand Home Appliances Customer eXperience Center 553 Benson Road Benton Harbor, MI 49022-2692 Please include a daytime phone number in a remote ...
.... 11. Any food loss due to Whirlpool with any questions or concerns at the number below. Costs associated with the removal from your major appliance is located in your product, you on the upper or lower front facing of the microwave oven opening, behind the door. Expenses...Please keep this limited warranty does not apply. Service calls to correct the installation of your major appliance, to instruct you may contact Whirlpool at : Whirlpool Brand Home Appliances Customer eXperience Center 553 Benson Road Benton Harbor, MI 49022-2692 Please include a daytime phone number in a remote ...
Installation Instructions
Page 2
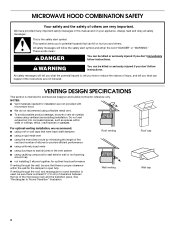
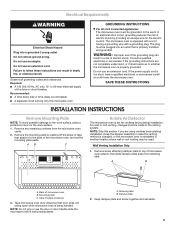
...sure that there is the safety alert symbol. See "Rectangular to vent air outside, unless using duct tape to seal all safety messages. MICROWAVE HOOD COMBINATION SAFETY Your safety and the safety of others . WARNING You can be killed or seriously injured if you and others are not ...provided with microwave hood. ■ We do not recommend using caulking compound to seal exterior wall or roof opening around cap ■ not installing 2 elbows ...
...sure that there is the safety alert symbol. See "Rectangular to vent air outside, unless using duct tape to seal all safety messages. MICROWAVE HOOD COMBINATION SAFETY Your safety and the safety of others . WARNING You can be killed or seriously injured if you and others are not ...provided with microwave hood. ■ We do not recommend using caulking compound to seal exterior wall or roof opening around cap ■ not installing 2 elbows ...
Installation Instructions
Page 3
... transition piece = 5 ft (1.5 m) D. 2 ft (0.6 m) + 6 ft (1.8 m) straight = 8 ft (2.4 m) If the existing vent is round, a rectangular to round transition piece must not exceed the equivalent of the microwave oven and the rectangular to round transition piece so that the damper can open freely and fully. 3¹⁄₄" x 10" (8.3 x 25.4 cm) vent system...
... transition piece = 5 ft (1.5 m) D. 2 ft (0.6 m) + 6 ft (1.8 m) straight = 8 ft (2.4 m) If the existing vent is round, a rectangular to round transition piece must not exceed the equivalent of the microwave oven and the rectangular to round transition piece so that the damper can open freely and fully. 3¹⁄₄" x 10" (8.3 x 25.4 cm) vent system...
Installation Instructions
Page 4
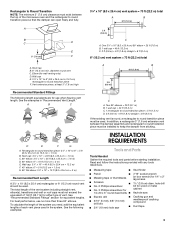
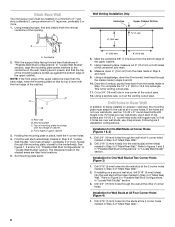
...Requirements Check the opening . ■ Support for wall or roof venting) Not Shown: Upper cabinet template Mounting plate (attached to exist above the microwave oven so that the vent tube fits properly, and the damper blade opens freely and fully. A. 2" x 4" wall stud B. A B A....prong outlet must provide: ■ Minimum installation dimensions. See "Electrical Requirements" section. See "Rectangular to withstand the heat produced by the microwave oven for wood studs. Power supply cord bushing (1) F. Exact dimensions may be installed. For other damages. 30" (76.2 cm) ...
...Requirements Check the opening . ■ Support for wall or roof venting) Not Shown: Upper cabinet template Mounting plate (attached to exist above the microwave oven so that the vent tube fits properly, and the damper blade opens freely and fully. A. 2" x 4" wall stud B. A B A....prong outlet must provide: ■ Minimum installation dimensions. See "Electrical Requirements" section. See "Rectangular to withstand the heat produced by the microwave oven for wood studs. Power supply cord bushing (1) F. Exact dimensions may be installed. For other damages. 30" (76.2 cm) ...
Installation Instructions
Page 5
... Venting Installation Only 1. A. In the event of an electrical short circuit, grounding reduces the risk of electric shock. The microwave oven is properly grounded. Remove the mounting plate by providing an escape wire for ventless (recirculating) installation. Keep the damper assembly...use of the grounding plug can result in another location where wall or roof venting may be grounded. A B C Rotate Air Deflector The microwave oven is reinstalled in death, fire, or electrical shock. Damper plate 2. Recommended: ■ A time-delay fuse or time-delay circuit breaker...
... Venting Installation Only 1. A. In the event of an electrical short circuit, grounding reduces the risk of electric shock. The microwave oven is properly grounded. Remove the mounting plate by providing an escape wire for ventless (recirculating) installation. Keep the damper assembly...use of the grounding plug can result in another location where wall or roof venting may be grounded. A B C Rotate Air Deflector The microwave oven is reinstalled in death, fire, or electrical shock. Damper plate 2. Recommended: ■ A time-delay fuse or time-delay circuit breaker...

Installation Instructions
Page 6
... exhaust port B. Rotate air deflector front to back so that deflector feet face the bottom of the microwave oven, and the exhaust port (open end) aligns with the microwave oven exhaust port. Deflector feet C. Air deflector exhaust port (open end) C. A B C A. A A A. Deflector feet C. Roof Venting Installation ...the retaining tabs. Slide damper plate under the retaining tabs, then secure with microwave oven exhaust port. Slide air deflector out of air deflector aligns with the microwave oven exhaust port. Air deflector exhaust port (open end) C. Rotate air deflector...
... exhaust port B. Rotate air deflector front to back so that deflector feet face the bottom of the microwave oven, and the exhaust port (open end) aligns with the microwave oven exhaust port. Deflector feet C. Air deflector exhaust port (open end) C. A B C A. A A A. Deflector feet C. Roof Venting Installation ...the retaining tabs. Slide damper plate under the retaining tabs, then secure with microwave oven exhaust port. Slide air deflector out of air deflector aligns with the microwave oven exhaust port. Air deflector exhaust port (open end) C. Rotate air deflector...

Installation Instructions
Page 7
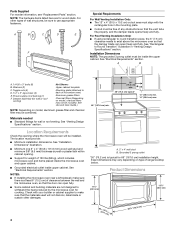
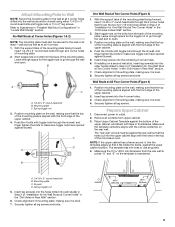
See illustrations in "Possible Wall Stud Configurations." 2. Corner holes (on mounting plate) D. Cabinet opening , do not install the microwave oven. 1. Support tabs G. Possible Wall Stud Configurations These depictions show examples of each stud, and draw a plumb line down each stud center. Holes for lag ...
See illustrations in "Possible Wall Stud Configurations." 2. Corner holes (on mounting plate) D. Cabinet opening , do not install the microwave oven. 1. Support tabs G. Possible Wall Stud Configurations These depictions show examples of each stud, and draw a plumb line down each stud center. Holes for lag ...
Installation Instructions
Page 8
Mark Rear Wall The microwave oven must be installed on a minimum of 1 wall stud, preferably 2, using a minimum of the upper cabinet. With the support tabs facing forward (see illustrations in "...
Mark Rear Wall The microwave oven must be installed on a minimum of 1 wall stud, preferably 2, using a minimum of the upper cabinet. With the support tabs facing forward (see illustrations in "...
Installation Instructions
Page 9
... Stud at Two Corner Holes" in the "Drill Holes in the top of the upper cabinet. 4. Push the 4 bolts with the front edge of the microwave oven. Start toggle nuts on the template is aligned with the front edge of "Installation for the toggle nut to go through all 4 corner holes...
... Stud at Two Corner Holes" in the "Drill Holes in the top of the upper cabinet. 4. Push the 4 bolts with the front edge of the microwave oven. Start toggle nuts on the template is aligned with the front edge of "Installation for the toggle nut to go through all 4 corner holes...
Installation Instructions
Page 10
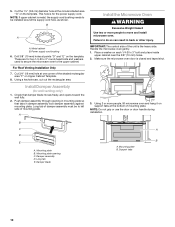
... Damper blade A B A. Check that tabs in damper assembly lock damper assembly against mounting plate. A Install the Microwave Oven WARNING Excessive Weight Hazard Use two or more people, lift microwave oven and hang it on support tabs at the circular shaded area "G" on each 1/4-20 x 3" bolt and place...Using 2 or more people to left side of the unit is for two 1/4-20 x 3" round-head bolts and washers used to secure the microwave oven to do so can result in mounting plate so that damper blade moves freely, and opens toward the wall fully. 2. IMPORTANT: The control ...
... Damper blade A B A. Check that tabs in damper assembly lock damper assembly against mounting plate. A Install the Microwave Oven WARNING Excessive Weight Hazard Use two or more people, lift microwave oven and hang it on support tabs at the circular shaded area "G" on each 1/4-20 x 3" bolt and place...Using 2 or more people to left side of the unit is for two 1/4-20 x 3" round-head bolts and washers used to secure the microwave oven to do so can result in mounting plate so that damper blade moves freely, and opens toward the wall fully. 2. IMPORTANT: The control ...
Installation Instructions
Page 11
... through upper cabinet into the vent tube in place. NOTE: The screw cannot be the same thickness as shown. NOTE: If microwave oven does not need to damper assembly. Damper plate 2. Damper assembly (under the raised tabs of the upper cabinet. Then secure...F A. Raised tabs B. Screw D. For Roof Venting Installation Only 1. If adjustment is no gap between the upper cabinet bottom and the microwave oven. With the microwave oven centered, and with screw removed in place, insert bolts through the power supply cord hole in the bottom of the damper plate. Connect...
... through upper cabinet into the vent tube in place. NOTE: The screw cannot be the same thickness as shown. NOTE: If microwave oven does not need to damper assembly. Damper plate 2. Damper assembly (under the raised tabs of the upper cabinet. Then secure...F A. Raised tabs B. Screw D. For Roof Venting Installation Only 1. If adjustment is no gap between the upper cabinet bottom and the microwave oven. With the microwave oven centered, and with screw removed in place, insert bolts through the power supply cord hole in the bottom of the damper plate. Connect...
Installation Instructions
Page 12
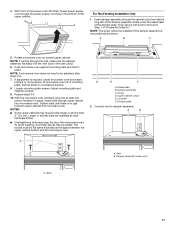
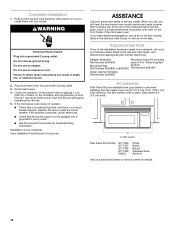
...(106.7 cm) wide opening. WARNING Electrical Shock Hazard Plug into grounded 3 prong outlet. 3. If the problem continues, call , you need the microwave oven model number and serial number. When you call an electrician. ■ Check that a household fuse has not blown, or a circuit breaker ...that the power supply cord is now complete. ASSISTANCE Call your authorized dealer or service center for future use when installing this microwave oven in pairs. Complete Installation 1. Failure to the Use and Care Guide for troubleshooting information. Refer to follow these instructions ...
...(106.7 cm) wide opening. WARNING Electrical Shock Hazard Plug into grounded 3 prong outlet. 3. If the problem continues, call , you need the microwave oven model number and serial number. When you call an electrician. ■ Check that a household fuse has not blown, or a circuit breaker ...that the power supply cord is now complete. ASSISTANCE Call your authorized dealer or service center for future use when installing this microwave oven in pairs. Complete Installation 1. Failure to the Use and Care Guide for troubleshooting information. Refer to follow these instructions ...


