
User Manual
Page 9
...below for the selection criteria for a Class B digital device, pursuant to correct the interference by turning the equipment off and on, the user is certified for the High Definition LCD TV. Some examples are designed to the current rating for your specific country. The female receptacle of ...part 15 of the following guidelines if it is not enclosed. Please consult the table below : USA UL Switzerland ..... For High Definition LCD TVs placed directly on a desk or table, type SVT or SJT cord sets may cause harmful interference to replace the original cord set, ...
...below for the selection criteria for a Class B digital device, pursuant to correct the interference by turning the equipment off and on, the user is certified for the High Definition LCD TV. Some examples are designed to the current rating for your specific country. The female receptacle of ...part 15 of the following guidelines if it is not enclosed. Please consult the table below : USA UL Switzerland ..... For High Definition LCD TVs placed directly on a desk or table, type SVT or SJT cord sets may cause harmful interference to replace the original cord set, ...

User Manual
Page 11
...the Westinghouse Service Center. 8 install in any other . therefore, if the provided plug does not fit into -or objects have fallen onto-the apparatus; Only use caution when moving it. • If the High Definition LCD TV emits smoke, abnormal noise, or a strange odor, immediately turn it... User's Manual for long periods of the obsolete outlet. 6. Skin oils are provided for replacement of time. 10. Your High Definition LCD TV contains high-voltage parts. Clean only with one wider than the other equipment (including amplifiers) that produce heat. 5. consult an electrician for...
...the Westinghouse Service Center. 8 install in any other . therefore, if the provided plug does not fit into -or objects have fallen onto-the apparatus; Only use caution when moving it. • If the High Definition LCD TV emits smoke, abnormal noise, or a strange odor, immediately turn it... User's Manual for long periods of the obsolete outlet. 6. Skin oils are provided for replacement of time. 10. Your High Definition LCD TV contains high-voltage parts. Clean only with one wider than the other equipment (including amplifiers) that produce heat. 5. consult an electrician for...

User Manual
Page 12
...disconnect the antenna or the power cord during a lightning storm, or when it from touching such power lines or circuits. 9 Turn off your High Definition LCD TV and wait for long periods of overhead power lines or other electric light or power circuits. Power Lines An outside antenna system ..., grounding of the lead-in the vicinity of time, unplug it is grounded to grounding electrodes, and requirements for the High Definition LCD TV during a heavy storm-lightning may strike while you are holding the cable cord, causing serious injury. Lightning For added protection for the grounding...
...disconnect the antenna or the power cord during a lightning storm, or when it from touching such power lines or circuits. 9 Turn off your High Definition LCD TV and wait for long periods of overhead power lines or other electric light or power circuits. Power Lines An outside antenna system ..., grounding of the lead-in the vicinity of time, unplug it is grounded to grounding electrodes, and requirements for the High Definition LCD TV during a heavy storm-lightning may strike while you are holding the cable cord, causing serious injury. Lightning For added protection for the grounding...
User Manual
Page 16
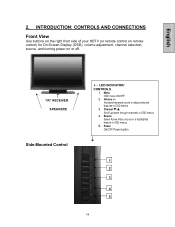
... on the right front side of your HDTV (or remote control on remote control) for On Screen Display (OSD), volume adjustment, channel selection, source, and turning power on or off. ↑ "IR" RECEIVER SPEAKERS Side-Mounted Control ← LED INDICATOR/ CONTROLS 1.
... on the right front side of your HDTV (or remote control on remote control) for On Screen Display (OSD), volume adjustment, channel selection, source, and turning power on or off. ↑ "IR" RECEIVER SPEAKERS Side-Mounted Control ← LED INDICATOR/ CONTROLS 1.
User Manual
Page 20
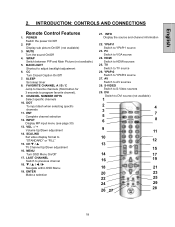
...Display sub picture On/Off (not available) 3. SWAP Switch between PIP and Main Picture (not available) 5. CH T / S TV Channel Up/Down adjustment 16. DVI Switch to "STANDARD" or "FILL" 15. CC Turn Closed Caption On/Off 7. SCALING Set video display format to DVI source (not available) 1 2 4 3 5 7 6 ...when selecting specific channels 11. INPUT Display MP input menu (see page 30) 13. ENTER Make a selection 21. HDMI Switch to YPbPr2 source 27. MUTE Turn the sound On/Off 4. VOL - / + Volume Up/Down adjustment 14. T / S / W / X Navigate within OSD Menu 19. INFO Display...
...Display sub picture On/Off (not available) 3. SWAP Switch between PIP and Main Picture (not available) 5. CH T / S TV Channel Up/Down adjustment 16. DVI Switch to "STANDARD" or "FILL" 15. CC Turn Closed Caption On/Off 7. SCALING Set video display format to DVI source (not available) 1 2 4 3 5 7 6 ...when selecting specific channels 11. INPUT Display MP input menu (see page 30) 13. ENTER Make a selection 21. HDMI Switch to YPbPr2 source 27. MUTE Turn the sound On/Off 4. VOL - / + Volume Up/Down adjustment 14. T / S / W / X Navigate within OSD Menu 19. INFO Display...
User Manual
Page 21
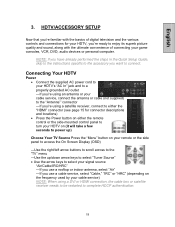
...) NOTE: When using a satellite receiver, connect to either the remote control or the side-mounted control panel to turn your HDTV on (it will take a few seconds to power up) Choose Your TV Source Press the "Menu" button on your remote or the side panel to access the On Screen Display (OSD...) -Use the right/left arrow buttons to scroll across to the "TV" menu -Use the up/down arrow keys to select "Tuner Source" • Use the arrow keys to complete HDCP authentication. 19
...) NOTE: When using a satellite receiver, connect to either the remote control or the side-mounted control panel to turn your HDTV on (it will take a few seconds to power up) Choose Your TV Source Press the "Menu" button on your remote or the side panel to access the On Screen Display (OSD...) -Use the right/left arrow buttons to scroll across to the "TV" menu -Use the up/down arrow keys to select "Tuner Source" • Use the arrow keys to complete HDCP authentication. 19

User Manual
Page 23
..." port -Connect a stereo mini cable from your computer's "AUDIO OUT" port to the HDTV's "AUDIO IN" port Power • Turn on your HDTV (wait a few seconds for it to power up) • Turn on your computer -The HDTV will automatically adjust to the computer's resolution 21 English 3. HDTV/ACCESSORY SETUP Connecting Your...
..." port -Connect a stereo mini cable from your computer's "AUDIO OUT" port to the HDTV's "AUDIO IN" port Power • Turn on your HDTV (wait a few seconds for it to power up) • Turn on your computer -The HDTV will automatically adjust to the computer's resolution 21 English 3. HDTV/ACCESSORY SETUP Connecting Your...
User Manual
Page 24
... Audio2 (Right/Left) connectors on the HDTV to an external audio amplifier (cable not supplied) 22 Before making any connections, make sure all equipment is turned off.
... Audio2 (Right/Left) connectors on the HDTV to an external audio amplifier (cable not supplied) 22 Before making any connections, make sure all equipment is turned off.
User Manual
Page 28
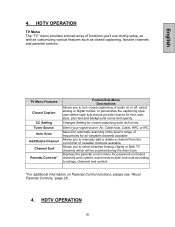
... Channel Surf Parental Controls* Feature/Sub-Menu Descriptions Allows you to turn closed captioning, favorite channels and parental controls. sub-menus include lock-outs according to select between Analog, Digital or Both TV channels which will be scanned during setup, as well as customizing... as closed captioning of audio on Parental Control functions, please see "About Parental Controls," page 28. 4. English 4. HDTV OPERATION TV Menu The "TV" menu provides a broad array of viewable channels available Allows you 'll use during the Auto Scan Displays the parental control menu...
... Channel Surf Parental Controls* Feature/Sub-Menu Descriptions Allows you to turn closed captioning, favorite channels and parental controls. sub-menus include lock-outs according to select between Analog, Digital or Both TV channels which will be scanned during setup, as well as customizing... as closed captioning of audio on Parental Control functions, please see "About Parental Controls," page 28. 4. English 4. HDTV OPERATION TV Menu The "TV" menu provides a broad array of viewable channels available Allows you 'll use during the Auto Scan Displays the parental control menu...

User Manual
Page 35
...Only MTS Digital Audio Mute Speaker HDMI Sub Woofer Equalizer Adjustment Descriptions Enables to listen to Audio only, the picture (Backlight) will be turned off and can be reactivate with any button of the Remote Control Choose from seven different Audio settings: • User, Speech, Jazz..." menu let's you precisely configure your audio preferences to either: • Analog-RCA audio input • Digital-HDMI cable integrated audio input Turn internal Sub Woofer on/off Choose from three different MTS (Multi-Channel Television Sound) settings: • Mono • Stereo • SAP ...
...Only MTS Digital Audio Mute Speaker HDMI Sub Woofer Equalizer Adjustment Descriptions Enables to listen to Audio only, the picture (Backlight) will be turned off and can be reactivate with any button of the Remote Control Choose from seven different Audio settings: • User, Speech, Jazz..." menu let's you precisely configure your audio preferences to either: • Analog-RCA audio input • Digital-HDMI cable integrated audio input Turn internal Sub Woofer on/off Choose from three different MTS (Multi-Channel Television Sound) settings: • Mono • Stereo • SAP ...
User Manual
Page 36
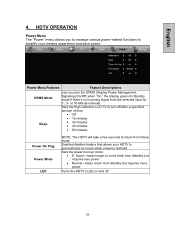
English 4. when "On," the display goes into Standby mode if there's no incoming signal from Standby but requires more power Turns the HDTV's LED on and off after a specified amount of time: • Off • 15 minutes • 30 minutes • 45 minutes • 60 ... DPMS (Display Power Management Signaling) On/Off; or 10-Minute intervals Sets the High Definition LCD TV to turn off 34 HDTV OPERATION Power Menu The "Power" menu allows you turn back when power is restored Sets the power boot up mode: • E. Enables/disables feature that allows your HDTV to simplify your ...
English 4. when "On," the display goes into Standby mode if there's no incoming signal from Standby but requires more power Turns the HDTV's LED on and off after a specified amount of time: • Off • 15 minutes • 30 minutes • 45 minutes • 60 ... DPMS (Display Power Management Signaling) On/Off; or 10-Minute intervals Sets the High Definition LCD TV to turn off 34 HDTV OPERATION Power Menu The "Power" menu allows you turn back when power is restored Sets the power boot up mode: • E. Enables/disables feature that allows your HDTV to simplify your ...
User Manual
Page 37
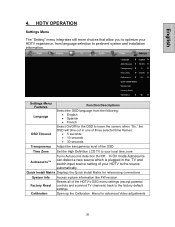
...) back to the factory default settings Calibration Open up the Calibration Menu for the OSD to optimize your local time zone Autosource™ Turns Autosource detection On/Off. English 4. HDTV OPERATION Settings Menu The "Setting" menu integrates still more choices that allow you to leave the screen; ...when "On," the OSD will time out in the TV and switch input source setting of the OSD Time Zone Set the High Definition LCD TV to your HDTV experience, from the following: • English • Spanish • French Select On/...
...) back to the factory default settings Calibration Open up the Calibration Menu for the OSD to optimize your local time zone Autosource™ Turns Autosource detection On/Off. English 4. HDTV OPERATION Settings Menu The "Setting" menu integrates still more choices that allow you to leave the screen; ...when "On," the OSD will time out in the TV and switch input source setting of the OSD Time Zone Set the High Definition LCD TV to your HDTV experience, from the following: • English • Spanish • French Select On/...

User Manual
Page 38
English 4. Settings Menu Features Function Descriptions Deinterlace Turns on/off Deienterlace. 3D Comb Filter Turns on mode, the picture quality is better. In on /off 3D Comb Filter. Color Temp Allow you to select between 3 different color temperatures, Warm, Neutral ...
English 4. Settings Menu Features Function Descriptions Deinterlace Turns on/off Deienterlace. 3D Comb Filter Turns on mode, the picture quality is better. In on /off 3D Comb Filter. Color Temp Allow you to select between 3 different color temperatures, Warm, Neutral ...
User Manual
Page 43
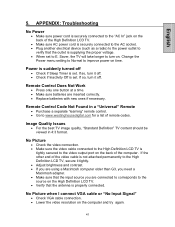
... I connect VGA cable or "No Input Signal" • Check VGA cable connection. • Lower the video resolution on the High Definition LCD TV. • Verify that the outlet is set to www.westinghousedigital.com for a list of the video cable is not attached permanently to verify ...Picture • Check the video connection. • Make sure the video cable connected to the High Definition LCD TV is tightly secured to improve power on . Saver, the TV will take longer to turn it tightly. • Adjust brightness and contrast. • If you are using a Macintosh computer older ...
... I connect VGA cable or "No Input Signal" • Check VGA cable connection. • Lower the video resolution on the High Definition LCD TV. • Verify that the outlet is set to www.westinghousedigital.com for a list of the video cable is not attached permanently to verify ...Picture • Check the video connection. • Make sure the video cable connected to the High Definition LCD TV is tightly secured to improve power on . Saver, the TV will take longer to turn it tightly. • Adjust brightness and contrast. • If you are using a Macintosh computer older ...
User Manual
Page 44
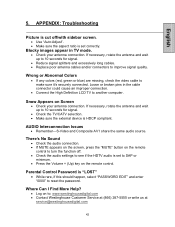
...LCD TV to another computer. Snow Appears on to 10 seconds for signal. • Reduce signal splitters and excessively long cables. • Replace poor antenna cables and/or connectors to reset the password. If necessary, rotate the antenna and wait up to : www.westinghousedigital.com • Contact Westinghouse...'s No Sound • Check the audio connection. • If MUTE appears on the screen, press the "MUTE" button on the remote control to turn the function off /with sidebar screen. • Use "Auto Adjust". • Make sure the aspect ratio is "LOST" • While rare, if...
...LCD TV to another computer. Snow Appears on to 10 seconds for signal. • Reduce signal splitters and excessively long cables. • Replace poor antenna cables and/or connectors to reset the password. If necessary, rotate the antenna and wait up to : www.westinghousedigital.com • Contact Westinghouse...'s No Sound • Check the audio connection. • If MUTE appears on the screen, press the "MUTE" button on the remote control to turn the function off /with sidebar screen. • Use "Auto Adjust". • Make sure the aspect ratio is "LOST" • While rare, if...
User Manual
Page 45
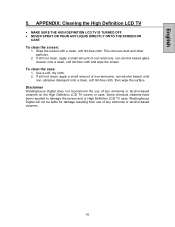
...glass cleaner onto a clean, soft lint-free cloth and wipe the screen. Westinghouse Digital will not be liable for damage resulting from use of any ammonia or alcohol-based cleaners on the High Definition LCD TV screen or case. Wipe the screen with a clean, soft lint-free cloth... cloth, then wipe the surface. Disclaimer Westinghouse Digital does not recommend the use of any ammonia or alcohol-based cleaners. 43 Use a soft, dry cloth. 2. English 5. APPENDIX: Cleaning the High Definition LCD TV • MAKE SURE THE HIGH DEFINITION LCD TV IS TURNED OFF • NEVER SPRAY OR POUR ANY...
...glass cleaner onto a clean, soft lint-free cloth and wipe the screen. Westinghouse Digital will not be liable for damage resulting from use of any ammonia or alcohol-based cleaners on the High Definition LCD TV screen or case. Wipe the screen with a clean, soft lint-free cloth... cloth, then wipe the surface. Disclaimer Westinghouse Digital does not recommend the use of any ammonia or alcohol-based cleaners. 43 Use a soft, dry cloth. 2. English 5. APPENDIX: Cleaning the High Definition LCD TV • MAKE SURE THE HIGH DEFINITION LCD TV IS TURNED OFF • NEVER SPRAY OR POUR ANY...


